background image


12


GB

 IMPORTANT!!!  Carefully read  this service manual before 

you  start  to  use,  repair  or  clean  the  heater.  Improper  use  of  the 

appliance may cause serious injuries, burns, electric shock or fire.  


1.


Safety instructions. 

The appliance  has  been designed  for  heating closed areas such as e.g. 
warehouses, shops and houses.  
It  complies  with    the  Directive    No.  2006/95/EC,  2004/108/EC 
including the harmonised standards No. EN 60335-1 and EN 60335-2. 

WARNING  !!!  Do  not  place  the  heater  directly  under  the  wall 

outlet. Do not touch internal components of the heater. 

This  appliance  is  not  intended  for  use  by  persons  (including  children) 
with  reduced  physical,  sensory  or  mental  capabilities,  or  lack  of 
experience and knowledge, unless they have been given supervision or 
instruction concerning use of the appliance by a person responsible for 
their  safety.


Children  should  be  supervised  to  ensure  that they  do  not 

play with the appliance. 


-

Do not cover the heater when it is operating. The appliance 

may get overheated. 


Do  not  operate  the  appliance  close  to  humid  places  such  as  water 
tanks, bathtubs, showers or swimming pools. Any contact with water 
may be the reason of short-circuit or electric shock. 


The  heater  should  be  kept  at  a  safe  distance  from  flammable 
materials. The minimum safety distance should not be inferior to 0.5 
m, otherwise you run the risk of starting the fire.  


Do  not  use  the  heater  in  dusty  spaces  or  rooms  where  gasoline, 
solvents,  paints  or  other  volatile  and  inflammable  materials  are 
stored  in order to avoid the risk of explosion. 


The heater should not be used close to the curtains or other textiles 
in order to avoid the risk of fire. 


Be  particularly  cautious  when  using  the  heater  in  the  rooms 
frequented by children or animals.  


The  heater  should  be  supplied  from  a  source  meeting  the 
requirements specified on the rating plate. 


Use  only  a  feeder  cable  including  the  earth  lead  in  order  to  avoid 
electric shock in emergency situations. 


Do not unplug the heater by pulling the wire out of the wall socket. 


Unplug  the  heater  when  not  used  in  order  to  avoid  accidental 
damages. 


Before you dismantle the casing check if the feeder cable has been 
pulled out of the wall socket. Internal components may be live.   

2.


Unpacking and transport. 


Open  the  package  and  take  the  heater  out  including  all  the  safety 
locks installed for the period of transport.  


Should  the  appliance  seem  damaged,  notify  immediately  the  seller 
of the same. 


Transport the  heater using the  lifting  eyes No. 1 shown  in  Figs. 1, 
page 2. 


The  heater  should  be  transported  in  original  package  including  the 
safety locks. 

3.


Description of individual components. 

See Figs. 1-2 Page. 2.


1) Lifting eye   

 8)   Back protective grid. 

2) Thermostat  

 9)   Power supply cable.    

3) Front protective grid 

10)  Base foot. 

4) Heating element 

11)  Fan.  

5) Casing 


12)  Motor . 

6) Switch 


13)  Plug. 

7) Cable penetration.  
 
4.


Switching on. 

WARNING !!! Carefully read  this service manual before you start 

to use the heater. The instructions contained herein will allow you 

to use the appliance in a safe manner.   


Make sure the power supply cable has not been damaged. If the 
supply cord is damaged, it must be replaced by the manufacturer, its 
service agent or similarly qualified persons in order to avoid a hazard.  
Moreover, check if the technical parameters of power supply source 
comply with the requirements specified on the rating plate. 
Place the appliance in its upright position. Make sure the switch is in 
its "0" position shown in Fig. 3. Connect the heater to the power 
supply source. Turn the switch and leave it for 5 seconds in the 
positions as follows:  


Fan only: Fig. 4;    


1

st

 degree of heating: Fig. 5, and     


2

nd

 degree of heating: Fig. 6.     

5.


Switching off. 

Turn the switch to its "0" position. Once the heating is off, leave the 
fan operating for 3 minutes.   

6.


Temperature control. 

The temperature in the room may be set by means of the control knob 
(Fig.  7,  page  2).  Once  the  pre-set  temperature  is  produced,  the  
thermostat will automatically  switch  the  heating elements off  while 
the  fan  will  continue  to  operate  thus  protecting  the  appliance  from 
overheating. If the temperature falls down  beyond the pre-set value, 
the system will switch the heating elements on again.    

7.


Thermal circuit breaker. 

The  appliance  has  been  equipped  with  an  integrated  thermal  circuit 
breaker  ensuring  high  safety  level.  The  breaker  will  automatically 
switch  the  power  supply  off  once  a  limit  temperature  is  exceeded.  
Should it happen, let the appliance cool down and only then, look for 
the  reason  of  the  problem.  Next  push  the  "RESET"  button  (Fig.  7) 
with a pointed tip in order to unlock the thermal circuit breaker. If the 
heater does not operate, contact the seller or approved service centre.   

8.


Out-of-season storage.   

Should the  appliance remain idle for  a  long  period  of  time,  clean 
it  before  shoving  by  blowing  the  inside  with  compressed  air.  The 
heater should be kept in a dry and clean place. Before you start using 
it again make sure the power supply cable  has not been damaged. In 
the case of any doubts contact the seller or approved service centre.   

9.


Functional inspection. 

The  appliance  should  be  checked  at  least  once  a  year  by  competent 
service  personnel  approved  by  the  manufacturer.  Any  inspections  or 
repairs should be conducted by competent personnel only.


10. 

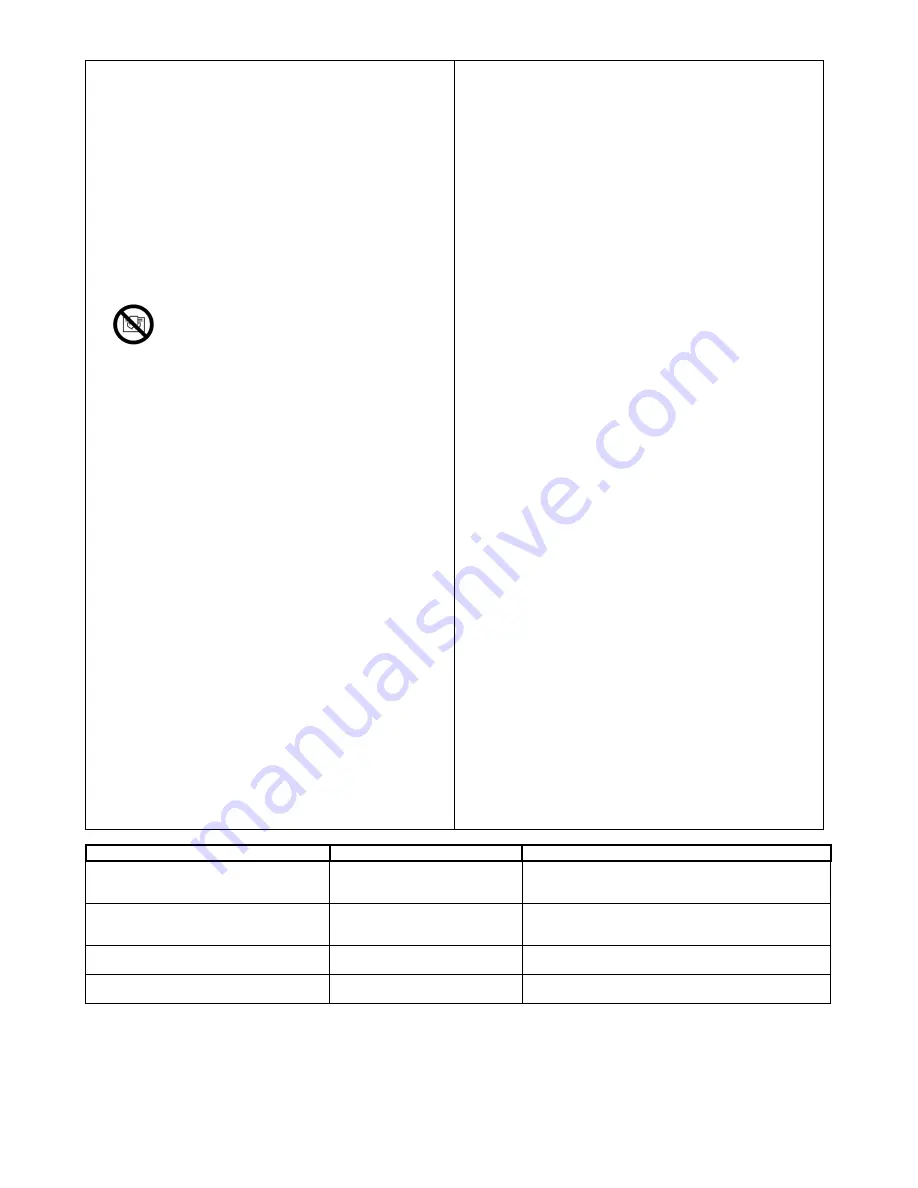
TROUBLESHOOTING


PROBLEM


REASON


SOLUTION


The motor operates while the appliance does 
not heat.    
 

Thermal circuit breaker is active. 
Thermostat has been damaged. 
Heating element has been damaged. 

Let the heater cool down and push the "RESET" button . 
Replace the thermostat. 
Replace the heating element. 

The motor does not operate while the heating 
elements are hot. 

Motor has been damaged. 
Fan has been stopped.  
 Switch has been damaged. 

Replace the motor. 
Unlock / clean the fan. 
Replace the switch. 

The whole appliance does not operate. 

Electric circuit open. 
Switch has been damaged. 

Check power supply connection. 
Replace the switch. 

Reduced air flow. 

Foul air duct. 
Motor has been damaged. 

Open the air duct. 
Replace the motor. 


Содержание B 5 ECA

Страница 1: ...uporabu HU Elektromos f t k sz l kek Kezel si utasit s IT Generatore d aria calda elettrico Manuale operativo LT Elektriniai ildytuvai Naudojimo instrukcijos LV Elektriskie sild t ji Lieto anas instr...

Страница 2: ...N K ZELL KLER UA YU TEHNI KI PODACI Model B 5 ECA Power kW 2 5 5 kcal h 2150 4300 Switch position 1 kW OFF Switch position 2 kW Fan Switch position 3 kW 2 5 Switch position 4 kW 5 Max current cons A 7...

Страница 3: ...V nia n pun e paisjes KUJDES Ju lutemi t lexoni me v mendje udh zimin e siguris para v nies n pun t paisjes gj q do tju mund soj p rdorimin n menyr t rregullt te paisjes Duhet t siguroheni q kablli e...

Страница 4: ...4 BG 1 2006 95 EC 2004 108 EC EN 60335 1 EN 60335 2 30 0 5 2 a b c 2 1 d 3 1 2 2 1 8 2 9 3 10 4 11 5 12 6 13 7 4 0 3 5 4 I 5 II 6 5 0 3 6 a 7 2 7 RESET RESET 7 8 9 10 RESET...

Страница 5: ...kyny Tyto pokyny dodr ujte aby spot ebi pracoval bezpe n Ujist te se e elektrick p vodn kabel nen po kozen Je li neodpojiteln nap jec ra po kozen mus b t vym n na ve specializovan m servisu aby nedo l...

Страница 6: ...m Absatz Sicherheitshinweise Halten Sie sich daran um den sicheren Betrieb dieses Heizger ts zu gew hrleisten Kontrollieren Sie dass das Stromversorgungskabel unversehrt ist Wenn die Ger tezuleitung b...

Страница 7: ...elegeme 11 Ventilator 5 Hus 12 Motor 6 Kontakt 13 Stikprop 7 Ledningskanal 4 S dan t nder du varmeanl gget ADVARSEL Sikkerhedsforskrifter skal l ses n je igennem f r varmeanl gget opstartes for at und...

Страница 8: ...nne soojapuhuri sissel litamist palume t helepanelikult l bi lugeda ohutusjuhised et seadet igesti kasutada Veenduda et toitejuhe ei ole mitte mingil moel kahjustatud Kui juhe on kahjustatud tuleb see...

Страница 9: ...e las im genes 1 2 p g 2 1 Manilla 8 Rejilla protecci n post 2 Termostato 9 Cable de alimentaci n 3 Rejilla protecci n Nat 10 Pie 4 Resistencia 11 Ventilador 5 Revestimiento 12 Motor 6 Conmutador 13 E...

Страница 10: ...yslaitteen p llekytkent VAROITUS Ennen kun kytket laitteen p lle lue tarkkaan k ytt ohjeiden turvallisuudesta kertovat ohjeet Seuraa ohjeet tarkkaan taataksesi ett laite toimii turvallisesti Tarkista...

Страница 11: ...ction avant 10 Pied 4 R sistance chauffante 11 Ventilateur 5 Enveloppe 12 Moteur 6 Commutateur 13 Fiche m le 7 Passe fil 4 Mise en circuit AVERTISSEMENT Avant de mettre le radiateur en circuit lisez a...

Страница 12: ...service manual before you start to use the heater The instructions contained herein will allow you to use the appliance in a safe manner Make sure the power supply cable has not been damaged If the s...

Страница 13: ...13 GR 1 2006 95 EC 2004 108 EC 93 68 EEC EN 60335 1 EN 60335 2 30 s 50 2 1 1 2 3 1 2 2 1 8 2 9 3 10 4 11 5 12 6 13 7 4 0 3 5 4 5 6 5 0 3 6 7 2 7 RESET RESET 7 8 9 10 RESET...

Страница 14: ...a POZOR Prije uklju enja ure aja molimo pa ljivo pro itati instrukciju bezbjednosti to omogu ava pravilno kori tenje ure aja Treba provjeriti da li elektri ni vod nije o te en Ako je dovodni kabl ure...

Страница 15: ...csol 13 Dugasz 7 K bel tvezet s 4 A berendez s bekapcsol sa FIGYELMEZTET S A berendez s bekapcsol sa el tt gondosan t nulm nyozza t a biztons gi utas t st ami lehet v teszi a berendez s szab lyos hasz...

Страница 16: ...Motore 6 Commutatore 13 Spina elettrica 7 Pressacavo 4 Accessione del riscaldatore AVVERTENZA Prima di avviare l apparecchio prendere tutte le misure di sicurezza riportate nella sezione Informazioni...

Страница 17: ...beliui 4 ildytuvo prijungimas D MESIO Prie prijungdami ildytuv atid iai perskaitykite saugumo nurodymus B tina tiksliai laikytis nurodym norint tinkamai naudotis ildytuvu sitikinkite kad elektros laid...

Страница 18: ...10 Pamatne 4 Sildelements 11 Ventilators 5 Korpuss 12 Motors 6 Sl dzis 13 Kontaktdak a 7 Kabe a augs 4 Ier ces piesl g ana BR DIN JUMS Pirms iesl dzat ier ci r p gi izlasiet dro bas instrukciju kas a...

Страница 19: ...len van het apparaat WAARSCHUWING Voor een juist gebruik van de verwarmer moet voor het bijvoegen van het apparaat de veiligheidsinformatie worden lezen Controleer of het netsnoer volledig intact is I...

Страница 20: ...Beskrivelse av produktets elementer Se bildene 1 2 p side 2 1 H ndtak 8 Baksidens sikkerhetsgitter 2 Termostat 9 Str mkabel 3 Forsidens sikkerhetsgitter 10 Bunn 4 Resistans 11 Ventilator 5 Dekke 12 M...

Страница 21: ...ylator 5 Obudowa 12 Silnik 6 Prze cznik 13 Wtyczka 7 Przepust kablowy 4 Po za czeniu urz dzenia OSTRZE ENIE Przed za czeniem urz dzenia prosimy uwa nie przeczyta instrukcj bezpiecze stwa co pozwoli na...

Страница 22: ...guran a Isso permitir o uso correto do aparelho Verificar se o cabo de alimenta o n o est danificado de alguma maneira Se o o cabo de electrico de ligacao for danificado deve ser substituido pelo fabr...

Страница 23: ...3 techer 7 Orificiu pentru trecerea cablului 4 Pornirea dispozitivului AVERTISMENT nainte de pornirea dispozitivului rug m a se fi cunoscut cu aten ie instruc ia de siguran pentru c numai n acest fel...

Страница 24: ...24 RU 1 2 3 3 3 2006 95 EC 2004 108 EC EN 60335 1 EN 60335 2 30 5 1 0 5 2 1 1 2 3 1 2 2 1 8 2 9 3 10 4 11 5 12 6 13 7 4 0 3 5 4 5 6 5 0 3 6 7 2 7 RESET 7 8 9 10 RESET...

Страница 25: ...el 2 termostat 9 bakre galler 3 fr mre skyddsgaller 10 grundpl t 4 v rmeelement 11 fl kt 5 hus 12 motor 6 str mbrytare 13 elplint 7 kabelpress 4 DRIFT VARNING L s och f rst s kerhetsanvisninigen f re...

Страница 26: ...lement 11 Ventilator 5 Ohi je 12 Motor 6 Stikalo 13 Vti 7 Odprtina za kabel 4 Priklju itev naprave OPOZORILO Prosimo da pred priklju itvijo naprave pazljivo preberete varnostna navodila da bi zagotovi...

Страница 27: ...ir ly 11 Ventil tor 5 Pl 12 Motor 6 Prep na 13 Z str ka 7 K bel lis 4 Zap nanie spotrebi a UPOZORNENIE Prv ne zapnete spotrebi pozorne si pre tajte bezpe nostn pokyny pre spr vne pou vanie spotrebi a...

Страница 28: ...z 7 Kablo penetrasyonu 4 Cihaz n ba lanmas UYARI Makinay ba lamadan nce makinan n do ru bir ekilde al t r lmas n sa layan emniyet k lavuzunu okuman z rica olunur E Elektrik kablosunun herhangi bir eki...

Страница 29: ...29 UA 1 2006 95 EC 2004 108 EC EN 60335 1 EN 60335 2 30 0 5 2 1 1 2 3 1 2 2 1 8 2 9 3 10 4 11 5 12 6 13 7 4 0 3 5 4 5 6 5 0 3 6 7 2 7 RESET 7 8 9 10 RESET...

Страница 30: ...4 Elemenat za grejanje 11 Ventilator 5 Ambala a 12 Motor 6 Preklopnik 13 Utika 7 Otvor za kablove 4 Uklju enje ure aja PA NJA im uklju ite ure aj molimo da pa livo pro itate upustvo o sigurnosnom stan...

Страница 31: ...HR SHEMA ELEKTRIKE HU ELEKTROMOS KAPCSOL SI S MA IT SCHEMA ELETTRICO LT ELEKTRIN SCHEMA LV ELEKTRISK SH MA NL SCHAKELSCHEMA NO ELEKTRISK SKJEMA PL SCHEMAT ELEKTRYCZNY PT ESQUEMA EL TRICO RO SCHEM ELEC...

Страница 32: ...dat de toestellen NO vi erkl rer at innretninger PL deklarujemy e urz dzenia PTdeclaramos que RO declar m c dispozitivul este conform cu RU SE vi f rs krar att apparater SI izjavljamo da je oprema SK...

Страница 33: ...onnale kahjulikke materjale Selliseid seadmeid ei tohi hoida pr gilates need tuleb anda mbert tlemiseks Informatsiooni kasutatud elektrooniliste ja elektriseadmete kogumiss steemist v ib saada seadme...

Страница 34: ...iag Tokios rangos negalima laikyti s vartynuose ji turi b ti atiduota perdirbimui Informacij apie panaudotos elektrin s rangos rinkimo sistem galima gauti rengini pardavimo vietose bei i gamintojo ar...

Страница 35: ...o Kadar izdelek ima pritrjeno tablico z oznako z velikim zbiralnikom odpadkov z kolesi in ta oznaka je zaznamovana z kri em pomeni da je izdelek za iten z Direktivo Evropske Skupnosti 2002 96 EC Dobro...

Страница 36: ...ul Magazynowa 5a 62 023 G dki Poland MCS Italy S p A Via Tione 12 37010 Pastrengo VR Italy MCS China Master Heating Equipment Shanghai Co Ltd Unit 11 No 198 Changjian Rd Baoshang Industrial Zone Shang...

Отзывы: