DEVICE TESTS
Flash test
This menu item appears only if the flash card is installed. Data is written to the flash card and read back to check the
accuracy.
Warning—Potential Damage:
This test deletes all data stored on the flash device. After the test is over, reformat the
flash using
Format Flash
in the customer Utilities Menu.
To run the Flash Test:
1
Select
DEVICE TESTS
from Diag Menu, and press
Select
.
2
Select
Flash Test
, and press
Select
.
Contents will be lost. Continue?
appears.
3
To continue, select
Yes
, and press
Select
. To end the test, select
No
, and press
Select
.
If you continue,
Flash Test Testing…
appears.
•
If the test is successful, then
Flash Test Test Passed
appears. Use Format Flash in the Utilities Menu
to reformat the flash card
•
If the test is unsuccessful, then
Flash Test Test Failed
appears. Replace the flash card.
4
Press
Back
to remove the message and return to the Device Tests menu.
PRINTER SETUP
•
“Defaults” on page 177
•
“PAGE COUNTS” on page 178
•
“Serial Number” on page 178
•
“Engine Setting 1 through 4” on page 178
•
“Model Name” on page 178
•
“Configuration ID” on page 178
•
“Transfer Module Barcode” on page 179
•
“Reset Fuser Count” on page 179
Defaults
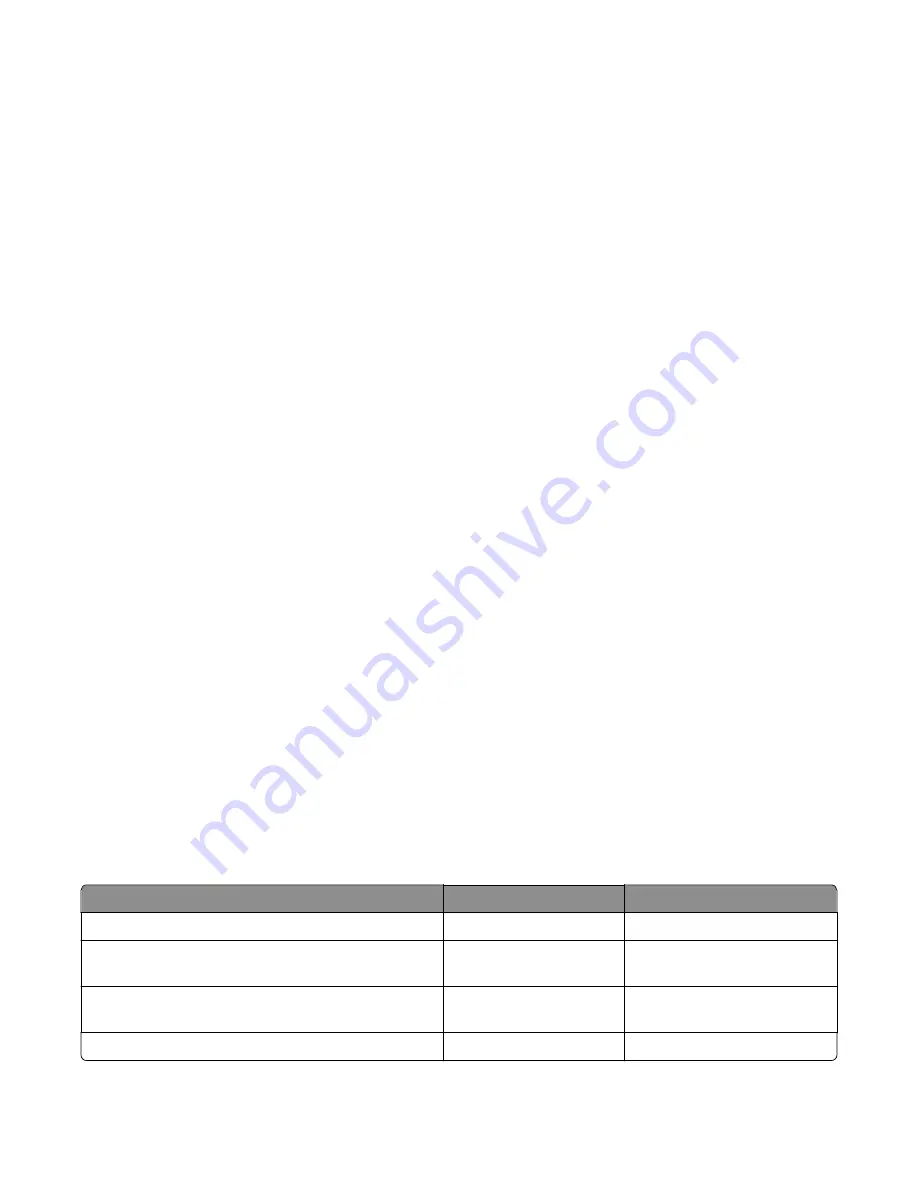
This setting is used by the printer to determine whether US or non-US factory default values should be used. The
following printer settings have different US and non-US values:
Printer default values
US value
Non-US value
Paper Sizes setting in the General Settings menu
U.S.
Metric
Default Paper Size (paper feeding sources which do not
have hardware size sensing capabilities)
Letter
A4
Default Envelope Size (envelope feeding sources which do
not have hardware size sensing capability)
10 Envelope
DL Envelope
Fax media size
Letter
A4
7527
Service menus
177
Содержание CX310dn
Страница 24: ...7527 24 ...
Страница 154: ...7527 154 ...
Страница 187: ...D ADF cover open E Flatbed cover open F Paperfeed sensor 7527 Service menus 187 ...
Страница 224: ...3 Remove the four screws A securing the right scanner cover to the flatbed unit 7527 Repair information 224 ...
Страница 227: ...5 Disconnect the belt C 6 Disconnect the fan and remove 7527 Repair information 227 ...
Страница 311: ...Component locations Controller boards CX310 models 7527 Component locations 311 ...
Страница 312: ...CX410 models 7527 Component locations 312 ...
Страница 313: ...CX510 models 7527 Component locations 313 ...
Страница 318: ...7527 318 ...
Страница 325: ...7527 325 ...
Страница 327: ...Assembly 1 Covers 7527 Parts catalog 327 ...
Страница 329: ...Assembly 2 Scanner 7527 Parts catalog 329 ...
Страница 331: ...Assembly 3 Paperpath 7527 Parts catalog 331 ...
Страница 334: ...7527 Parts catalog 334 ...
Страница 335: ...Assembly 4 Operator panels 7527 Parts catalog 335 ...
Страница 338: ...7527 Parts catalog 338 ...
Страница 339: ...Assembly 5 Electronics 7527 Parts catalog 339 ...
Страница 342: ...7527 Parts catalog 342 ...
Страница 343: ...Assembly 6 Cables and sensors 7527 Parts catalog 343 ...
Страница 345: ...Assembly 7 Media drawers and trays 7527 Parts catalog 345 ...
Страница 358: ...7527 358 ...
Страница 372: ...7527 372 ...
Страница 386: ...7527 Part number index 386 ...
Страница 392: ...7527 Part name index 392 ...


