


Installing and configuring ServeRAID controllers
177
Checking the ownership of a physical drive
A physical drive that is owned (and configured) on Server B will appear in the ready
or defunct state on Server A. To determine if a ready drive is owned by the other
server, do the following:
1.
In the Main Tree, click the controller that contains the ready drives.
2.
Click Actions
Ó
Clustering actions.
3.
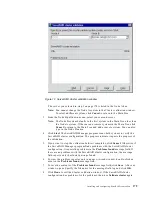
Click View shared drives. The View shared drives window opens.
4.
Click Enable view shared drives.
5.
Select the SCSI channel and SCSI ID of a physical drive on a shared channel.
6.
Click OK. Physical drives that are available for use are labeled Ready in the Main
Tree. If the physical drive is not available for use (that is, it is owned by the other
server), the drive is labeled Reserved in the Main Tree.
Important:
Hot-spare drives owned by the other server are not labeled Reserved.
Be sure you do not inadvertently use a hot-spare drive in both servers.
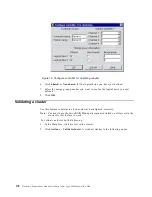
Adding logical drives to a cluster
If you want to add logical drives to a cluster, do the following:
1.
Install the hard disk drives in the server or shared expansion enclosure. For
installation information, refer to the documentation that is included with the hard
disk drive and the server.
Attention:
Physical drives that are configured by one controller in the pair must
appear as ready drives to the other controller in the pair. Be sure to
verify this status when you add drives after the servers are started.
Before creating logical drives, restart both servers, or scan for new
drives using the ServeRAID Manager program on both servers, to
make sure the added physical drives appear as ready drives on both
servers.
2.
Using the ServeRAID Manager program, configure the physical drives for the
ServeRAID controller. Refer to “Installing and configuring ServeRAID
controllers” on page 139 for instructions.
Note:
If the drives will be shared, define only one logical drive per array.
3.
In the Main Tree, click the controller for the cluster.
4.
Click
5.
on the tool bar. A window similar to the following opens.
Содержание 86655RY - Netfinity 7600 - 8665
Страница 1: ...IBM Hardware Maintenance Manual Netfinity 7600 Type 8665 Models 1RY 2RY ...
Страница 2: ......
Страница 3: ...IBM Hardware Maintenance Manual Netfinity 7600 Type 8665 Models 1RY 2RY ...
Страница 10: ...viii Hardware Maintenance Manual Netfinity 7600 Type 8665 Models 1RY 2RY ...
Страница 52: ...42 Hardware Maintenance Manual Netfinity 7600 Type 8665 Models 1RY 2RY ...
Страница 104: ...94 Hardware Maintenance Manual Netfinity 7600 Type 8665 Models 1RY 2RY ...
Страница 148: ...138 Hardware Maintenance Manual Netfinity 7600 Type 8665 Models 1RY 2RY ...
Страница 252: ...242 Hardware Maintenance Manual Netfinity 7600 Type 8665 Models 1RY 2RY ...
Страница 270: ...260 Hardware Maintenance Manual Netfinity 7600 Type 8665 Models 1RY 2RY ...
Страница 271: ...Related service information 261 ...
Страница 272: ...262 Hardware Maintenance Manual Netfinity 7600 Type 8665 Models 1RY 2RY ...
Страница 273: ...Related service information 263 ...
Страница 274: ...264 Hardware Maintenance Manual Netfinity 7600 Type 8665 Models 1RY 2RY ...
Страница 284: ...274 Hardware Maintenance Manual Netfinity 7600 Type 8665 Models 1RY 2RY ...
Страница 285: ...Related service information 275 ...
Страница 292: ...282 Hardware Maintenance Manual Netfinity 7600 Type 8665 Models 1RY 2RY ...
Страница 293: ......