3. Piping work and refrigerant charge
52
SMGB0079 rev.0 - 01/2013
3.1 General notes before performing pipe work
3.1.1 Piping Materials
1
In order to avoid supply problems in terms of local regulations and quality, prepare locally-supplied copper pipes.
N O T E
In case of using copper pipes for piping sections bigger than Ø19.05 mm (3/4 inches), flaring work cannot be per-
formed. If necessary, use a joint adapter.
2
Select the piping size with the correct thickness and correct material able to withstand sufficient pressure.
3
Select clean copper pipes. Make sure there is no dust and moisture inside. Blow the inside of the pipes through with
oxygen-free nitrogen to remove any dust and foreign materials before connecting pipes.
4
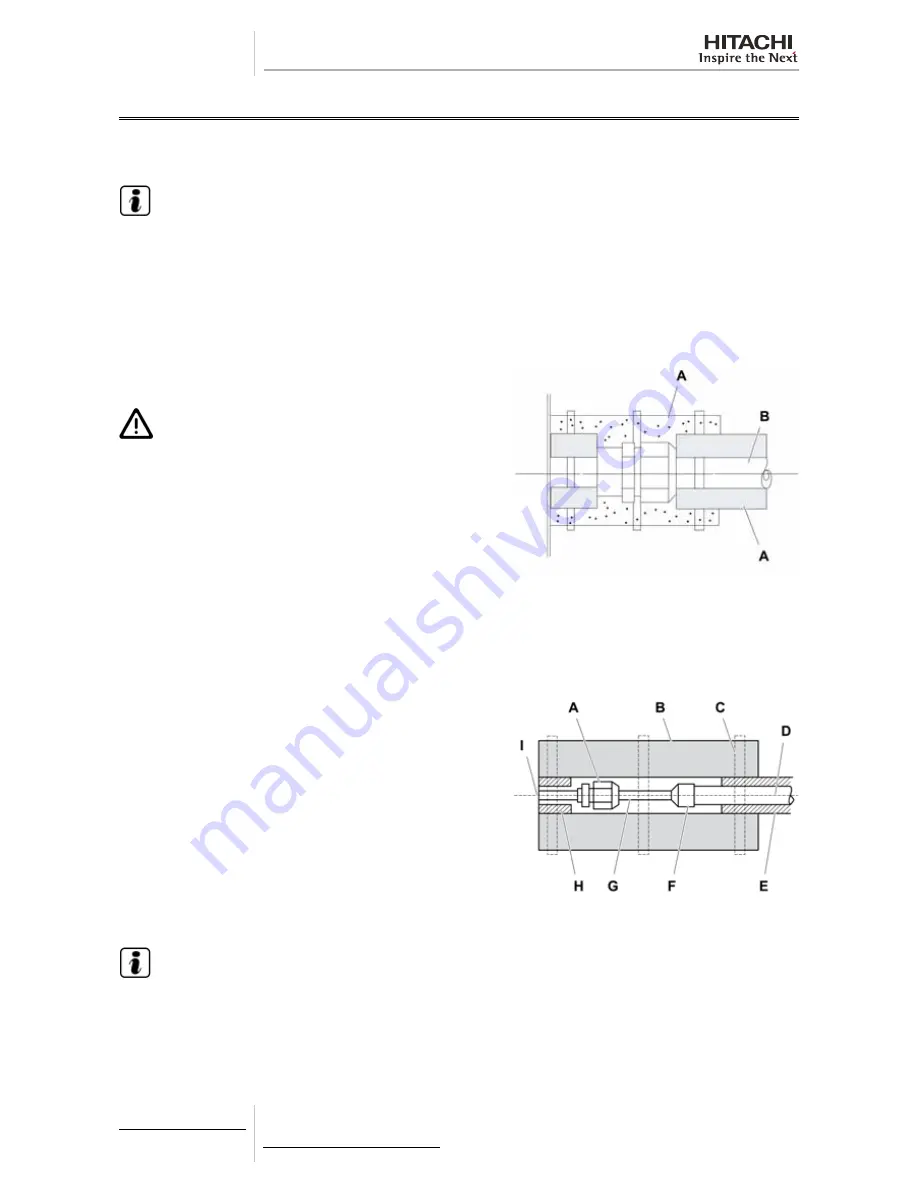
After connecting the refrigerant piping, seal the open space between the knockout hole and refrigerant pipes by using
insulation material as shown below:
A. Insulator material.
B. Field-supplied refrigeration pipe.
C A U T I O N
•
Do not use saws, grindstones or other tools which cause
copper powder.
•
When cutting pipes, secure the part for brazing in accord-
ance with both national and local regulations.
•
Use security glasses and gloves for cutting or welding
works.
Piping Connection
When connecting liquid piping for units with piping longer than 15 meters, apply a piping size of Ø9.52 mm (3/8 inches). Fix
the connecting pipe as shown in the following figure using the insulation attached to the Indoor Unit.
A. Use the flare nut of the indoor unit.
B. Insulate this part with the attached insulation.
C. Fix this part with the attached cord band or with tape.
D. Field-supplied refrigerant piping.
E. Field-supplied insulation.
F. Brazing.
G. Make flares after attaching flare nut to the connecting pipe in
the Multi-kit package.
H. Insulation attached to indoor unit.
I. Indoor unit.
N O T E
•
A system with no moisture or oil contamination will give maximum performance and lifecycle compared to a
poorly prepared system. Take particular care to ensure that all copper piping is clean and dry internally.
•
To ensure this, blow oxygen-free nitrogen through the pipes.
Содержание EV-1.5N1
Страница 2: ......
Страница 4: ... II ...
Страница 26: ......
Страница 100: ......
Страница 123: ...4 Electrical wiring 109 SMGB0079 rev 0 01 2013 4 4 7 2 RAS 3HVNPE 1 230V 50Hz U Surface V Surface W Surface XEK01261_0 ...
Страница 124: ...4 Electrical wiring 110 SMGB0079 rev 0 01 2013 4 7 3 RAS 4 6 HVNPE 1 230V 50Hz U Surface V Surface W Surface XEK01262_0 ...
Страница 128: ...4 Electrical wiring 114 SMGB0079 rev 0 01 2013 4 7 7 RAS 8 10 HN P C E 3N 400V 50Hz XEK01288_0 ...
Страница 129: ...4 Electrical wiring 115 SMGB0079 rev 0 01 2013 4 4 7 8 RAS 12HNP 3N 400V 50Hz Preliminary data 317S136064 ...
Страница 130: ...4 Electrical wiring 116 SMGB0079 rev 0 01 2013 4 7 9 RAS 12HNC 3N 400V 50Hz Preliminary data 317S136071 ...
Страница 144: ...5 Control System 130 SMGB0079 rev 0 01 2013 5 4 2 Dry operation Continues in the next page ...
Страница 148: ...5 Control System 134 SMGB0079 rev 0 01 2013 5 4 4 Automatic cooling and heating operation ...
Страница 158: ......
Страница 196: ......
Страница 212: ...8 Troubleshooting 198 SMGB0079 rev 0 01 2013 ...
Страница 215: ...8 Troubleshooting 201 SMGB0079 rev 0 01 2013 8 ...
Страница 323: ...9 Spare parts 309 SMGB0079 rev 0 01 2013 9 RAS 8 10 HNCE Spare Parts Document EPN 201211B ...
Страница 324: ...9 Spare parts 310 SMGB0079 rev 0 01 2013 9 6 2 Electrical parts Spare Parts Document EPN 201211B ...
Страница 332: ......
Страница 452: ......
Страница 479: ......


