


3. Click “Apply” to save the settings.
4. Select the “Email” tab to enter the Email Settings interface.
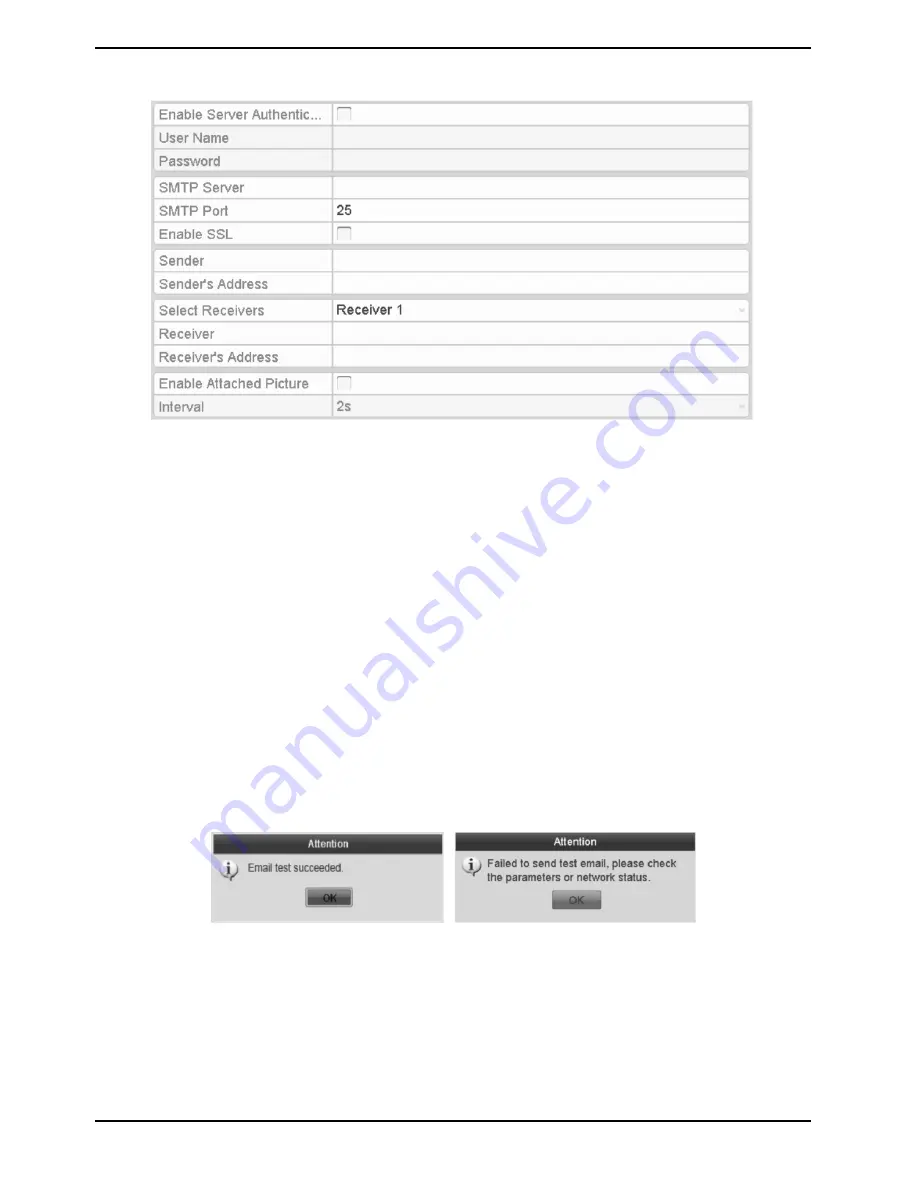
5. Con
fi
gure the following Email settings:
- Enable Server Authentication (optional): Check the checkbox to enable the server authentication feature.
- User Name: The user account of the sender’s Email for SMTP server authentication.
- Password: The password of the sender’s Email for SMTP server authentication.
- SMTP Server: The SMTP Server IP address or host name (e.g., smtp.yourprovider.com).
- SMTP Port No.: The SMTP port. The default TCP/IP port used for SMTP is 25.
- Enable SSL (optional): Click the checkbox to enable SSL if required by the SMTP server.
- Sender: The name of the sender.
- Sender’s Address: The Email address of the sender.
- Select Receivers: Select the receiver. Up to 3 receivers can be configured.
- Receiver: The name of the user to be notified.
- Receiver’s Address: The Email address of the user to be notified.
- Enable Attached Pictures: Check the checkbox of “Enable Attached Picture” if you want to send an email with
attached alarm images. The interval is the time of two adjacent alarm images. You can also set SMTP port and
enable SSL here.
- Interval: The interval refers to the time between two actions of sending attached pictures.
- E-Mail Test: Sends a test message to verify that the SMTP server can be reached.
6. Click the “Apply” button to save the Email settings.
7. You can click the “Test” button to test whether your Email settings work. The corresponding Attention
message box will pop up.
122
English
Содержание GRN-R5128N
Страница 2: ......
Страница 12: ...4 Installation 4 1 Connections and Control Keys Front View 12 English...
Страница 18: ...18 English...
Страница 173: ...140 W Power Consumption 16 kg Weight 442 x 494 x 164 mm Dimensions wxhxd 173 English...


