223
Print head needs Power Cleaning
6.
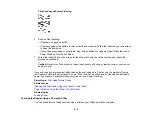
Do one of the following:
• If there are no gaps, select
O
.
• If there are gaps or the pattern is faint, select
X
and continue. Follow the instructions on the screen
to clean the print head.
• If most lines are missing or not printed, most of the nozzles are clogged. Select
O
and then run a
Power Cleaning. See the link below.
7.
Select
to print a nozzle check pattern and confirm that the print head is clean.
If you don’t see any improvement after cleaning the print head up to 3 times, turn the product off using
the
power button and wait at least 12 hours. Then run a nozzle check and try cleaning the print head
again, if necessary. If quality still does not improve, run a Power Cleaning.
Parent topic:
Related references
Related tasks
Checking the Nozzles Using the Product Control Panel
Power Cleaning Using the Product Control Panel
Related topics
Cleaning the Print Head Using a Computer Utility
You can clean the print head using a utility on your Windows or Mac computer.
1.
Load a few sheets of plain paper in the product.
Содержание C11CK60201
Страница 1: ...WF 2960 User s Guide ...
Страница 2: ......
Страница 13: ...13 WF 2960 User s Guide Welcome to the WF 2960 User s Guide For a printable PDF copy of this guide click here ...
Страница 17: ...17 Product Parts Inside 1 Document cover 2 Scanner glass 3 Control panel 4 Front cover ...
Страница 52: ...52 Parent topic Changing or Updating Network Connections Related references Status Icon Information ...
Страница 109: ...109 10 Select the Layout tab 11 Select the orientation of your document as the Orientation setting ...
Страница 134: ...134 You see an Epson Scan 2 window like this ...
Страница 136: ...136 You see an Epson Scan 2 window like this ...
Страница 150: ...150 You see a screen like this 2 Click the Save Settings tab ...
Страница 155: ...155 You see this window ...
Страница 267: ...267 2 Squeeze the tabs and remove the rear cover 3 Carefully remove any jammed paper from inside the product ...
Страница 269: ...269 3 Open the ADF cover 4 Carefully remove any jammed pages from beneath the ADF ...

