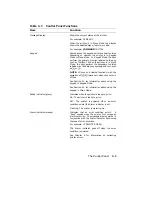
Table 3–1: Control Panel Functions
Item
Function
Message Display
Shows the current status of the printer.
For example: 00 READY
When the printer is in Menu Mode, the display
shows the selected menu, feature, or value.
For example: COMMAND INITIAL
Keypad
Some keys on the keypad perform a dual function
depending on whether the printer is in Keypad
Mode or Menu Mode. In Keypad Mode, the keys
perform the primary function labeled on the key,
such as Test/Font. When the printer is in Menu
Mode, the keys perform the secondary function
labeled with the dark gray symbols and text, such
as
/
or
.
.
NOTE: All keys and related functions (with the
exception of
On Line
) work only when the printer is
off line.
See Section 3.1 for information about using the
keypad in Keypad Mode.
See Section 4.1 for information about using the
keypad in Menu Mode.
Ready indicator (green)
Indicates when the printer is ready to print.
On: The printer is ready to print.
Off:
The printer is powered off or an error
condition exists (the Alarm indicator is on).
Flashing: The printer is warming up.
Alarm indicator (orange)
Indicates that an error condition exists.
A
‘‘beep’’ sounds when the printer first senses an
alarm condition. The message display works in
conjunction with the Alarm indicator by showing
the type of error condition.
For example: 12 PRINTER OPEN
The Alarm indicator goes off when the error
condition is cleared.
See Chapter 6 for information on correcting
printer errors.
The Control Panel
3–3
Содержание DEClaser 1100 Series
Страница 18: ...Figure 1 1 Components Front Right Side View MLO 005960 1 2 Operator s Guide ...
Страница 21: ...Figure 1 2 Components Rear Left Side View MLO 005961 Printer Components 1 5 ...
Страница 23: ...Figure 1 3 Components Inside the Printer MLO 005962 Printer Components 1 7 ...
Страница 31: ...2 Pull the extension tray straight out MLO 005815 Operating Information 2 5 ...
Страница 34: ...3 Tap the stack of paper on a flat surface to align the edges MLO 005967 2 8 Operator s Guide ...
Страница 40: ...2 Align the stack of envelopes by tapping them on a flat surface MLO 005970 2 14 Operator s Guide ...
Страница 65: ...Figure 3 1 Control Panel MLO 005830 3 2 Operator s Guide ...
Страница 123: ...2 Remove any paper remaining in the paper tray and close the extension tray MLO 005981 Troubleshooting 6 15 ...
Страница 141: ...4 Insert the printed cleaning paper into the paper tray with the printed side facing up MLO 005988 Maintenance 7 11 ...
Страница 177: ...Figure C 2 Serial Connections to Modem MLO 004885 Specifications C 5 ...
Страница 180: ...Figure C 4 Parallel Pin Assignment MLO 004886 Figure C 5 Parallel Connections MLO 005828 C 8 Operator s Guide ...


