background image

224

Understanding the Printer Menus

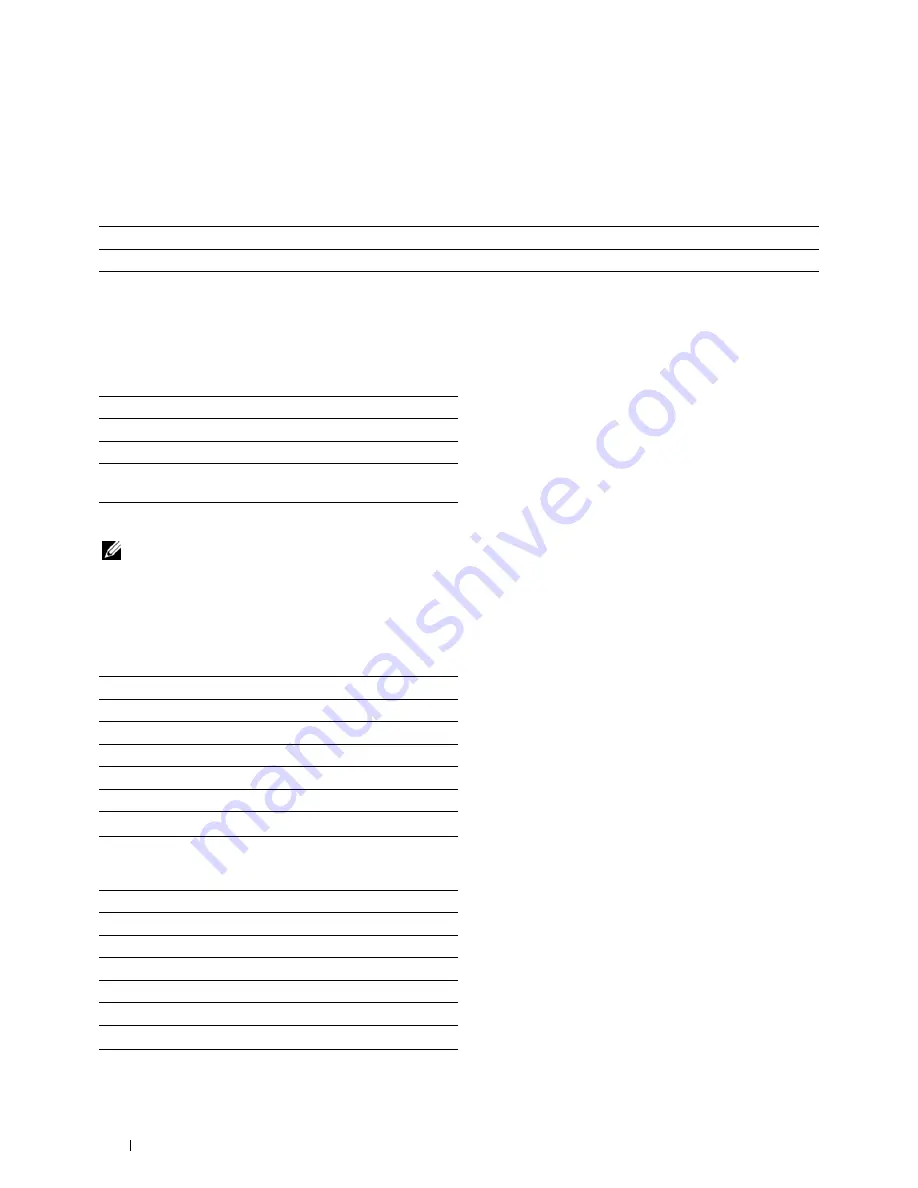
Output Color

Purpose:

To specify whether to print in black and white or in color.

Values:

Select Tray

Purpose:

To specify the input tray.

Values:

MPF Paper Size


NOTE: 

MPF Paper Size feature is available only when 

MPF: Any

 is selected in 

Select Tray

.

Purpose:

To specify the paper size for the MPF.

Values:

mm series

inch series

Full Color

*

Prints in color.

Black & White

Prints in black and white.

MPF
Tray 1

*

Tray 2

*1

*1

This item is available only when the optional 550-sheet 
feeder is installed.

A4

*1

A5
B5
Letter
Folio
Legal

*1

Denotes country-specific factory default values.

Letter

*1

Folio
Legal
A4
A5
B5

*1

Denotes country-specific factory default values.

Содержание C3760DN Color Laser

Страница 1: ...Dell C3760n C3760dn Color Laser Printer User s Guide Regulatory Model C3760dn C3760n ...

Страница 2: ......

Страница 3: ...ions 19 2 Finding Information 21 3 Product Features 25 4 About the Printer 27 Front and Rear View 27 Front View 27 Rear View 28 Space Requirements 29 Operator Panel 29 Additional Components 30 Optional Accessories 30 Non bundled Items 30 Securing the Printer 30 Ordering Supplies 31 Setting up the Printer Printer Setup 33 5 Preparing Printer Hardware 35 Removing Tape 35 ...

Страница 4: ...Using Wizard Setup to Configure a Wireless Adapter 51 Using Advanced Setup to Configure a Wireless Adapter 53 Reconfiguring the Wireless Setting 57 Installing the Optional Hard Disk 58 Updating Your Driver to Detect Hard Disk 60 7 Connecting Your Printer 65 Connecting Printer to Computer or Network 66 Direct Connection 66 Network Connection 67 Turning on the Printer 68 Setting Initial Settings on ...

Страница 5: ...acintosh Computers 99 Installing the Drivers and Software 99 Adding a Printer on Mac OS X 10 5 10 6 10 7 or 10 8 99 Adding a Printer on Mac OS X 10 4 11 100 Adding a Printer on Mac OS X 10 3 9 101 Configuring Settings 103 12 Installing Printer Drivers on Linux Computers CUPS 105 Operation on Red Hat Enterprise Linux 5 6 Desktop 105 Setup Overview 105 Installing the Printer Driver 105 Setting Up th...

Страница 6: ...117 Using the Number Pad 118 Number Pad Letters and Numbers 118 Changing Numbers or Names 118 Printing a Panel Settings Report 119 Changing the Language 119 When Using the Operator Panel 119 When Using the Tool Box 119 Setting the Power Saver Timer Option 119 14 Dell Printer Configuration Web Tool 121 Overview 121 Setting Up the Dell Printer Configuration Web Tool 122 Setting Up From Web Browser 1...

Страница 7: ...30 Printer Jobs 131 Printer Settings 132 Print Server Settings 146 Copy Printer Settings 167 Print Volume 168 Tray Settings 169 15 Understanding the Tool Box Menus 171 Starting the Tool Box 171 Printer Setting Reports 171 Printer Information 171 Menu Settings 172 Reports 173 TCP IP Settings 174 Tray Settings 174 Panel Language 175 USB Direct Print Defaults 175 Printer Maintenance 176 System Settin...

Страница 8: ...b History 187 Error History 188 Print Meter 188 Color Test Page 188 Stored Documents 188 Printing a Report List Using the Operator Panel 188 Printing a Report List Using the Tool Box 188 Admin Settings 188 PCL 188 PDF 194 PostScript 196 Network 197 USB Settings 201 System Settings 202 Maintenance 210 Secure Settings 215 Defaults Settings 216 USB Direct Print Defaults 216 Tray Settings 216 MPF 216 ...

Страница 9: ...ing Pre Printed Media and Letterheads 231 Selecting Pre Punched Paper 231 Envelopes 231 Labels 232 Storing Print Media 233 Identifying Print Media and Specifications 233 Supported Paper Sizes 233 Supported Paper Types 234 Paper Type Specifications 234 18 Loading Print Media 235 Capacity 235 Print Media Dimensions 235 Loading Print Media in Tray1 and the Optional 550 Sheet Feeder 235 Loading Letter...

Страница 10: ...and Dell C3760dn Models 246 Using the Stored Print Feature 247 Overview 248 Procedures for Printing Stored Print 249 Printing from USB Memory 250 Supported File Formats 251 Inserting and Removing a USB Memory 251 Printing a File in a USB Memory 251 Printing With Web Services on Devices WSD 252 Adding Roles of Printer Services 252 Printer Setup 253 Installing a Printer Driver Using the Add Printer ...

Страница 11: ... 263 Opening and Closing the Status Monitor Widget 264 Printer Status Window 264 Order Window 265 Preferences 266 Status Monitor Console for Linux 267 Status Monitor Console Feature 267 Before Installing the Status Monitor Console 267 Installing the Status Monitor Console 267 Starting the Status Monitor Console 268 Printer Selection Window 268 Printer Status Window 269 Dell Supplies Management Sys...

Страница 12: ...ture Mode 286 Setting the SSL use Server Certificate HTTP IPP 287 Setting LDAP SSL TLS Communication 287 Setting Server Certificate Verification for LDAP SSL TLS Communication 287 Setting Client Certificate for LDAP SSL TLS Communication 288 Setting for Wireless LAN WPA Enterprise EAP TLS 288 Setting for Wireless LAN WPA Enterprise PEAPV0 MS CHAPV2 EAP TTLS PAP EAP TTLS CHAP 289 Setting Client Cer...

Страница 13: ...8 Cables 309 Optional Wireless Adapter 309 Maintaining Your Printer 311 26 Maintaining Your Printer 313 Determining the Status of Supplies 313 Conserving Supplies 313 Ordering Supplies 313 Storing Print Media 314 Storing Consumables 314 Replacing the Toner Cartridges 315 Removing the Toner Cartridge 315 Installing a Toner Cartridge 316 Replacing the Drum Cartridges 317 Removing the Drum Cartridge ...

Страница 14: ...ical Scanner ROS Window 338 Adjusting Color Registration 342 Printing the Color Registration Chart 342 Determining Values 342 Entering Values 344 27 Removing Options 347 Removing the Optional Memory Module 347 Removing the Optional 550 Sheet Feeder 349 Removing the Optional Wireless Adapter 351 Removing the Optional Hard Disk 353 28 Clearing Jams 355 Avoiding Jams 355 Identifying the Location of P...

Страница 15: ...osting 380 Light induced fatigue 381 Fog 382 Bead Carry Out BCO 382 Jagged characters 383 Banding 383 Auger mark 384 Wrinkled Stained paper 385 Damage on the leading edge of paper 385 Jam Alignment Problems 386 The top and side margins are incorrect 386 Color registration is out of alignment 386 Images are skewed 387 Tray1 Optional 550 Sheet Feeder Misfeed Jam 388 MPF Misfeed Jam 389 Regi Jam Exit...

Страница 16: ...late Last Updated 2 7 2007 Contacting Service 395 Appendix 397 B Appendix 399 Dell Technical Support Policy 399 Online Services 399 Warranty and Return Policy 400 Recycling Information 400 Contacting Dell 400 Index 401 ...

Страница 17: ...15 Before Beginning Notes Cautions and Warnings 17 1 Dell C3760n C3760dn Color Laser Printer User s Guide 19 2 Finding Information 21 3 Product Features 25 4 About the Printer 27 ...

Страница 18: ...16 ...

Страница 19: ...ed trademarks of Red Hat Inc in the U S and other countries SUSE is a registered trademark of Novell Inc in the United States and other countries XML Paper Specification XPS This product may incorporate intellectual property owned by Microsoft Corporation The terms and conditions upon which Microsoft is licensing such intellectual property may be found at http go microsoft com fwlink LinkId 52369 ...

Страница 20: ...18 Notes Cautions and Warnings ...

Страница 21: ...s referred to as the printer Conventions The following describe the meaning of the symbols and fonts used in this manual Bold texts Names of hardware button on the operator panel Screen names on the LCD panel Menus commands windows or dialog boxes displayed on the computer screen Texts in Courier New font Menus and messages displayed on the LCD panel Characters entered from the computer Directory ...

Страница 22: ...20 Dell C3760n C3760dn Color Laser Printer User s Guide ...

Страница 23: ...ion disc to install drivers or access your setup video and documentation Readme files may be included on your Software and Documentation disc to provide last minute updates about technical changes to your printer or advanced technical reference material for experienced users or technicians How to use my printer Quick Reference Guide NOTE Quick Reference Guide may not be included in the package for...

Страница 24: ...ing your printer How to set up my printer Setup diagram Express Service Code and Service Tag The Express Service Code and Service Tag are located inside the front cover of your printer Latest drivers for my printer Documentation for my printer Go to support dell com What are you looking for Find it here Setting Up Your Printer 5 4 a1 a2 b 1 2 3 Service Tag Express Service Code xxxxxxx 000 000 000 ...

Страница 25: ...s and online courses Upgrades Upgrade information for components such as the printer drivers Customer Care Contact information order status warranty and repair information Downloads Drivers Manuals Printer documentation and product specifications Go to support dell com Select your region and fill in the requested details to access help tools and information What are you looking for Find it here ...

Страница 26: ...24 Finding Information ...

Страница 27: ...nts containing multiple pages on a single sheet of paper by setting from the printer driver This feature helps save paper Using the Stored Print Feature Stored Print The Stored Print feature allows you to temporarily store your print data in the printer memory or hard disk so you can print it later When printing confidential jobs use the number pad to enter the password You can effectively manage ...

Страница 28: ...26 Product Features ...

Страница 29: ...3760dn Color Laser Printer unless otherwise mentioned Front and Rear View Front View 1 Transfer Belt Unit 8 Multipurpose Feeder MPF 2 Drum Cartridges 9 Toner Cartridges 3 Waste Toner Box 10 Front Cover 4 Right Side Cover 11 Operator Panel 5 Power Switch 12 Output Tray Extension 6 Tray1 13 Front USB Port 7 Optional 550 Sheet Feeder Tray2 14 Top Cover 1 2 3 4 5 6 7 8 9 10 11 13 14 12 ...

Страница 30: ...ear View 1 Control Board 6 Duplex Unit C3760dn only 2 Left Side Cover 7 2nd Belt Transfer Roller 2nd BTR 3 Ethernet Port 8 Fusing Unit 4 Wireless Adapter Socket 9 Power Connector 5 USB Port 10 Rear Cover 1 2 3 4 5 6 7 8 9 10 ...

Страница 31: ...nd optional accessories and for proper ventilation Operator Panel For more information on the operator panel see About the Operator Panel 200 mm 7 87 inches 379 mm 14 92 inches 400 mm 15 75 inches 485 mm 19 09 inches 600 mm 23 62 inches 400 mm 15 75 inches 439 mm 17 28 inches 400 mm 15 75 inches ...

Страница 32: ... adapter 512MB memory module Hard disk Optional 550 sheet feeder Non bundled Items The following items are required for connecting the printer to a computer or a network Please purchase them as needed USB cable Ethernet cable Securing the Printer To protect your printer from theft you can use the optional Kensington lock Attach the Kensington lock to the security slot on your printer For details s...

Страница 33: ... the icon on your desktop a Right click DLRMM EXE under x abc Dell Printers Additional Color Laser Software Reorder where x abc is the location where the printer software is installed b Choose Send To from the drop down menu and then click Desktop create shortcut on the submenu The Dell Supplies Management System window appears You can also launch the Dell Supplies Management System by clicking St...

Страница 34: ...32 About the Printer ...

Страница 35: ...nstalling Optional Accessories 37 7 Connecting Your Printer 65 8 Setting the IP Address 71 9 Loading Paper 75 10 Installing Printer Drivers on Windows Computers 79 11 Installing Printer Drivers on Macintosh Computers 99 12 Installing Printer Drivers on Linux Computers CUPS 105 ...

Страница 36: ...34 ...

Страница 37: ...Preparing Printer Hardware 35 5 Preparing Printer Hardware Removing Tape 1 Remove tapes from the printer ...

Страница 38: ...36 Preparing Printer Hardware ...

Страница 39: ... MB memory module optional 550 sheet feeder tray2 wireless adapter and hard disk NOTE The images used in this manual are those of the Dell C3760dn Color Laser Printer unless otherwise mentioned Installing the Optional Memory Module 1 Ensure that the printer is turned off 2 Turn the screw on the left side cover counterclockwise 3 Slide the left side cover towards the back of the printer 4 Open the ...

Страница 40: ...d the slot with the notch on the connector positioned on left 6 Align the connector of the memory module with the slot and insert the memory module into the slot 7 Push the memory module firmly into the slot NOTE Ensure that the memory module is firmly fixed in the slot and does not move easily notch ...

Страница 41: ...e after installing the printer driver update your driver by following the instructions for the operating system you are using If the printer is on a network update the driver for each client Updating Your Driver to Detect Memory Module NOTE When you use XPS driver driver updating is not required When Using PCL Driver Microsoft Windows 8 Windows 8 x64 Windows Server 2012 1 Under Desktop mode right ...

Страница 42: ...on from Printer 4 Click Apply and then click OK 5 Close the Printers dialog box Windows Server 2008 Server 2008 x64 1 Click Start Control Panel Printers 2 Right click the printer icon of the Dell C3760n C3760dn Color Laser Printer and then select Properties 3 Click the Options tab and then select Get Information from Printer 4 Click Apply and then click OK 5 Close the Printers dialog box Windows X...

Страница 43: ... Setup 4 Select Get Information from Printer and then click OK 5 Click Apply and then click OK 6 Close the Printers dialog box Windows Server 2008 Server 2008 x64 1 Click Start Control Panel Printers 2 Right click the printer icon of the Dell C3760n C3760dn Color Laser Printer and then select Properties 3 Click the Configuration tab and then select Bi Directional Setup 4 Select Get Information fro...

Страница 44: ...e and the bag holding the screws NOTE Do not lose the screws because you will need them later 3 Place the optional 550 sheet feeder in the same location that the printer is located 4 Pull tray1 out of the printer about 200 mm 5 Hold tray1 with both hands and remove it from the printer Mac OS X 10 3 x 10 4 x 1 Select the printer from the Printer List screen in Print Center or Printer Setup Utility ...

Страница 45: ... WARNING Be careful not to pinch your fingers when lowering the printer onto the optional 550 sheet feeder 7 Secure the optional 550 sheet feeder to the printer by tightening the two screws provided with the feeder using a coin or similar object 8 Insert tray1 into the printer and push until it stops 9 Re connect all cables into the back of the printer and turn on the printer NOTE The printer will...

Страница 46: ...eet Feeder When Using PCL Driver Windows 8 Windows 8 x64 Windows Server 2012 1 Under Desktop mode right click the bottom left corner of the screen and then click Control Panel Hardware and Sound Hardware for Windows Server 2012 Devices and Printers 2 Right click the printer icon of the Dell C3760n C3760dn Color Laser Printer and then select Printer properties 3 Click the Options tab and then selec...

Страница 47: ...lick the Configuration tab and then select Bi Directional Setup 4 Select Get Information from Printer and then click OK 5 Click Apply and then click OK 6 Close the Devices and Printers dialog box Windows 7 7 x64 Server 2008 R2 x64 1 Click Start Devices and Printers 2 Right click the printer icon of the Dell C3760n C3760dn Color Laser Printer and then select Printer properties 3 Click the Configura...

Страница 48: ...K Mac OS X 10 5 x 10 6 x 1 Select the Print Fax in System Preferences 2 Select the printer in Printers list and click Options Supplies 3 Select Driver select the options that have been installed on the printers and then click OK Mac OS X 10 3 x 10 4 x 1 Select the printer from the Printer List screen in Print Center or Printer Setup Utility 2 Click Printers on the Print Center or Printer Setup Uti...

Страница 49: ...n C3760dn Color Laser Printer and then select Properties 3 Click the Device Setting tab and then select Available in Tray2 drop down menu 4 Click Apply and then click OK 5 Close the Printers dialog box Windows Server 2008 Server 2008 x64 1 Click Start Control Panel Printers 2 Right click the printer icon of the Dell C3760n C3760dn Color Laser Printer and then select Properties 3 Click the Device S...

Страница 50: ...so be downloaded from support dell com Installing the Wireless Adapter Using Video Instructions Recommended To install the wireless adapter perform the following method 1 Insert the Software and Documentation disc in your computer The Easy Setup Navigator file launches automatically 2 Select Optional Accessories Setup on the Easy Setup Navigator window Installing the Optional Wireless Adapter Wire...

Страница 51: ...d with the wireless adapter 1 Ensure that the printer is turned off 2 Align the connector and the three protrusions of the wireless adapter with the four holes and insert the adapter NOTE Ensure that the adapter is fully inserted and secured 3 Turn on the printer NOTE If a message displays telling you to make initial setup on the LCD panel always do as instructed 4 Print the printer settings repor...

Страница 52: ...th up to 32 alphanumeric characters Network Mode Specifies the network mode from Ad hoc or Infrastructure Security Settings Security Selects the encryption type from No Security Mixed mode PSK WPA PSK TKIP WPA2 PSK AES and WEP Transmit Key Specifies the transmit key from the list WEP Key Specifies the WEP key used through the wireless network only when WEP is selected as the encryption type Pass P...

Страница 53: ...launches automatically 2 Click Start Setup Wizard Setup through USB Cable recommended Advanced Setup through WPS PBC 1 3 WPS PIN 2 3 Operator Panel Ethernet Cable Dell Printer Configuration Web Tool 1 WPS PBC Wi Fi Protected Setup Push Button Configuration is a method to authenticate and register devices required for wireless configuration by pressing the button provided on the access point via wi...

Страница 54: ...52 Installing Optional Accessories 3 Click Connect Your Printer 4 Click Wireless Connection 5 Click Wizard Follow the on screen instructions to configure wireless settings ...

Страница 55: ... the following connection methods WPS PBC WPS PIN Operator Panel Ethernet Cable Dell Printer Configuration Web Tool 1 Insert the Software and Documentation disc provided with the printer in your computer The Easy Setup Navigator file launches automatically 2 Click Start Setup 3 Click Connect Your Printer 4 Click Wireless Connection ...

Страница 56: ...he following instructions WPS PIN The PIN code of WPS PIN can only be configured from the operator panel NOTE WPS PIN Wi Fi Protected Setup Personal Identification Number is a method to authenticate and register devices required for wireless configuration by entering PIN assignments to a printer and computer This setting performed through an access point is available only when the access points of...

Страница 57: ...he message Please wait WPS Setting is displayed and start the WPS PBC on the wireless LAN access point Registrar within two minutes 7 When the WPS operation is successful and the printer is rebooted wireless LAN connection setting is completed Operator Panel Auto SSID Setup 1 Press the Menu button 2 Press the button until Admin Settings is highlighted and then press the Set button 3 Press the butt...

Страница 58: ...Mixed mode PSK WPA PSK TKIP or WPA2 PSK AES encryption a Press the button until Mixed mode PSK WPA PSK TKIP or WPA2 PSK AES is highlighted and then press the Set button b Enter the pass phrase and then press the Set button To use WEP encryption a Press the button until WEP is highlighted and then press the Set button b Enter the WEP key and then press the Set button c Press the button to highlight...

Страница 59: ...on type from No Security WEP WPA PSK TKIP WPA PSK AES WEP2 PSK AES and Mixed Mode PSK in the Encryption drop down list box and then set each item for the encryption type selected NOTE For details on each item see Dell Printer Configuration Web Tool 11 Click Apply New Settings to apply the settings 12 Turn off the printer disconnect the Ethernet cable and turn it on again Wireless LAN connection se...

Страница 60: ...etting of the printer 7 Reboot the printer 8 Change the wireless settings on your computer or access point accordingly NOTE To change the wireless settings on your computer refer to the manuals provided with the wireless adapter or if your computer provides a wireless adapter tool change the wireless settings using that tool Installing the Optional Hard Disk 1 Ensure that the printer is turned off...

Страница 61: ...e cover towards the back of the printer 4 Open the left side cover completely 5 Insert the two plastic pins on the hard disk into the metal casing holes 6 Attach the plastic pin and the connector to the control board and push the hard disk firmly into place ...

Страница 62: ...lowing the instructions for the operating system you are using If the printer is on a network update the driver for each client Hard disk can be specified on the printer driver only when hard disk or RAM disk is available on the printer driver Updating Your Driver to Detect Hard Disk NOTE When you use XPS driver driver updating is not required When Using PCL Driver Windows 8 Windows 8 x64 Windows ...

Страница 63: ...k OK 5 Close the Printers dialog box Windows Server 2008 Server 2008 x64 1 Click Start Control Panel Printers 2 Right click the printer icon of the Dell C3760n C3760dn Color Laser Printer and then select Properties 3 Click the Options tab and then select Get Information from Printer 4 Click Apply and then click OK 5 Close the Printers dialog box Windows XP XP x64 Server 2003 Server 2003 x64 1 Clic...

Страница 64: ...tion from Printer and then click OK 5 Click Apply and then click OK 6 Close the Printers dialog box Windows Server 2008 Server 2008 x64 1 Click Start Control Panel Printers 2 Right click the printer icon of the Dell C3760n C3760dn Color Laser Printer and then select Properties 3 Click the Configuration tab and then select Bi Directional Setup 4 Select Get Information from Printer and then click OK...

Страница 65: ...rom the Printer List screen in Print Center or Printer Setup Utility 2 Click Printers on the Print Center or Printer Setup Utility menu bar and select Show Info 3 Select Installable Options and select the options that have been installed on the printer and then click Apply Changes ...

Страница 66: ...64 Installing Optional Accessories ...

Страница 67: ...ollowing requirements NOTE The images used in this manual are those of the Dell C3760dn Color Laser Printer unless otherwise mentioned Connection type Connection specifications Ethernet 10 Base T 100 Base TX 1000 Base T Wireless optional IEEE 802 11b 802 11g 802 11n USB USB 2 0 1 Ethernet port 2 Wireless adapter socket 3 USB port 1 2 3 ...

Страница 68: ...our computer skip this section and go to Network Connection To connect the printer to a computer 1 Connect the smaller USB connector into the USB port at the back of the printer NOTE Ensure that you match the USB symbol on the cable to the USB symbol on the printer 2 Connect the other end of the cable into a USB port of the computer CAUTION Do not connect the printer USB cable to the USB port avai...

Страница 69: ...t cable into the Ethernet port on the rear of the printer and the other end to a LAN drop or hub To setup a wireless connection insert the wireless adapter into the wireless adapter socket on the back of the printer For a wireless connection see Installing the Optional Wireless Adapter NOTE To use the wireless adapter be sure to disconnect the Ethernet cable 1 Ethernet port 1 1 ...

Страница 70: ...irst time When you turn the printer on the wizard screen to perform the initial setup appears on the operator panel Follow the steps below to set the initial settings NOTE If you do not start configuring the initial settings the printer automatically restarts in three minutes After that you can set the following initial setup by enabling Power on Wizard on the operator panel or Dell Printer Config...

Страница 71: ...rade Berlin Bratislava Brussels Budapest Copenhagen Douala Libreville Luanda Madrid Paris Prague Rome Sarajevo Skopje Stockholm Tunis Vienna Warsaw Zagreb Windhoek UTC 02 00 Amman Athens Beirut Bucharest Cairo Damascus Harare Helsinki Istanbul Jerusalem Johannesburg Kaliningrad Kiev Kinshasa Minsk Nicosia Riga Sofia Tripoli Palestine UTC 03 00 Addis Ababa Aden Antananarivo Baghdad Comoro Islands K...

Страница 72: ...rinter 3 Please Enter Date appears Specify the date and then press the Set button 4 Please Enter Time appears Specify the time and then press the Set button The printer automatically restarts after selecting the Set button ...

Страница 73: ... Tool use the link local address To confirm the link local address print a printer settings report and check the Link Local Address under Network Wired or Network Wireless For details about how to print a printer settings report see Report List NOTE If the Panel Lock Control is set to Enable you need to enter the four digit password to enter the Admin Settings menu NOTE The images used in this man...

Страница 74: ... 12 Press the Back button 13 Press the button until Subnet Mask is highlighted and then press the Set button 14 Repeat steps 11 and 12 to set Subnet Mask NOTE If the message This Setting Becomes Effective after Restart is displayed press the Back button 15 Press the Back button 16 Press the button until Gateway Address is highlighted and then press the Set button 17 Repeat steps 11 and 12 to set t...

Страница 75: ... displayed on the operator panel Verifying the Settings Using Printer Settings Report 1 Print the printer settings report For details about how to print a printer settings report see Report List 2 Verify the correct IP address subnet mask and gateway address are listed in the printer settings report under Network Wired or Network Wireless If the IP address shows 0 0 0 0 the factory default an IP a...

Страница 76: ...74 Setting the IP Address ...

Страница 77: ...nter unless otherwise mentioned NOTE To avoid paper jams do not remove the tray while printing is in progress 1 Pull the tray out of the printer about 200 mm 2 Hold the tray with both hands and remove it from the printer 3 Adjust the paper guides NOTE Extend the front side of the tray when you load Legal size paper ...

Страница 78: ...tray may cause paper jams 6 Align the width guides against the edges of the paper NOTE When loading user specified print media adjust the width guides and slide the extendable part of the tray by pinching the length guide and sliding it until it rests lightly against the edge of the paper 7 After confirming that the guides are securely adjusted insert the tray into the printer NOTE If the front si...

Страница 79: ...77 8 On the operator panel press the or button until the desired paper size is highlighted and then press the Set button 9 Press the or button until the desired paper type is highlighted and then press the Set button ...

Страница 80: ...78 Loading Paper ...

Страница 81: ...c into your computer 2 Click Start Control Panel 3 Select System and Security 4 Click Allow a program through Windows Firewall 5 Click Change settings Allow another program 6 Check Browse 7 D setup_assist exe where D is the drive letter of the optical drive in the File name text box and then click Open 8 Click Add and then click OK Inserting the Software and Documentation Disc 1 Insert the Softwar...

Страница 82: ...r printer is connected to a network and not your computer see Network Connection Setup For installing XML Paper Specification XPS printer driver NOTE XPS driver is supported on the following operating systems Windows Vista Windows Vista 64 bit Edition Windows Server 2008 Windows Server 2008 64 bit Edition Windows Server 2008 R2 Windows 7 Windows 7 64 bit Edition Windows 8 Windows 8 64 bit Edition ...

Страница 83: ... default printer select the Set as the default printer check box and then click Next 11 If you do not share your printer select Do not share this printer If you share your printer select Share this printer so that others on your network can find and use it 12 Click Next Installation starts 13 As the driver installation is completed click Print a test page to print a test page 14 Click Finish Windo...

Страница 84: ...t share your printer select Do not share this printer If you share your printer select Share this printer so that others on your network can find and use it Click Next 10 As the driver installation is completed click Print a test page to print a test page To use this printer as the default printer select the Set as the default printer check box 11 Click Finish Network Connection Setup NOTE To use ...

Страница 85: ...ication XPS printer driver NOTE XPS driver is supported on the following operating systems Windows Vista Windows Vista 64 bit Edition Windows Server 2008 Windows Server 2008 64 bit Edition Windows Server 2008 R2 Windows 7 Windows 7 64 bit Edition Windows 8 Windows 8 64 bit Edition and Windows Server 2012 Windows Vista or Windows Vista 64 bit Edition 1 Extract the following zip file to your desired...

Страница 86: ...splay the Install From Disk dialog box 9 Click Browse and then select the extracted folder in step 1 10 Click OK 11 Select your printer name and click Next 12 To change the printer name enter the printer name in the Printer name box and then click Next To use this printer as the default printer select the Set as the default printer check box and then click Next 13 If you do not share your printer ...

Страница 87: ... Click Add a printer 4 Click Add a network wireless or Bluetooth printer 5 Select printer or click The printer that I want isn t listed When you select your printer go to step 8 When you click The printer that I want isn t listed go to step 6 6 Select Add a printer using a TCP IP address or host name and then click Next 7 Select TCP IP Device from Device type and enter the IP address for Hostname ...

Страница 88: ...vel and acknowledge the timing of ordering replacement consumables You can click the Dell supplies link for ordering supplies NOTE The Dell Printer Configuration Web Tool is not available when the printer is directly connected to a computer or a print server To launch the Dell Printer Configuration Web Tool type the printer s IP address in your web browser The printer configuration appears on the ...

Страница 89: ...dit 5 Select Enabled and then click OK 6 Restart the computer Change the Firewall Setting to Share File and Printer NOTE This procedure is required for Windows XP Windows XP 64 bit Edition Windows Vista Windows Vista 64 bit Edition Windows Server 2008 Windows Server 2008 64 bit Edition Windows Server 2008 R2 Windows 7 and Windows 7 64 bit Edition For Windows XP 1 Click start Control Panel 2 Select...

Страница 90: ...ote Registry and select Start 7 Right click Remote Registry and select Properties 8 Change Startup type to Automatic and then click OK Disable User Account Control CAUTION Disabling the User Account Control might leave the system vulnerable to virus attacks NOTE This procedure is required for Windows Vista Windows Vista 64 bit Edition Windows Server 2008 Windows Server 2008 64 bit Edition Windows ...

Страница 91: ...discovery and file sharing for all public networks Disable Simple File Sharing NOTE This procedure is required for Windows XP and Windows XP 64 bit Edition 1 Click start Control Panel 2 Select Appearance and Themes 3 Select Folder Options 4 On the View tab clear the Use simple file sharing Recommended check box and then click OK 5 Click Start Control Panel 6 Select Performance and Maintenance 7 Se...

Страница 92: ...estrict color printing select the appropriate Dell ColorTrack option Enter the password when Color Password Enabled is selected for Dell ColorTrack 6 Select the software and documentation you want to install and then click Next If you want to change the installation destination click Input and specify a new location 7 Click Install 8 Click Finish to exit the wizard when the Congratulations screen ...

Страница 93: ...nter 5 Click OK If you are missing files you are prompted to insert the server operating system CD Windows Vista or Windows Vista 64 bit Edition 1 Click Start Control Panel Hardware and Sound Printers 2 Right click the printer icon and select Sharing 3 Click Change sharing options The message Windows needs your permission to continue appears 4 Click Continue 5 Select the Share this printer check b...

Страница 94: ...t method or the peer to peer method NOTE If the OS bit editions 32 64 bit edition differ between a print server and a client computer you need to manually add the printer driver for the client computer edition on the server Otherwise the printer driver cannot be installed on the client computer using the point and print or peer to peer method For example if the print server runs on Windows XP 32 b...

Страница 95: ...or Windows Vista 64 bit Edition 1 On the Windows desktop of the client computer click Start Network 2 Locate the host name of the server computer and then double click the host name 3 Right click the shared printer name and then click Connect 4 Click Install driver 5 Click Continue in the User Account Control dialog box 6 Wait for the driver information to be copied from the server computer to the...

Страница 96: ...it for the driver information to be copied from the server computer to the client computer and for a new printer object to be added to the Devices and Printers folder The time this takes varies based on network traffic and other factors 6 Print a test page to verify installation a Click Start Devices and Printers b Right click the printer you just created and select Printer properties c On the Gen...

Страница 97: ...tached to another computer and then click Next If the printer is not listed type the path to the printer in the text box The server host name is the name of the server computer that identifies it on the network The shared printer name is the name assigned during the server installation process 5 Click Browse for a printer and then click Next If this is a new printer you may be prompted to install ...

Страница 98: ...Print a test page 6 Click Finish When a test page prints successfully installation is complete Windows Server 2008 or Windows Server 2008 64 bit Edition 1 Click Start Control Panel Printers 2 Click Add a Printer 3 Select Add a network wireless or Bluetooth printer and then click Next If the printer is listed select the printer and click Next or select The printer that I want isn t listed and type ...

Страница 99: ...nish When a test page prints successfully installation is complete Windows 8 Windows 8 64 bit Edition or Windows Server 2012 1 Under Desktop mode right click the bottom left corner of the screen and then click Control Panel Hardware and Sound Hardware for Windows Server 2012 Devices and Printers 2 Click Add a Printer to launch the Add Printer wizard 3 If the printer is listed select the printer an...

Страница 100: ...98 Installing Printer Drivers on Windows Computers ...

Страница 101: ... 10 Type the administrator s name and password and then click OK Install Software for Mac OS X 10 7 and Mac OS X 10 8 11 When the installation is complete click Close Adding a Printer on Mac OS X 10 5 10 6 10 7 or 10 8 When Using a USB connection 1 Turn on the printer 2 Connect the USB cable between the printer and the Macintosh computer The printer is automatically added to your Macintosh compute...

Страница 102: ... options that have been installed on the printer and then click Continue 9 Confirm that the printer is displayed in the Print Fax Print Scan for Mac OS X 10 7 and Mac OS X 10 8 dialog box Adding a Printer on Mac OS X 10 4 11 When Using a USB Connection 1 Turn on the printer 2 Connect the USB cable between the printer and the Macintosh computer 3 Start Printer Setup Utility NOTE You can find Printe...

Страница 103: ...onfigured properly on your Macintosh computer and the printer 3 Start the Printer Setup Utility NOTE You can find Printer Setup Utility in the Utilities folder in Applications 4 Click Add 5 Click Default Browser in the Printer Browser dialog box 6 Select the printer connected via Bonjour from the Printer Name list 7 Name and Print Using are automatically entered 8 Click Add 9 Specify the options i...

Страница 104: ...r the printer in the Address area 8 Select Dell for Printer Model and select Dell C3760dn Color Laser NOTE When printing is set up using IP printing the queue name is displayed as blank You do not need to specify it 9 Click Add When Using Rendezvous Bonjour 1 Turn on the printer 2 Ensure that Macintosh computer and the printer are connected If you use wired connection connect the LAN cable between...

Страница 105: ... 7 and Mac OS X 10 8 2 Select the printer in the Printer Name list and click Options Supplies 3 Select Driver and select the options that have been installed in the printer and then click OK Mac OS X 10 3 9 or 10 4 11 1 Start Printer Setup Utility 2 Select the printer in the Printer List dialog box and click Show Info 3 Select Installable Options and select the options that have been installed in ...

Страница 106: ...104 Installing Printer Drivers on Macintosh Computers ...

Страница 107: ...ade of your system 1 Select Applications System Tools Accessories for Red Hat Enterprise Linux 5 Desktop Terminal 2 Type the following command in the terminal window The printer driver is installed Setting Up the Queue To execute printing you must set up the print queue on your workstation For Red Hat Enterprise Linux 5 Desktop 1 Open the URL http localhost 631 using a web browser 2 Click Administ...

Страница 108: ... connections a Select Dell C3760dn Color Laser or Dell C3760n Color Laser from the Local Printers menu and click Continue 5 Type the name of the printer in the Name box in the Add Printer window and click Continue You can optionally specify the location and description of the printer for further information 6 Select Dell C3760dn Color Laser PS vx x en or Dell C3760n Color Laser PS vx x en from the...

Страница 109: ...eb browser 2 Click Administration 3 Click Manage Printers 4 Click the queue name for which you want to specify the printing options 5 Select Set Default Options from the Administration menu 6 Click the desired setting item specify the required settings and click Set Default Options The message Printer xxx default options have been set successfully appears The setting is complete Uninstalling the P...

Страница 110: ...inue YaST Control Center is activated 3 Select Hardware on YaST Control Center and select Printer The Printer Configuration dialog box appears For network connections a Click Add b Select Network Printers as Printer Type and click Next c Select Print via LPD Style Network Server as Network Printers and click Next d Type the IP address of the printer in Hostname of Print Server e Type the name of t...

Страница 111: ...nt to print to as the default queue For information on specifying the default queue see Setting the Default Queue Setting the Default Queue 1 To activate the Printer setup Autodetected printers do the following a Select Computer More Applications and select YaST on the Application Browser b Type the administrator password and click Continue YaST Control Center is activated c Select Hardware on YaS...

Страница 112: ... print queue 3 Repeat the command above for all queues for the same model 4 Type the following command in the terminal window The printer driver is uninstalled Operation on SUSE Linux Enterprise Desktop 11 Setup Overview SUSE Linux Enterprise Desktop 11 1 Install the printer driver 2 Set up the print queue 3 Specify the default queue 4 Specify the printing options su Type the administrator passwor...

Страница 113: ...m Access Network Printer or Printserver Box via d Type the IP address of the printer in IP Address or Host Name e Select Dell in the Select the printer manufacturer drop down menu f Click OK The Add New Printer Configuration dialog box appears g Select Dell C3760dn Color Laser PS vx x Dell Dell_C3760dn_Color_Laser ppd gz or Dell C3760n Color Laser PS vx x Dell Dell_C3760n_Color_Laser ppd gz from t...

Страница 114: ...ter and select Printer The Printer Configurations dialog box opens 4 Click Edit A dialog box to modify the specified queue opens 5 Confirm that the printer you want to set is selected in the Connection list 6 Select the Default Printer check box 7 Confirm the settings and click OK Specifying the Printing Options You can specify the printing options such as color mode 1 Open a web browser 2 Type ht...

Страница 115: ...E Terminal on the Application Browser 2 Type the following command in the terminal window to delete the print queue 3 Repeat the command above for all queues for the same model 4 Type the following command in the terminal window The printer driver is uninstalled su Type the administrator password lppasswd g sys a root Type the password for authority as the printer administrator after the Enter pas...

Страница 116: ...114 Installing Printer Drivers on Linux Computers CUPS ...

Страница 117: ...our Printer 13 Operator Panel 117 14 Dell Printer Configuration Web Tool 121 15 Understanding the Tool Box Menus 171 16 Understanding the Printer Menus 187 17 Print Media Guidelines 229 18 Loading Print Media 235 ...

Страница 118: ...116 ...

Страница 119: ...king amber light when an unrecoverable print error occurs 2 LCD Panel Displays various settings instructions and error messages 3 button Moves the cursor or highlight up or down 4 button Moves the cursor or highlight right or left 5 Cancel button Cancels active or pending jobs 6 Number Pad Enters numbers and characters 7 Power Saver button Enters or exits the Power Saver mode When the machine is n...

Страница 120: ...you perform various tasks you may need to enter characters and numbers For example when you enter the password or when you setup wireless network Number Pad Letters and Numbers Changing Numbers or Names If you make a mistake while entering a number press the Cancel button to delete the last digit or character Then enter the correct number or character Key Assigned numbers letters or characters 1 1...

Страница 121: ...power saver timer for the printer The printer enters the power saver mode when the printer is not used for a certain period of time If the Auto Off Timer is set to On the printer automatically turns off after a specified period of time passes in deep sleep mode NOTE If the Panel Lock Control is set to Enable you need to enter the four digit password to enter the Admin Settings menu NOTE Auto Off T...

Страница 122: ...120 Operator Panel ...

Страница 123: ...up which sends e mail to you or the key operator when the printer needs supplies or intervention To fill out printer inventory reports requiring the asset tag number of all the printers in your area use the Printer Information feature in the Dell Printer Configuration Web Tool Enter the IP address of each printer on the network to display the asset tag number The Dell Printer Configuration Web Too...

Страница 124: ...fy the display language in order of preference in the Language list For example Italian Italy it IT Spanish Traditional Sort es ES tradnl German Germany de DE French France fr FR English United States en US Danish da DK Dutch Netherlands nl NL Norwegian Bokmal no Swedish sv SE Setting the IP Address of the Printer to Non Proxy 1 Select Internet Options from the Tools menu 2 Click LAN Settings unde...

Страница 125: ...dress of the printer in the No Proxy for edit box Select the Automatic proxy configuration URL check box If you are using Firefox 3 0 do one of the following Select the No Proxy check box if you do not want to use a proxy Select the Auto detect proxy settings for this network check box Select the Manual proxy configuration check box and then enter a hostname and a port number if you have a list of...

Страница 126: ...r Settings Print Volume Printer Information Tray Settings E Mail Alert Set Password Online Help Order Supplies at Contact Dell Support at Printer Status Use the Printer Status menu to get immediate feedback on the printer supply status When a toner cartridge is running low click the order supplies link on the first screen to order a new toner cartridge Printer Jobs Use the Printer Jobs menu to con...

Страница 127: ...calls inventory reports or the status of current memory and engine code levels Tray Settings Use the Tray Settings menu to get information about the paper type and size for each tray E Mail Alert Use the E Mail Alert menu to receive e mail when the printer needs supplies or intervention To be notified type your name or the name of the key operator in the e mail list box Set Password Use the Set Pa...

Страница 128: ...1 Dell C3760dn Color Laser Displays the product name of the printer 2 IPv4 Displays the IP address of the printer IPv6 3 Location Displays location of the printer The location can be changed in the Basic Information section on the Print Server Settings page 4 Contact Person Displays the name of the printer administrator The name can be changed in the Basic Information section on the Print Server S...

Страница 129: ...Links to the Printer Settings Report menu 4 Print Server Settings Links to the Print Server Reports menu 5 Copy Printer Settings Links to the Copy Printer Settings menu 6 Print Volume Links to the Print Volume menu 7 Printer Information Links to the Printer Status menu 8 Tray Settings Links to the Tray Settings menu 9 E Mail Alert Links to the Print Server Settings menu 10 Set Password Links to th...

Страница 130: ... the dialog box The default user name is admin and the default password is left blank NULL You can change only the password in the Set Password page in the Security menu The user name cannot be changed See Set Password for more information Details of the Menu Items 1 Refresh Button Receives the current printer configuration and updates the latest information in the right frame 2 Apply New Settings...

Страница 131: ... Transfer Belt Unit Adjust 2nd BTR Adjust Fusing Unit Auto Registration Adjustment Color Registration Adjustments Reset Defaults Initialize PrintMeter Storage 1 Non Dell Toner Adjust Altitude Clock Settings Web Link Customization Print Server Settings Print Server Reports Print Server Setup Page E Mail Alert Setup Page Print Server Settings Basic Information Port Settings TCP IP SMB E Mail Alert B...

Страница 132: ... item is available only when the printer is connected using the wireless network 3 This item is available only when the printer is connected using an Ethernet cable Cyan Toner Cartridge Magenta Toner Cartridge Yellow Toner Cartridge Black Toner Cartridge OK Indicates that there is enough amount of toner for use Replace Soon Indicates that the toner needs to be replaced soon Replace Now Indicates t...

Страница 133: ...able Capacity Displays the maximum capacity of the paper tray Cover Status Closed Indicates that the cover is closed Open Indicates that the cover is open Printer Type Displays the type of the printer Color Laser is displayed normally Printing Speed Displays the printing speed Location Displays the location where a fault occurred Details Displays the details of the fault Dell Service Tag Number Di...

Страница 134: ...ys the date when the job was submitted ID Displays the job ID Job Name Displays the file name of the completed job Owner Displays the name of the job owner Host Name Displays the name of the host computer Output Result Displays the status of the completed job Impression Number Displays the total number of pages for the job No of Sheets Displays the total number of sheets for the job Host I F Displ...

Страница 135: ... to automatically print a job history report after every 20 jobs RAM Disk 2 Displays whether to allocate RAM for the file system for the Secure Print Proof Print Private Mail Box Print and Public Mail Box Print features Panel Language Displays the language used on the LCD panel Auto Reset Displays the amount of time before the printer automatically resets its settings to the defaults when no addit...

Страница 136: ...to enable the Hex Dump feature Draft Mode Displays whether to print in the draft mode Line Termination Displays whether to set the line termination Default Color Displays the color mode setting Ignore Form Feed Displays whether to ignore blank pages that only contain Form Feed control codes PostScript Settings PS Error Report Displays whether the printer outputs error contents for a PostScript err...

Страница 137: ...ther to print on both sides of a sheet of paper Multiple Up Displays whether to print two or more pages on one side of a sheet of paper Collation 4 Displays whether to sort a job Paper Density Plain Displays the paper density of plain paper Label Displays the paper density of labels Adjust Transfer Belt Unit K Offset Displays the value for black ghost image YMC Offset Displays the value for color ...

Страница 138: ...color registration adjustment Adjust Altitude Displays the altitude of the location where the printer is installed Non Dell Toner Displays whether to use toner cartridge of another manufacturer Clock Settings Date Format Displays the default date format Time Format Displays the default time format 24H or 12H Time Zone Displays the default time zone Set Date Displays the date setting Set Time Displ...

Страница 139: ...splays the paper type setting of the optional 550 sheet feeder Tray 2 Custom Paper Size Y 8 Displays the length of custom size paper loaded in the optional 550 sheet feeder Tray 2 Custom Paper Size X 8 Displays the width of custom size paper loaded in the optional 550 sheet feeder Tray 2 Display Popup 8 Displays whether to show a popup menu that prompts the user to set the paper size and type when...

Страница 140: ...s the time taken by the printer to enter Deep Sleep mode after it has entered Sleep mode Power Saver Time Auto Off Timer 1 Sets the time taken by the printer to be turned off after it has entered Deep Sleep mode mm inch Sets the measurement unit to be used on the LCD panel as either mm or inches Control Panel Tone Sets the volume of the tone that is emitted when the operator panel input is correct...

Страница 141: ... outputs PDL data which is not supported by the printer as text when the printer receives it Banner Sheet Insert Position Sets where to insert a banner sheet in the output Banner Sheet Specify Tray Sets from which tray a banner sheet is fed Substitute Tray Sets whether to use another size paper when the paper that is loaded in the specified tray does not match the paper size settings for the curre...

Страница 142: ...e font pitch for scalable mono spaced fonts Form Line Sets the number of lines in a page Quantity Sets the number of copies to print Image Enhance Sets whether to enable the Image Enhancement feature Hex Dump Sets whether to help isolate the source of a print job problem With Hex Dump selected all data sent to the printer is printed in hexadecimal and character representation Control codes are not...

Страница 143: ...ber of copies 2 Sided Print 1 Sets whether to print on both sides of a sheet of paper Print Mode Sets a print mode PDF Password Sets a password Re enter PDF Password Confirms the set password Collation Sets whether to sort the output Output Size Sets the output paper size Layout Sets the output layout Output Color Sets the output color 1 This item is available only for Dell C3760dn Color Laser Pri...

Страница 144: ...o specify the date and time to delete the files stored as Secure Print in the optional 512MB memory module or the optional hard disk drive Values Data Encryption Encryption Sets whether to encrypt the data Encryption Key Sets a key that is required to encrypt Re enter Encryption Key Enter the new key again to confirm Hard Disk Over Write Sets whether to overwrite the hard disk drive Login Error Di...

Страница 145: ...ime to delete the files stored as Secure Print in the optional 512MB memory module or the optional hard disk drive Recurrence Sets the period to repeat the setting Weekly Settings Sets the day of the week to repeat the setting Monthly Settings Sets the day of the month to repeat the setting Output Color Sets whether to print in color or in black and white Select Tray Sets the default input tray 2 ...

Страница 146: ... range of 5 to 10 Covers Thick Sets the reference voltage setting for the transfer roller for thick cover paper within the range of 5 to 10 Coated Sets the reference voltage setting for the transfer roller for coated paper within the range of 5 to 10 Coated Thick Sets the reference voltage setting for the transfer roller for thick coated paper within the range of 5 to 10 Label Sets the reference v...

Страница 147: ...or Regi Chart Click Start to print a color registration chart The color registration chart prints a lattice pattern of yellow magenta and cyan lines On the chart look at the values on the right side that are next to the line that is perfectly straight for each of the three colors If the value for this line is 0 color registration adjustment is not required If the value for this line is any value o...

Страница 148: ...e and the necessary conditions for communication The following tabbed pages are displayed in the top of the right frame Format Hard Disk 2 Format Hard Disk Click Start to format the optional hard disk All fonts forms and files for Secure Print Proof Print Private Mail Box Print and Public Mail Box Print stored in the optional hard disk are cleared 1 This item is available only when RAM Disk is ena...

Страница 149: ...rom either the Ad Hoc or Infrastructure mode MAC Address Displays the MAC address of the wireless adapter Link Channel Displays the channel number of the connection Link Quality Displays the quality of the connection TCP IP Settings IP Mode Displays the IP mode Host Name Displays the host name IPv4 3 IP Address Mode Displays the IP address mode IP Address Displays the IP address Subnet Mask Displa...

Страница 150: ...addresses via DHCP WINS Primary Server Displays the primary WINS server address WINS Secondary Server Displays the secondary WINS server address LPD Port Status Displays the port status of the Line Printer Daemon LPD protocol Connection Time Out Displays the connection time out period Port9100 Port Status Displays the port status Port Number Displays the port number Connection Time Out Displays th...

Страница 151: ...Wide Area Bonjour feature Telnet Port Status Displays the port status Connection Time Out Displays the connection time out period SNMP Port Status Displays the port status Enable SNMP v1 v2c Protocol Displays the status of the SNMP v1 v2c feature Enable SNMP v3 Protocol Displays the status of the SNMP v3 feature SNTP Port Status Displays the port status IP Address Host Name Displays the IP address...

Страница 152: ...esses that are permitted or denied access to the printer 1 This item is available only when the printer is connected using an Ethernet cable 2 This item is available only when the printer is connected using the wireless network 3 This item is displayed when IPv4 Mode or Dual Stack in IP Mode is selected 4 This item is displayed when IPv6 Mode or Dual Stack in IP Mode is selected 5 This item is dis...

Страница 153: ...tus for paper handling Service Call Displays the e mail alert receive status for service calls E Mail List 2 Displays the acceptable e mail addresses for the E Mail Alert feature specified in E Mail List 2 Select Alerts for List 2 Supplies Alerts Displays the e mail alert receive status for consumables Paper Handling Alerts Displays the e mail alert receive status for paper handling Service Call D...

Страница 154: ...fault value 100Base TX Full Duplex Selects 100Base TX Full Duplex as the default value 1000Base T Full Duplex Selects 1000Base T Full Duplex as the default value Current Ethernet Settings Displays the current settings of the Ethernet MAC Address Displays the MAC address of the printer Port Status LPD Sets whether to enable LPD Port9100 Sets whether to enable Port9100 IPP Sets whether to enable IPP...

Страница 155: ...alue in the range of 0 to 255 255 255 255 255 cannot be specified as the subnet mask Manual Gateway Address When an IP address is being set manually the gateway address is specified using the format nnn nnn nnn nnn Each octet that makes up nnn nnn nnn nnn is a value in the range of 0 to 254 127 and any value in the range of 224 to 254 cannot be specified for the first octet of a gateway address IP...

Страница 156: ...riod between 1 and 60 seconds Priority to IPv6 DNS Name Resolution Select the check box to enable the DNS Name Resolution feature WINS WINS Mode Allows you to enable or disable the automatic setting of the primary and secondary WINS server addresses via DHCP WINS Primary Server Manually sets the primary WINS server address in xxx xxx xxx xxx format when WINS Mode is not selected WINS Secondary Ser...

Страница 157: ...ter 192 168 100 10 in the Address field and 255 255 255 255 in the Address Mask field 3 Select Reject 4 Click the first column of the Access List row 2 5 Enter 0 0 0 0 in the Address field and 0 0 0 0 in the Address Mask field 6 Select Accept 7 Click Apply New Settings WSD Port Number Sets the port number to 80 or from 8 000 to 9 999 Receive Time Out Sets the receive time out period from 1 to 65 5...

Страница 158: ...se To specify the setting of the Server Message Block SMB protocol Values E Mail Alert Purpose To configure detailed settings of E Mail Alert This page can also be displayed by clicking the E Mail Alert in the left frame Values Host Name Sets the host name of the server computer Workgroup Sets the workgroup Maximum Sessions Sets the maximum number of sessions Unicode Support Sets whether to notify...

Страница 159: ...er POP User Password 1 Confirms the set password Reply Address Designates the reply e mail address sent with each E mail Alert SMTP Server Connection Displays the status of the SMTP server connection E Mail Alert Settings E Mail List 1 Sets acceptable e mail addresses for the E Mail Alert feature using up to 255 alphanumeric characters Select Alerts for List 1 Supplies Alerts Select the check box ...

Страница 160: ... name up to 63 alphanumeric characters and symbol sets The original setting will remain valid if no input is made Wide Area Bonjour Select the check box to enable the Wide Area Bonjour protocol SNMP Configuration Enable SNMP v1 v2c Protocol Select the check box to enable the SNMP v1 v2c protocol Edit SNMP v1 v2c Properties Click to display the SNMP v1 v2c page and to edit the setting of SNMP v1 v2...

Страница 161: ...m it Community Name Trap 1 Sets the community name used for trap up to 31 alphanumeric characters The original setting will remain valid if no input is made Characters entered for Community Name Trap in the previous settings will not be displayed on the screen The default Trap Community is NULL Re enter Community Name Trap 1 Enters the community name used for trap again to confirm it Trap Notifica...

Страница 162: ...ivers Remote Client Account Account Enabled Select the check box to enable the print drivers and remote client account Reset to default Password Click to reset the password for the print drivers and remote client account to default SNTP IP Address Host Name Sets the IP address or the host name of the SNTP server Connection Time Out Sets the connection time out period from 1 to 120 seconds Time Syn...

Страница 163: ... AES WEP Encryption Select the WEP key code from either Hex or Ascii WEP Key 1 Sets the WEP key set used through the wireless network only when WEP 128bit or WEP 64bit is selected for Encryption Re enter WEP Key 1 Enters the WEP key 1 again to confirm it WEP Key 2 Sets the WEP key set used through the wireless network only when WEP 128bit or WEP 64bit is selected for Encryption Re enter WEP Key 2 ...

Страница 164: ...SL TLS pages and enable the relevant certificate in advance 6 When Auto is selected for Transmit Key the key set specified for WEP Key 1 is used AirPrint Enable AirPrint Click to enable the printer for AirPrint Name Enters the name that is to be displayed as an AirPrint printer Location Sets the location of the printer Geo Location Sets the physical location of the printer Supply Levels Cyan Toner...

Страница 165: ...the use of a proxy server Address to Bypass Proxy Server Sets the address to bypass proxy server Server Name Sets the name of the proxy server Port Number Sets the port number from 1 to 65535 Authentication Sets whether to enable authentication Login Name Sets the login name for the proxy server Password Sets the login password for the proxy server Retype Password Confirms the set password Initial...

Страница 166: ...er the domain name Server Information for ColorTrack PRO IP Address Host Name Port Sets IP address or the host name and the port address The port address must be 389 3268 or between 5 000 and 65 535 1 LDAP Server Displays the current software information of the LDAP server Optional Information for ColorTrack PRO Search Directory Root Enters the search directory root Login Name Enters the login nam...

Страница 167: ...lf signed certificate Upload Signed Certificate 3 4 Click to display the Upload Signed Certificate page and to upload the certificate file to the device from the page Password Enter the password to upload the certificate file Re enter Password Enter the password again for confirmation File Name Click Browse to browse the file name to upload to the device Import Click Import to upload the certifica...

Страница 168: ... been generated 2 This item is displayed only when the optional hard disk is installed and is set to On for encryption 3 This item is effective only when connected via SSL TLS https Only the administrator is allowed to display the pages 4 This item is displayed only when the optional hard disk is installed and is set to On for encryption If not Certificate Details is displayed IPsec Settings Proto...

Страница 169: ...he settings were actually copied or not Configure 802 1x Enable IEEE 802 1x Select the check box to enable IEEE 802 1x authentication Authentication Method EAP MD5 Selects the authentication method to use for IEEE 802 1x authentication EAP MS CHAPv2 PEAP MS CHAPv2 EAP TLS 1 2 Login Name Device Name Sets the login name device name for IEEE 802 1x authentication using up to 128 alphanumeric characte...

Страница 170: ... based on the print user information registered in the internal server External Mode Restricts printing based on the print user information registered in the external server Non Registered User Sets whether to permit the printing of data with no authentication information To permit the printing for non account user select the check box Non Registered User Password 1 Sets the password to be used fo...

Страница 171: ...and Non Registered User is set to on 2 This item is displayed only when ColorTrack Mode is Internal Mode 3 This item is displayed only when ColorTrack Mode is External Mode MPF Mode Sets whether to use the printer driver settings for the size and type of paper loaded in the MPF MPF Paper Size 1 Sets the size of paper loaded in the MPF MPF Paper Type 1 Sets the type of paper loaded in the MPF MPF C...

Страница 172: ...isplay a popup message that prompts the user to set the paper size and type when the paper is loaded in the optional 550 sheet feeder 1st Priority Sets the paper source to be used as the first priority 2nd Priority Sets the paper source to be used as the second priority 3rd Priority 2 Sets the paper source to be used as the third priority 1 This item is available only when Panel Specified in MPF M...

Страница 173: ...sses cannot be detected 3 Click OK The Tool Box opens The Tool Box consists of the Printer Setting Reports Printer Maintenance and Diagnosis tabs Printer Setting Reports The Printer Setting Reports tab includes the Printer Information Menu Settings Reports TCP IP Settings Tray Settings Panel Language and USB Direct Print Defaults pages Printer Information Purpose To display the system information ...

Страница 174: ...is not available in the paper trays and vice versa Letter size job on A4 size paper Auto Log Print Displays whether to automatically print a job history report after every 20 jobs Report 2 Sided Print 2 Displays whether to print reports on both sides of a sheet of paper Print ID Displays where to print a user ID on the output paper Print Text Displays whether the printer outputs PDL Page Descripti...

Страница 175: ...plays whether to emit a tone when the printer runs out of paper Off indicates that the tone is disabled Low Toner Alert Tone Displays whether to emit a tone when the toner is low Off indicates that the tone is disabled Auto Clear Alert Tone Displays whether to emit a tone 5 seconds before the printer performs auto clear Off indicates that the tone is disabled Paper Density Plain Displays the plain...

Страница 176: ...Manual Address Displays whether to set the IP address manually Manual Address Displays the IP address of the printer Link Local Address Displays the link local address Tray Settings MPF Mode Displays whether the paper size and paper type for the multipurpose feeder MPF are specified from the printer driver or the operator panel MPF Display Popup Displays a popup menu that prompts to set the paper ...

Страница 177: ...oaded in the optional 550 sheet feeder Tray 2 Paper Type 1 Displays the paper type setting of the optional 550 sheet feeder Tray Priority Tray Priority Displays the priority order of the paper trays 1 This item is available only when the optional 550 sheet feeder is installed Panel Language Displays the language that is used on the LCD panel Output Color Displays the default color mode Select Tray...

Страница 178: ...n no additional settings are made 1 minute 2 minutes 3 minutes 4 minutes Fault Time out 0 Sets the amount of time the printer waits before canceling a job when the job stops abnormally Available Range 3 300 seconds Job Time out 0 Sets the amount of time the printer waits for additional data from the computer before it cancels the job Available Range 5 300 seconds Date Time Time Zone Sets the time ...

Страница 179: ...s on Letter size paper or Letter size jobs on A4 paper Auto Log Print Off Does not automatically print a job history report after every 20 jobs On Automatically prints a job history report after every 20 jobs Report 2 Sided Print 3 1 Sided Prints reports on one side of a sheet of paper 2 Sided Prints reports on both sides of a sheet of paper Print ID Off Does not print the user ID Top Left Prints ...

Страница 180: ...to apply the changes 1 When you specify 1 minute for Sleep the printer enters power saver mode 1 minute after it finishes a job This uses much less energy but requires more warm up time for the printer Specify 1 minute if your printer shares an electrical circuit with room lighting and you notice lights flickering Select a high value if your printer is in constant use Under most circumstances this...

Страница 181: ...ess paper feed direction color adjustment values that are found in the color registration chart individually for Yellow Magenta and Cyan LM Left Magenta Available Range 9 to 9 LC Left Cyan Available Range 9 to 9 RY Right Yellow Available Range 9 to 9 RM Right Magenta Available Range 9 to 9 RC Right Cyan Available Range 9 to 9 PY Process Yellow Available Range 9 to 9 PM Process Magenta Available Ra...

Страница 182: ...paper is loaded in the MPF Off MPF Paper Size 1 Use Driver Settings Sets the size of paper loaded in the MPF A4 210x297mm A5 148x210mm B5 182x257mm Letter 8 5x11 Folio 8 5x13 Legal 8 5x14 Executive 7 3x10 5 Envelope 10 4 1x9 5 Monarch Env 3 9x7 5 DL Env 110x220mm C5 Env 162x229mm Custom Size MPF Custom Size Y 1 Available Range 127 355 mm 5 0 14 0 inches Sets the length of custom size paper loaded ...

Страница 183: ...in tray1 Tray 1 Paper Type Plain Sets the type of paper loaded in tray1 Plain Thick Covers 106 163g m2 Covers Thick 164 216g m2 Coated 106 163g m2 Coated Thick 164 216g m2 Recycled Letterhead Preprinted Prepunched Color Plain Side 2 Color Side 2 Plain Thick Side 2 Recycled Side 2 Tray 2 Display Popup 2 On Displays a popup message that prompts the user to set Paper Type and Paper Size when the pape...

Страница 184: ... 2 Color Side 2 Plain Thick Side 2 Recycled Side 2 Tray Priority MPF Tray1 Sets the priority order of the paper trays Tray1 MPF MPF Tray1 Tray2 2 MPF Tray2 2 Tray1 Tray1 MPF Tray2 2 Tray1 Tray2 2 MPF Tray2 2 MPF Tray1 Tray2 2 Tray1 MPF Apply New Settings After you change the settings click this button to apply the changes Restart printer to apply new settings Click this button to restart the print...

Страница 185: ...ing BOOTP RARP Sets the IP address using RARP DHCP Sets the IP address using DHCP Panel Manually sets the IP address IP Address Manually sets the IP address allocated to the printer It is allocated to the printer using the format nnn nnn nnn nnn Each octet that makes up nnn nnn nnn nnn is a value in the range of 0 to 254 127 and any value in the range of 224 to 254 cannot be specified for the firs...

Страница 186: ... item is available only when Display of Dell Configuration Web Tool is set to On Output Color Full Color Prints in color mode Black White Prints in black and white mode Select Tray MPF The paper is fed from the MPF Tray 1 The paper is fed from tray1 Tray 2 1 The paper is fed from the optional 550 sheet feeder 2 Sided Printing 2 1 1 Sided Prints on one side of a sheet of paper Long Edge Binding Pri...

Страница 187: ...settings Data Encryption settings Hard Disk Over write settings ColorTrack Mode settings ColorTrack Error Report settings Non Registered User settings Pitch Configuration Chart Prints full halftone pages for yellow magenta cyan and black Also prints pages to check the pitch A total of five pages are output Ghost Configuration Chart Prints a chart to check for ghost printing One page is printed 4 C...

Страница 188: ...Laser Printer Tool Box NOTE For details about starting the Tool Box see Starting the Tool Box The Tool Box opens 2 Click the Printer Maintenance tab 3 Select Maintenance from the list at the left side of the page The Maintenance page appears 4 Click Reset Default The printer restarts automatically to apply the settings ...

Страница 189: ...sts Printer Settings Purpose To print a list of the current user default values the installed options the amount of installed print memory and the status of printer supplies Panel Settings Purpose To print a detailed list of all the settings of the printer menus PCL Fonts List Purpose To print a sample of the available PCL fonts See also Understanding Fonts PCL Macros List Purpose To print the inf...

Страница 190: ... 2 Press the button until Report List is highlighted and then press the Set button 3 Press the button until the desired report or list is highlighted and then press the Set button The selected report or list is printed Printing a Report List Using the Tool Box 1 Click Start All Programs Dell Printers Dell C3760 Color Laser Printer Tool Box NOTE For details about starting the Tool Box see Starting ...

Страница 191: ...fault paper size Values mm series inch series Auto MPF Tray1 Tray2 1 1 This item is available only when the optional 550 sheet feeder is installed A4 1 A5 B5 Letter Executive Folio Legal Envelope 10 Monarch DL C5 Custom Size 1 Denotes country specific factory default value Letter 1 Executive Folio Legal A4 A5 B5 Envelope 10 Monarch ...

Страница 192: ...Landscape Prints text and graphics parallel to the long edge of the paper 2 Sided Print Off Does not print on both sides of a sheet of paper On Prints on both sides of a sheet of paper Binding Edge Flip on Long Edge Prints on both sides of a sheet of paper to be bound by long edge Flip on Short Edge Prints on both sides of a sheet of paper to be bound by short edge CG Times LetterGothic CourierPS ...

Страница 193: ...ngdings N C Schbk Roman CG Omega BdIt Line Printer N C Schbk It GaramondAntiqua Times Roman N C Schbk Bd Garamond Krsv Times It N C Schbk BdIt Garamond Hlb Times Bd ITC A G Go Bk GaramondKrsvHlb Times BdIt ITC A G Go BkOb Courier Helvetica ITC A G Go Dm Courier It Helvetica Ob ITC A G Go DmOb Courier Bd Helvetica Bd ZapfC MdIt Courier BdIt Helvetica BdOb ZapfDingbats ROMAN 8 WIN L1 ISO 6 ISO L1 WI...

Страница 194: ...ies The printer sets the amount of space between each line vertical line spacing based on the Form Line and Orientation menu items Select the correct Form Line and Orientation before changing Form Line See also Orientation Quantity Purpose To set the default print quantity Set the number of copies required for a specific job from the printer driver Values selected from the printer driver always ov...

Страница 195: ...toner by printing in the draft mode The print quality is reduced when printing in the draft mode Values LineTermination Purpose To add the line termination commands Values 1 Sets the value in increments of 1 Available Range 1 999 Off Disables the Image Enhance feature On Enables the Image Enhance feature Disable Disables the Hex Dump feature Enable Enables the Hex Dump feature Disable Does not pri...

Страница 196: ...number of copies to print Values 2 Sided Print NOTE 2 Sided Print feature is available only for Dell C3760dn Color Laser Printer Purpose To specify whether to print on both sides of a sheet of paper Value Print Mode Purpose To specify the print mode Black Prints in the black and white mode Color Prints in the color mode Off Disables the Ignore Form Feed feature On Enables the Ignore Form Feed feat...

Страница 197: ... layout Value Normal For documents with normal sized characters High Quality For documents with small characters or thin lines or documents printed using a dot matrix printer High Speed Prints with the higher speed than the Normal mode but the quality is less Enter PDF Password Enter the password to print the secure PDF Collated Sorts the job Uncollated Does not sort the job A4 1 Letter 1 Auto 1 T...

Страница 198: ... Job Time out Purpose To specify the execution time for one PostScript job The change becomes effective after the printer is turned off and then on again Values Paper Select Mode Purpose To specify the way to select the tray for PostScript mode The change becomes effective after the printer is turned off and then on again Values Color Auto Black Off Discards the print job without printing an error...

Страница 199: ...eless Status feature is available only when the printer is connected using the wireless network Purpose To confirm the wireless communication status Values Wireless Setup NOTE Wireless Setup is available only when the printer is connected using the wireless network Purpose To configure the wireless network interface Color Prints in the color mode Black Prints in the black and white mode Auto Detec...

Страница 200: ...PSK TKIP WPA PSK AES or WPA2 PSK AES PassPhrase Entry Specifies the passphrase of alphanumeric characters from 8 to 63 WPA PSK TKIP Select to configure the wireless setting with the encryption type of WPA PSK TKIP PassPhrase Entry Specifies the passphrase of alphanumeric characters from 8 to 63 WPA2 PSK AES Select to configure the wireless setting with the encryption type of WPA2 PSK AES PassPhras...

Страница 201: ...P Mode Dual Stack Uses both IPv4 and IPv6 to set the IP address IPv4 Mode Uses IPv4 to set the IP address IPv6 Mode Uses IPv6 to set the IP address IPv4 Get IP Address AutoIP Sets the IP address automatically A random value in the range of 169 254 1 0 to 169 254 254 255 that is not currently in use on the network is set as the IP address The subnet mask is set as 255 255 0 0 BOOTP Sets the IP addr...

Страница 202: ...es the FTP port Enable Enables the FTP port IPP Disable Disables IPP port Enable Enables IPP port SMB TCP IP Disable Disables SMB TCP IP port Enable Enables SMB TCP IP port SMB NetBEUI Disable Disables SMB NetBEUI port Enable Enables SMB NetBEUI port WSD Print Disable Disables WSD port Enable Enables WSD port SNMP UDP Disable Disables the SNMP UDP port Enable Enables the Simple Network Management ...

Страница 203: ...figure the Adobe Protocol settings for the wired network The change becomes effective after the printer is turned off and then on again Values USB Settings Use the USB Settings menu to change printer settings affecting a USB port USB Port NOTE USB Port feature is available only for the USB port on the rear of the printer 1 HTTP SSL TLS feature is available only when a digital certificate is set fr...

Страница 204: ...ergy but requires more warm up time for the printer Specify 1 minute if your printer shares an electrical circuit with room lighting and you notice lights flickering Disable Disables the USB interface Enable Enables the USB interface Auto Used when auto detecting the PostScript communication protocol Standard Used when the communication protocol is in ASCII interface BCP Used when the communicatio...

Страница 205: ... power switch of the printer to On Auto Reset Purpose To automatically reset the settings to the default settings and return to the standby mode after you do not specify any settings for the specified time Values Fault Time out Purpose To specify the amount of time the printer waits before canceling a job that stops abnormally The print job is cancelled if the time out time is exceeded Values Job ...

Страница 206: ...nput is incorrect On Emits a tone when the operator panel input is incorrect Machine Ready Off Does not emit a tone when the printer is ready to process a job On Emits a tone when the printer is ready to process a job Job Completed Off Does not emit a tone when a job is complete On Emits a tone when a job is complete Fault Tone Off Does not emit a tone when a job ends abnormally On Emits a tone wh...

Страница 207: ... Millimeters mm Selects millimeter as the default measurement unit Inches Selects inch as the default measurement unit A4 1 Letter 1 Denotes country specific factory default values A4 Letter 1 1 Denotes country specific factory default values Off 1 Does not print A4 size jobs on Letter size paper or Letter size jobs on A4 paper On Prints A4 size jobs on Letter size paper if A4 size paper is not av...

Страница 208: ...et is loaded Values 1 Sided Prints reports on one side of a sheet of paper 2 Sided Prints reports on both side of a sheet of paper Off Does not print the user ID Top Left Prints the user ID on the top left of the page Top Right Prints the user ID on the top right of the page Bottom Left Prints the user ID on the bottom left of the page Bottom Right Prints the user ID on the bottom right of the pag...

Страница 209: ...n Print is set to On Secure Job Expiration NOTE Secure Job Expiration feature is available only when RAM Disk is set to Enable or when the optional hard disk is installed 1 This item is available only when the optional 550 sheet feeder is installed Off Does not allocate memory to the RAM disk file system Secure Print Private Mail Box Print Public Mail Box Print and Proof Print jobs will abort and ...

Страница 210: ...int in the RAM Disk or the optional hard disk daily Weekly Sets the recurrence to delete the files stored as Secure Print in the RAM Disk or the optional hard disk weekly Monthly Sets the recurrence to delete the files stored as Secure Print monthly Weekly Setting Monday Sets the day of the week to delete the files stored as Secure Print Tuesday Wednesday Thursday Friday Saturday Sunday Monthly Se...

Страница 211: ...ides when using letterhead Values Low Toner Alert Msg Purpose To specify whether to show the alert message when the toner is low Values S W Download Purpose To enable or disable download of firmware updates Values Off Prints according to the specified color mode On Prints all print jobs in black and white even when color print is specified Off Does not print the error report when printing with Col...

Страница 212: ...ize the NV non volatile memory configure the plain paper quality adjustment settings and configure the security settings NOTE Values marked by an asterisk are the factory default menu settings F W Version Purpose To confirm the current F W version Service Tag Purpose To confirm the service tag Express Code Purpose To confirm the express service code Paper Density Purpose To specify paper density s...

Страница 213: ... appear try to decrease the value Available Range 5 to 5 Plain 0 Sets the transfer roller voltage in increments of 1 The default settings may not give the best output on all paper types If you see mottles on the print output try to increase the voltage If you see white spots on the print output try to decrease the voltage Available Range Lighten 5 to Darken 10 Plain Thick 0 Available Range Lighten...

Страница 214: ...paper has curled try to lower the temperature When the toner does not fuse on the paper properly try to increase the temperature Available Range Lighten 3 to Darken 3 Plain Thick 0 Available Range Lighten 3 to Darken 3 Covers 0 Available Range Lighten 3 to Darken 3 Covers Thick 0 Available Range Lighten 3 to Darken 3 Coated 0 Available Range Lighten 3 to Darken 3 Coated Thick 0 Available Range Lig...

Страница 215: ...belt unit be sure to initialize its life counter Auto Correct Cancel Does not perform color registration correction Start Automatically performs color registration correction Color Regi Chart Yes Prints a color registration chart The color registration chart prints a lattice pattern of yellow magenta and cyan lines On the chart find the values on the right side that are next to the line that is pe...

Страница 216: ...ed by using non Dell toner cartridges Values Adjust Altitude Purpose To specify the altitude of the location where the printer is installed The discharge phenomenon for charging the photo conductor varies with barometric pressure Adjustments are performed by specifying the altitude of the location where the printer is being used NOTE An incorrect altitude adjustment setting leads to poor printing ...

Страница 217: ...pose To disable or enable data encryption when using the printer Values Panel Lock Control Disable Disables password protection for Admin Settings Enable Enables password protection for Admin Settings Change Password 1 0000 9999 Sets or changes the password required to access Admin Settings 1 This item is available only when Panel Lock Control is set to Enable USB Direct Print On Enables the USB D...

Страница 218: ...u Values Defaults Settings Use Defaults Settings to modify the USB Direct Print menu defaults USB Direct Print Defaults Purpose To modify the defaults for the USB Direct Print Defaults menu See USB Direct Print for more details Tray Settings Use the Tray Settings menu to define the print media loaded in tray1 and the optional 550 sheet feeder NOTE Values marked by an asterisk are the factory defau...

Страница 219: ...velope 10 Monarch DL C5 Custom Size Paper Type 1 Plain Plain Thick Covers Covers Thick Coated Coated Thick Label Envelope Recycled Letterhead Preprinted Prepunched Color Plain S2 Color S2 Plain Thick S2 Recycled S2 MPF Mode Panel Specified Uses the paper size and paper type set from the operator panel DriverSpecified Uses the paper size and paper type set on the printer driver ...

Страница 220: ...sage that prompts to set Paper Type and Paper Size when paper is loaded in the MPF 1 This item is available only when MPF Mode is set to Panel Specified Paper Size mm series A4 1 A5 B5 Letter Executive Folio Legal Custom Size inch series Letter 1 Executive Folio Legal A4 A5 B5 Custom Size Paper Type Plain Plain Thick Covers Covers Thick Coated Coated Thick Recycled Letterhead Preprinted Prepunched...

Страница 221: ...at prompts to set Paper Type and Paper Size when paper is loaded in tray1 1 Denotes country specific factory default value Paper Size Auto Custom Size Paper Type Plain Plain Thick Covers Covers Thick Coated Coated Thick Recycled Letterhead Preprinted Prepunched Color Plain S2 Color S2 Plain Thick S2 Recycled S2 Display Popup Off Does not display a popup message that prompts to set Paper Type and P...

Страница 222: ...s tray1 as the first priority Tray 2 Sets the optional 550 sheet feeder as the first priority 2nd Priority 1 MPF Sets the MPF as the second priority Tray 1 Sets tray1 as the second priority Tray 2 Sets the optional 550 sheet feeder as the second priority 3rd Priority 2 MPF Sets the MPF as the third priority Tray 1 Sets tray1 as the third priority Tray 2 Sets the optional 550 sheet feeder as the th...

Страница 223: ...s 1 Print and Delete Deletes all documents from print memory after printing them Delete Deletes all documents from print memory document n 2 Print and Delete Deletes the specified document from print memory after printing it Delete Deletes the specified document from print memory 1 This item is available only when the multiple print jobs are stored 2 The document name is displayed The save date an...

Страница 224: ...Print Prints all documents and saves them in memory Use PC Settings Sets the number of copies specified on the printer driver Input Number of Copies Sets the number of copies Print and Delete Deletes all documents from print memory after printing them Use PC Settings Sets the number of copies specified on the printer driver Input Number of Copies Sets the number of copies Delete Deletes all docume...

Страница 225: ...cument Purpose To change the file you want to print Select User ID All Documents 1 Print Prints all documents and saves them in memory Use PC Settings Sets the number of copies specified on the printer driver Input Number of Copies Sets the number of copies Print and Delete Deletes all documents from print memory after printing them Use PC Settings Sets the number of copies specified on the printe...

Страница 226: ... when MPF Any is selected in Select Tray Purpose To specify the paper size for the MPF Values mm series inch series Full Color Prints in color Black White Prints in black and white MPF Tray 1 Tray 2 1 1 This item is available only when the optional 550 sheet feeder is installed A4 1 A5 B5 Letter Folio Legal 1 Denotes country specific factory default values Letter 1 Folio Legal A4 A5 B5 1 Denotes c...

Страница 227: ... output layout Values Collation Purpose To specify whether to sort the job Values Plain Plain Thick Covers Covers Thick Coated Coated Thick Envelope Recycled Letterhead Prepunched Color 1 1Sided Prints on one side of a sheet of paper Long Edge Binding Prints on both sides of a sheet of paper to be bound by long edge Short Edge Binding Prints on both sides of a sheet of paper to be bound by short e...

Страница 228: ...then press the Set button CAUTION Be sure to remember the password The procedure described below allows you to reset the password Turn off the printer Then while holding the Menu button turn on the printer Perform steps 7 and 8 8 Re enter the password to confirm the password that you entered and then press the Set button The password has been changed NOTE If you change the password while Panel Loc...

Страница 229: ...ion settings USB Port settings Data Encryption settings Hard Disk Over write settings ColorTrack Mode settings ColorTrack Error Report settings Non Registered User settings When Using the Operator Panel 1 Press the Menu button 2 Press the button until Admin Settings is highlighted and then press the Set button 3 Press the button until Maintenance is highlighted and then press the Set button 4 Pres...

Страница 230: ...228 Understanding the Printer Menus ...

Страница 231: ...ter than 60 g m2 16 lb may not feed properly and could cause paper jams For best performance use 75 g m2 20 lb bond grain long paper Curl Curl is the tendency of print media to curve at its edges Excessive curl can cause paper feeding problems Curl usually occurs after the paper passes through the printer where it is exposed to high temperatures Storing paper unwrapped even in the paper tray can c...

Страница 232: ...he printer Preprinted paper that can be affected by the temperature in the fusing unit Preprinted paper that requires a registration the precise print location on the page greater than 0 09 inches such as optical character recognition OCR forms In some cases you can adjust registration with your software program to successfully print on these forms Coated paper erasable bond synthetic paper and th...

Страница 233: ... feed through the printer This may result in a paper jam Pre punched paper can include more paper dust than standard paper Your printer may require more frequent cleaning and feed reliability may not be as good as standard paper Weight guidelines for pre punched paper are the same as non punched paper Envelopes Depending on the envelopes it is possible to expect variable levels of wrinkling It is ...

Страница 234: ...selecting labels Label adhesives face sheet printable stock and topcoats must be able to withstand temperatures of 205 C 401 F and pressure of 25 pounds per square inch psi Use labels that can be without sealing excessive curling wrinkling or releasing hazardous emissions Do not use label sheets with a slick backing material CAUTION Before buying large quantities of any print media it is recommend...

Страница 235: ...rest on a flat surface so that the edges do not buckle or curl Do not place anything on top of the print media packages Identifying Print Media and Specifications The following tables show print media information Supported Paper Sizes Paper size MPF Tray1 Optional 550 sheet feeder Duplex unit Side 1 Side 2 Side 1 Side 2 Side 1 Side 2 A4 210 x 297 mm Y Y Y Y Y Y Y B5 182 x 257 mm Y Y Y Y Y Y Y A5 1...

Страница 236: ... Y Y Y Y N Normal Y Y Y Y Y Y Y N Thick Y Y Y Y Y Y Y N Covers Normal Y N Y N Y N Y N Thick Y N Y N Y N N N Coated Normal Y N Y N Y N Y N Thick Y N Y N Y N N N Label Normal Y N N N N N N N Light Y N N N N N N N Envelope Y N N N N N N N Recycled Y Y Y Y Y Y Y N Letterhead Y N Y N Y N Y N Preprinted Y N Y N Y N Y N Prepunched Y N Y N Y N Y N Color Y Y Y Y Y Y Y N Paper type Weight g m2 Remarks Plain...

Страница 237: ...m 8 5 inches Length 127 mm 5 00 inches to 355 6 mm 14 00 inches Loading Print Media in Tray1 and the Optional 550 Sheet Feeder This section describes how to load letterhead For details about loading print media other than letterhead see Loading Paper NOTE To avoid paper jams do not remove the tray while printing is in progress NOTE Use only laser print media Do not use ink jet paper in the printer...

Страница 238: ...550 sheet feeder Dell C3760n Color Laser Printer Face up Letterhead enters the printer first Dell C3760dn Color Laser Printer Face down Letterhead enters the printer last MPF Dell C3760n Color Laser Printer Face up Letterhead enters the printer first LETTERHEAD LETTERHEAD L E T T E R H E A D ...

Страница 239: ...t Media in the MPF 1 Gently pull open the MPF cover 2 Extend the extension tray as necessary Dell C3760dn Color Laser Printer Face down Letterhead enters the printer last Print media source Print side Page orientation L E T T E R H E A D ...

Страница 240: ... force the print media into the MPF 5 Slide both width guides until they rest lightly against the edge of the print media stack NOTE Do not force the print media into the MPF 6 On the operator panel press the or button until the desired paper size is highlighted and then press the Set button 7 Press the or button until the desired paper type is highlighted and then press the Set button ...

Страница 241: ... MPF right after they have been removed from the packaging they may bulge To avoid jams press firmly across the whole envelopes to flatten them as shown below before loading the envelopes in the MPF NOTE The maximum height quantity of envelopes that can be loaded in the MPF is approximately 15 mm 0 59 inches 15 envelopes Envelope 10 Monarch or DL Load the envelopes short edge feed with the flaps c...

Страница 242: ...F first Do not place objects on the MPF Also avoid pressing down or apply excessive force on it The icons on the MPF show how to load the MPF with paper and how to turn an envelope for printing Linking Trays The printer automatically links the trays when you load the same size and type of print media in them The first tray will be utilized until the media runs out after which the next tray will be...

Страница 243: ...241 Printing 19 Printing 243 ...

Страница 244: ...242 ...

Страница 245: ...tures use the printer driver When you choose Print from an application a window representing the printer driver opens Select the appropriate settings for the specific job that you are sending to print Print settings selected from the driver override the default menu settings selected from the operator panel or Tool Box You may need to click Preferences from the initial Print box to see all of the ...

Страница 246: ...y Canceling a Job From the Desktop 1 Click Start Devices and Printers For Windows XP Click start Printers and Faxes For Windows Vista Click Start Control Panel Hardware and Sound Printers For Windows Server 2008 Click Start Control Panel Printers For Windows Server 2008 R2 Click Start Devices and Printers For Windows 8 Under Desktop mode right click the bottom left corner of the screen and then cl...

Страница 247: ... Select from Automatically Select Tray1 Tray2 or MPF 4 From Duplex select Flip on Short Edge or Flip on Long Edge NOTE For details on the Flip on Short Edge and Flip on Long Edge options see Flip on Short Edge and Flip on Long Edge 5 Click OK Duplex Printing Without Duplex Unit Dell C3760n Color Laser Printer Only Manual duplex printing or two sided printing allows you to manually print on both si...

Страница 248: ...rt Output to Tray 1 Tray 2 or MPF 071 920 072 920 or 075 920 appears on the operator panel 6 Remove the stack of output from the output tray Load the stack back into the tray without turning it over with the blank side face up 7 A message Press to Continue Printing 071 921 072 921 or 075 921 appears on the operator panel Press the Set button The odd numbered pages are printed in the order of page ...

Страница 249: ...re is available when The optional 512MB memory module is installed The RAM disk is enabled in the printer menu RAM Disk is set to Available in the printer driver OR The optional hard disk is installed Flip on Long Edge Assumes binding along the long edge of the page left edge for portrait orientation and top edge for landscape orientation The following illustration shows long edge binding for port...

Страница 250: ...ard disk Users with the password can print them at a more convenient time from the operator panel This feature can be used to print confidential documents The stored jobs remain in the memory or hard disk until you delete them from the operator panel Public Mail Box Print You can store print jobs without a password in the memory or hard disk Any user can print them at a more convenient time from t...

Страница 251: ...uest to print it from the operator panel NOTE Secure Print and Private Mail Box Print require specifying a password for confidentiality NOTE If a document name is not assigned to your print job in the printer driver the job s name will be identified using the printer s time and date of submission to distinguish it from other jobs you have stored under your name Printing the Stored Jobs 1 Press the...

Страница 252: ...ks to ensure confidentiality If you enter an invalid password the message Wrong Password Re enter appears Wait 3 seconds or press the Set button or Cancel button to return to the screen for entering the password When you enter a valid password you have access to all print jobs matching the user ID and password you entered The print jobs matching the password you entered appear on the screen You ca...

Страница 253: ...lor to Full Color and the Function Enabled setting for USB Direct Print to On Color Password you will need to enter the four digit password after selecting Print Start NOTE Depending on how the PDF TIFF or JPEG file is created the file may not be printed directly from a USB memory In this case open the file on a computer and print using the printer driver 1 Insert a USB memory to the front USB por...

Страница 254: ...R2 or Windows Server 2012 client For Windows Server 2008 1 Click Start Administrative Tools Server Manager 2 Select Add Roles from the Action menu 3 Check the Print Services check box on the Server Roles window in the Add Roles Wizard and then click Next 4 Check the Print Server check box and then click Next 5 Click Install For Windows Server 2008 R2 1 Click Start Administrative Tools Server Manag...

Страница 255: ...group 1 Click The printer that I want isn t listed 2 Select Add a printer using a TCP IP address or hostname and click Next 3 Select Web Services Device from Device type 4 Enter the printer s IP address in the Hostname or IP address text box and click Next NOTE Before installing the driver using the Add Printer wizard on Windows Server 2008 R2 or Windows 7 perform one of the following Establish th...

Страница 256: ...ctive it means that both Bonjour mDNS and IPP are already set to Enable on the operator panel menu and the printer is ready for AirPrint Printing via AirPrint The following procedure uses the iPhone running iOS5 as an example 1 Open your email photo web page or document you want to print 2 Tap the action icon 3 Tap Print 4 Select your printer and set printer options 5 Tap Print NOTE To cancel the ...

Страница 257: ...ter in your web browser For more information see Setting Up the Dell Printer Configuration Web Tool and Starting the Dell Printer Configuration Web Tool 2 When the Dell Printer Configuration Web Tool opens go to the pages in the Print Server Settings tab Click Register This Device to Google Cloud Print in Google Cloud Print A sheet with a URL for the Google Cloud Print printer registration web sit...

Страница 258: ... Box or the Dell Printer Configuration Web Tool Changing a system setting from the operator panel Tool Box or from the Dell Printer Configuration Web Tool makes that setting the user default You can verify the detailed system settings by printing a printer settings report For details about how to print a printer settings report see Report List You can reset settings to their default values from th...

Страница 259: ...s list To change the ColorTrack settings choose Print Volume from the topics list and then select the Dell ColorTrack tab To copy your system settings to another printer on the network choose Copy Printer Settings from the topics list and then type the other printer s IP address If you do not know your printer s IP address see the printer settings report or display the TCP IP settings For details ...

Страница 260: ...258 Printing ...

Страница 261: ...r 20 Understanding Your Printer Software 261 21 Printing Using ColorTrack External Authentication 273 22 Using Digital Certificates 281 23 Understanding Fonts 293 24 Understanding Printer Messages 301 25 Specifications 307 ...

Страница 262: ...260 ...

Страница 263: ...h the Dell Supplies Management System dialog box from the All Programs menu or the desktop icon You can order consumables by phone or from the web 1 Click Start All Programs Dell Printers Additional Color Laser Software Dell Supplies Management System The Dell Supplies Management System window appears 2 Select your printer from the Select Printer Model list 3 If you are ordering from the web a Sel...

Страница 264: ...TE Quick Launch Utility is only supported on Microsoft Windows To use the Quick Launch Utility select to install the Quick Launch Utility when you install the Dell software To install the Dell software follow the instructions below 1 Insert the Software and Documentation disc into your computer and click setup_assist exe to start Easy Setup Navigator 2 Click Installing Driver and Software 3 Follow...

Страница 265: ...ts you to problems such as paper jams or low toner Ordering Supplies Allows you to access the web site to order supplies Before Installing the Status Monitor Widget Operating systems Mac OS X 10 4 11 Mac OS X 10 5 Mac OS X 10 6 Mac OS X 10 7 Mac OS X 10 8 Network protocols and interfaces LPR Socket 9100 Bonjour USB 2 0 and 1 1 When connecting with multiple printers of the same model via USB cables...

Страница 266: ...n in the upper left corner of the Printer Status window Printer Status Window When the Status Monitor Widget is activated the Printer Status window appears on Dashboard Printer Status Message Area Displays a message of the current printer status NOTE The Status Monitor Widget automatically obtains the printer information at the updated interval that can be specified in Preferences Also the printer...

Страница 267: ... be used Order Supplies button Click this button to display the Order window To hide the Order window click Order Supplies again Info i button Click this button to open Preferences NOTE The info i button appears on the lower right corner of the window when the cursor is over the Printer Status window The info i button is a standard used across all widgets Order Window This window provides you with...

Страница 268: ...ll and the Environment Click the hyperlink to access the web site about recycling Preferences To open Preferences 1 Click the info i button in the Printer Status window Preferences appears NOTE The info i button appears on the lower right corner of the window when the cursor is over the Printer Status window The info i button is a standard used across all widgets Printer Displays a list of availab...

Страница 269: ... toner Ordering Supplies Allows you to access the web site to order supplies Before Installing the Status Monitor Console NOTE The Status Monitor Console requires the following modules installed Python PyGTK Net SNMP cups libs and xdg open Please confirm that these modules are installed before you install the Status Monitor Console NOTE The Status Monitor Console is available when the printer is c...

Страница 270: ...Printer Selection Window Printers list All the printers registered in the CUPS Common UNIX Printing System are displayed in a list Status icons Ready Unknown Offline Toner Low Paper Low Door Open Paper Jam No Toner Out Of Paper Settings button Click this button to open the Settings window Details button Click this button to open the Printer Status window If a non supported printer is selected it o...

Страница 271: ...ormation is displayed Printer Status Image Area Current Toner Status icons Displays icons of the current status of each toner The toner level is more than 30 The toner level is less than 29 The toner level is less than 9 The toner level is unknown Estimated Toner Level images Keeps you informed about the amount of toner that remains for each color Toner Alert Displays an alert message when any rem...

Страница 272: ...is button to open the Service Tag window When the Premier URL is selected in the Select Reorder URL Click this button to open the procurement and support web site Select Reorder URL Displays a list of available URLs where you can order Dell printer supplies Select a URL address to use when the Order Supplies Online button is clicked Regular URL http accessories us dell com sna printerseg aspx Prem...

Страница 273: ...e Code and Service Tag Settings Window To open the Settings window 1 Click Settings in the Printer Selection window The Settings window appears Update of status Printer Status is regularly updated check box Select the check box to enable disable the printer status to be updated by the specified interval Update interval text box Specify the update interval of the printer status Port Number Settings...

Страница 274: ...l Settings SNMP Community Name Enter the Community name of SNMP in the Community Name text box Order URL Select Reorder URL The selected URL address is set as default web site for the Select Reorder URL in the Dell Supplies Management System window ...

Страница 275: ...int ColorTrack Settings To print using Dell ColorTrack configure the following settings Dell ColorTrack Authentication System Kerberos Server LDAP Server LDAP Authentication Dell ColorTrack Specify the authentication method When Using the Dell Printer Configuration Web Tool 1 Launch Dell Printer Configuration Web Tool a Open the web browser b Enter the IP address of your printer in the web browser...

Страница 276: ...Internal Mode using user information registered on the printer and the External Mode using user information registered on an external server To authenticate on the external authentication server with External Mode you need not register user information on the printer The change becomes effective after the printer is turned off and then on again Non Registered User Specify whether to permit the pri...

Страница 277: ...ettings Authentication System Settings Select the authentication system from the list The change becomes effective after the printer is turned off and then on again Server Response Time Out Specify the amount of time the printer should wait for response from the server Set the time period from 1 up to 75 seconds The change becomes effective after the printer is turned off and then on again Search ...

Страница 278: ... turned off and then on again NOTE Specify the domain name with uppercase characters Depending on your server an error may occur if you specify the domain name with lowercase characters LDAP Server Specify the directory server and the authentication method to execute LDAP authentication or to acquire information using LDAP and specify the range and attributes for searching NOTE When using LDAPS or...

Страница 279: ... text string as the origin of the search when using LDAP communication The change becomes effective after the printer is turned off and then on again For example ou colortrackv3 dc win2003ad dc colortrack dc net Login Name Specify the login name for accessing the directory server with LDAP authentication Specify the name of a user with the authority to update the LDAP server The change becomes eff...

Страница 280: ...AP authentication method Direct Authentication executes server authentication with the UserID and password entered Use Added Text String Specify whether to add a text string to the UserID The change becomes effective after the printer is turned off and then on again Text String Added to User Name When using an added string for the user name specify the text string to be added For example if the us...

Страница 281: ...cify a group that does not belong authentication fails and the data is not printed Also the default group is set if Specify Group Name is not specified Specify Job Owner Select Use Login Name to use the user information logged into your PC and select Enter ID to enter the user name yourself Job Owner Name Specify the user name to use when authenticating with an external server You can enter this o...

Страница 282: ...280 Printing Using ColorTrack External Authentication ...

Страница 283: ...only when the optional hard disk is installed and is set to On for encryption Preparing to Manage Certificates Before managing digital certificates the following settings must be applied Changing the Encryption Setting of the Hard Disk Setting HTTPS Communication Changing the Encryption Setting of the Hard Disk Some items are effective only when encryption of the optional hard disk is set to On Ch...

Страница 284: ...ing the Dell Printer Configuration Web Tool 1 Launch Dell Printer Configuration Web Tool a Open the web browser b Enter the IP address of your printer in the web browser See Dell Printer Configuration Web Tool 2 Select Printer Settings 3 Click the Printer Settings tab 4 Select Secure Settings 5 Check that the Enable check box of Panel Lock Control of Panel Lock is selected If Enable is selected pr...

Страница 285: ...displayed select Enable Importing a Digital Certificate CAUTION Before importing a certificate file back up the certificate file NOTE To manage digital certificates you must first set encryption of the optional hard disk to On and then set up HTTPS communication For details see Preparing to Manage Certificates NOTE Be sure to import the certificate with Internet Explorer NOTE After importing a PKC...

Страница 286: ...icate to associate At this time confirm that Validity of the certificate selected is set to Valid 10 Click Certificate Details to display the Certificate Details page 11 Confirm the content and click Use This Certificate at the upper right corner Confirming the Settings of a Digital Certificate NOTE To manage digital certificates you must first set encryption of the optional hard disk to On and th...

Страница 287: ...cate click Delete at the upper right corner NOTE When a certificate is deleted the features associated with the deleted certificate are disabled To delete a certificate being used either set the feature to OFF in advance or switch the association to another certificate and then switch to another operation mode if possible before deleting the certificate For an SSL Server switch to another certific...

Страница 288: ...reless LAN WPA Enterprise EAP TLS Setting for Wireless LAN WPA Enterprise PEAPV0 MS CHAPV2 EAP TTLS PAP EAP TTLS CHAP Setting Client Certificate for IEEE 802 1x EAP TLS Setting the Certificate in the IPsec Digital Signature Mode NOTE To manage digital certificates you must first set encryption of the optional hard disk to On and then set up HTTPS communication For details see Preparing to Manage C...

Страница 289: ... TLS Communication is enabled NOTE When executing the certificate validity of the server and the presentation of the client certificate see Setting Server Certificate Verification for LDAP SSL TLS Communication and Setting Client Certificate for LDAP SSL TLS Communication Setting Server Certificate Verification for LDAP SSL TLS Communication NOTE This setting is available only when the optional ha...

Страница 290: ...er importing a PKCS 12 format certificate the secret key is not exported even if you execute exporting 1 Import the certificate to be used with Wireless LAN server or root certificate For details see Importing a Digital Certificate 2 Set the digital certificate for wireless LAN server or root certificate a Launch Dell Printer Configuration Web Tool b Select Print Server Settings c Click the Securi...

Страница 291: ...ES WPA Enterprise TKIP NOTE WPA Enterprise AES WPA2 Enterprise AES or WPA Enterprise TKIP becomes available only when the following steps are set correctly Importing a Digital Certificate Setting a Digital Certificate Confirming the Settings of a Digital Certificate e Set EAP Identity of WPA Enterprise f Select EAP TLS from the Authentication Method list of WPA Enterprise g Click Apply New Setting...

Страница 292: ...ot necessary if you do not need to specify the order for the certificates i Click Display the List to display the Certificate List page j The certificate displayed with an asterisk as Valid in the Validity column is the certificate associated with the use purpose and actually used 4 Set WPA Enterprise for PEAPV0 MS CHAPV2 EAP TTLS PAP or EAP TTLS CHAP a Launch Dell Printer Configuration Web Tool b...

Страница 293: ...th SSL Client For more information see Importing a Digital Certificate 2 Set a certificate to be used with SSL Client For more information see Setting a Digital Certificate 3 Confirm whether the certificate is set correctly For more information see Confirming the Settings of a Digital Certificate 4 After restarting the printer the IEEE 802 1x EAP TLS certificate is presented when IEEE 802 1x commu...

Страница 294: ...292 Using Digital Certificates ...

Страница 295: ...medium light black and heavy Style refers to other typeface modifications such as tilt or character width Italic and oblique are styles where the characters are tilted Narrow condensed and extended are three common styles that modify the character widths Some fonts combine several weight and style modifications for example Helvetica BdOb A group of several weight and style variations of a single t...

Страница 296: ...ite different in size This is because there are other font parameters that affect how the font looks However the point size of a font is an excellent specification of the relative size of a font The following examples illustrate two very different proportional fonts at 14 point Bitmapped and Scalable Fonts The printer uses both bitmapped and scalable fonts Bitmapped fonts are stored in print memor...

Страница 297: ...5 PCL 6 and PostScript 3 Some of the most popular typefaces like Courier and TimesNew PCL 5 PCL 6 Times New Roman PostScript 3 are available for all printer languages The following table lists all the fonts resident in your printer See Report List for instructions on how to print samples of the fonts You can select the resident fonts from your software program You can also select the fonts from th...

Страница 298: ...LetterGothic It Cooper Gothic 32BC LetterGothic Bd Cooper Gothic 33BC Coronet Albertus Md Courier Albertus XBd Courier Oblique Courier Bold Clarendon Cd Courier Bold Oblique Eurostile Medium Coronet Eurostile Bold Eurostile Extended No 2 Marigold Eurostile Bold Extended No 2 Geneva Arial Gill Sans Arial It Gill Sans Italic Arial Bd Gill Sans Bold Arial BdIt Gill Sans Bold Italic Gill Sans Light Ti...

Страница 299: ...xt Black Italic Hoefler Ornaments SymbolPS Joanna Joanna Italic Palatino Roman Joanna Bold Palatino It Joanna Bold Italic Palatino Bd Letter Gothic Palatino BdIt Letter Gothic Slanted Letter Gothic Bold ITCBookman Lt Letter Gothic Bold Slanted ITCBookman LtIt ITC Lubalin Graph Book ITCBookmanDm ITC Lubalin Graph Book Oblique ITCBookmanDm It ITC Lubalin Graph Demi ITC Lubalin Graph Demi Oblique Hel...

Страница 300: ...ic Times Bold Times Bold Italic Times New Roman Times New Roman Italic Times New Roman Bold Times New Roman Bold Italic Univers 45 Light Univers 45 Light Oblique Univers 55 Univers 55 Oblique Univers 65 Bold Univers 65 Bold Oblique Univers 57 Condensed Univers 57 Condensed Oblique Univers 67 Condensed Bold Univers 67 Condensed Bold Oblique Univers 53 Extended Univers 53 Extended Oblique Univers 63...

Страница 301: ... support multiple applications and languages your printer has 36 symbol sets for the resident PCL 5 PCL 6 fonts Symbol Sets for PCL 5 PCL 6 Not all font names support all of the symbol sets listed Roman 8 Default ISO 8859 1 Latin 1 ISO 8859 2 Latin 2 ISO 8859 9 Latin 5 ISO 8859 10 Latin 6 PC 8 PC 8 DN PC 775 Baltic PC 850 Multilingual PC 852 Latin 2 PC 1004 OS 2 PC Turkish Windows 3 1 Latin 1 Wind...

Страница 302: ...300 Understanding Fonts ...

Страница 303: ... cartridge is correctly installed and turn on the printer Contact customer support if this failure is repeated For more information about installing the toner cartridge see Replacing the Toner Cartridges 009 363 Turn off the printer Make sure that the black toner cartridge is correctly installed and turn on the printer Contact customer support if this failure is repeated For more information about...

Страница 304: ...e verification error The SSL certificate of the LDAP server is not trusted by the device Register the root certificate of the SSL certificate of the LDAP server with the device 016 524 LDAP certificate error No server certificate exists Change the SSL certificate of the LDAP server to a valid SSL certificate 016 527 LDAP certificate error SSL authentication internal error The error has occurred in...

Страница 305: ...091 918 Reinsert the magenta drum cartridge If the message remains replace the cartridge For more information about reinserting the drum cartridge see Replacing the Drum Cartridges 091 919 Reinsert the cyan drum cartridge If the message remains replace the cartridge For more information about reinserting the drum cartridge see Replacing the Drum Cartridges 091 921 Make sure that the black drum car...

Страница 306: ...r cartridge see Replacing the Toner Cartridges 093 933 Remove the used black toner cartridge and install a new cartridge For more information about replacing the toner cartridge see Replacing the Toner Cartridges 093 960 Remove the unsupported yellow toner cartridge and install a supported toner cartridge For more information about installing the toner cartridge see Replacing the Toner Cartridges ...

Страница 307: ...ormation about replacing the transfer belt unit see Replacing the Transfer Belt Unit the 2nd Belt Transfer Roller 2nd BTR and the Retard Roller 193 700 When genuine toner cartridges are installed change the Non Dell Toner setting to disable using the Dell Printer Configuration Web Tool or the Tool Box Error Code What you can do ...

Страница 308: ...306 Understanding Printer Messages ...

Страница 309: ... SUSE Linux Enterprise Desktop 10 11 x86 Power Supply Dimensions Height 379 mm 14 92 inches Width 439 mm 17 28 inches Depth 485 mm 19 09 inches Weight including toner cartridges and drum cartridges 25 7 kg 56 66 lb Memory Page Description Language PDL Emulation Operating System and Interface Rated voltage 220 VAC 240 VAC 110 VAC 127 VAC Frequency 50 60 Hz 50 60 Hz Current 5 A or less 9 A or less P...

Страница 310: ...Altitude Operating systems Microsoft Windows XP XP x64 Server 2003 Server 2003 x64 Server 2008 Server 2008 x64 Server 2008 R2 x64 Vista Vista x64 7 7 x64 8 8 x64 Server 2012 Mac OS X 10 3 9 10 4 11 10 5 10 6 10 7 10 8 Red Hat Enterprise Linux 5 6 Desktop x86 and SUSE Linux Enterprise Desktop 10 11 x86 Interfaces Standard local USB 2 0 Standard network 10Base T 100Base TX 1000Base T Ethernet Option...

Страница 311: ...00Base TX 1000Base T 2 Wireless adapter socket IEEE 802 11b 802 11g 802 11n 3 USB USB 2 0 Item Description Connectivity technology Wireless Compliant standards IEEE 802 11b 802 11g and 802 11n Bandwidth 2 4 GHz Data transfer rate IEEE 802 11n 65 Mbps IEEE 802 11g 54 48 36 24 18 12 9 and 6 Mbps IEEE 802 11b 11 5 5 2 and 1 Mbps Security 64 40 bit key 128 104 bit key WEP WPA PSK TKIP AES WPA2 PSK AES...

Страница 312: ...310 Specifications ...

Страница 313: ...311 Maintaining Your Printer 26 Maintaining Your Printer 313 27 Removing Options 347 28 Clearing Jams 355 ...

Страница 314: ...312 ...

Страница 315: ...ed printer Type the IP address of your printer in your web browser launch the Dell Printer Configuration Web Tool and click the Order Supplies at to order consumables for your printer You can also order consumables by the following method 1 Click Start All Programs Dell Printers Additional Color Laser Software Dell Supplies Management System The Dell Supplies Management System window appears 2 Sel...

Страница 316: ...rectly on the floor If you store individual packages of print media out of the original carton ensure that they rest on a flat surface so the edges do not buckle or curl Do not place anything on top of the print media packages Storing Consumables Store consumables in their original packaging until you need to use them Do not store consumables in Temperatures greater than 40 C 104 F An environment ...

Страница 317: ...age for problems caused by using accessories parts or components not supplied by Dell WARNING Never throw used toner cartridges into fire The residual toner could explode resulting in burns and injuries WARNING Do not shake the used toner cartridge This may cause toner spills Removing the Toner Cartridge NOTE Ensure that you remove all the paper from the MPF and close the MPF cover before removing...

Страница 318: ...idge 1 Unpack a new toner cartridge of the desired color 2 Shake the new toner cartridge five or six times to distribute the toner evenly 3 Insert the toner cartridge into the associated cartridge slot and then push until it stops 4 Close the front cover ...

Страница 319: ...procedures read and follow the safety instructions in the Product Information Guide CAUTION Protect the drum cartridges against bright light If the right side cover remains open for more than three minutes print quality may deteriorate Removing the Drum Cartridge 1 Open the right side cover 2 Turn the waste toner box lock lever 90 degrees counterclockwise to unlock the waste toner box ...

Страница 320: ...UTION Take care not to drop the waste toner box while you are removing it CAUTION After removing the waste toner box do not touch the parts shown in the illustration Toner can dirty or stain your hands 4 Stand the removed waste toner box upright on a level surface WARNING Never lay the waste toner box on its side as this may cause its malfunction or toner spills ...

Страница 321: ...nderneath and then pull it out completely 7 Repeat the steps 5 and 6 to remove the other three cartridges Installing a Drum Cartridge 1 Unpack a new drum cartridge of the desired color 2 Remove the orange protective cover from the drum cartridge 3 Insert the drum cartridge into the associated cartridge slot and then push until it stops 4 Repeat the steps 1 to 3 to insert the other three cartridges...

Страница 322: ...rinter 5 Remove the cleaning rod from inside the printer 6 Remove the cleaning pad by pressing the white tabs between your thumb and index finger 7 Unpack a new cleaning pad 8 Attach the new cleaning pad to the cleaning rod ...

Страница 323: ...ted below and then pull it out 10 Repeat step 9 also on the other three holes One time insertion is enough for each hole 11 Return the cleaning rod to its original location 12 Reinsert the removed waste toner box CAUTION If the waste toner box does not fit into place properly make sure that the drum cartridge is fully inserted in the previous step ...

Страница 324: ...ner box 14 Close the right side cover Replacing the Fusing Unit WARNING Before performing any of the following procedures read and follow the safety instructions in the Product Information Guide Removing the Fusing Unit 1 Turn off the printer and wait for 30 minutes 2 Push down the latch to open the rear cover ...

Страница 325: ...nit Installing a Fusing Unit 1 Unpack a new fusing unit 2 Make sure that the two tabs of the fusing unit align with the grooves on the printer and then insert it into the printer until it clicks 3 Close the rear cover NOTE After replacing the fusing unit be sure to initialize its life counter by following the instructions in the accompanying manual ...

Страница 326: ...performing any of the following procedures read and follow the safety instructions in the Product Information Guide CAUTION Ensure nothing touches or scratches the surface black colored film of the transfer belt unit Scratches dirt or oil from your hands on the film of the transfer belt unit may reduce print quality Removing the Transfer Belt Unit 1 Push down the latch to open the rear cover 2 Ope...

Страница 327: ...UTION Take care not to drop the waste toner box while you are removing it CAUTION After removing the waste toner box do not touch the parts shown in the illustration Toner can dirty or stain your hands 5 Stand the removed waste toner box upright on a level surface WARNING Never lay the waste toner box on its side as this may cause its malfunction or toner spills ...

Страница 328: ...ers through the loops on both sides of the transfer belt unit and then pull it out CAUTION If you cannot pull out the unit from the printer make sure that all of the above procedures are performed properly 8 Clean the CTD sensor as shown with a clean dry cotton swab ...

Страница 329: ...sfer belt unit CAUTION Ensure nothing touches or scratches the surface black colored film of the transfer belt unit Scratches dirt or oil from your hands on the film of the transfer belt unit may reduce print quality 3 Make sure that the arrow marks on the transfer belt unit and the printer face each other and then insert the unit into the printer until it clicks 4 Close the top cover ...

Страница 330: ...e properly make sure that the transfer belt unit is fully inserted 6 Turn the waste toner box lock lever 90 degrees clockwise to lock the waste toner box 7 Close the right side cover NOTE After replacing the transfer belt unit be sure to initialize its life counter by following the instructions in the accompanying manual ...

Страница 331: ... sides of the 2nd BTR lift it out of the printer Installing a 2nd BTR 1 Unpack a new 2nd BTR 2 Hold the 2nd BTR by both its ends 3 Make sure that the arrow marks on the 2nd BTR and the printer face each other and then press down the 2nd BTR until it clicks 4 Close the rear cover ...

Страница 332: ...e printer about 200 mm 2 Hold tray1 with both hands and remove it from the printer NOTE Ensure that you remove all the paper from tray1 before removing the retard roller 3 Slightly pressing down the lock lever on tray1 to the right with one hand raise the retard roller with the other hand ...

Страница 333: ...eft to remove it from tray1 Installing a Retard Roller in Tray1 1 Slide the two axles of the retard roller into the holes on tray1 2 Press down the retard roller until it snaps 3 Load paper in tray1 and then insert the tray into the printer and push until it stops ...

Страница 334: ...de cover 2 Turn the waste toner box lock lever 90 degrees counterclockwise to unlock the waste toner box 3 Grasp the handle on the waste toner box and pull it out making sure to hold it upright so that the waste toner does not spill out CAUTION Take care not to drop the waste toner box while you are removing it CAUTION After removing the waste toner box do not touch the parts shown in the illustra...

Страница 335: ... plastic bag that came with the new waste toner box and seal the bag Installing a Waste Toner Box 1 Unpack a new waste toner box 2 Insert the waste toner box 3 Turn the waste toner box lock lever 90 degrees clockwise to lock the waste toner box 4 Close the right side cover ...

Страница 336: ...y CTD sensor only when an alert for the CTD sensor is shown on the Status Monitor or LCD panel screen 1 Ensure that the printer is turned off 2 Push down the latch to open the rear cover 3 Open the right side cover 4 Turn the waste toner box lock lever 90 degrees counterclockwise to unlock the waste toner box ...

Страница 337: ...UTION Take care not to drop the waste toner box while you are removing it CAUTION After removing the waste toner box do not touch the parts shown in the illustration Toner can dirty or stain your hands 6 Stand the removed waste toner box upright on a level surface WARNING Never lay the waste toner box on its side as this may cause its malfunction or toner spills ...

Страница 338: ... Maintaining Your Printer 7 Open the top cover 8 Put your fingers through the loops on both sides of the transfer belt unit and then pull it out 9 Clean the CTD sensor as shown with a clean dry cotton swab ...

Страница 339: ...elt unit and the printer face each other and then insert the unit into the printer until it clicks 11 Close the top cover 12 Reinsert the removed waste toner box CAUTION If the waste toner box does not fit into place properly make sure that the transfer belt unit is fully inserted ...

Страница 340: ...er box 14 Close the right side cover 15 Close the rear cover Cleaning the Raster Optical Scanner ROS Window To prevent deterioration of printing quality due to stains inside the printer clean inside the printer regularly by using the cleaning rod whenever you replace drum cartridges 1 Open the right side cover ...

Страница 341: ...ht so that the waste toner does not spill out CAUTION Take care not to drop the waste toner box while you are removing it CAUTION After removing the waste toner box do not touch the parts shown in the illustration Toner can dirty or stain your hands 4 Stand the removed waste toner box upright on a level surface WARNING Never lay the waste toner box on its side as this may cause its malfunction or ...

Страница 342: ...m inside the printer 6 Insert the cleaning rod fully into one of the four holes until it clicks into the interior of the printer as illustrated below and then pull it out 7 Repeat step 6 also on the other three holes One time insertion is enough for each hole ...

Страница 343: ...Printer 341 8 Return the cleaning rod to its original location 9 Reinsert the removed waste toner box 10 Turn the waste toner box lock lever 90 degrees clockwise to lock the waste toner box 11 Close the right side cover ...

Страница 344: ...s the button until Color Reg Adjust is highlighted and then press the Set button 5 Press the button until Color Regi Chart is highlighted and then press the Set button 6 Press the button until Yes is highlighted and then press the Set button The color registration chart is printed When Using the Tool Box 1 Click Start All Programs Dell Printers Dell C3760 Color Laser Printer Tool Box NOTE For deta...

Страница 345: ...low scan using Chart 1 and Chart 2 Fast Scan On the Chart 1 of the color registration chart find the straightest lines where the two black lines and the colored line are most closely aligned for each color LY LM LC RY RM and RC If you find the straightest line make a note of the value 8 to 8 indicated by the straightest line for each color When the value is 0 for each color you do not need to adju...

Страница 346: ...the value is not 0 enter the value using the procedure in Entering Values Entering Values When Using the Operator Panel Using the operator panel enter the values found in the color registration chart to make adjustments 1 Press the Menu button 2 Press the button until Admin Settings is highlighted and then press the Set button 3 Press the button until Maintenance is highlighted and then press the ...

Страница 347: ...t to make adjustments 1 Click Start All Programs Dell Printers Dell C3760 Color Laser Printer Tool Box NOTE For details about starting the Tool Box see Starting the Tool Box The Tool Box opens 2 Click the Printer Maintenance tab 3 Select Maintenance from the list at the left side of the page The Maintenance page is displayed 4 Specify each value for process left and right colors in Registration Ad...

Страница 348: ...346 Maintaining Your Printer ...

Страница 349: ...The images used in this manual are those of the Dell C3760dn Color Laser Printer unless otherwise mentioned Removing the Optional Memory Module WARNING When you remove the optional memory module be sure to turn off the printer unplug the power cable and disconnect all cables from the back of the printer before starting these tasks 1 Ensure that the printer is turned off 2 Turn the screw on the lef...

Страница 350: ...n both sides of the slot outward to raise the memory module up 6 Hold the memory module and pull it straight out 7 Close the left side cover and then slide it towards the front of the printer 8 Turn the screw clockwise 9 Turn on the printer ...

Страница 351: ...bles from the back of the printer before starting these tasks 1 Ensure that the printer is turned off and then disconnect all cables from the back of the printer 2 Pull the tray1 out of the printer about 200 mm 3 Hold tray1 with both hands and remove it from the printer 4 Remove the two screws joining the printer and the optional 550 sheet feeder by unscrewing them with a coin or similar object ...

Страница 352: ...l surface WARNING Two people are required to lift the printer 6 Insert the tray1 into the printer and push until it stops CAUTION Do not use excessive force on the tray Doing so could damage the tray or the inside of the printer 7 Re connect all cables into the back of the printer and turn on the printer ...

Страница 353: ... off the printer unplug the power cable and disconnect all cables from the back of the printer before starting these tasks 1 Ensure that the printer is turned off 2 Turn the screw on the left side cover counterclockwise to remove it 3 Slide the left side cover towards the back of the printer 4 Open the left side cover completely ...

Страница 354: ...ter from the printer by releasing the adapter s hook while pushing the wireless adapter towards the front of the printer 6 Close the left side cover and then slide it towards the front of the printer 7 Turn the screw clockwise 8 Turn on the printer ...

Страница 355: ...turn off the printer unplug the power cable and disconnect all cables from the back of the printer before starting these tasks 1 Ensure that the printer is turned off 2 Turn the screw on the control board counterclockwise 3 Slide the left side cover towards the back of the printer 4 Open the left side cover completely ...

Страница 356: ...g Options 5 Remove the hard disk from the printer by releasing the hook of hard disk 6 Close the left side cover and then slide it towards the front of the printer 7 Turn the screw clockwise 8 Turn on the printer ...

Страница 357: ...e load line labels in the tray Do not load wrinkled creased damp or curled print media Flex fan and straighten print media before you load it If a jam occurs with print media try feeding one sheet at a time through the multipurpose feeder MPF Do not use print media that you have cut or trimmed yourself Do not mix print media sizes weights or types in the same print media source Ensure that the rec...

Страница 358: ...er The following illustration shows where paper jams may occur along the print media path Clearing Paper Jams From the MPF NOTE To resolve the error displayed on the LCD panel you must clear all print media from the print media path If error code 050 112 appears 1 Remove any paper loaded on the MPF 1 Fusing Unit 2 Tray1 3 MPF 4 Optional 550 Sheet Feeder 1 2 3 4 ...

Страница 359: ...Clearing Jams 357 2 Grasp both sides of the MPF and then pull it out of the printer 3 Pull tray1 out of the printer about 200 mm 4 Hold tray1 with both hands and remove it from the printer ...

Страница 360: ... Remove the jammed paper 6 Insert tray1 into the printer and push until it stops 7 Insert the MPF into the printer If error code 050 129 appears Follow the instructions in If error code 050 129 appears to clear paper jams ...

Страница 361: ...ray1 NOTE To resolve the error displayed on the LCD panel you must clear all print media from the print media path 1 Pull tray1 out of the printer about 200 mm 2 Hold tray1 with both hands and remove it from the printer 3 Remove the jammed paper ...

Страница 362: ...Set button Clearing Paper Jams From the Fusing Unit NOTE To resolve the error displayed on the LCD panel you must clear all print media from the print media path If error code 050 111 appears 1 Push down the latch to open the rear cover 2 Lift the levers on both sides of the fusing unit ...

Страница 363: ...learing Jams 361 3 Hold and lower the tab to open the inner part 4 Remove the jammed paper 5 Replace the inner part 6 Press down the levers on both sides of the fusing unit and then close the rear cover ...

Страница 364: ...362 Clearing Jams If error code 050 129 appears 1 Remove any paper loaded on the MPF 2 Grasp both sides of the MPF and then pull it out of the printer 3 Pull tray1 out of the printer about 200 mm ...

Страница 365: ...4 Hold tray1 with both hands and remove it from the printer If you can see the jammed paper a Remove the jammed paper b Reinsert tray1 and the MPF into the printer If you cannot see the jammed paper a Go to the next step ...

Страница 366: ...364 Clearing Jams 5 Push down the latch to open the rear cover 6 Lift the levers on both sides of the fusing unit 7 Hold and lower the tab to open the inner part ...

Страница 367: ...ng Jams 365 8 Remove the jammed paper 9 Replace the inner part 10 Press down the levers on both sides of the fusing unit and then close the rear cover 11 Insert tray1 into the printer and push until it stops ...

Страница 368: ...tional 550 Sheet Feeder NOTE To resolve the error displayed on the LCD panel you must clear all print media from the print media path 1 Pull the optional 550 sheet feeder out of the printer about 200 mm 2 Hold the optional 550 sheet feeder with both hands and remove it from the printer ...

Страница 369: ...Clearing Jams 367 3 Remove the jammed paper 4 Insert the optional 550 sheet feeder into the printer and push until it stops ...

Страница 370: ...368 Clearing Jams ...

Страница 371: ...369 Troubleshooting 29 Troubleshooting Guide 371 ...

Страница 372: ...370 ...

Страница 373: ...s set to Enable you need to enter the four digit password to enter the Admin Settings menu Problem Action Menu settings changed from the operator panel have no effect Settings in the software program the printer driver or the printer utilities are overriding the settings made on the operator panel Problem Action Job did not print or incorrect characters printed Ensure that the top menu appears on ...

Страница 374: ...at the print media is not curled Face the recommended print side up See Loading Print Media in Tray1 and the Optional 550 Sheet Feeder for more information Turn the print media over or around and try printing again to see if feeding improves Do not mix print media types Do not mix reams of print media Remove the top and bottom curled sheets of a ream before loading the print media Load print media...

Страница 375: ...oner level in the Status tab in the Status Monitor b Replace the toner cartridges as necessary Does this solve your problem The task is complete Go to action 2 2 If you are using non Dell brand toner cartridges enable the Non Dell Toner option a Launch the Tool Box and click Maintenance on the Printer Maintenance tab b Ensure that the On check box under Non Dell Toner is selected Does this solve y...

Страница 376: ...ion Chart The Pitch Configuration Chart is printed Does this solve your problem The task is complete Go to action 7 7 Replace the drum cartridges a Replace the drum cartridges See Replacing the Drum Cartridges b After you replace the drum cartridges click Chart Print on the Diagnosis tab c Click 4 Colors Configuration Chart The 4 Colors Configuration Chart is printed Does this solve your problem T...

Страница 377: ...the 2nd Belt Transfer Roller 2nd BTR and the retard roller a Replace the transfer belt unit the 2nd BTR and the retard roller See Replacing the Transfer Belt Unit the 2nd Belt Transfer Roller 2nd BTR and the Retard Roller b After you replace the transfer belt unit the 2nd BTR and the retard roller click Chart Print on the Diagnosis tab c Click Pitch Configuration Chart The Pitch Configuration Char...

Страница 378: ...tridges enable the Non Dell Toner option a Launch the Tool Box and click Maintenance on the Printer Maintenance tab b Ensure that the On check box under Non Dell Toner is selected Does this solve your problem The task is complete Go to action 3 3 Disable the Toner Saver in the printer driver a On the Others tab ensure that Off is selected in the Toner Saver drop down menu Does this solve your prob...

Страница 379: ...the Status Monitor b Replace the toner cartridges as necessary Does this solve your problem The task is complete Go to action 2 2 If you are using non Dell brand toner cartridges enable the Non Dell Toner option a Launch the Tool Box and click Maintenance on the Printer Maintenance tab b Ensure that the On check box under Non Dell Toner is selected Does this solve your problem The task is complete...

Страница 380: ... you replace the drum cartridges click Chart Print on the Diagnosis tab c Click 4 Colors Configuration Chart The 4 Colors Configuration Chart is printed Does this solve your problem The task is complete Contact Dell Action Yes No 1 Locate the cause of the problem using the Pitch Configuration Chart a Launch the Tool Box and click Chart Print on the Diagnosis tab b Click Pitch Configuration Chart T...

Страница 381: ...ntact Dell 4 Replace the transfer belt unit the 2nd BTR and the retard roller a Replace the transfer belt unit the 2nd BTR and the retard roller See Replacing the Transfer Belt Unit the 2nd Belt Transfer Roller 2nd BTR and the Retard Roller b After you replace the transfer belt unit the 2nd BTR and the retard roller click Chart Print on the Diagnosis tab c Click Pitch Configuration Chart The Pitch...

Страница 382: ...s printed Does this solve your problem The task is complete Contact Dell Action Yes No 1 Locate the cause of the problem using the Ghost Configuration Chart a Launch the Tool Box and click Chart Print on the Diagnosis tab b Click Ghost Configuration Chart The Ghost Configuration Chart is printed Is the type of the problem identified Proceed to the action corresponding to the type of ghosting Posit...

Страница 383: ...guration Chart is printed Does this solve your problem The task is complete Contact Dell Action Yes No 1 Check the light fatigue pattern using the Pitch Configuration Chart a Launch the Tool Box and click Chart Print on the Diagnosis tab b Click Pitch Configuration Chart The Pitch Configuration Chart is printed Does the pattern on the output match with that on the Pitch Configuration Chart Go to a...

Страница 384: ...ve your problem The task is complete Contact Dell Action Yes No 1 If the printer is installed in a high altitude location set the altitude of the location a Launch the Tool Box and click Maintenance on the Printer Maintenance tab b Under Adjust Altitude select the value close to the altitude of the location where the printer is installed Does this solve your problem The task is complete Go to acti...

Страница 385: ... Go to action 4 4 Enable Print Page Mode in the printer driver a On the Others tab set Print Page Mode under Items to On Does this solve your problem The task is complete Go to action 5 5 If using a downloaded font ensure that the font is recommended for the printer operating system and the application being used Does this solve your problem The task is complete Contact Dell Action Yes No 1 Locate...

Страница 386: ...R and the retard roller a Replace the transfer belt unit the 2nd BTR and the retard roller See Replacing the Transfer Belt Unit the 2nd Belt Transfer Roller 2nd BTR and the Retard Roller b After you replace the transfer belt unit the 2nd BTR and the retard roller click Chart Print on the Diagnosis tab c Click Pitch Configuration Chart The Pitch Configuration Chart is printed Does this solve your p...

Страница 387: ...f wrinkle is considered normal Your printer is not at fault Go to action 3 3 Load the envelopes in the MPF properly For details see Loading an Envelope in the MPF Does this solve your problem The task is complete Contact Dell Action Yes No 1 When you use the MPF reverse the paper and then try again When you use any of the trays change the paper and then try again Does this solve your problem The t...

Страница 388: ...ion is out of alignment Images are skewed Tray1 Optional 550 Sheet Feeder Misfeed Jam MPF Misfeed Jam Regi Jam Exit Sensor On JAM Exit Jam Exit Sensor Off JAM Tray1 Optional 550 Sheet Feeder Multi feed Jam MPF Multi feed Jam The top and side margins are incorrect Color registration is out of alignment Action Yes No 1 Ensure that the margins are set correctly on the application being used Does this...

Страница 389: ...or Registration Adjustments The Color Regi Configuration Chart is printed Does this solve your problem The task is complete Contact Dell 4b Print the Color Regi Configuration Chart and manually correct the color registration a Launch the Tool Box and click Maintenance on the Printer Maintenance tab b Click Start under Print Color Regi Chart in Color Registration Adjustments The Color Regi Configur...

Страница 390: ...s solve your problem The task is complete Go to action 3a 2c Load coated paper one sheet at a time Does this solve your problem The task is complete Go to action 3b 2d Ensure that the print media is not curled Does this solve your problem The task is complete Go to action 3a 2e Is the print media damp Go to action 3c Go to action 3a 3a Fan the print media Does this solve your problem The task is c...

Страница 391: ...that the envelope is properly loaded in the MPF as instructed in Loading an Envelope in the MPF Does this solve your problem The task is complete Go to action 3c 2e Ensure that the print media is not curled The task is complete Go to action 3a 2f Is the print media damp Go to action 3d Go to action 3a 3a Fan the print media Does this solve your problem The task is complete Go to action 3b 3b Wipe ...

Страница 392: ... is installed correctly Does this solve your problem The task is complete Go to action 6 6 Replace the transfer belt unit the 2nd BTR and the retard roller a Replace the transfer belt unit the 2nd BTR and the retard roller See Replacing the Transfer Belt Unit the 2nd Belt Transfer Roller 2nd BTR and the Retard Roller b After you replace the transfer belt unit the 2nd BTR and the retard roller clic...

Страница 393: ...eet feeder where the multi feed occurred with a cloth moistened with water Does this solve your problem The task is complete Contact Dell 1 Ensure the media type you are using If using coated paper go to action 2 If using other type of print media go to action 3 2 Load coated paper one sheet at a time Does this solve your problem The task is complete Go to action 4 3 Use print media that is not da...

Страница 394: ...Click Pitch Configuration Chart The Pitch Configuration Chart is printed Does this solve your problem The task is complete Go to action 4 4 Replace the waste toner box Does this solve your problem The task is complete Go to action 5 5 Replace the drum cartridges Does this solve your problem The task is complete Go to action 6 6 Replace the toner cartridge K See Replacing the Toner Cartridges The t...

Страница 395: ... the file type is PKCS 7 12 or x509CACert extension p7b p12 pfx cer crt Confirm whether the attribute information key Usage Extended key usage of the certificate to be imported is set correctly The browser is incorrect Use Internet Explorer 016 404 is displayed when setting the encryption of the optional hard disk to Off The optional hard disk is formatted and the certificate data is deleted when ...

Страница 396: ...orrect To import a certificate for use with the device own device import the secret key and a certificate of the PKCS 12 p12 pfx format as a pair Server validation is not operating correctly The certificate chain is incorrect when importing Although importing a root certificate Trusted to use for server authentication an Intermediate certificate may be required when validating the path When execut...

Страница 397: ... the error message that appears You need to know the model type and service tag of your printer See the label located inside the front cover of your printer Problem Action 550 sheet feeder Ensure the 550 sheet feeder is correctly installed on the printer Re install the feeder See Removing the Optional 550 Sheet Feeder and Installing the Optional 550 Sheet Feeder Ensure the print media is loaded co...

Страница 398: ...396 Troubleshooting Guide ...

Страница 399: ...397 Appendix Appendix 397 Index 401 ...

Страница 400: ...398 ...

Страница 401: ... purchased and or installed through Software Peripherals DellWare ReadyWare and Custom Factory Integration CFI DellPlus Online Services You can learn about Dell products and services on the following websites www dell com www dell com ap Asian Pacific countries only www dell com jp Japan only www euro dell com Europe only www dell com la Latin American and Caribbean countries www dell ca Canada on...

Страница 402: ... Support at support dell com Select your region on the WELCOME TO DELL SUPPORT page and fill in the requested details to access help tools and information You can contact Dell electronically using the following addresses World Wide Web www dell com www dell com ap Asian Pacific countries only www dell com jp Japan only www euro dell com Europe only www dell com la Latin American and Caribbean coun...

Страница 403: ...tion 342 Admin Settings 188 Administrator Account 160 AirPrint 149 162 254 Alert Tone 133 138 173 177 Alignment Chart 185 All Tones 133 139 Altitude 308 Appendix 399 Apply New Settings 128 Asset Tag Number 121 131 Assigning IP address 71 Audio Tone 173 176 Authenticate Error Trap 159 Authentication System 275 Auto Clear Alert Tone 133 138 173 177 Auto Color To Mono Print 209 Auto Correct 145 179 A...

Страница 404: ... printer 65 Connecting to the network 67 Connection specification 65 309 Connection Time Out 154 Connection type 65 309 Conserving supplies 313 Contact Dell Support at 125 127 Contact Person 126 Contacting service 395 Control board 28 Control Panel Tone 138 173 176 Copy Printer Settings 125 127 167 Copy Printer Settings Report 168 Cover 131 Covers 135 136 144 211 212 Covers Thick 135 136 144 211 2...

Страница 405: ...Express Service Code 131 External Authentication 273 F Fast scan 343 Fault Time out 133 139 172 176 Fault Tone 133 138 173 176 Finding information 21 Firmware Version 131 Flip on Long Edge 247 Flip on Short Edge 247 Folio 233 Font 134 140 293 PCL 5 PCL 6 295 Pitch 293 Point size 293 PostScript 3 295 Style 293 Typefaces and fonts 293 Weight 293 Font Pitch 134 140 192 Font Size 134 140 191 Form Line...

Страница 406: ...50 166 IPv4 159 166 IPv6 126 148 154 159 166 J Job Completed Tone 133 138 173 176 Job History 138 174 187 Job List 124 131 Job Name 132 Job Status 132 Job Submitted Time 132 Job Time out 133 139 172 176 203 K Kerberos Server 275 L Label 135 136 144 173 179 211 212 232 Landscape 190 Layout 134 LCD panel 117 LDAP Authentication 278 LDAP Server 164 276 277 LDAP SSL TLS Communication 287 288 Left fram...

Страница 407: ...tup 82 Network Firmware Version 131 Network Type 160 New Password 141 No carbon required paper 230 No of Sheets 132 Non Registered User 136 274 Non Dell Toner 136 173 179 214 Number pad 117 118 O OCR 230 Online Help 125 127 Operation 308 Operator panel 27 29 Operator Panel Buttons 117 Optical character recognition 230 Optional 550 sheet feeder 27 356 366 Order Supplies at 125 127 Ordering supplies...

Страница 408: ...er Timer Auto Off Timer 172 202 Power Saver Timer Deep Sleep 172 Power Saver Timer Sleep 172 Power supply 307 Power switch 27 Premier 136 Print Color Regi Chart 179 Print Drivers Remote Client Account 160 Print ID 133 139 172 177 206 Print media 229 313 Source 236 Print Meter 138 174 Print Mode 134 Print quality guarantee 308 Print Server Reports 147 Print Server Settings 124 127 146 151 184 Print...

Страница 409: ...emoving optional memory module 347 Removing optional wireless adapter 351 Removing options 347 Report 2 Sided Print 172 177 Reports 137 188 Reset Defaults 179 Reset Defaults and restart printer 145 Reset Print Server 163 Resident fonts 295 Resident scalable fonts 295 Restore Settings 128 Retard roller 324 Return policy 400 Right frame 128 Right side cover 27 RSA BSAFE 17 S Safety information 22 Sc...

Страница 410: ...53 Telnet 149 152 155 Temperature 308 Time Format 136 173 176 Time Zone 136 173 176 Toner cartridge 27 315 Toner cartridge level 130 Tool Box 171 262 Top cover 27 Top frame 126 Transfer belt unit 27 324 Trap Notification 159 Tray 1 Custom Paper Size X 137 169 Tray 1 Custom Paper Size Y 137 169 Tray 1 Custom Size X 174 181 Tray 1 Custom Size Y 174 181 Tray 1 Display Popup 137 169 174 181 Tray 1 Pap...

Страница 411: ...y information 22 Waste toner box 27 332 Web Link Customization 136 146 Web services on devices 252 Weekly Settings 143 WEP 161 Width guide 76 WINS 148 154 Wired Network Ethernet 197 IP Filter 201 Protocols 200 Reset LAN 201 TCP IP 199 Wireless Adapter 47 Wireless adapter socket 28 Wireless Settings 147 160 WPA Enterprise 288 289 WPA PSK 161 WPS PBC 55 WPS PIN 54 WSD 148 155 252 X XPS printer drive...

Страница 412: ...410 Appendix ...

Отзывы: