


Figure 62. Installing the optical drive cage or tape drive
Next steps
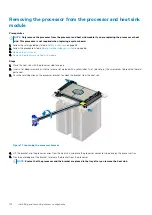
1. If removed,
.
2. Follow the procedure listed in
After working inside your system
Removing the slim optical drive
The procedure to remove the slim optical drive blank is similar to removing the slim optical drive.
Prerequisites
1. Follow the safety guidelines listed in
on page 65.
2. Follow the procedure listed in
Before working inside your system
3.
.
NOTE:
The procedure to remove the optical drive cage is identical to removing the optical or tape drive blank.
Steps
1. Locate the touch point for the slim optical drive lock on the cage.
2. Press the lock and push the slim optical drive out of the cage.
Installing and removing system components
105
Содержание 7CX5T
Страница 21: ...Figure 16 Configuration and layout Dell EMC PowerEdge T640 overview 21 ...
Страница 22: ...Figure 17 Electrical overview 22 Dell EMC PowerEdge T640 overview ...
Страница 23: ...Figure 18 Memory information Dell EMC PowerEdge T640 overview 23 ...
Страница 24: ...Figure 19 System tasks 24 Dell EMC PowerEdge T640 overview ...


