


Figure 61. Removing the optical drive cage or tape drive
Next steps
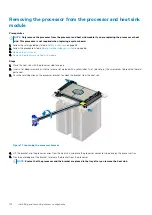
1.
Install the optical drive cage or tape drive
Installing the optical drive cage or tape drive
Prerequisites
NOTE:
The procedure to install the optical drive cage is the same as installing the tape drive.
Follow the safety guidelines listed in
Steps
1. Unpack and prepare the drive for installation.
For instructions, see the documentation that shipped with the drive.
If you are installing a SAS tape drive, you must have an internal tape adapter installed. For more information on installing a SAS tape
drive, see the
on page 130 section.
2. If applicable, remove the existing drive or the drive blank.
3. Align the guide on the drive with the slot on drive bay.
4. Slide the drive into the slot until the latch clicks into place.
5. Connect the power and data cable to the drive.
6. Connect the power and data cables to the backplane and the system board.
104
Installing and removing system components
Содержание 7CX5T
Страница 21: ...Figure 16 Configuration and layout Dell EMC PowerEdge T640 overview 21 ...
Страница 22: ...Figure 17 Electrical overview 22 Dell EMC PowerEdge T640 overview ...
Страница 23: ...Figure 18 Memory information Dell EMC PowerEdge T640 overview 23 ...
Страница 24: ...Figure 19 System tasks 24 Dell EMC PowerEdge T640 overview ...


