


Figure 60. Installing the optical or tape drive blank
Next steps
1. If removed,
.
2. Follow the procedure listed in
After working inside your system
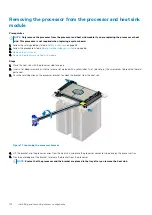
Removing the optical drive cage or tape drive
Prerequisites
NOTE:
The procedure to remove the optical drive cage is identical to removing a tape drive.
1. Follow the safety guidelines listed in
on page 65.
2. Follow the procedure listed in
Before working inside your system
3. If installed,
Steps
1. Disconnect the power and data cable from the back of the drive.
NOTE:
Observe the routing of the power and data cable inside the chassis as you remove them from the system
board and the drive. You must route these cables properly when you replace them to prevent them from being
pinched or crimped.
2. To remove the drive, push the release latch to release the drive.
3. Slide the drive out of the drive bay.
4. If you are not immediately replacing the tape drive, install the blank.
NOTE:
Blanks must be installed on empty optical drive or tape drive slots to maintain FCC certification of the
system. The brackets also keep dust and dirt out of the system and aid in proper cooling and airflow inside the
system. Perform the same steps to install blanks.
Installing and removing system components
103
Содержание 7CX5T
Страница 21: ...Figure 16 Configuration and layout Dell EMC PowerEdge T640 overview 21 ...
Страница 22: ...Figure 17 Electrical overview 22 Dell EMC PowerEdge T640 overview ...
Страница 23: ...Figure 18 Memory information Dell EMC PowerEdge T640 overview 23 ...
Страница 24: ...Figure 19 System tasks 24 Dell EMC PowerEdge T640 overview ...


