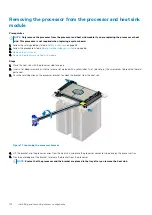
Figure 72. Removing the processor bracket
Next steps
1.
Install the processor into the processor and heat sink module.
Installing the processor into a processor and heat sink
module
Prerequisites
Follow the safety guidelines listed in
Steps
1. Place the processor in the processor tray.
NOTE:
Ensure that the pin 1 indicator on the processor tray is aligned with the pin 1 indicator on the processor.
2. Flex the outer edges of the bracket around the processor ensuring that the processor is locked into the clips on the bracket.
NOTE:
Ensure that the pin 1 indicator on the bracket is aligned with the pin 1 indicator on the processor before
placing the bracket on the processor.
NOTE:
Ensure that the processor and the bracket are placed in the tray before you install the heat sink.
Installing and removing system components
119
Содержание 7CX5T
Страница 21: ...Figure 16 Configuration and layout Dell EMC PowerEdge T640 overview 21 ...
Страница 22: ...Figure 17 Electrical overview 22 Dell EMC PowerEdge T640 overview ...
Страница 23: ...Figure 18 Memory information Dell EMC PowerEdge T640 overview 23 ...
Страница 24: ...Figure 19 System tasks 24 Dell EMC PowerEdge T640 overview ...


