


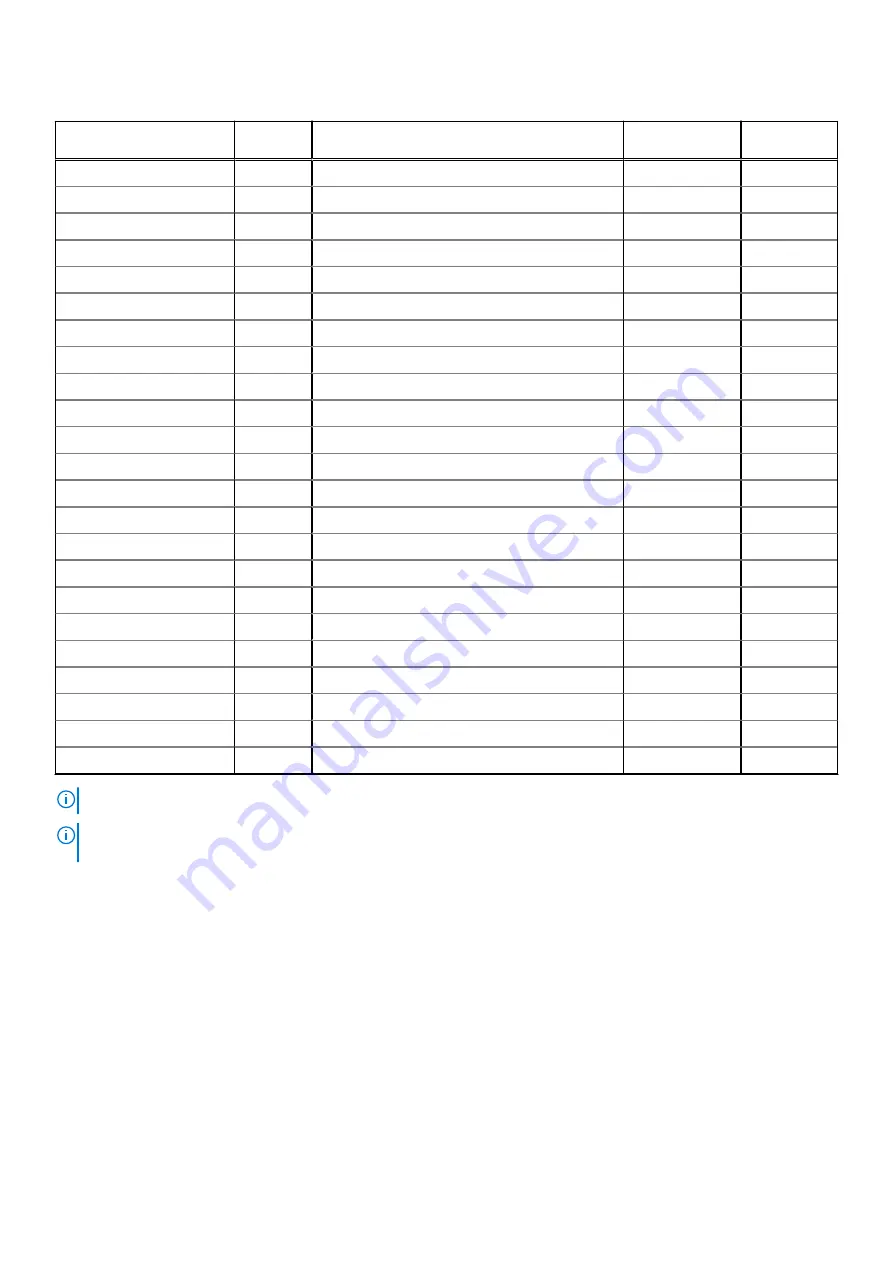
Table 42. Expansion card installation order (continued)
System Configuration
Card
Priority
Card Type
Slot Priority
Maximum
Allowed
RAID (H330), RAID (H730)
0
1
RAID (H740)
0, 1, 3
2
RAID (H840)
7, 8, 6, 4
4
BOSS
1, 3, 7, 8, 6, 4
6
2
100 Gb NICs
8, 6
4
3
40 Gb NICs, 25 Gb NICs
7, 8, 6, 4
4
4
FC32 HBAs, FC16 HBAs
7, 8, 6, 4
4
5
10 Gb NICs
7, 8, 6, 4
4
6
FC8 HBAs
7, 8, 6, 4
4
7
1 Gb NICs
7, 8, 6, 4
4
8
12Gb SAS HBA
7, 8, 6, 4
4
9
HBA330
0, 1, 3
2
10
PCIe SSD
1, 3, 7, 8, 6, 4
6
2 CPU, 2 External fans
1
Dell PowerEdge Express Flash (PCIe SSD) Bridge
1, 3
2
2
GPUs
3, 6, 8, 1
4
RAID (H330), RAID (H730)
0
1
RAID (H740)
0, 1 ,3
2
RAID (H840)
4
1
BOSS
1, 3, 7, 8, 6, 4
6
3
NICs
4
1
4
12Gb SAS HBA
4
1
HBA330
0, 1, 3
2
5
PCIe SSD
1, 3, 7, 8, 6, 4
6
NOTE:
The PCIe cards with * require the cooling fan assembly (middle fans) to support.
NOTE:
Without external fans, Mellanox CX4 SP 100 Gb NIC and Intel QP 10 Gb Base-T NIC are only allowed on slot 8 and
2 CPU configuration.
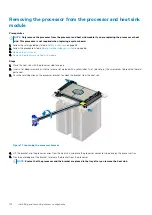
Removing a expansion card
Prerequisites
1. Follow the safety guidelines listed in
on page 65.
2. Follow the procedure listed in
Before working inside your system
3.
4.
Remove the expansion card holder
.
Steps
1. If installed, disconnect the data cables from the PERC card and/or the power cables from the GPU card.
2. Press the expansion card latch and push down the latch to open it.
3. Hold the expansion card by its edge, and pull the card up to remove it from the expansion card connector and the system.
Installing and removing system components
129
Содержание 7CX5T
Страница 21: ...Figure 16 Configuration and layout Dell EMC PowerEdge T640 overview 21 ...
Страница 22: ...Figure 17 Electrical overview 22 Dell EMC PowerEdge T640 overview ...
Страница 23: ...Figure 18 Memory information Dell EMC PowerEdge T640 overview 23 ...
Страница 24: ...Figure 19 System tasks 24 Dell EMC PowerEdge T640 overview ...


