


Steps
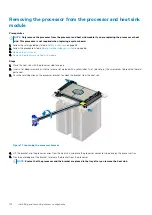
1. Using a Torx #T30 screwdriver, loosen the screws on the heat sink in the order below:
a. Loosen the first screw three turns.
b. Loosen the second screw completely.
c. Return to the first screw and loosen it completely.
2. Pushing both blue retention clips simultaneously, lift the processor and heat sink module (PHM).
3. Set the PHM aside with the processor side facing up.
Figure 70. Removing the processor and heat sink module
Next steps
1.
Installing and removing system components
117
Содержание 7CX5T
Страница 21: ...Figure 16 Configuration and layout Dell EMC PowerEdge T640 overview 21 ...
Страница 22: ...Figure 17 Electrical overview 22 Dell EMC PowerEdge T640 overview ...
Страница 23: ...Figure 18 Memory information Dell EMC PowerEdge T640 overview 23 ...
Страница 24: ...Figure 19 System tasks 24 Dell EMC PowerEdge T640 overview ...


