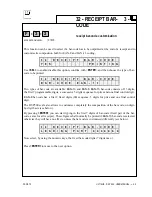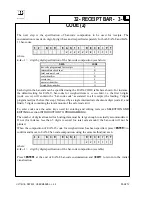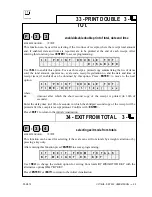
PAGE 70
UV119UE - DSP 500 : USER MANUAL - v. 4.0
3 -
30 - SHOP NAME
F
+
+
3
0
ACCESS FROM LEVEL:
shop name (and commercial text)
to be printed on receipt
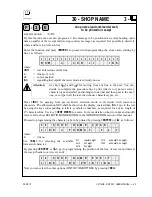
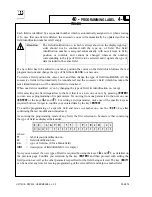
By this function the user can program a 6 line message to be positioned at receipt heading (store
name, usually) or the receipt end (closing courtesy message), as required. It is possible to decide if,
where and how to print each line.
Enter the function and press
<ENTER>
to proceed with programming the store name, starting by
line 1 as follows:
t t t t t t t t t t t t t t t t t t t t
R O W
n
C U R .
c c
I N S
where:
tttttt
= text entered on current line
n
= line no. (1 to 6)
cc
=
cursor
position
INS
= signalling that capital character mode is currently on use
Attention
:
Use keys
<
←
←
←
←
>
and
<
→
→
→
→
>
for moving from one line to the next. You can
decide to complete the procedure line by line (that is to type text, select
character-type and select positioning for one line) and then pass to the next
one, or to type in all the text, then choose character-types, etc.
Press
<INS>
for passing from pre-set Insert selection mode to Overwrite with lower-case
characters. The abbreviation
SCC
shall be shown on the display, instead than
INS
. Type in the text
by using the keys corresponding to letters, symbols or numbers, as required, for a max. length of
27 characters/line. Use key
<CENT MESS>
to centre. For more details on how to input and modify
texts, refer to sheet
SELECTION AND EDITING
, in the
INTRODUCTION
section of this manual.
Proceed to programming the character-type to be printed by pressing
<ENTER>
or
<
↓↓↓↓
>
, as follows:
3 0 S H O P
N A M E
C H A R .
L I N E
n
F O R M A T
5
x 7
where:
n
=
line
no.
Use
<SEL>
for selecting the available
formats of character:
5x7 regular
height
5x12 2x
height
5x18 3x
height
7x18
extra width, 3x height
7x23
extra width, 4x height
By pressing
<ENTER>
or
<
↓↓↓↓
>
, get to programming the position of the line of text (not printed, at
the receipt header or at its very end):
3 0 S H O P
N A M E
P O S I T .
L I N E
n
N O P R I N T I N G
Now you can select the other options (
ON TOP
/
ON BOTTOM
) by pressing
<SEL>
.
Содержание DSP 500
Страница 1: ...ELECTRONIC SCALE DSP 500 USER MANUAL v 4 0 UV119UE Doc a Ware 960510...
Страница 2: ......
Страница 4: ...PAGE ii UV119UE DSP 500 USER MANUAL v 4 0...
Страница 6: ...PAGE iv UV119UE DSP 500 USER MANUAL v 4 0...
Страница 12: ...PAGE 6 UV119UE DSP 500 USER MANUAL v 4 0...
Страница 13: ...PAGE 6 UV119UE DSP 500 USER MANUAL v 4 0 DISCARD THIS PAGE USED ONLY FOR PAGE NUMBERING ALIGNMENT...
Страница 29: ...PAGE 22 UV119UE DSP 500 USER MANUAL v 4 0...
Страница 30: ...PAGE 38 UV119UE DSP 500 USER MANUAL v 4 0 DISCARD THIS PAGE USED ONLY FOR PAGE NUMBERING ALIGNMENT...
Страница 35: ...PAGE 66 UV119UE DSP 500 USER MANUAL v 4 0 DISCARD THIS PAGE USED ONLY FOR PAGE NUMBERING ALIGNMENT...
Страница 67: ...PAGE 21 UV119UE DSP 500 USER MANUAL v 4 0...
Страница 90: ...UV119UE DSP 500 USER MANUAL v 4 0 PAGE 83...
Страница 111: ......
Страница 112: ...PAGE 104 UV119UE DSP 500 USER MANUAL v 4 0...
Страница 113: ...NEW FEATURES PRE SET TARE FUNCTION SELF SERVICE VERSION...
Страница 117: ...DATAPROCESS S p A NEW FEATURES self service version page 5 SELF SERVICE VERSION GENERAL CHARACTERISTICS...


