


Chapter 2
2-14
4) Turn ON the main power switch.
2.2.8 Points to Note When Turning OFF the Main Power
0019-0209
iR3225 / iR3225N / iR3235 / iR3235N / iR3245 / iR3245N
2.2.9 Stirring Toner
0019-0210
iR3225 / iR3225N / iR3235 / iR3235N / iR3245 / iR3245N
1) Enter the service mode.
Select: COPIER > FUNCTION > INSTALL > TONER-S.
2) When the count displays "OK!", exit the service mode.
2.2.10 Cassette Setting
0019-4001
iR3225 / iR3225N / iR3235 / iR3235N / iR3245 / iR3245N
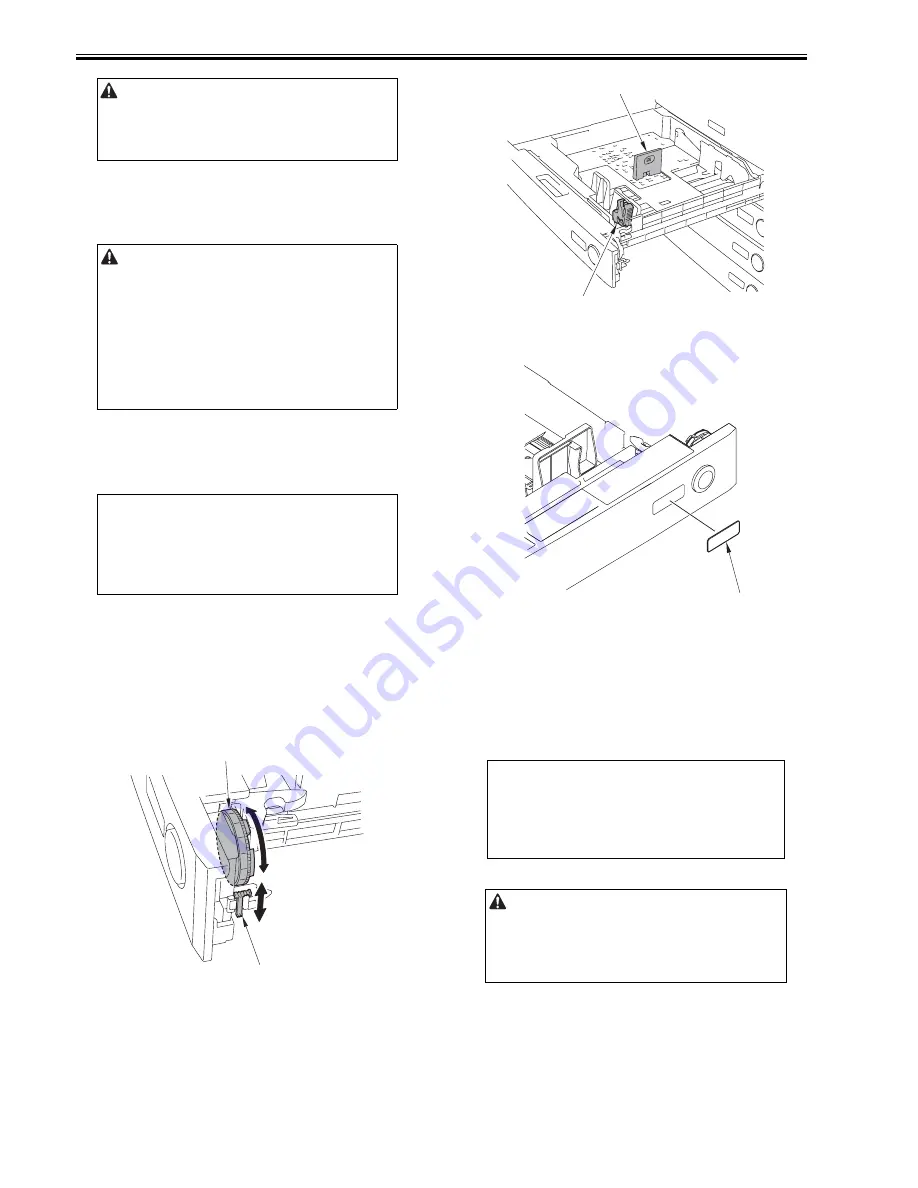
1) Press the cassette release button to pull out the cassette.
2) Check the paper type that users will be using and make sure that the size
type selection switch [1] of the cassette matches with the required paper
size type. If not, adjust the position of the size type selection switch to the
corresponding paper size type.
3) Adjust the paper size registration dial [2] to the requires paper size.
F-2-56
4) Pick the lever [1] on the side guide plate and adjust the side guide plate to
the intended size.
5) Tilt the side guide plate and remove it. Adjust the leading edge guide plate
[2] to the intended size by following the instruction on the bottom on the
cassette.
F-2-57
6) Put the paper size label [1] corresponding to the paper set on front of the
cassette.
F-2-58
7) Set the paper into the cassette and put back the cassette.
8) Specify the setting for the other cassette in the same manner.
9) If the cassette feeding unit is installed, refer to the installation procedure
of cassette pedestal to specify the cassette settings.
2.2.11 APVC Correction of Drum
0019-4002
iR3225 / iR3225N / iR3235 / iR3235N / iR3245 / iR3245N
1) Enter the service mode.
Select: COPIER > FUNCTION > DPC > D-GAMMA.
2) Exit the service mode.
2.2.12 Auto Gradation Correction
0019-4381
iR3225 / iR3225N / iR3235 / iR3235N / iR3245 / iR3245N
1) Open the platen cover/DADF.
2) Clean the copyboard glass.
3) Set the A3, A4, 11x17 or LTR paper into the cassette. (refer to the cassette
settings.)
4) Press [Additional Functions].
5) Press [Adjustment/Cleaning] > [Auto Gradation Adjustment] > [Test
Print].
Use the correct power code to mach the location/area of installation.
Make sure not to leave unused power code at the site.
Turning OFF the main power
When turning off the main power, follow the procedures described below
to protect the hard disk
1) Hold down the control panel power switch for 3 sec or more.
2) Operate the control panel as instructed on the shut-down sequence
screen. (The main power will go off automatically.)
3) Unplug the power plug.
MEMO:
Stirring toner operation takes for approx 6 min. After counted, it
automatically stops. Perform the cassette setting before the completion of
toner stirring. (Refer to the cassette setting.)
[1]
[2]
MEMO:
After the paper is picked up from the cassette 1, blank paper is delivered
and APVC correction completes automatically (indifferent to paper size in
the cassette).
Just after the stirring toner, floating toner inside the body due to toner
stirring may attaches to the test print (back side) slightly. This will be
cleared after making a couple of copies.
[1]
[2]
[1]
Содержание iR3245
Страница 1: ...Jul 3 2008 Service Manual iR3245 3235 3230 3225 Series...
Страница 2: ......
Страница 6: ......
Страница 25: ...Chapter 1 Introduction...
Страница 26: ......
Страница 28: ......
Страница 64: ......
Страница 65: ...Chapter 2 Installation...
Страница 66: ......
Страница 120: ......
Страница 121: ...Chapter 3 Basic Operation...
Страница 122: ......
Страница 124: ......
Страница 128: ......
Страница 129: ...Chapter 4 Main Controller...
Страница 130: ......
Страница 132: ......
Страница 134: ...Chapter 4 4 2 F 4 1 1 5 8 9 11 14 12 3 4 10 2 13 7 15 16 17...
Страница 152: ......
Страница 153: ...Chapter 5 Original Exposure System...
Страница 154: ......
Страница 184: ......
Страница 185: ...Chapter 6 Laser Exposure...
Страница 186: ......
Страница 188: ......
Страница 197: ...Chapter 7 Image Formation...
Страница 198: ......
Страница 227: ...Chapter 8 Pickup Feeding System...
Страница 228: ......
Страница 232: ......
Страница 244: ...Chapter 8 8 12 For iR3245 3235 3230 F 8 14 1 2 3 4...
Страница 261: ...Chapter 8 8 29 10 11 12 13 14 3 1 2 4 5 4 4 1 2 3 5 4 1 2 3 5 5 4 1 2 3 5 4 1 2 3 5...
Страница 278: ......
Страница 279: ...Chapter 9 Fixing System...
Страница 280: ......
Страница 282: ......
Страница 297: ...Chapter 10 External and Controls...
Страница 298: ......
Страница 302: ......
Страница 315: ...Chapter 10 10 13 2 Uncheck SNMP Status Enabled F 10 11...
Страница 342: ......
Страница 343: ...Chapter 11 MEAP...
Страница 344: ......
Страница 346: ......
Страница 397: ...Chapter 12 e maintenance imageWARE Remote...
Страница 398: ......
Страница 400: ......
Страница 408: ......
Страница 409: ...Chapter 13 Maintenance and Inspection...
Страница 410: ......
Страница 412: ......
Страница 424: ...Chapter 13 13 12...
Страница 425: ...Chapter 14 Standards and Adjustments...
Страница 426: ......
Страница 428: ......
Страница 433: ...Chapter 14 14 5 Execute the following in Service Mode ADF white level adjustment COPIER FUNCTION CCD DF WLVL1 2 3 4...
Страница 436: ......
Страница 437: ...Chapter 15 Correcting Faulty Images...
Страница 438: ......
Страница 440: ......
Страница 465: ...Chapter 16 Self Diagnosis...
Страница 466: ......
Страница 468: ......
Страница 493: ...Chapter 17 Service Mode...
Страница 494: ......
Страница 498: ......
Страница 690: ......
Страница 691: ...Chapter 18 Upgrading...
Страница 692: ......
Страница 694: ......
Страница 738: ...Chapter 18 18 44...
Страница 739: ...Chapter 19 Service Tools...
Страница 740: ......
Страница 741: ...Contents Contents 19 1 Service Tools 19 1 19 1 1 Special Tools 19 1 19 1 2 Oils and Solvents 19 1...
Страница 742: ......
Страница 744: ......
Страница 745: ...Jul 3 2008...
Страница 746: ......


