Chapter 14
14-2
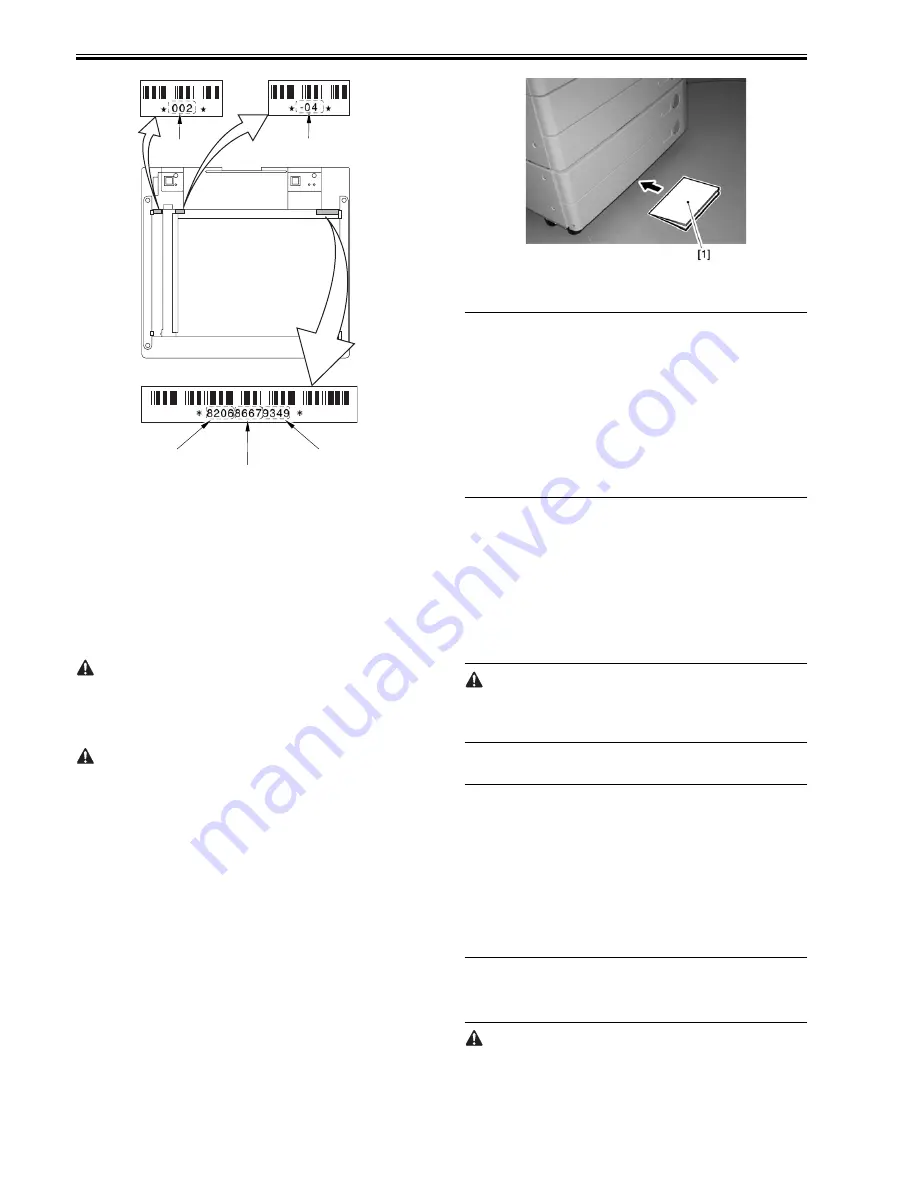
F-14-5
d. service label (behind reader unit left cover) values
d-1. CIS read position adjustment (fixed reading)
COPIER>ADJUST>ADJ-XY>ADJ-X
d-2. main scanning direction position adjustment (fixed reading)
COPIER>ADJUST>ADJ-XY>ADJ-Y
d-3. shading position adjustment (fixed reading)
COPIER>ADJUST>ADJ-XY>ADJ-S
d-4. sub scanning direction color displacement correction
COPIER>ADJUST>CCD>CCDU-RG
d-5. main/sub scanning direction MTF value
COPIER>ADJUST>CCD>MTF-MG,SG
d-6. auto gradation correction target value
COPIER>ADJUST>PASCAL>OFST-P-Y,M,C,K
If the value of the following was not 0 before the replacement of the
reader controller PCB: COPIER>OPTION>BODY>CCD-LUT.
Set a value other than '0' once again, and make the following adjustments
using the D-10 Chart.
COPIER>FUNCTION>CCD>LUT-ADJ2
2. ADF-Related Adjustment
The machine keeps ADF-related service mode data in the RAM of the
reader controller; as such, you will have to make the appropriate
adjustments if you have replaced the reader controller or initialized the
RAM.
1) Enter the values indicated in the P-PRINT printout you have previously
generated for the following:
a. main scanning direction position adjustment (stream reading)
COPIER>ADJSUT>ADJ-XY>ADJ-Y-DF
b. original stop position adjustment
FEEDER>ADJSUT>DOCST
c. original feed speed (magnification) adjustment
FEEDER>ADUST>LA-SPEED
2) Make adjustments using the following items:
a. tray width adjustment
FEEDER>FUNCTION>TRY-A4
FEEDER>FUNCTION>TRY-A5R
FEEDER>FUNCTION>TRY-LTR
FEEDER>FUNCTION>TRY-LTRR
b. CIS read position adjustment (stream reading)
COPIER>FUNCTION>INSTALL>STRD-POS
c. white level adjustment
COPIER>FUNCTION>CCD>DF-WLVL1
COPIER>FUNCTION>CCD>DF-WLVL2
When you have finished the foregoing adjustments, put the P-PRINT print-
out [1] you have previously generated in the service book cassette to replace
the old P-PRINT printout.
F-14-6
14.2 Laser Exposure System
14.2.1 After Replacing the Laser Scanner Unit
0014-3098
/ / / / iR C3380i / iR C3380 / iR C2880i / iR C2880
When replacing the laser scanner unit, register the values described on the
label which is included in the package in the service modes below. After reg-
istration, attach the label onto the front cover.
COPIER > FUNCTION > LASER > FSLUT-Y1 to 8
COPIER > FUNCTION > LASER > FSLUT-M1 to 8
COPIER > FUNCTION > LASER > FSLUT-C1 to 8
COPIER > FUNCTION > LASER > FSLUT-K1 to 8
Registration of the main scanner reproduction ratio correction value
14.3 Image Formation System
14.3.1 After Replacing the Secondary Transfer Roller
0014-3128
/ / / / iR C3380i / iR C3380 / iR C2880i / iR C2880
Upon replacement to the new secondary transfer outer roller, attachment of
the rubber component of the secondary transfer roller onto the ITB belt caus-
es a white spot image.
In order to prevent this, at replacing the secondary transfer outer roller to the
new one, coating of toner onto the surface of the roller is required.
When replacing the secondary transfer outer roller, execute the service mode
below:
- COPIER > FUNCTION > TNR-COAT
Coating of the Y toner onto the secondary transfer roller
In case the white spot image occurred after replacing the secondary transfer
roller, clean the ITB unit.
Initial settings / registration > adjustment / cleaning > cleaning within the
main body
14.4 Fixing System
14.4.1 Confirming of the nip width
0014-3631
/ / / / iR C3380i / iR C3380 / iR C2880i / iR C2880
Executed the following item of the service mode, and measure the nip width.
COPIER>FUNCTION>FIXING>NIP-CHK
*:The sheet stops temporarily at the fixing unit and it is delivered.
Standard of the nip width
Center part: 8mm or more
Difference of right and left edge: 1mm or less
14.5 Electrical Components
14.5.1 After Replacing the Reader Controller PCB
0014-3118
/ / / / iR C3380i / iR C3380 / iR C2880i / iR C2880
- Before replacing the reader controller PCB, be sure to generate the latest P-
PRINT printout.
- If you carry out the power ON and the copier returns to the standby
condition after the controller circuit PCB replacement, turn ON/OFF the
power supply once again.
W- P LT- X
W- P LT- Y
W- P LT- Z
D F - R G
B O O K - R G
Содержание iR C3380 series
Страница 1: ...Aug 29 2006 Service Manual iR C3380 2880 Series...
Страница 2: ......
Страница 6: ......
Страница 23: ...Chapter 1 Introduction...
Страница 24: ......
Страница 26: ......
Страница 52: ......
Страница 53: ...Chapter 2 Installation...
Страница 54: ......
Страница 127: ...Chapter 3 Basic Operation...
Страница 128: ......
Страница 130: ......
Страница 136: ......
Страница 137: ...Chapter 4 Main Controller...
Страница 138: ......
Страница 160: ......
Страница 161: ...Chapter 5 Original Exposure System...
Страница 162: ......
Страница 188: ...Chapter 5 5 24 F 5 68 4 Remove the original sensor 2 hook 1 F 5 69...
Страница 189: ...Chapter 6 Laser Exposure...
Страница 190: ......
Страница 192: ......
Страница 206: ......
Страница 207: ...Chapter 7 Image Formation...
Страница 208: ......
Страница 256: ......
Страница 257: ...Chapter 8 Pickup Feeding System...
Страница 258: ......
Страница 262: ......
Страница 303: ...Chapter 9 Fixing System...
Страница 304: ......
Страница 306: ......
Страница 321: ...Chapter 10 Externals and Controls...
Страница 322: ......
Страница 326: ......
Страница 336: ...Chapter 10 10 10 F 10 10 2 Remove the check mark from SNMP Status Enabled...
Страница 337: ...Chapter 10 10 11 F 10 11...
Страница 359: ...Chapter 11 MEAP...
Страница 360: ......
Страница 362: ......
Страница 401: ...Chapter 12 RDS...
Страница 402: ......
Страница 404: ......
Страница 411: ...Chapter 13 Maintenance and Inspection...
Страница 412: ......
Страница 414: ......
Страница 416: ...Chapter 13 13 2 F 13 1 8 9 1 2 3 3 5 6 7 10 11 12 13 14 4...
Страница 421: ...Chapter 14 Standards and Adjustments...
Страница 422: ......
Страница 424: ......
Страница 431: ...Chapter 15 Correcting Faulty Images...
Страница 432: ......
Страница 434: ......
Страница 459: ...Chapter 16 Self Diagnosis...
Страница 460: ......
Страница 462: ......
Страница 481: ...Chapter 17 Service Mode...
Страница 482: ......
Страница 484: ......
Страница 571: ...Chapter 18 Upgrading...
Страница 572: ......
Страница 574: ......
Страница 603: ...Chapter 19 Service Tools...
Страница 604: ......
Страница 605: ...Contents Contents 19 1 Service Tools 19 1 19 1 1 Special Tools 19 1 19 1 2 Solvents and Oils 19 2...
Страница 606: ......
Страница 609: ...Aug 29 2006...
Страница 610: ......


