Chapter 7
7-6
7.1.6 Transfer Block
0013-8467
/ / / / iR C3380i / iR C3380 / iR C2880i / iR C2880
This block consists of 3 steps, in which the toner image is moved from the photosensitive drum surface to paper.
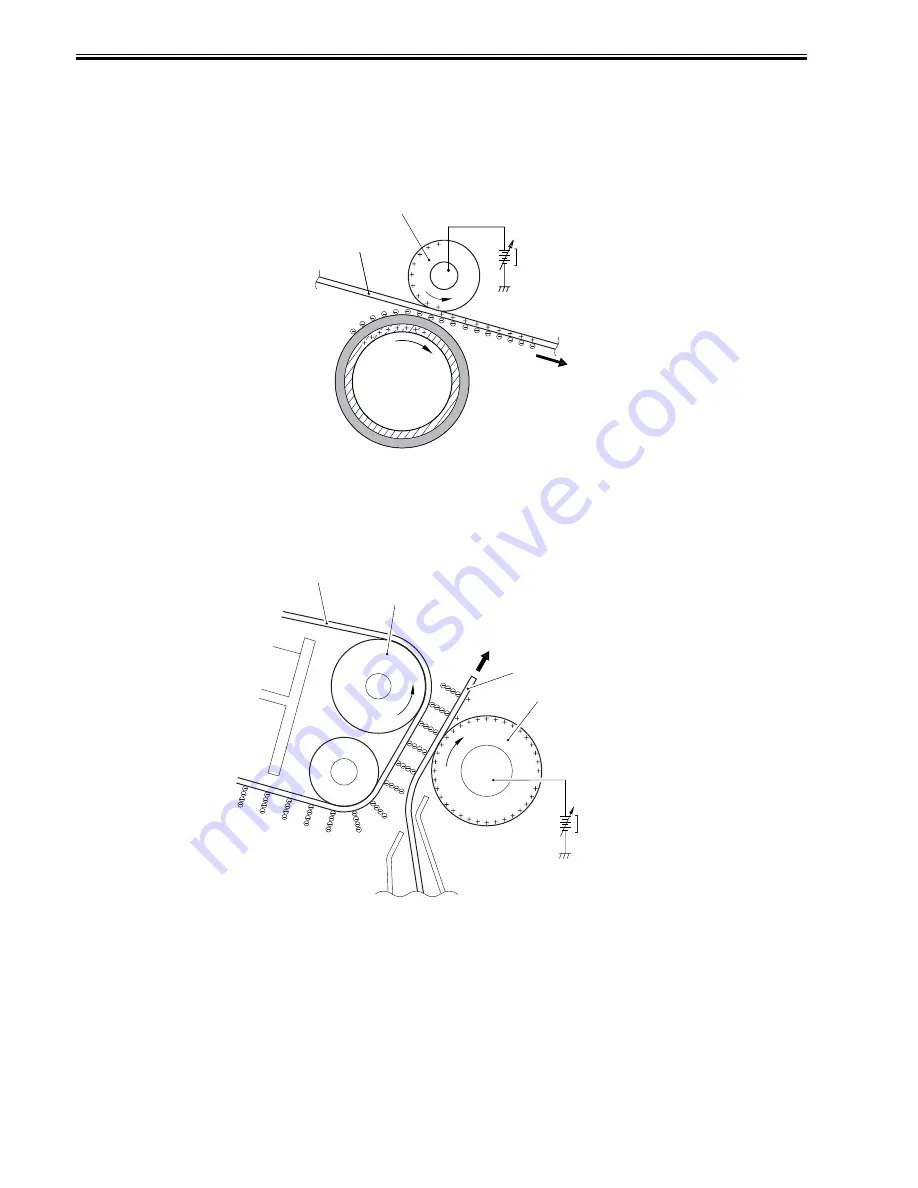
step 4: primary transfer
In this step, toner is moved from the photosensitive drum to the ITB.
A positive bias is applied to the primary transfer roller found on the inner side of the machine, thus charging the ITB to a positive potential. As a result, the negatively
charged toner on the surface of the photosensitive drum moves to the positively charged ITB. This whole process is performed for all colors (Y, M, C, Bk).
F-7-8
step 5: secondary transfer
In this step, the toner on the ITB is moved to paper.
A positive bias is applied to the secondary transfer outside roller to charge the back of paper to a positive potential. As a result, the toner on the ITB moves to the
paper.
To prevent soiling of the back of paper, the secondary transfer outside roller is given a positive and then a negative bias in turns at the end of secondary transfer,
thus returning the residual toner on the secondary transfer outside roller to the ITB.
Thereafter, the residual toner returned to the ITB is collected to the waste toner case in the ITB cleaning block.
F-7-9
step 6: separation
In this step, the rigidity of paper is used to separate paper from the ITB.
Thin paper has little body. The static eliminator decreases the charges on paper, thus weakening the static bonding and, consequently, facilitating separation.
photosensitive drum
DC bias
ITB
Primary transfer roller
Paper
DC bias
ITB
Secondary transfer inside roller
Secondary transfer outside roller
Содержание iR C3380 series
Страница 1: ...Aug 29 2006 Service Manual iR C3380 2880 Series...
Страница 2: ......
Страница 6: ......
Страница 23: ...Chapter 1 Introduction...
Страница 24: ......
Страница 26: ......
Страница 52: ......
Страница 53: ...Chapter 2 Installation...
Страница 54: ......
Страница 127: ...Chapter 3 Basic Operation...
Страница 128: ......
Страница 130: ......
Страница 136: ......
Страница 137: ...Chapter 4 Main Controller...
Страница 138: ......
Страница 160: ......
Страница 161: ...Chapter 5 Original Exposure System...
Страница 162: ......
Страница 188: ...Chapter 5 5 24 F 5 68 4 Remove the original sensor 2 hook 1 F 5 69...
Страница 189: ...Chapter 6 Laser Exposure...
Страница 190: ......
Страница 192: ......
Страница 206: ......
Страница 207: ...Chapter 7 Image Formation...
Страница 208: ......
Страница 256: ......
Страница 257: ...Chapter 8 Pickup Feeding System...
Страница 258: ......
Страница 262: ......
Страница 303: ...Chapter 9 Fixing System...
Страница 304: ......
Страница 306: ......
Страница 321: ...Chapter 10 Externals and Controls...
Страница 322: ......
Страница 326: ......
Страница 336: ...Chapter 10 10 10 F 10 10 2 Remove the check mark from SNMP Status Enabled...
Страница 337: ...Chapter 10 10 11 F 10 11...
Страница 359: ...Chapter 11 MEAP...
Страница 360: ......
Страница 362: ......
Страница 401: ...Chapter 12 RDS...
Страница 402: ......
Страница 404: ......
Страница 411: ...Chapter 13 Maintenance and Inspection...
Страница 412: ......
Страница 414: ......
Страница 416: ...Chapter 13 13 2 F 13 1 8 9 1 2 3 3 5 6 7 10 11 12 13 14 4...
Страница 421: ...Chapter 14 Standards and Adjustments...
Страница 422: ......
Страница 424: ......
Страница 431: ...Chapter 15 Correcting Faulty Images...
Страница 432: ......
Страница 434: ......
Страница 459: ...Chapter 16 Self Diagnosis...
Страница 460: ......
Страница 462: ......
Страница 481: ...Chapter 17 Service Mode...
Страница 482: ......
Страница 484: ......
Страница 571: ...Chapter 18 Upgrading...
Страница 572: ......
Страница 574: ......
Страница 603: ...Chapter 19 Service Tools...
Страница 604: ......
Страница 605: ...Contents Contents 19 1 Service Tools 19 1 19 1 1 Special Tools 19 1 19 1 2 Solvents and Oils 19 2...
Страница 606: ......
Страница 609: ...Aug 29 2006...
Страница 610: ......


