


9
9
9-120
9-120
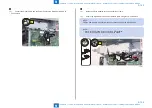
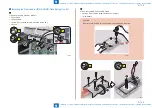
Installation > TYPE-1: HDD Data Encryption Kit Installation Procedure > Checking the Security Mark
Installation > TYPE-1: HDD Data Encryption Kit Installation Procedure > Checking the Security Mark
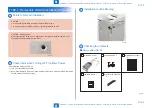
HDD Initialization Procedure
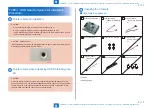
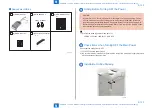
1. Items to be prepared
1) PC
Be sure that the version of the Service Support Tool that supports the host machine is
installed.
2) Crossover Ethernet cable.
2. Preparing for the Installation of the System Software of Host machine
1) If the PC and host machine have been started, turn the main power OFF.
2) Connect the PC and the machine using an Cross Ethernet cable. (In case of SST).
3) Turn ON the power of the PC.
3. Registering the system software
1) Insert the latest System Software into the PC using the SST.
2) Start the SST.
3) Click ‘Register Firmware’.
4) Select the drive where the system software has been inserted, and click the [SEARCH]
button.
5) Click the [REGISTER] button.
6) Click [OK].
4. Initializing HDD
< In case of SST >
1) Start the host machine with download mode in safe mode.
2) Start the SST.
3) Select the model. Then, select [Single] and click [Start].
4) Click [Format HDD].
5) Select [All], and click [Start].
6) Click [Execute Format].
7) The Format is executed.
8) Click [OK].
9) After formatting is completed, select [Shutdown/Restart], and click [Restart].
10)
Click [OK]
11)
The power of the host machine is turned OFF.
12)
Terminate the SST.
13)
Disconnect the Cross Ethernet Cable from the machine, and connect the user's
network cable to the machine.
<In case of USB flash drive>
1) Connect the USB memory to the PC.
2) Start up SST, and click the USB icon displayed in the target selection screen.
3) Select the drive, the model series, and the version to be written to the USB flash drive, and
click [Confirm].
4) Click [Start], and after the version has been written to the USB flash drive, click [OK] and
then remove the USB flash drive.
5) Terminate the SST.
6) Connect the USB memory device to the host machine, and start the host machine with
download mode in safe mode.
7) Press keys on the Control Panel in the order shown below.
• Press any keys
• [4] : Clear/Format
• [1] : Disk Format
• [0] : OK
• Press any keys
• [C] : Return to Menu
• [Reset] : Start shutdown sequence
• [0] : OK (The power of the host machine is turned OFF automatically.)
8) Remove the USB flash drive.
9) Turn ON the main power switch.
Checking the Security Version
1) .Press the Counter Check key on the control panel.
2) Press the [Check Device Configuration] key appearing on the control panel.
3) Confirm that '2.01' is displayed for the [Canon MFP Security Chip] item indicating the
version of the security chip.
If multiple Encryption Boards are installed, the version information for each board is
displayed.
CAUTION:
The user can refer to the version displayed in the [Canon MFP Security Chip] item
indicating the version of the security chip to confirm that an Encryption Board that
contains a security chip version that has received CC certification is operating correctly.
Checking the Security Mark
The user can check the security mark displayed on the Control Panel when using the host
Содержание imageRUNNER ADVANCE C3325 Series
Страница 16: ...1 1 Product Overview Product Overview Product Lineup Features Specifications Parts Name ...
Страница 324: ...5 5 Adjustment Adjustment Pickup Feed System Document Exposure System Actions after Replacement ...
Страница 427: ...7 7 Error Jam Alarm Error Jam Alarm Overview Error Code Jam Code Alarm Code ...
Страница 552: ...8 8 Service Mode Service Mode Overview COPIER FEEDER SORTER BOARD ...
Страница 935: ... Service Tools General Circuit Diagram Backup Data Detail of HDD partition Soft counter specifications Removal Appendix ...
Страница 937: ...III III Appendix Service Tools Special Tools Appendix Service Tools Special Tools Solvents and Oils None ...