


6
6
6-3
6-3
Troubleshooting > Test Print > Steps to select the test print TYPE
Troubleshooting > Test Print > Steps to select the test print TYPE
Test Print
Overview
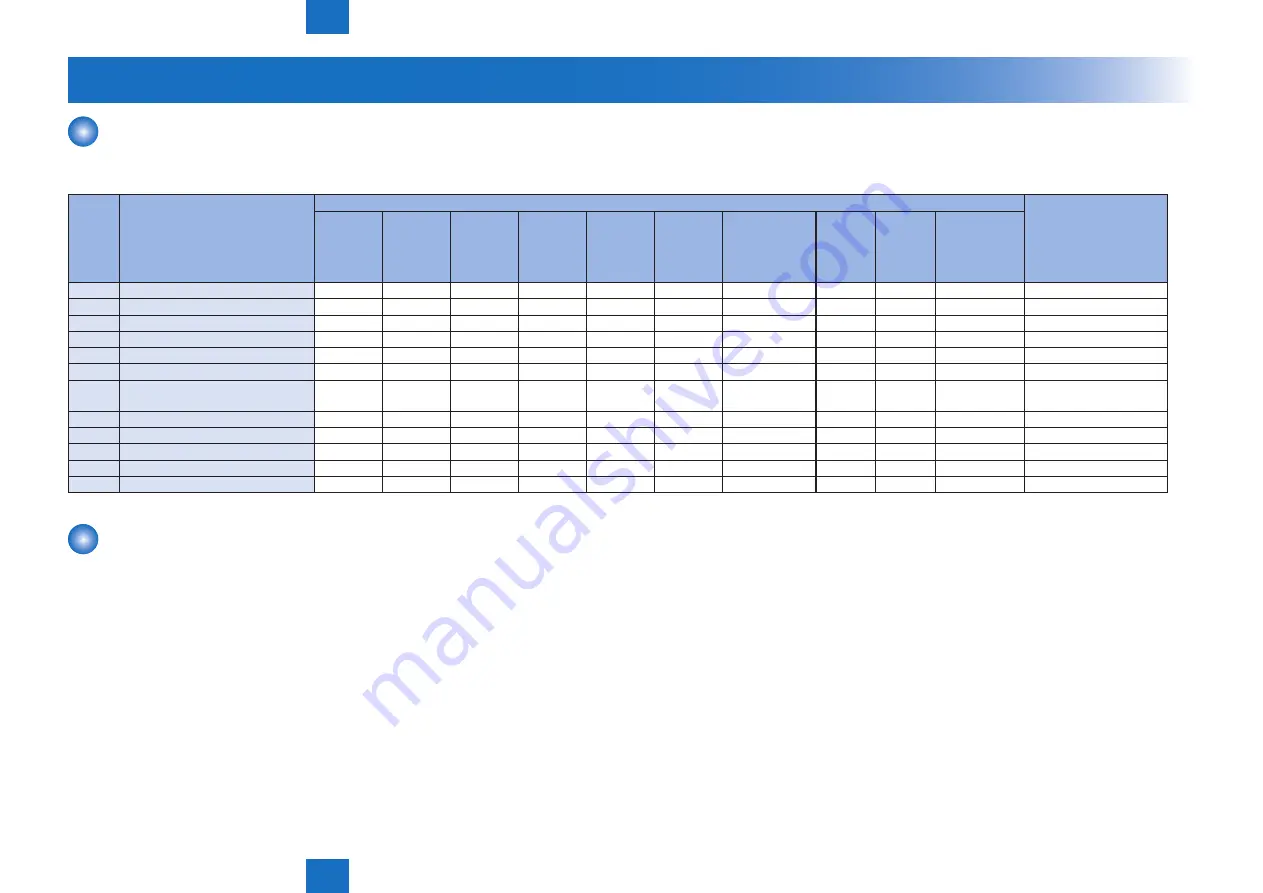
This machine have the following test print TYPE and you can judge the image failure that is checked as “Yes” in the following image check items with each test print.
If the image failure occurred on normal output does not reappear on the test print, it may be caused by the PDL input or reader side.
PG
TYPE
TYPE Pattern
Items
Originator
Gradation
Fogging
Transfer
Fault
Black line
(Color line)
White line
Uneven
Density
Uneven
Density
at the Front /
Rea
Right
Angle
Straight
Lines
Color
displacement,
0
Normal copy / print
----
1to3
---(For R&D)
----
4
16 gradations
Yes
Yes
Yes
Yes
Main controller PCB 2
5
Full half-tone
Yes
Yes
Yes
Yes
Yes
Main controller PCB 2
6
Grid
Yes
Yes
Yes
Main controller PCB 2
7to9
---(For R&D)
----
10
MCYBk horizontal stripes
(sub scanning direction)
Yes
Yes
Yes
Main controller PCB 2
11
---(For R&D)
----
12
64-gradation
Yes
Yes
Yes
Main controller PCB 2
13
---(For R&D)
----
14
Full color 16-gradation
Yes
Yes
Main controller PCB 2
15to100 ---(For R&D)
----
Steps to select the test print TYPE
1) Set the number of print, paper size etc.
2) Select: COPIER > TEST > PG.
3) Select: COPIER > TEST > PG > TYPE.
4) Enter the desired TYPE number and press OK key.
5) Select the corresponding color (setting 1 means output) in COLOR-Y/M/C/K.
6) Set the density in DENS-Y/M/C/K (this is enabled for TYPE=5 only).
7) Press start key.
T-6-2


