


Performance Tests
3
Installation and Verification Manual
101
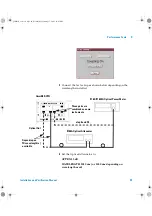
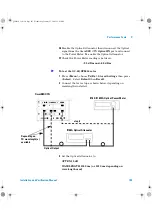
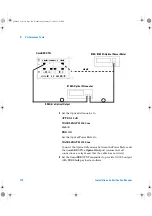
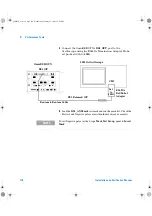
Disconnect the Optical Attenuator Output from the Power
Meter and connect to the OmniBER OTN’s
Optical IN
Port
(52–622 Mb/s). Ensure all optical connectors are clean and
all connections are tight with no twists in the optical cable.
Set the Optical Attenuator to Enable.
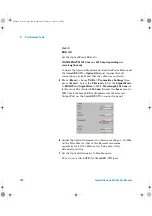
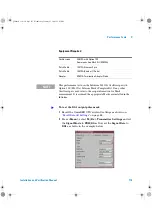
8
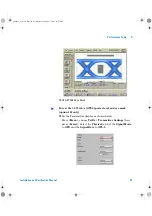
Press
<Smart Test>
, choose
Shortcuts > Trouble Scan
then
press
<Select>
. Press
<Run/Stop>
to begin measurement.
9
After 1 minute check that
‘No Trouble’
is displayed in the
Results window to confirm no errors have been detected.
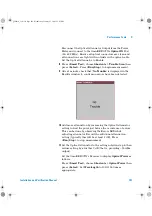
10
Add more attenuation by increasing the Optical Attenuator
setting to find the point just before the occurrence of errors.
This can be done by observing the Errors LED while
adjusting attenuator. Record the additional attenuation
setting (typically this will be at least 1 dB). Press
<Run/Stop>
to stop measurement.
11
Set the Optical Attenuator to the setting noted in step 6, then
reduce setting by a further 3 dB (that is, providing –30 dBm
output).
Set the OmniBER OTN’s Receiver to display
Optical Power
as
follows:
Press
<Smart Test>
, choose
Shortcuts > Optical Power
then
press
<Select>
. Set
Wavelength
to 1310/1550 nm as
appropriate.
panther3_iv.book Page 101 Wednesday, January 15, 2003 12:03 PM
Содержание OmniBER J7230A
Страница 2: ...sdh_Lynx2 book Page 148 Wednesday April 17 2002 12 49 PM...
Страница 10: ...8 Installation and Verification Manual panther3_iv book Page 8 Wednesday January 15 2003 12 03 PM...
Страница 172: ...170 Installation and Verification Manual panther3_iv book Page 170 Wednesday January 15 2003 12 03 PM...
Страница 173: ...sdh_Lynx2 book Page 148 Wednesday April 17 2002 12 49 PM...