Chapter 4
157
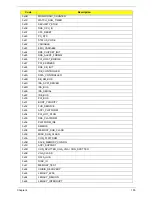
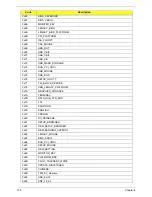
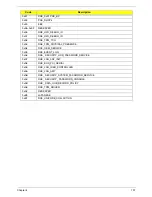
0x91
DXE_0x91 PXE_BC
0x92
PXE_DHCP4
0x93
EBC
0x94~0x9F
RESERVED
0xA0
DXE_H2O_DEBUG_IO
0xA1
DXE_H2O_DEBUG_IO
0xA2
DXE_TPM_TCG
0xA3
DXE_TPM_PHYSICAL_PRESENCE
0xA4
DXE_OEM_SERVICE
0xA5
DXE_EVENT_LOG
0xA6
DXE_ SECURITY_HDD_PASSWORD_SERVICE
0xA7
DXE_LAN_ASF_INIT
0xA8
DXE_BUS_PCI_SERIAL
0xA9
DXE_LAN_IDER_CONTROLLER
0xAA
DXE_LAN_AMT
0xAB
DXE_ SECURITY_SYSTEM_PASSWORD_SERVICE
0xAC
DXE_ SECURITY_ PASSWORD_CONSOLE
0xAD
DXE_ DATA_HUB_RECORD_POLICY
0xAE
DXE_TPM_DRIVER
0xAF
RESERVED
0xB0
JAPANESE
0xB1
DXE_UNICODE_COLLACTION
Code
Description
Содержание Aspire One AO531h
Страница 6: ...VI ...
Страница 10: ...X Table of Contents ...
Страница 30: ...20 Chapter 1 ...
Страница 48: ...38 Chapter 2 ...
Страница 63: ...Chapter 3 53 8 Disconnect the FFC and remove the Keyboard ...
Страница 69: ...Chapter 3 59 4 Remove the board from the Upper Cover ...
Страница 82: ...72 Chapter 3 5 Disconnect the Bluetooth cable from the module ...
Страница 89: ...Chapter 3 79 4 Lift the CPU Fan clear of the Mainboard ...
Страница 101: ...Chapter 3 91 4 Lift up the bezel and remove it from the LCD Module ...
Страница 107: ...Chapter 3 97 7 Disconnect the cable from the LCD panel as shown ...
Страница 120: ...110 Chapter 3 4 Press down around the edges of the bezel to secure it in place 5 Replace the six screws and screw caps ...
Страница 138: ...128 Chapter 3 6 Insert the FFC in to the Button Board and close the locking latch ...
Страница 202: ...192 Appendix B ...
Страница 204: ...194 Appendix C ...
Страница 208: ...198 ...

