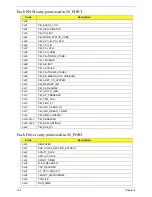
Chapter 4
155
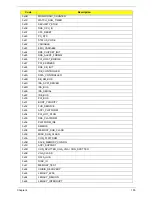
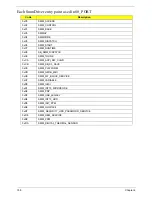
0x3B
MONOTONIC_COUNTER
0x3C
WATCH_DOG_TIMER
0x3D
SECURITY_STUB
0x3E
DXE_CPU_IO
0x3F
CF9_RESET
0x40
PC_RTC
0x41
STATUS_CODE
0x42
VARIABLE
0x43
EMU_VARIABLE
0x44
DXE_CHIPSET_INIT
0x45
DXE_ALERT_FORMAT
0x46
PCI_HOST_BRIDGE
0x47
PCI_EXPRESS
0x48
DXE_SB_INIT
0x49
IDE_CONTROLLER
0x4A
SATA_CONTROLLER
0x4B
SB_SM_BUS
0x4C
ISA_ACPI_DRIVER
0x4D
ISA_BUS
0x4E
ISA_SERIAL
0x4F
IDE_BUS
0x50
PCI_BUS
0x51
BOOT_PRIORITY
0x52
FVB_SERVICE
0x53
ACPI_PLATFORM
0x54
PCI_HOT_PLUG
0x55
DXE_PLATFORM
0x56
PLATFORM_IDE
0x57
SMBIOS
0x58
MEMORY_SUB_CLASS
0x59
MISC_SUB_CLASS
0x5A
CON_PLATFORM
0x5B
SAVE_MEMORY_CONFIG
0x5C
ACPI_SUPPORT
0x5D
CON_SPLITTER_UGA_VGA / CON_SPLITTER
0x5E
VGA_CLASS
0x5F
DATA_HUB
0x60
DISK_IO
0x61
MEMORY_TEST
0x62
CRISIS_RECOVERY
0x63
LEGACY_8259
0x64
LEGACY_REGION
0x65
LEGACY_INTERRUPT
Code
Description
Содержание Aspire One AO531h
Страница 6: ...VI ...
Страница 10: ...X Table of Contents ...
Страница 30: ...20 Chapter 1 ...
Страница 48: ...38 Chapter 2 ...
Страница 63: ...Chapter 3 53 8 Disconnect the FFC and remove the Keyboard ...
Страница 69: ...Chapter 3 59 4 Remove the board from the Upper Cover ...
Страница 82: ...72 Chapter 3 5 Disconnect the Bluetooth cable from the module ...
Страница 89: ...Chapter 3 79 4 Lift the CPU Fan clear of the Mainboard ...
Страница 101: ...Chapter 3 91 4 Lift up the bezel and remove it from the LCD Module ...
Страница 107: ...Chapter 3 97 7 Disconnect the cable from the LCD panel as shown ...
Страница 120: ...110 Chapter 3 4 Press down around the edges of the bezel to secure it in place 5 Replace the six screws and screw caps ...
Страница 138: ...128 Chapter 3 6 Insert the FFC in to the Button Board and close the locking latch ...
Страница 202: ...192 Appendix B ...
Страница 204: ...194 Appendix C ...
Страница 208: ...198 ...

