background image

Chapter 6

163

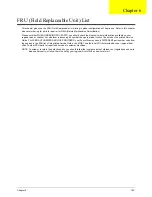
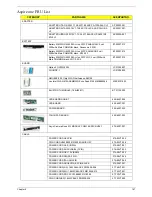
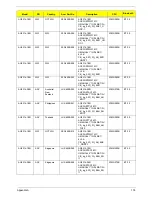
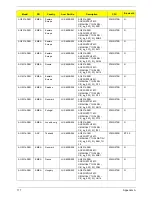
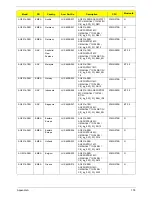
FRU (Field Replaceable Unit) List

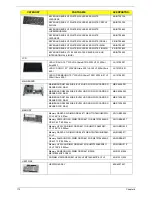
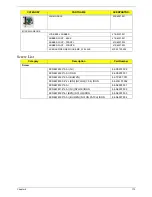
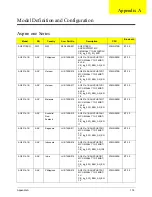
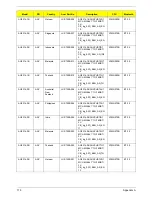
This chapter gives you the FRU (Field Replaceable Unit) listing in global configurations of Aspire one. Refer to this chapter 
whenever ordering for parts to repair or for RMA (Return Merchandise Authorization).

Please note that WHEN ORDERING FRU PARTS, you should check the most up-to-date information available on your 
regional web or channel. For whatever reasons a part number change is made, it will not be noted on the printed Service 
Guide. For ACER AUTHORIZED SERVICE PROVIDERS, your Acer office may have a DIFFERENT part number code from 
those given in the FRU list of this printed Service Guide. You MUST use the local FRU list provided by your regional Acer 
office to order FRU parts for repair and service of customer machines.

NOTE: To scrap or to return the defective parts, you should follow the local government ordinance or regulations on how to 

dispose it properly, or follow the rules set by your regional Acer office on how to return it.

Chapter 6

Содержание Aspire One AO531h

Страница 1: ...Aspire one Series Service Guide PRINTED IN TAIWAN Service guide files and updates are available on the ACER CSD web for more information please refer to http csd acer com tw ...

Страница 2: ...II Revision History Please refer to the table below for the updates made on Aspire one Series service guide Date Chapter Updates ...

Страница 3: ...pect to the contents hereof and specifically disclaims any warranties of merchantability or fitness for any particular purpose Any Acer Incorporated software described in this manual is sold or licensed as is Should the programs prove defective following their purchase the buyer and not Acer Incorporated its distributor or its dealer assumes the entire cost of all necessary servicing repair and an...

Страница 4: ... bits and pieces of additional information related to the current topic WARNING Alerts you to any damage that might result from doing or not doing specific actions CAUTION Gives precautionary measures to avoid possible hardware or software problems IMPORTANT Reminds you to do specific actions relevant to the accomplishment of procedures ...

Страница 5: ... NOT be covered in this generic service guide In such cases please contact your regional offices or the responsible personnel channel to provide you with further technical details 2 Please note WHEN ORDERING FRU PARTS that you should check the most up to date information available on your regional web or channel If for whatever reason a part number change is made it will not be noted in the printe...

Страница 6: ...VI ...

Страница 7: ...ash Utility 31 Remove HDD BIOS Password Utilities 33 Miscellaneous Utilities 36 Machine Disassembly and Replacement 39 Disassembly Requirements 39 Related Information 39 General Information 40 Pre disassembly Instructions 40 Disassembly Process 40 External Module Disassembly Process 41 External Modules Disassembly Flowchart 41 Removing the Battery Pack 42 Removing the SD Dummy Card 43 Removing the...

Страница 8: ...ntennas 98 LCD Module Reassembly Procedure 102 Replacing the Antennas 102 Replacing the LCD Cable and Brackets 105 Replacing the LCD Panel 107 Replacing the Microphone Board 108 Replacing the Camera Board 108 Replacing the LCD Bezel 109 Lower Cover Reassembly Procedure 111 SSD SKU Reassembly Procedure 111 Replacing the CPU Fan 111 Replacing the Thermal Module 112 Replacing the RTC Battery 113 Repl...

Страница 9: ...150 Undetermined Problems 150 POST Code Reference Tables 151 Sec 151 Memory 151 BDS Specific action 152 Each PEIM entry point used in 80_PORT 154 Each Driver entry point used in 80_PORT 154 Each SmmDriver entry point used in 80_PORT 158 Jumper and Connector Locations 159 Top View 159 Bottom View 160 Clearing Password Check and BIOS Recovery 161 Clearing Password Check 161 BIOS Recovery by Crisis D...

Страница 10: ...X Table of Contents ...

Страница 11: ... TFT WSVGA 1024 x 600 pixels Storage subsystem 2 5 1 8 hard disk drive or solid state drive 5 in 1 card reader SD card reader Audio High Definition audio support with two built in 1W speakers Realtek ALC272 Azalia Codec and Amplifier G1441 G1453 Built in Microphone Headphone jack Dimensions and Weight 255 x 183 x 26 9 mm 2 5 HDD 25 5mm Battery 255 x 183 x 23 9 mm 1 8 HDD 25 5mm Battery Weight TBD ...

Страница 12: ...200 mAH 3 hour battery life with 3 cell battery 6 hour battery life with 6 cell battery 3 pin 30W AC adapter Privacy control BIOS user supervisor HDD passwords Kensington lock slot Special keys and controls New Acer flat keyboard Supports Application keys for Windows XP Linux version Support for Home key and Application keys for Windows XP Linux version Multi language support I O interface Color c...

Страница 13: ...Chapter 1 3 Environment Temperature Operating 5 C to 35 C Non operating 20 C to 65 C Humidity non condensing Operating 20 to 80 Non operating 20 to 80 ...

Страница 14: ...0 Port0 7 PCI Express DDRII SODIMM 533 MHZ INT_LVDS INT_CRT EC 4 in 1 Card Reader LPC K B Con SPI Flash PCIE 4 10 100 LAN PCIE 1 PCIE 2 PCIE 3 WLAN USB port 3 USB 1 2 4 SATA IHDA LPC RTC BATTERY USB DMI Audio Jack Int SPK Int MIC Audio Codec SATA 0 SATA HDD SD Cardreader USB 0 USB 7 Audio AMP 3G WiMAX USB 6 USB 5 SIM Card CRT 10 1 Panel Realtek ALC272 CCD Bluetooth module Realtek RTS5159 Atheros 8...

Страница 15: ...communication 2 Display screen Also called Liquid Crystal Display LCD displays computer output 3 Microphone Internal microphone for sound recording 4 Status indicators Light Emitting Diodes LEDs that light up to show the status of the computer s functions and components 5 Keyboard For entering data into your computer 6 TouchPad Touch sensitive pointing device which functions like a computer mouse ...

Страница 16: ... button indicator Turns the computer on and off No Icon Item Description 1 Bluetooth communication switch Enables disables the Bluetooth function 2 3G Wireless communication switch Enables disables the 3G wireless function No Icon Item Description 1 External display VGA port Connects to a display device e g external monitor projector 2 Kensington lock slot Connects to a Kensington compatible compu...

Страница 17: ...l the card Only one card can operate at any given time 6 SD Expansion slot Accepts Secure Digital SD Card Note Push to remove install the card No Icon Item Description 1 Headphones speaker line out jack Connects to line out audio devices e g speakers headphones 2 Microphone in jack Accepts input from external microphones 3 USB 2 0 ports Connect to USB 2 0 devices e g USB mouse 4 DC in jack Connect...

Страница 18: ...t Accepts a 3G SIM card for 3G connectivity only for certain models 3 Battery release latch Releases the battery for removal 4 Wireless LAN Bay Houses the computer s Wireless LAN module 5 Ventilation slots Vents enable the computer to stay cool even after prolonged use Note Do not cover or obstruct the cooling vents 6 Memory compartment Houses the computer s main memory 7 Battery lock Locks the ba...

Страница 19: ...rged The light shows green when in AC mode Icon Function Description Bluetooth Indicates the status of Bluetooth communication Wireless LAN Indicates the status of Wireless LAN communication 3G communication Indicates the status of 3G communication HDD Indicates when the hard disk drive is active Num Lock Lights up when Num Lock is activated Caps Lock Lights up when Caps Lock is activated Battery ...

Страница 20: ...fingers dry and clean The TouchPad is sensitive to finger movement hence the lighter the touch the better the response Tapping too hard will not increase the TouchPad s responsiveness NOTE By default vertical and horizontal scrolling is enabled on your touchpad It can be disabled under Mouse settings in Windows Control Panel Function Left Button 2 Right Button 3 Main TouchPad 1 Execute Quickly cli...

Страница 21: ...ock When Caps Lock is on all alphabetic characters typed are in uppercase Num Lock Fn F11 When Num Lock is on the embedded keypad is in numeric mode The keys function as a calculator complete with the arithmetic operators and Use this mode when you need to do a lot of numeric data entry A better solution would be to connect an external keypad Scroll Lock Fn F12 When Scroll Lock is on the screen mo...

Страница 22: ...rk domain M Minimizes all windows R Open the Run dialog box T Cycle through programs on the taskbar U Open Ease of Access Center X Open Windows Mobility Center BREAK Display the System Properties dialog box SHIFT M Restore minimized windows to the desktop TAB Cycle through programs on the taskbar by using Windows Flip 3 D SPACEBAR Bring all gadgets to the front and select Windows Sidebar CTRL F Se...

Страница 23: ... F3 Acer ePower Management Launches Acer ePower Management in Acer Empowering Technology Fn F4 Sleep Puts the computer in Sleep mode Fn F5 Display toggle Switches display output between the display screen external monitor if connected and both Fn F6 Screen blank Turns the display screen backlight off to save power Press any key to return Fn F7 TouchPad toggle Turns the internal TouchPad on and off...

Страница 24: ... a text editor or word processor 2 Hold Alt Gr and then press the 5 key at the upper center of the keyboard NOTE Some fonts and software do not support the Euro symbol The US dollar sign 1 Open a text editor or word processor 2 Hold Shift and then press the 4 key at the upper center of the keyboard NOTE This function varies according to the language settings ...

Страница 25: ...port On die 512 kB 8 way L2 cache Support for IA 32 bit architecture Intel Streaming SIMD Extensions 2 and 3 Intel SSE2 and Intel SSE3 support and Supplemental Streaming SIMD Extension 3 SSSE3 support Micro FCBGA8 packaging technologies Thermal management support via Intel Thermal Monitor 1 and Intel Thermal Monitor 2 FSB Lane Reversal for flexible routing Supports C0 C1 e C2 e C4 e L2 Dynamic Cac...

Страница 26: ...tor BTO Item Specification Vendor Model Name Seagate ST9160310AS Toshiba MK1652GSX Toshiba MK1655GSX HGST HTS543216L 9A300 HGST HTS545016B 9A300 WD WD1600BEVT Capacity GB 160 160 160 160 160 160 Bytes per sector 512 512 512 512 512 512 Data heads 2 2 2 2 2 2 Drive Format Disks 1 1 1 1 1 1 Spindle speed RPM 5400 5400 5400 5400 5400 5400 Performance Specifications Buffer size 8 MB 8 MB 8 MB 8 MB 8 M...

Страница 27: ...22 72 H x 125 28 V 222 72 H x 125 28 V Display resolution pixels 1024 x 3 RGB x 600 1024 x 600 1024 x R G B x 600 Pixel Pitch mm 0 2175 H X 0 2088 V 0 2175 H x 0 2088 V typical 0 2175 H x 0 2088 V Typical White Luminance cd m2 also called Brightness 200 typ 5 points average 200 200 typ Contrast Ratio 400 1 typ 300 1 typical 650 1 typ Response Time Optical Rise Time Fall Time msec 16 typ 25 Max 16 ...

Страница 28: ...ne amplifiers for port A and port D port E port F and port I Headphone amplifier for port I HP OUT is designed to drive output without external DC blocking capacitors Software selectable 2 5V and 3 2V reference output for microphone bias Software selectable boost gain 10 20 30dB for analog microphone input Two jack detection pins each supports detection of up to 4 jacks Jack detection function is ...

Страница 29: ...ace User accessible SIM card by battery removal Antenna Has to be placed on the sides of LCD in A B cover Item Specification Chipset FOXCON T60H928 01 LF Bluetooth miniUSB module Features Embedded USB solution with antenna Bluetooth 2 0 EDR Bluetooth control for BT optical mouse Item Specification Type IEEE802 11 b g Half PCI e Card Features IEEE 802 11 b g PCI Express Half Mini card H2 type Item ...

Страница 30: ...20 Chapter 1 ...

Страница 31: ...e boot device without entering BIOS SETUP Utility Navigating the BIOS Utility There are six menu options Information Main Advanced Security Power Boot and Exit Follow these instructions To choose a menu use the left and right arrow keys To choose an item use the up and down arrow keys To change the value of a parameter press F5 or F6 A plus sign indicates the item has sub items Press Enter to expa...

Страница 32: ...ld displays the manufacturer of this system UUID Number Universally Unique Identifier UUID is an identifier standard used in software construction standardized by the Open Software Foundation OSF as part of the Distributed Computing Environment DCE InsydeH20 Setup Utility Rev 3 5 F1 ESC Help Exit Select Item Select Menu Change Values Select SubMenu Enter F9 F10 Setup Default Save and Exit Intel R ...

Страница 33: ...m LAN remote server Option Enabled or Disabled F12 Boot Menu Enables disables Boot Menu during POST Option Enabled or Enabled D2D Recovery Enables disables D2D Recovery function The function allows the user to create a hidden partition on hard disc drive to store operation system and restore the system to factory defaults Option Enabled or Disabled SATA Mode Control the mode in which the SATA cont...

Страница 34: ...ssword Press Enter to set the user password When user password is set this password protects the BIOS Setup Utility from unauthorized access The user can enter Setup menu only and does not have right to change the value of parameters Set Hdd Password Enter HDD password Power on password Defines whether a password is required or not while the events defined in this group happened The following sub ...

Страница 35: ...ter to Set 4 If desired you can opt to enable the Password on boot parameter 5 When you are done press F10 to save the changes and exit the BIOS Setup Utility Removing a Password Follow these steps 1 Use the and keys to highlight the Set Supervisor Password parameter and press the Enter key The Set Password box appears 2 Type the current password in the Enter Current Password field and press Enter...

Страница 36: ... When you are done press F10 to save the changes and exit the BIOS Setup Utility If the verification is OK the screen will display as following The password setting is complete after the user presses Enter If the current password entered does not match the actual current password the screen will show you the Setup Warning If the new password and confirm new password strings do not match the screen...

Страница 37: ...ove it down the list or F6 to move it up the list Press Esc to escape the menu F1 ESC Help Exit Select Item Select Menu Change Values Select SubMenu Enter F9 F10 Setup Default Save and Exit Boot priority order 1 IDE0 ST9250315AS 2 IDE1 3 USB FDD 4 USB HDD 5 Network Boot Atheros Boot Agent 6 USB CDROM Boot priority order 1 IDE0 ST9250315AS 2 IDE1 3 USB FDD 4 USB HDD 5 Network Boot Atheros Boot Agen...

Страница 38: ...ues for all SETUP item Discard Changes Load previous values from CMOS for all SETUP items Save Changes Save Setup Data to CMOS Item Specific Help Exit System Setup and save your changes to CMOS F1 ESC Help Exit Select Item Select Menu Change Values Select SubMenu Enter F9 F10 Setup Default Save and Exit Exit Saving Changes Exit Discarding Changes Load Setup Defaults Discard Changes Save Changes Ex...

Страница 39: ...Diskette before you use the Phlash utility NOTE Do not install memory related drivers XMS EMS DPMI when you use the Phlash NOTE Please use the AC adaptor power supply when you run the flashit utility If the battery pack does not contain enough power to finish BIOS flash you may not boot the system because the BIOS is not completely loaded Follow the steps below to run the Phlash 1 Prepare a bootab...

Страница 40: ...eps to use the DOS Flash Utility 1 Copy the BIOS flash tool and the BIOS file to a USB storage disk Now use this disk to boot the system 2 Use the DOS command prompt to enter the following command Flashit bios _ver fd dc mc all The BIOS flash process begins ...

Страница 41: ...Chapter 2 31 WinFlash Utility Perform the following steps to use the WinFlash Utility 1 Copy the BIOS file into the Winflash folder 2 Double click the WinFlash executable file ...

Страница 42: ...32 Chapter 2 3 Click OK to begin the update A progress screen displays 4 When the process is complete close all programs and applications and reboot the system ...

Страница 43: ... An Unlock Password displays 3 Make a note of the key 76943488 in the example 4 Boot up the system and open a DOS prompt 5 Enter the UnlockHD EXE command and input the key to create an unlock code Make a note of the result for example 46548274 6 Reboot and enter the BIOS by pressing F2 when prompted 7 Go to the Security menu and select Set Hdd Password 8 Enter the unlock code generated by UnlockHD...

Страница 44: ...words If you key in the wrong Supervisor Password three times System Disabled displays on the screen See the image below To reset the BIOS password run BIOS_PW EXE as follows 1 Key in bios_pw 14452 0 2 Select one string from the list ...

Страница 45: ...etc for the BIOS user password Cleaning BIOS Passwords To clear the password perform the following steps 1 From a DOS prompt Execute clnpwd exe 2 Press 1 or 2 to clean the desired password shown on the screen The onscreen message determines whether the function is successful or not ...

Страница 46: ...2 to change the boot sequence to HDD CD ROM LAN Floppy Using DMITools The DMI Desktop Management Interface Tool copies BIOS information to eeprom to be used in the DMI pool for hardware management When the BIOS displays Verifying DMI pool data it is checking the table correlates with the hardware before sending to the operating system Windows etc To update the DMI Pool perform the following steps ...

Страница 47: ...t dmitools wp Acer Example 3 Write Serial Number to EEPROM Input dmitools ws 01234567890123456789 Example 4 Write UUID to EEPROM Input dmitools wu Example 5 Write Asset Tag to EEPROM Input dmitools wa Acer Asstag Using the LAN MAC Utility Perform the following steps to write MAC information to eeprom 1 Use a text editor for example Notepad to edit the MAC CFG file as shown WriteData 001122334455 M...

Страница 48: ...38 Chapter 2 ...

Страница 49: ...equirements To disassemble the computer you need the following tools Wrist grounding strap and conductive mat for preventing electrostatic discharge Flat screwdriver Philips screwdriver Plastic flat screwdriver Plastic tweezers NOTE The screws for the different components vary in size During the disassembly process group the screws with the corresponding components to avoid mismatch when putting b...

Страница 50: ...ove the battery pack Disassembly Process The disassembly process is divided into the following sections External components disassembly Main unit disassembly LCD module disassembly The flowcharts provided in the succeeding disassembly sections illustrate the entire disassembly sequence Observe the order of the sequence to avoid damage to any of the hardware components For example if you want to re...

Страница 51: ... otherwise stated External Modules Disassembly Flowchart NOTE Items enclosed with broken lines are optional and may not be present Screw List Step Screw Quantity Part No WLAN Module M2 3 1 86 S0207 001 3G Module M2 3 1 86 S0207 001 Disconnect power and signal cables from system Remove Battery Turn off system and peripherals power Remove DIMM Remove WLAN Remove 3G Remove Lower Covers Remove SD Dumm...

Страница 52: ...e Battery Pack 1 Turn the computer over 2 Slide the battery lock unlock latch to the unlock position 3 Slide and hold the battery release latch to the release position 1 then slide out the battery pack from the main unit 2 1 2 ...

Страница 53: ...Chapter 3 43 Removing the SD Dummy Card 1 Push the SD dummy card all the way in to eject it 2 Pull the card out from the slot ...

Страница 54: ...the Lower Covers 1 See Removing the Battery Pack on page 42 2 Loosen the two captive screws in Memory red callout and Wireless covers green callout 3 Lift the Memory Cover up to remove 4 Lift the Wireless Cover up to remove ...

Страница 55: ...Chapter 3 45 Removing the DIMM Module 1 See Removing the Lower Covers on page 44 2 Push out the release latches on both sides of the DIMM socket to release the DIMM module 3 Remove the DIMM module ...

Страница 56: ... 1 See Removing the Lower Covers on page 44 2 Disconnect the antenna cables from the WLAN Module IMPORTANT The black cable attaches to the Main terminal and the white or gray for models without the optional 3G module cable attaches to the AUX terminal 3 Move the antennas away and remove the single screw on the WLAN Module Step Size Quantity Screw Type WLAN Module M2 3 1 ...

Страница 57: ...Chapter 3 47 4 Detach the WLAN Module from the WLAN socket NOTE When reattaching the antennas ensure the cables are tucked into the chassis to prevent damage ...

Страница 58: ...ing the Lower Covers on page 44 2 Disconnect the antenna cables from the 3G Module IMPORTANT The yellow cable attaches to the M Main terminal and the blue cable attaches to the A Aux terminal 3 Move the antennas away and remove the single screw on the 3G Module Step Size Quantity Screw Type 3G Module M2 3 1 ...

Страница 59: ...Chapter 3 49 4 Detach the 3G Module from the socket NOTE When reattaching the antennas ensure the cables are tucked into the chassis to prevent damage ...

Страница 60: ...rwise stated Upper Cover Disassembly Flowchart Screw List Step Screw Quantity Part No Upper Cover M2 6 3 86 S6507 001 M2 5 8 86 S0207 002 M2 3 7 86 S0207 001 Power Board M2 2 2 86 W4107 002 Button Board M2 3 2 86 S0207 001 LCD Module M2 5 2 86 S0207 002 Remove External Modules before proceeding Remove LCD Module Remove Keyboard Remove Upper Cover Remove Button Board Remove Power Board Remove Touch...

Страница 61: ...nt 3 Locate the three securing latch at the top of the Keyboard as shown 4 Gently lift the Keyboard using one of the keys as shown and unlock the three securing latches above the F2 F8 and Pause Break keys by pressing down with a thumb IMPORTANT The use of a plastic tool may help to release the latches Do not use excessive force or metal tools ...

Страница 62: ...52 Chapter 3 5 Grasp the Keyboard and lift upward in the centre as shown 6 Turn the Keyboard over and place it on the TouchPad area as shown 7 Lift the Keyboard FFC securing latch as shown ...

Страница 63: ...Chapter 3 53 8 Disconnect the FFC and remove the Keyboard ...

Страница 64: ...ver Remove the seven securing screws 3 Turn the computer over and remove the nine screws securing the Upper Cover Step Size Quantity Screw Type Upper Cover red callouts M2 6 3 Upper Cover green callouts M2 3 4 Step Size Quantity Screw Type Upper Cover red callouts M2 5 8 Upper Cover green callout M2 3 1 ...

Страница 65: ...r 3 55 4 Disconnect the following cables from the Mainboard Release the locking latch on A as shown Disconnect A from the Mainboard Release the locking latch on B as shown Disconnect B from the Mainboard A B ...

Страница 66: ... two securing screws as shown 7 Grasp the hinge covers and remove them using a side to side motion as indicated 8 Open the lid and turn the computer around to access the two side covers 9 Grasp the rear edge of the right side cover as shown and pry it away from the Upper Cover Step Size Quantity Screw Type Hinge Cover M2 3 2 ...

Страница 67: ...Chapter 3 57 10 Grasp the rear edge of the left side cover as shown and pry it away from the Upper Cover 11 Lift the Upper Cover clear of the computer in the direction of the arrow ...

Страница 68: ...ng the Power Board 1 See Removing the Upper Cover on page 54 2 Open the FFC locking latch as shown and remove the FFC 3 Remove the two securing screws from the Power Board Step Size Quantity Screw Type Power Board M2 2 2 ...

Страница 69: ...Chapter 3 59 4 Remove the board from the Upper Cover ...

Страница 70: ...r on page 54 2 Open the Mainboard FFC locking latch and remove the FFC as shown 3 Grasp the other end of the Mainboard FFC and pass the cable between the plastic and cover 4 Peel back the plastic strip and release the Mainboard FFC from the adhesive to remove the cable ...

Страница 71: ...Open the TouchPad FFC locking latch and remove the FFC as shown 6 Remove the two securing screws from the Button Board 7 Lift the Button Board clear of the Upper Cover Step Size Quantity Screw Type Button Board M2 3 2 ...

Страница 72: ...TouchPad on the Aspire one If the TouchPad malfunctions follow the disassembly steps to remove any additional components on the Upper Cover and replace the entire Upper Cover 1 See Removing the Button Board on page 60 2 Open the TouchPad FFC locking latch and remove the FFC as shown ...

Страница 73: ...sive strip securing the LCD power cable in place 3 Disconnect the LCD power cable as shown 4 Carefully pull the antenna and 3G cables through from the underside of the computer NOTE The 3G Module is only available on certain models If 3G is not supported only the two WLAN cables must be removed ...

Страница 74: ...wo securing screws from the LCD brackets IMPORTANT Ensure all cables are clear of the lower cover before removing the LCD module 6 Grasp the module with both hands and lift upwards Step Size Quantity Screw Type LCD Module M2 5 2 ...

Страница 75: ...D Board M2 3 2 86 S0207 001 Speaker Module M2 4 3 86 S6507 003 SSD Module SSD SKU only M2 3 1 86 S0207 001 SSD Carrier SSD SKU only M1 6 2 5 2 86 S6507 002 HDD Module HDD SKU only M2 3 3 86 S0207 001 HDD Carrier HDD SKU only M2 3 4 86 S0207 001 Mainboard SSD and HDD SKU M2 3 3 86 S0207 001 Mainboard SSD SKU only M2 3 1 86 S0207 001 Thermal Module M2 3 3 86 S0207 001 CPU Fan M2 3 1 86 S0207 001 Rem...

Страница 76: ...66 Chapter 3 SSD SKU Disassembly Procedure The SSD SKU Lower Assembly appears as shown after removal of the Upper Cover and LCD Module ...

Страница 77: ...er 3 67 Removing the LED Board 1 See Removing the Upper Cover on page 54 2 Open the Mainboard FFC locking latch and remove the FFC as shown 3 Open the LED Board FFC locking latch and remove the FFC as shown ...

Страница 78: ...68 Chapter 3 4 Remove the two securing screws from the LED Board 5 Lift the LED Board clear of the Lower Cover Step Size Quantity Screw Type LED Board M2 3 2 ...

Страница 79: ... the Speaker Module 1 See Removing the Upper Cover on page 54 2 Remove the three securing screws from the Speaker Module 3 Disconnect the Speaker cable from the Mainboard Step Size Quantity Screw Type Speaker Module M2 4 3 ...

Страница 80: ...70 Chapter 3 4 Remove the adhesive strips holding the cable in place 5 Lift the left and right side speakers from the Lower Cover as shown ...

Страница 81: ...emoving the Upper Cover on page 54 2 Disconnect the Bluetooth cable from the Mainboard 3 Lift the cable as shown to disengage the adhesive strip from the Mainboard 4 Lift the Bluetooth Module upward to disengage the adhesive holding the module in place ...

Страница 82: ...72 Chapter 3 5 Disconnect the Bluetooth cable from the module ...

Страница 83: ...ee Removing the Upper Cover on page 54 2 Remove the single securing screw from the SSD Module 3 Slide the SSD Module in the direction of the arrow to disconnect the interface Remove the module from the Lower Cover Step Size Quantity Screw Type SSD Module M2 3 1 ...

Страница 84: ...74 Chapter 3 4 Remove the two screws securing the SSD to the carrier 5 Remove the SSD from the carrier Step Size Quantity Screw Type SSD Carrier 2 ...

Страница 85: ... 73 or Removing the Hard Disk Drive Module on page 87 depending on the model purchased 5 Remove the four or three for the HDD SKU screws securing the Mainboard to the Lower Cover NOTE The HDD SKU Mainboard is secured with three screws 6 Lift the Mainboard using both hands and remove it from the Lower Cover Step Size Quantity Screw Type Mainboard red callout SSD and HDD SKU M2 3 3 Mainboard green c...

Страница 86: ... RTC Battery IMPORTANT Follow local regulations for disposal of all batteries 1 See Removing the Mainboard on page 75 2 Turn the Mainboard over and locate the RTC Battery 3 Lift the battery out of the Mainboard socket as shown ...

Страница 87: ...e Mainboard on page 75 2 Turn the Mainboard CPU side up and place it on a clean surface 3 Remove the three securing screws from the Thermal Module 4 Grasp the Thermal Module and lift it clear of the Mainboard Step Size Quantity Screw Type Thermal Module M2 3 3 ...

Страница 88: ...3 Removing the CPU Fan 1 See Removing the Thermal Module on page 77 2 Disconnect the CPU Fan power cable 3 Remove the single screw securing the CPU Fan to the Mainboard Step Size Quantity Screw Type CPU Fan M2 3 1 ...

Страница 89: ...Chapter 3 79 4 Lift the CPU Fan clear of the Mainboard ...

Страница 90: ...80 Chapter 3 HDD SKU Disassembly Procedure The HDD SKU Lower Assembly appears as shown after removal of the Upper Cover and LCD Module ...

Страница 91: ...er 3 81 Removing the LED Board 1 See Removing the Upper Cover on page 54 2 Open the Mainboard FFC locking latch and remove the FFC as shown 3 Open the LED Board FFC locking latch and remove the FFC as shown ...

Страница 92: ...82 Chapter 3 4 Remove the two securing screws from the LED Board 5 Lift the LED Board clear of the Lower Cover Step Size Quantity Screw Type LED Board M2 3 2 ...

Страница 93: ... the Speaker Module 1 See Removing the Upper Cover on page 54 2 Remove the three securing screws from the Speaker Module 3 Disconnect the Speaker cable from the Mainboard Step Size Quantity Screw Type Speaker Module M2 4 3 ...

Страница 94: ...84 Chapter 3 4 Remove the adhesive strip holding the cable in place 5 Lift the left and right side speakers from the Lower Cover as shown ...

Страница 95: ...emoving the Upper Cover on page 54 2 Disconnect the Bluetooth cable from the Mainboard 3 Lift the cable as shown to disengage the adhesive strip from the Mainboard 4 Lift the Bluetooth Module upward to disengage the adhesive holding the module in place ...

Страница 96: ...86 Chapter 3 5 Lift the module and cable clear of the Lower Cover 6 Disconnect the Bluetooth cable from the module ...

Страница 97: ...emoving the Upper Cover on page 54 2 Remove the three securing screws from the HDD Module 3 Slide the HDD Module in the direction of the arrow to disconnect the interface Remove the module from the Lower Cover Step Size Quantity Screw Type HDD Module M2 3 3 ...

Страница 98: ...er IMPORTANT The procedures for removing the Mainboard RTC Battery Thermal Module and CPU Fan are identical for both SKUs See Removing the Mainboard on page 75 Removing the RTC Battery on page 76 Removing the Thermal Module on page 77 and See Removing the CPU Fan on page 78 Step Size Quantity Screw Type HDD Carrier M3 3 4 ...

Страница 99: ...nly therefore there are four antenna cables white black yellow and blue addressed during the procedure If 3G is not supported only the WLAN antennas white and black need to be removed LCD Module Disassembly Flowchart Screw List Step Screw Quantity Part No LCD Bezel M2 5 6 86 S0207 002 LCD Panel M2 3 2 LCD Brackets M2 3 4 Remove LCD Panel Remove LCD Bezel Remove LCD FPC Cable Remove LCD Panel from ...

Страница 100: ...he six screw caps and screws from the LCD Bezel 3 Starting from the inside top edge pry the bezel away from the panel Continue moving down the sides until the bezel is removed If necessary use a plastic pry to release the corners of the bezel Step Size Quantity Screw Type LCD Bezel M2 5 6 ...

Страница 101: ...Chapter 3 91 4 Lift up the bezel and remove it from the LCD Module ...

Страница 102: ...92 Chapter 3 Removing the Camera Board 1 See Removing the LCD Bezel on page 90 2 Disconnect the cable from the Camera Board as shown 3 Remove the Camera Board from the LCD Module ...

Страница 103: ...Chapter 3 93 Removing the Microphone Board 1 See Removing the LCD Bezel on page 90 2 Disconnect the cable from the Microphone Board as shown 3 Remove the Microphone Board from the LCD Module ...

Страница 104: ... Panel 1 See Removing the Camera Board on page 92 2 Remove the two securing screws from the LCD Panel 3 Hold the LCD Panel by the hinges and lift to remove Place it on a clean surface Step Size Quantity Screw Type LCD Panel M2 3 2 ...

Страница 105: ... Brackets and FPC Cable 1 See Removing the LCD Panel on page 94 2 Remove the four securing screws two each side from the LCD Panel brackets 3 Remove the brackets from the LCD Panel Step Size Quantity Screw Type LCD Brackets M2 3 4 ...

Страница 106: ... over on a clean surface Lift the cable to release the adhesive strips securing the cable to the panel 5 Carefully lift the adhesive tape protecting the cable connector 6 Carefully lift the adhesive tape securing the cable to the panel ...

Страница 107: ...Chapter 3 97 7 Disconnect the cable from the LCD panel as shown ...

Страница 108: ... procedure If 3G is not supported only the WLAN antennas white and black need to be removed 1 See Removing the LCD Panel on page 94 2 The LCD Module appears as follows when the Camera Microphone and LCD Panel are removed A yellow 3G Antenna cable B combined blue 3G Antenna cable white and black WLAN Antenna cables 3 Remove the adhesive strips holding the yellow 3G cable in place A B ...

Страница 109: ...the 3G Antenna cable completely clear of the module 6 Lift the adhesive pad securing the Antenna pad to the module Carefully pry up the yellow cable 3G Antenna pad as shown and remove the pad from the LCD Module IMPORTANT A strong adhesive is used to secure the Antenna pad in place Take care not to bend the pad during removal ...

Страница 110: ...s 8 Lift the adhesive pad securing the Antenna pad to the module Carefully pry up the white cable WLAN Antenna pad as shown and remove the pad from the LCD Module IMPORTANT A strong adhesive is used to secure the Antenna pad in place Take care not to bend the pad during removal 9 Lift the adhesive securing the Antenna cable to the module ...

Страница 111: ...Lift the adhesive pad securing the Antenna pad to the module Carefully pry up the blue and black cable 3G and WLAN Antenna pad as shown and remove the pad from the LCD Module IMPORTANT A strong adhesive is used to secure the Antenna pad in place Take care not to bend the pad during removal ...

Страница 112: ...pad as shown Press down the pad and adhesive tape as indicated to secure it in place 2 Replace the WLAN Antenna cable as shown using all available cable clips 3 Replace the adhesive tape to secure the WLAN cable in place 4 Replace the adhesive tape securing the WLAN Antenna to the combined 3G and WLAN Antenna pad ...

Страница 113: ...ce the 3G Antenna pad as shown Press down the pad and adhesive tape as indicated to secure it in place 7 Run the 3G Antenna cable along the LCD Module using all available cable clips Replace the lid sensor magnet as shown 8 Ensure that the 3G Antenna cable runs as shown using all available cable clips and securing tape ...

Страница 114: ...hapter 3 9 Run the 3G Antenna cable along the bottom edge of the LCD Module as shown using all available cable clips 10 The LCD Module appears as follows when the 3G and WLAN Antennas are correctly installed ...

Страница 115: ...anel connector as shown 2 Secure the connector by replacing the adhesive strip as shown 3 Replace the adhesive protection strip as shown 4 Replace the cable as shown on the rear of the panel IMPORTANT Ensure that the LCD Cable runs as shown to avoid trapping when the Bezel is replaced ...

Страница 116: ...106 Chapter 3 5 Align the screw holes and replace the left and right LCD brackets as shown 6 Secure the brackets to the panel using four bracket screws two each side ...

Страница 117: ...f the brackets are positioned correctly 2 Ensure the cables pass through the hinge well as shown two cables above and two below the hinge NOTE For the WLAN only model both cables should pass below the hinge 3 Ensure that the locating pins on the bottom edge of the brackets are positioned correctly and replace the two securing screws ...

Страница 118: ...e Microphone Board in the LCD Module and press down to secure it in place 2 Connect the Microphone cable as shown 1 Ensure that the locating pins are correctly positioned and place the Camera Board in the LCD Module Press down to secure it in place 2 Connect the Camera cable as shown ...

Страница 119: ...l 1 Replace the bezel top edge first as shown 2 Starting at the hinge wells ensure that the Antenna and LCD power cables are not trapped and press down to secure the bezel in place 3 Press down the top corners to secure the bezel in place ...

Страница 120: ...110 Chapter 3 4 Press down around the edges of the bezel to secure it in place 5 Replace the six screws and screw caps ...

Страница 121: ...e is split in to two separate sections for the SSD and HDD models SSD SKU Reassembly Procedure Replacing the CPU Fan 1 Align the screw holes on the CPU Fan and Mainboard and replace the CPU Fan 2 Replace the single securing screw 3 Connect the CPU Fan cable to the Mainboard connector as shown ...

Страница 122: ...n place before replacing the Thermal Module The following thermal pads are approved for use Eapus XR PE 1 Align the screw holes on the Thermal Module and Mainboard and replace the module CPU Fan side first 2 Lower the Thermal Module in to place and insert the three securing screws ...

Страница 123: ...RTC Battery in to the Mainboard socket as shown 2 Press down to secure it in place 1 Align the screw holes and replace the Mainboard in the Lower Cover as shown 2 Replace the four or three screws to secure the Mainboard in place NOTE The green callout applies to the SSD SKU only ...

Страница 124: ...carrier as shown 2 Replace the two securing screws 3 Insert the module in the direction of the arrow Ensure that the interface is properly connected 4 Replace the single securing screw 1 Connect the Bluetooth cable to the Bluetooth Module 2 Place the Bluetooth Module in the Lower Cover as shown ...

Страница 125: ...Chapter 3 115 3 Run the Bluetooth cable along the Lower Cover as shown using all the available cable clips 4 Connect the Bluetooth cable to the Mainboard ...

Страница 126: ...dule 1 Align the screws on the Speaker Modules and the Lower Cover 2 Replace the left and right Speakers as shown Ensure that the locating pin on the left Speaker is seated correctly 3 Replace the adhesive tapes securing the cables in place ...

Страница 127: ...nnect the Speaker cable to the Mainboard connector 5 Replace the three securing screws 1 Place the LED Board in the Lower Cover as shown Ensure that the Bluetooth and WLAN switches red callouts are correctly placed in the spacers green callouts ...

Страница 128: ...118 Chapter 3 2 Replace the two securing screws 3 Connect the FFC to the LED Board and close the locking latch 4 Connect the FFC to the Mainboard and close the locking latch ...

Страница 129: ...U Fan on page 111 Replacing the Thermal Module on page 112 Replacing the RTC Battery on page 113 and Replacing the Mainboard on page 113 Replacing the HDD Module 1 Place the HDD in the carrier as shown 2 Replace the four securing screws two each side 3 Insert the module in the direction of the arrow Ensure that the interface is properly connected 4 Replace the three securing screws ...

Страница 130: ...Connect the Bluetooth cable to the Bluetooth Module 2 Place the Bluetooth Module in the Lower Cover as shown 3 Run the Bluetooth cable along the Lower Cover as shown using all the available cable clips 4 Connect the Bluetooth cable to the Mainboard ...

Страница 131: ...r 2 Replace the left and right Speakers as shown Ensure that the locating pin on the left Speaker is seated correctly 3 Ensure that the cables run as shown tucked in to the cover between components to avoid trapping when the Upper Cover is replaced 4 Replace the adhesive tape securing the cables in place ...

Страница 132: ...nnect the Speaker cable to the Mainboard connector 6 Replace the three securing screws 1 Place the LED Board in the Lower Cover as shown Ensure that the Bluetooth and WLAN switches red callouts are correctly placed in the spacers green callouts ...

Страница 133: ...Chapter 3 123 2 Replace the two securing screws 3 Connect the FFC to the LED Board and close the locking latch 4 Connect the FFC to the Mainboard and close the locking latch ...

Страница 134: ...r Reassembly Process Replacing the LCD Module 1 Place the LCD Module on the Lower Cover and secure it in place with the two screws 2 Connect the Power cable to the Mainboard and secure the cable in place with the adhesive tape ...

Страница 135: ... 125 3 Pass the Antenna cables through the Lower Cover as shown NOTE The yellow and blue cables are only present on the 3G models 4 The Lower Cover appears as follows when all the LCD cables are correctly placed ...

Страница 136: ...126 Chapter 3 Replacing the TouchPad FFC 1 Insert the FFC in to the TouchPad connector 2 Close the locking latch to secure the cable in place ...

Страница 137: ...r Cover to engage the securing clips 2 Replace the two securing screws 3 Insert the TouchPad FFC in to the Button Board connector and close the locking latch 4 Lift the plastic covering and insert the FFC so that it is accessible from the top side 5 Secure the FFC in place with the adhesive strip ...

Страница 138: ...128 Chapter 3 6 Insert the FFC in to the Button Board and close the locking latch ...

Страница 139: ...acing the Power Board 1 Place the Power Board front edge first on to the Upper Cover to seat the locating pin 2 Replace the two securing screws 3 Insert the FFC in to the Power Board connector and close the locking latch ...

Страница 140: ...pper Cover in to place as shown 3 Replace the left side cover front edge first as shown 4 Press the cover in to place so that there are no gaps between the Upper an left covers 5 Replace the right side cover front edge first as shown 6 Press the cover in to place so that there are no gaps between the Upper an right covers ...

Страница 141: ...Chapter 3 131 7 Close the lid and replace the left hinge cover as shown 8 Replace the right hinge cover as shown 9 Replace the two securing screws in the hinges ...

Страница 142: ...132 Chapter 3 10 Reconnect the following cables to the Mainboard Connect A to the Mainboard Secure the locking latch on A as shown Connect B to the Mainboard Secure the locking latch on B as shown A B ...

Страница 143: ...Cover NOTE Ensure the correct screw type is used for each hole Red callout M2 5 Green callout M2 3 12 Turn the computer over and replace the seven securing screws as shown NOTE Ensure the correct screw type is used for each hole Red callout M2 6 Green callout M2 3 ...

Страница 144: ...nsert the Keyboard FFC in to the Mainboard connector 2 Close the FFC locking latch as shown 3 Turn the Keyboard over and slide it in the direction of the arrow IMPORTANT Ensure the four securing tabs slide underneath the Upper Cover to secure the keyboard in place ...

Страница 145: ...the three securing clips 1 Turn the computer over Insert the 3G Module in to the socket 2 Replace the single securing screw 3 Connect the two 3G Antenna cables to the 3G Module IMPORTANT The yellow cable attaches to the M Main terminal and the blue cable attaches to the A Aux terminal ...

Страница 146: ... socket 2 Replace the single securing screw 3 Connect the two Antenna cables to the WLAN Module IMPORTANT The black cable attaches to the Main terminal and the white or gray cable attaches to the Aux terminal 1 Insert the DIMM Module in to the DIMM slot 2 Press the module down to complete the installation ...

Страница 147: ... Covers 1 Replace the Wireless Cover and press down around the perimeter to snap it in to place 2 Replace the Memory Cover and press down around the perimeter to snap it in to place 3 Secure the covers in place with the captive screws ...

Страница 148: ...rt the SD Dummy Card as shown 2 Press the card in to the slot until it clicks in to place 1 Slide and hold the battery release latch to the release position 1 then insert the battery pack in to the main unit 2 2 Slide the battery lock unlock latch to the lock position 1 2 ...

Страница 149: ... the diagnostic test or by repeating the same operation 3 Use the following table with the verified symptom to determine which page to go to 4 If the Issue is still not resolved see Online Support Information on page 193 Symptoms Verified Go To Power On Issue Page 140 No Display Issue Page 141 LCD Failure Page 143 Internal Keyboard Failure Page 143 TouchPad Failure Page 144 Internal Speaker Failur...

Страница 150: ...cal outlet 2 Remove any extension cables between the computer and the outlet 3 Remove any surge protectors between the computer and the electrical outlet Plug the computer directly into a known good electrical outlet 4 Remove all external and non essential hardware connected to the computer that are not necessary to boot the computer to the failure point 5 Remove any recently installed software 6 ...

Страница 151: ...the computer has power by checking at least one of the following occurs Fans start up Status LEDs light up If there is no power see Power On Issue on page 140 3 Drain any stored power by removing the power cable and battery and holding down the power button for 10 seconds Reconnect the power and reboot the computer 4 Connect an external monitor to the computer and switch between the internal displ...

Страница 152: ...mbly Process on page 40 5 Check the display resolution is correctly configured a Minimize or close all Windows b If display size is only abnormal in an application check the view settings and control mouse wheel zoom feature in the application c If desktop display resolution is not normal right click on the desktop and select Personalize Display Settings d Click and drag the Resolution slider to t...

Страница 153: ... 193 LCD Failure If the LCD fails perform the following actions one at a time to correct the problem Do not replace a non defective FRUs Built In Keyboard Failure If the built in Keyboard fails perform the following actions one at a time to correct the problem Do not replace a non defective FRUs START Check LCD module Replace Mainboard Swap LCD Panel Cable NG OK START Keyboard FFC well connected K...

Страница 154: ... Problems If sound problems are experienced perform the following actions one at a time to correct the problem 1 Reboot the computer 2 Navigate to Start Control Panel System and Maintenance System Device Manager Check the Device Manager to determine that START Check M B T P FCC Check Upper Cover Replace Mainboard Reassemble T P FFC to Mainboard Swap Reassemble T P board or T P FFC OK NG NG OK STAR...

Страница 155: ...t muted 6 Navigate to Start Control Panel Hardware and Sound Sound Ensure that Speakers are selected as the default audio device green check mark NOTE If Speakers does not show right click on the Playback tab and select Show Disabled Devices clear by default 7 Select Speakers and click Configure to start Speaker Setup Follow the onscreen prompts to configure the speakers 8 Remove and recently inst...

Страница 156: ...d select Show Disabled Devices clear by default 3 The microphone appears on the Recording tab 4 Right click on the microphone and select Enable 5 Select the microphone then click Properties Select the Levels tab 6 Increase the volume to the maximum setting and click OK 7 Test the microphone hardware a Select the microphone and click Configure b Select Set up microphone c Select the microphone type...

Страница 157: ...to locate and resolve issues with the computer i When complete click Finish If an issue is discovered follow the onscreen information to resolve the problem 4 Run the Windows Memory Diagnostic Tool For more information see Windows Help and Support 5 Restart the computer and press F2 to enter the BIOS Utility Check the BIOS settings are correct and that CD DVD drive is set as the first boot device ...

Страница 158: ...rt fails perform the following actions one at a time to correct the problem Do not replace a non defective FRUs Power Button Failure If the Power Button fails perform the following actions one at a time to correct the problem Do not replace a non defective FRUs ...

Страница 159: ...e is not fixed repeat the preceding steps and select an earlier time and date 9 Run the Event Viewer to check the events log for errors For more information see Windows Help and Support 10 Roll back the mouse driver to the previous version if updated recently 11 Remove and reinstall the mouse driver 12 Check the Device Manager to determine that The device is properly installed There are no red Xs ...

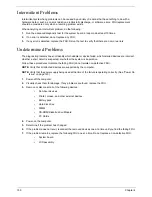
Страница 160: ...her a short circuit is suspected or whether the system is inoperative Follow these procedures to isolate the failing FRU do not isolate non defective FRU NOTE Verify that all attached devices are supported by the computer NOTE Verify that the power supply being used at the time of the failure is operating correctly See Power On Issue on page 140 1 Power off the computer 2 Visually check them for d...

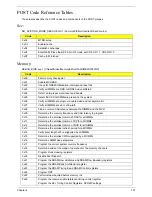
Страница 161: ...a common CAS latency between the DIMMS and the MCH 0x09 Determine the memory frequency and CAS latency to program 0x10 Determine the smallest common TRAS for all DIMMs 0x11 Determine the smallest common TRP for all DIMMs 0x12 Determine the smallest common TRCD for all DIMMs 0x13 Determine the smallest refresh period for all DIMMs 0x14 Verify burst length of 8 is supported by all DIMMs 0x15 Determi...

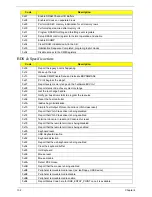
Страница 162: ...e 0x50 Get the root bridge handle 0x51 Notify pci bus driver starts to program the resource 0x58 Reset the host controller 0x5A IdeBus begin initialization 0x70 Simple Text Output Protocol Functions VGA class reset 0x71 Report that VGA Class driver is being disabled 0x72 Report that VGA Class driver is being enabled 0x78 Terminal Console In reset and Console Out reset 0x79 Report that the remote t...

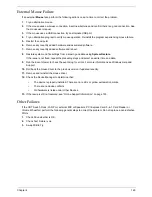
Страница 163: ...Chapter 4 153 0xF8 Report that ExitBootServices has been called 0xF9 Runtime driver set virtual address map Code Description ...

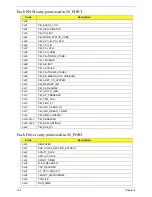
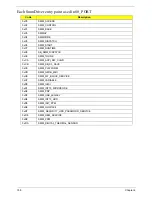
Страница 164: ...ULE 0x0D PEI_PLATFORM_STAGE2 0x0E PEI_SB_SMBUS_ARP_DISABLED 0x0F PEI_HOST_TO_SYSTEM 0x10 PEI_MEMORY_INIT 0x11 PEI_S3_RESUME 0x12 PEI_CLOCK_GEN 0x13 PEI_OP_PRESENCE 0x14 PEI_TPM_TCG 0x15 PEI_FIND_FV 0x16 PEI_H2O_DEBUG_IO 0x17 PEI_H2O_DEBUG_COMM 0x18 PEI_SMM_CONTROL 0x19 0x1F PEI_RESERVED 0x20 0x2E PEI_OEM_DEFINED 0x2F PEI_DXE_IPL Code Description 0x30 RESERVED 0x31 DXE_CRC32_SECTION_EXTRACT 0x32 SC...

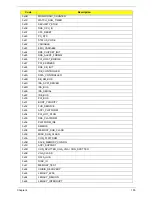
Страница 165: ...R 0x4B SB_SM_BUS 0x4C ISA_ACPI_DRIVER 0x4D ISA_BUS 0x4E ISA_SERIAL 0x4F IDE_BUS 0x50 PCI_BUS 0x51 BOOT_PRIORITY 0x52 FVB_SERVICE 0x53 ACPI_PLATFORM 0x54 PCI_HOT_PLUG 0x55 DXE_PLATFORM 0x56 PLATFORM_IDE 0x57 SMBIOS 0x58 MEMORY_SUB_CLASS 0x59 MISC_SUB_CLASS 0x5A CON_PLATFORM 0x5B SAVE_MEMORY_CONFIG 0x5C ACPI_SUPPORT 0x5D CON_SPLITTER_UGA_VGA CON_SPLITTER 0x5E VGA_CLASS 0x5F DATA_HUB 0x60 DISK_IO 0x6...

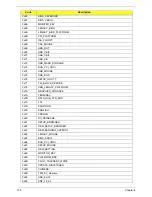
Страница 166: ...TILITY 0x77 FW_BLOCK_SERVICE 0x78 USB_LEGACY_PLATFORM 0x79 GRAPHICS_CONSOLE 0x7A TERMINAL 0x7B DATA_HUB_STD_ERR 0x7C FAT 0x7D PARTITION 0x7E ENGLISH 0x7F FRENCH 0x80 HII_DATABASE 0x81 SETUP_BROWSER 0x82 OEM_SETUP_BROWSER 0x83 OEM_BADGING_SUPPORT 0x84 LEGACY_MOUSE 0x85 BIOS_SNP16 0x86 BUS_PCI_UNDI 0x87 SETUP_MOUSE 0x88 OEM_SETTING 0x89 MONITOR_KEY 0x8A PLATFORM_BDS 0x8B FAULT_TOLERANT_WRITE 0x8C UP...

Страница 167: ...4 DXE_OEM_SERVICE 0xA5 DXE_EVENT_LOG 0xA6 DXE_ SECURITY_HDD_PASSWORD_SERVICE 0xA7 DXE_LAN_ASF_INIT 0xA8 DXE_BUS_PCI_SERIAL 0xA9 DXE_LAN_IDER_CONTROLLER 0xAA DXE_LAN_AMT 0xAB DXE_ SECURITY_SYSTEM_PASSWORD_SERVICE 0xAC DXE_ SECURITY_ PASSWORD_CONSOLE 0xAD DXE_ DATA_HUB_RECORD_POLICY 0xAE DXE_TPM_DRIVER 0xAF RESERVED 0xB0 JAPANESE 0xB1 DXE_UNICODE_COLLACTION Code Description ...

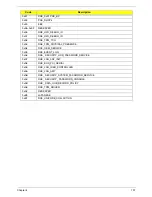
Страница 168: ...E 0xC8 SB_SMM_DISPATCH 0xC9 SMM_THUNK 0xCA SMM_ACPI_SW_CHILD 0xCB SMM_SB_S3_SAVE 0xCC SMM_PLATFORM 0xCD SMM_GMCH_MBI 0xCE SMM_FW_BLOCK_SERVICE 0xCF SMM_VARIABLE 0xD0 SMM_IHISI 0xD1 SMM_INT15_MICROCODE 0xD2 SMM_PNP 0xD3 SMM_USB_LEGACY 0xD4 SMM_INT13_HDD 0xD5 SMM_INIT_PPM 0xD6 SMM_OHCI1394 0xD7 SMM_ SECURITY_HDD_PASSWORD_SERVICE 0xD8 SMM_OEM_SERVICE 0xD9 SMM_PPM 0xDA SMM_DIGITAL_THERMAL_SENSOR ...

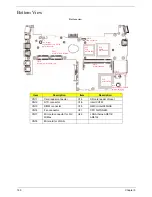
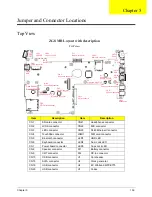
Страница 169: ...nector CN10 USB connector U1 Card reader CN15 SATA connector U2 Clock generator CN19 USB connector U4 EC Winbond WPCE775 CN20 USB connector U7 Codec ZG8 MB Layout with description TOP view U1 Card Reader Realtek RTSSI59 CN3 LFD connector CN1 SD Card connector CN5 Bluetooth connector CN2 Clock Generator CN4 TouchPad connector CN15 SATA connector CN8 Speaker connector CN21 HeadPhone CN7 Power board ...

Страница 170: ...or U21 CPU N270 N280 CN17 Mini card connector for 3G WiMax U22 LAN Atheros AR8114 AR8132 CN18 Mini card for WLAN Bottom view CN11 Card reader U2 Lan chipset Atheros ARS114 ARS132 SATA connector CN14 FAN connector CN18 Mini card for Wireless LAN CN17 Mii card for 3G WiMAX U16 SD card reader chipset JMicron JMB385 U18 intel ICH7M CN13 DIMM connector CN12 RTC connector U21 CPU N270 N280 U19 GMCH inte...

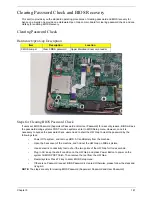
Страница 171: ...sword check users need to short the HW Gap to clear the password by the following steps Power Off a system and remove HDD AC and Battery from the machine Open the back cover of the machine and find out the HW Gap on M B as picture Use an electric conductivity tool to short the two points of the HW Gap for three seconds Plug in AC keep the short condition on the HW Gap and press Power Button to pow...

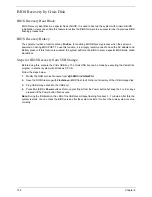
Страница 172: ... BIOS block called Boot Block Steps for BIOS Recovery from USB Storage Before doing this prepare the Crisis USB key The Crisis USB key can be made by executing the Crisis Disk program in another system with Windows XP OS Follow the steps below 1 Modify the ROM archive file name from Zg5 BIOS to ZG5ia32 fd 2 Save the ROM file along with Flashit exe BIOS flash tool to the root directory of the USB s...

Страница 173: ...easons a part number change is made it will not be noted on the printed Service Guide For ACER AUTHORIZED SERVICE PROVIDERS your Acer office may have a DIFFERENT part number code from those given in the FRU list of this printed Service Guide You MUST use the local FRU list provided by your regional Acer office to order FRU parts for repair and service of customer machines NOTE To scrap or to retur...

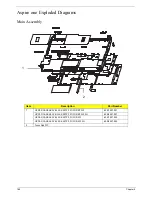
Страница 174: ...m Description Part Number 1 UPPER CASE ASSY BLACK W TP FFC FOR BT WF 60 S7507 001 UPPER CASE ASSY BLACK W TP FFC FOR BT WF 3G 60 S6507 001 UPPER CASE ASSY BLACK W TP FFC FOR WF 60 S7507 002 UPPER CASE ASSY BLACK W TP FFC FOR WF 3G 60 S6507 002 2 TouchPad FFC 1 2 ...

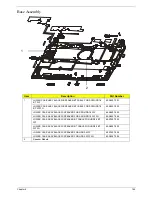
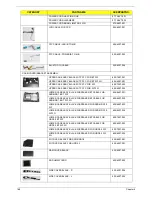
Страница 175: ...OWER CASE ASSY BLACK W SPEAKER FOR SSD HDD1 8 WF 60 S6407 003 LOWER CASE ASSY BLACK W SPEAKER FOR SSD HDD1 8 WF 3G 60 S6407 004 LOWER CASE ASSY BLACK W SPEAKER BT CABLE FOR HDD2 5 BT WF 60 S7507 003 LOWER CASE ASSY BLACK W SPEAKER BT CABLE FOR HDD2 5 BT WF 3G 60 S6507 003 LOWER CASE ASSY BLACK W SPEAKER FOR HDD2 5 WF 60 S7507 004 LOWER CASE ASSY BLACK W SPEAKER FOR HDD2 5 WF 3G 60 S6507 004 2 Spea...

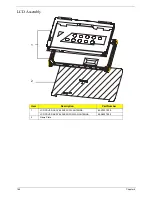
Страница 176: ...166 Chapter 6 LCD Assembly Item Description Part Number 1 LCD COVER ASSY BLACK W WL ANTENNA 60 S7507 005 LCD COVER ASSY BLACK W 3G WLAN ANTENNA 60 S6507 005 2 Name Plate 1 2 ...

Страница 177: ...00 005 QMI IEEE 802 11b g WLAN half size no EM108 Lan Intel WLAN 512ANXMMWG Echo Peak 5150 MM 895364 KI EPM01 003 BLUETOOTH MODULE T60H928 11 BT 21100 005 LED BOARD NON BT 55 S6507 004 LED BOARD 55 S6507 001 POWER BOARD 55 S6507 002 TOUCHPAD BOARD 55 S6507 003 Suyin Camera Rosa 2G MODULE CN0316 S30C OV06 1 57 S6507 001 CABLE POWER CORD UK 3PIN 27 A03V7 004 PWR CORD V943B30001218008 DANISH 3P 27 A0...

Страница 178: ...ABLE FOR SSD HDD1 8 BT WF 60 S6407 001 LOWER CASE ASSY BLACK W SPEAKER BT CABLE FOR SSD HDD1 8 BT WF 3G 60 S6407 002 LOWER CASE ASSY BLACK W SPEAKER FOR SSD HDD1 8 WF 60 S6407 003 LOWER CASE ASSY BLACK W SPEAKER FOR SSD HDD1 8 WF 3G 60 S6407 004 LOWER CASE ASSY BLACK W SPEAKER BT CABLE FOR HDD2 5 BT WF 60 S7507 003 LOWER CASE ASSY BLACK W SPEAKER BT CABLE FOR HDD2 5 BT WF 3G 60 S6507 003 LOWER CAS...

Страница 179: ...BA 2 5 5400rpm 160GB MK1652GSX Virgo BS SATA LF F W LV020J KH 16004 004 HDD HGST 2 5 5400rpm 160GB HTS543216L9A300 Falcon B SATA LF F W C40C KH 16007 019 HDD WD 2 5 5400rpm 160GB WD1600BEVT 22ZCTO ML160 SATA LF F W 11 01A11 KH 16008 022 HDD TOSHIBA 2 5 5400rpm 160GB MK1655GSX Libra SATA LF F W FG011J KH 16004 006 HDD SEAGATE 2 5 5400rpm 250GB ST9250827AS Corsair SATA LF F W 3 AAA KH 25001 011 HDD ...

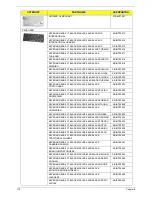
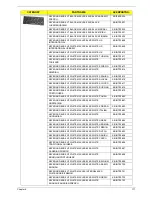
Страница 180: ...ACLES 84KS BLACK KOREAN KB INT00 528 KEYBOARD 8KB FV1 BLACK MACLES 85KS BLACK ITALIAN KB INT00 529 KEYBOARD 8KB FV1 BLACK MACLES 85KS BLACK HUNGARIAN KB INT00 532 KEYBOARD 8KB FV1 BLACK MACLES 84KS BLACK GREEK KB INT00 533 KEYBOARD 8KB FV1 BLACK MACLES 85KS BLACK GERMAN KB INT00 534 KEYBOARD 8KB FV1 BLACK MACLES 85KS BLACK FRENCH KB INT00 535 KEYBOARD 8KB FV1 BLACK MACLES 85KS BLACK DUTCH KB INT00...

Страница 181: ...SE KB INT00 679 KEYBOARD 8KB FV2 WHITE MACLES 85KS WHITE POLISH KB INT00 680 KEYBOARD 8KB FV2 WHITE MACLES 85KS WHITE NORWEGIAN KB INT00 681 KEYBOARD 8KB FV2 WHITE MACLES 84KS WHITE KOREAN KB INT00 683 KEYBOARD 8KB FV2 WHITE MACLES 85KS WHITE ITALIAN KB INT00 685 KEYBOARD 8KB FV2 WHITE MACLES 85KS WHITE HUNGARIAN KB INT00 688 KEYBOARD 8KB FV2 WHITE MACLES 84KS WHITE GREEK KB INT00 689 KEYBOARD 8KB...

Страница 182: ...RD N270 945GSE ICH7M HDD FOR 3G W CARD SD READER W O RAM MB S6506 001 MAINBOARD N280 945GSE ICH7M HDD FOR 3G W CARD SD READER W O RAM MB S6506 002 MAINBOARD N270 945GSE ICH7M HDD NON 3G W CARD SD READER W O RAM MB S7506 001 MAINBOARD N280 945GSE ICH7M HDD NON 3G W CARD SD READER W O RAM MB S7506 002 MEMORY Memory NANYA SO DIMM DDRII 667 1GB NT1GT64UH8D0FN 3C LF 64 16 0 07um KN 1GB03 026 Memory SAM...

Страница 183: ..._A1 BLACK MS 20700 008 Category Description Part Number Screw SCREW M2 0 5 0 I NI 86 S0207 002 SCREW M2 0 3 0 I IRON 86 S0207 001 SCREW M2 0 2 5 I BUWZN 86 TPK07 001 SCREW M2 0 4 2 I BNI NYLOK 7 0 6 IRON 86 W4107 002 SCREW M2 0 6 0 I 86 S6507 001 SCREW M1 6 2 5 I NI NYLOK IRON 86 S6507 002 SCREW M2 0 4 I BZN NYLOK IRON 86 S6507 003 SCREW M2 0 5 0 I BUWZN NYLON PATCH IRON 86 S6507 004 CATEGORY PART...

Страница 184: ...G_AN_EN 12 ATMN280B BT 2 0 AO531h 1B AAP Malaysia LU S750B 019 AO531h 1B AOXPHSTMY1 MC UMACkk 1 1G 160 BT 6L2 6 CB_bg_0 3D_BAG_AN_EN 12 ATMN280B BT 2 0 AO531h 1B AAP Australia New Zealand LU S750B 010 AO531h 1B AOXPHSTAU1 MC UMACkk 1 1G 160 BT 3L CB_bg_0 3D_BAG_AN_EN 11 ATMN280B BT 2 0 AO531h 1B AAP Singapore LU S750B 011 AO531h 1B AOXPHSTSG1 MC UMACkk 1 1G 160 BT 3L CB_bg_0 3D_BAG_AN_EN 11 ATMN28...

Страница 185: ...MN280B BT 2 0 AO531h 0B AAP Australia New Zealand LU S750B 006 AO531h 0B AOXPHSTAU1 MC UMACkk 1 1G 160 BT 3L CB_bg_0 3D_BAG_AN_EN 11 ATMN270B BT 2 0 AO531h 0B AAP Philippines LU S750B 004 AO531h 0B AOXPHSTPH1 MC UMACkk 1 1G 160 BT 3L CB_bg_0 3D_BAG_AN_EN 12 ATMN270B BT 2 0 AO531h 0B AAP India LU S750B 005 AO531h 0B AOXPHSTIN1 MC UMACkk 1 1G 160 BT 3L CB_bg_0 3D_BAG_AN_EN 11 ATMN270B BT 2 0 AO531h ...

Страница 186: ... AAP Australia New Zealand LU S650B 052 AO531h 0BG AOXPHSTAU1 MC UMAGCkk 1 1G 160 BT 3L CB_bg_0 3D_3G_BAG_AN _EN11 ATMN270B BT 2 0 AO531h 1BG AAP Philippines LU S650B 051 AO531h 1BG AOXPHSTPH1 MC UMAGCkk 1 1G 160 BT 3L CB_bg_0 3D_3G_BAG_AN _EN12 ATMN280B BT 2 0 AO531h 1BG AAP Thailand LU S650B 050 AO531h 1BG AOXPHSTTH1 MC UMAGCkk 1 1G 160 BT 3L CB_bg_0 3D_3G_BAG_AN _TH22 ATMN280B BT 2 0 AO531h 1BG...

Страница 187: ... LU S650B 038 AO531h 0BG AOXPHSTSE1 MC UMAGCkk 1 1G 160 3L CB_bg_0 3D_3G_FI13 ATMN270B N AO531h 0BG EMEA Denmark LU S650B 027 AO531h 0BG AOXPHSTDK1 MC UMAGCkk 1 1G 160 3L CB_bg_0 3D_3G_NO12 ATMN270B N AO531h 0BG EMEA Portugal LU S650B 023 AO531h 0BG AOXPHSTPT1 MC UMAGCkk 1 1G 160 3L CB_bg_0 3D_3G_PT12 ATMN270B N AO531h 0BG EMEA Luxembourg LU S650B 034 AO531h 0BG AOXPHSTLU3 MC UMAGCkk 1 1G 160 3L C...

Страница 188: ... 3D_3G_NO12 ATMN270B N AO531h 1BG AAP Indonesia LU S650B 046 AO531h 1BG AOXPHSTID1 MC UMAGCkk 1 1G 160 BT 3L CB_bg_0 3D_3G_BAG_ID2 3 ATMN280B BT 2 0 AO531h 1BG AAP Singapore LU S650B 047 AO531h 1BG AOXPHSTSG1 MC UMAGCkk 1 1G 160 BT 3L CB_bg_0 3D_3G_BAG_EN 11 ATMN280B BT 2 0 AO531h 0BG EMEA Eastern Europe LU S650B 025 AO531h 0BG AOXPHSTEU5 MC UMAGCkk 1 1G 160 3L CB_bg_0 3D_3G_RO12 ATMN270B N AO531h...

Страница 189: ... LU S650B 038 AO531h 0BG AOXPHSTSE1 MC UMAGCkk 1 1G 160 3L CB_bg_0 3D_3G_FI13 ATMN270B N AO531h 0BG EMEA Denmark LU S650B 027 AO531h 0BG AOXPHSTDK1 MC UMAGCkk 1 1G 160 3L CB_bg_0 3D_3G_NO12 ATMN270B N AO531h 0BG EMEA Portugal LU S650B 023 AO531h 0BG AOXPHSTPT1 MC UMAGCkk 1 1G 160 3L CB_bg_0 3D_3G_PT12 ATMN270B N AO531h 0BG EMEA Luxembourg LU S650B 034 AO531h 0BG AOXPHSTLU3 MC UMAGCkk 1 1G 160 3L C...

Страница 190: ...rd WiFi BG AO531h 0B NLED10 1WSVGAG SO1GBII6 N N160GB5 4KS N 3rd WiFi BG AO531h 1B NLED10 1WSVGAG SO1GBII6 N N160GB5 4KS N 3rd WiFi BG AO531h 1B NLED10 1WSVGAG SO1GBII6 N N160GB5 4KS N 3rd WiFi BG AO531h 1B NLED10 1WSVGAG SO1GBII6 N N160GB5 4KS N 3rd WiFi BG AO531h 1B NLED10 1WSVGAG SO1GBII6 N N160GB5 4KS N 3rd WiFi BG AO531h 1B NLED10 1WSVGAG SO1GBII6 N N160GB5 4KS N 3rd WiFi BG AO531h 1B NLED10 ...

Страница 191: ... 4KS N 3rd WiFi BG AO531h 1BG NLED10 1WSVGAG SO1GBII6 N N160GB5 4KS N 3rd WiFi BG AO531h 0BG NLED10 1WSVGAG SO1GBII6 N N160GB5 4KS N 3rd WiFi BG AO531h 0BG NLED10 1WSVGAG SO1GBII6 N N160GB5 4KS N 3rd WiFi BG AO531h 0BG NLED10 1WSVGAG SO1GBII6 N N160GB5 4KS N 3rd WiFi BG AO531h 0BG NLED10 1WSVGAG SO1GBII6 N N160GB5 4KS N 3rd WiFi BG AO531h 0BG NLED10 1WSVGAG SO1GBII6 N N160GB5 4KS N 3rd WiFi BG AO5...

Страница 192: ...4KS N 3rd WiFi BG AO531h 0B NLED10 1WSVGAG SO1GBII6 N N160GB5 4KS N 3rd WiFi BG AO531h 1B NLED10 1WSVGAG SO1GBII6 N N160GB5 4KS N 3rd WiFi BG AO531h 1B NLED10 1WSVGAG SO1GBII6 N N160GB5 4KS N 3rd WiFi BG AO531h 1B NLED10 1WSVGAG SO1GBII6 N N160GB5 4KS N 3rd WiFi BG AO531h 1B NLED10 1WSVGAG SO1GBII6 N N160GB5 4KS N 3rd WiFi BG AO531h 1B NLED10 1WSVGAG SO1GBII6 N N160GB5 4KS N 3rd WiFi BG AO531h 1B ...

Страница 193: ...ctions are tested under Windows XP Home Windows XP Pro environment Refer to the following lists for components adapter cards and peripherals which have passed these tests Regarding configuration combination and test procedures please refer to the Aspire one series Compatibility Test Report released by the Acer Mobile System Testing Department Appendix B ...

Страница 194: ... DELTA 30W Adapter DELTA 30W 19V 1 7x5 5x11 Black ADP 30JH BA LF AO531h_UMA GCkk LITE ON 30W Adapter LITE ON 30W 19V 1 7x5 5x11 Black PA 1300 04AC LF AO531h_UMA GCkk HIPRO 30W Adapter HIPRO 30W 19V 1 7x5 5x11 Black HP A0301R3 B1LF LF Audio Codec AO531f_UMA GCkk Realtek ALC272X Realtek Audio Codec ALC272X AO531h_UMA Ckk Realtek ALC272X Realtek Audio Codec ALC272X AO531h_UMA GCkk Realtek ALC272X Rea...

Страница 195: ...y SONY UM 2009B Li Ion 3S2P SONY 6 cell 5200mAh Main COMMON black AO531f_UMA GCkk SONY 6CELL2 6 Battery SONY UM 2009BW Li Ion 3S2P SONY 6 cell 5200mAh Main COMMON white AO531f_UMA GCkk SIMPLO 6CELL2 6 Battery SIMPLO UM 2009B Li Ion 3S2P SAMSUNG 6 cell 5200mAh Main COMMON Black SDI 2 6 C AO531f_UMA GCkk SIMPLO 6CELL2 6 Battery SIMPLO UM 2009B Li Ion 3S2P LGC 6 cell 5200mAh Main COMMON Black LGC 2 6...

Страница 196: ...Y UM 2009B Li Ion 3S2P SONY 6 cell 5200mAh Main COMMON black AO531h_UMA Ckk SONY 6CELL2 6 Battery SONY UM 2009BW Li Ion 3S2P SONY 6 cell 5200mAh Main COMMON white AO531h_UMA Ckk SIMPLO 6CELL2 6 Battery SIMPLO UM 2009B Li Ion 3S2P SAMSUNG 6 cell 5200mAh Main COMMON Black SDI 2 6 C AO531h_UMA Ckk SIMPLO 6CELL2 6 Battery SIMPLO UM 2009B Li Ion 3S2P LGC 6 cell 5200mAh Main COMMON Black LGC 2 6 B3 AO53...

Страница 197: ...BW Li Ion 3S2P SANYO 6 cell 5200mAh Main COMMON white ID UM09B34 AO531h_UMA GCkk SONY 6CELL2 6 Battery SONY UM 2009B Li Ion 3S2P SONY 6 cell 5200mAh Main COMMON black AO531h_UMA GCkk SONY 6CELL2 6 Battery SONY UM 2009BW Li Ion 3S2P SONY 6 cell 5200mAh Main COMMON white AO531h_UMA GCkk SIMPLO 6CELL2 6 Battery SIMPLO UM 2009B Li Ion 3S2P SAMSUNG 6 cell 5200mAh Main COMMON Black SDI 2 6 C AO531h_UMA ...

Страница 198: ...T 2 5 5400rpm 160GB HTS543216L9A300 Falcon B SATA LF F W C40C AO531h_UMA Ckk HGST N160GB5 4KS HDD HGST 2 5 5400rpm 160GB HTS545016B9A300 Panther B SATA LF F W C60F AO531h_UMA Ckk WD N160GB5 4KS HDD WD 2 5 5400rpm 160GB WD1600BEVT 22ZCTO ML160 SATA LF F W 11 01A11 AO531h_UMA GCkk SEAGATE N160GB5 4KS HDD SEAGATE 2 5 5400rpm 160GB ST9160310AS Crockett SATA LF F W 0303 AO531h_UMA GCkk TOSHIBA N160GB5 ...

Страница 199: ... NLED10 1WSVGAG LED LCD CMO 10 1 WSVGA Glare N101L6 L02 C2 3G LF 200nit 10ms 650 1 AO531h_UMA Ckk AUO NLED10 1WSVGAG LED LCD AUO 10 1 WSVGA Glare B101AW03 V0 LF 200nit 8ms 500 1 AO531h_UMA Ckk AUO NLED10 1WSVGAG LED LCD AUO 10 1 WSVGA Glare B101AW03 V0 2A 3G LF 200nit 8ms 500 1 AO531h_UMA Ckk SAMSUNG NLED10 1WSVGAG LED LCD SAMSUNG 10 1 WSVGA Glare LTN101NT02 A01 LF 200nit 16ms 400 1 AO531h_UMA Ckk...

Страница 200: ... 0 065um AO531h_UMA Ckk SAMSUNG SO1GBII6 Memory SAMSUNG SO DIMM DDRII 667 1GB M470T2864EH3 CE6 LF 64 16 0 055um AO531h_UMA Ckk HYNIX SO1GBII6 Memory HYNIX SO DIMM DDRII 667 1GB HMP112S6EFR6C Y5 LF 64 16 0 055um AO531h_UMA Ckk SAMSUNG SO512MBII6 Memory SAMSUNG SO DIMM DDRII 667 512MB M470T6464QZ3 CE6 LF AO531h_UMA GCkk NANYA SO1GBII6 Memory NANYA SO DIMM DDRII 667 1GB NT1GT64UH8D0FN 3C LF 64 16 0 0...

Страница 201: ...ntel AO531h_UMA Ckk None UMA UMA Intel AO531h_UMA GCkk None UMA UMA Intel WiFi Antenna AO531f_UMA GCkk WNC PIFA PIFA AO531h_UMA Ckk WNC PIFA PIFA AO531h_UMA GCkk WNC PIFA PIFA WLAN AO531f_UMA GCkk Foxconn 3rd WiFi BG Foxconn Wireless LAN Atheros HB95 1x1 BG HM AO531f_UMA GCkk Foxconn 3rd WiFi BG Foxconn Wireless LAN Atheros HB63 BG HM AO531h_UMA Ckk Foxconn 3rd WiFi BG Foxconn Wireless LAN Atheros...

Страница 202: ...192 Appendix B ...

Страница 203: ...formation on all of Acer s Notebook Desktop and Server models including Service guides for all models User s manuals Training materials Bios updates Software utilities Spare parts lists TABs Technical Announcement Bulletin For these purposes we have included an Acrobat File to facilitate the problem free downloading of our technical material Also contained on this website are Detailed information ...

Страница 204: ...194 Appendix C ...

Страница 205: ...placing SSD 114 Board Layout Top View 159 brightness hotkeys 13 Button Board Removing 60 Replacing 127 C Camera Board Removing 92 Replacing 108 caps lock on indicator 9 Common Problems 140 CPU Fan Replacing 111 D DIMM Module Removing 45 Replacing 136 Display 4 display hotkeys 13 E Euro 14 External Module Disassembly Flowchart 41 F Features 1 FLASH Utility 29 Flash Utility 29 FPC Cable Removing 95 ...

Страница 206: ...SD 67 Replacing HDD 122 Replacing SSD 117 Lower Cover Replacing 137 Lower Cover Reassembly Procedure 111 Lower Covers Removing 44 M Mainboard Removing 75 Replacing 113 media access on indicator 9 Memory Check 140 Microphone Board Removing 93 Replacing 108 Model Definition 174 N No Display Issue 141 Notebook Manager hotkey 13 num lock on indicator 9 O ODD Failure 148 Online Support Information 193 ...

Страница 207: ...Built in KB Failure 143 Internal Microphone 146 Internal Speakers 144 LCD Failure 143 No Display 141 ODD 148 Other Failures 149 Power Button 148 Power On 140 Touch Pad 144 USB 148 WLAN 149 U Undetermined Problems 150 Upper Cover Removing 54 Replacing 130 Upper Cover Disassembly Flowchart 50 Upper Cover Reassembly Process 124 USB Failure Rightside 148 utility BIOS 21 29 V volume hotkeys 13 W Window...

Страница 208: ...198 ...
Отзывы: