Chapter 4
151
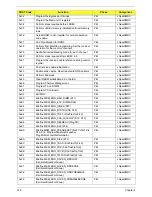
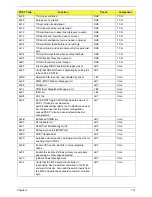
0x09
TCG log event failed
DXE
TCG
0x09
Setup event log failed
DXE
TCG
0x12
TIS set active locality failed
DXE
TCG
0x12
TIS relinquish active locality failed
DXE
TCG
0x12
TIS wait command ready failed (prepare to send)
DXE
TCG
0x12
TIS abort 'send 'command due to timeout
DXE
TCG
0x12
TIS abort 'sendAndGo 'command due to timeout
DXE
TCG
0x04
TIS wait bit set failed before send last byte
DXE
TCG
0x12
TIS abort command due to timeout before send last
byte
DXE
TCG
0x04
TIS wait bit clear failed when sending last byte
DXE
TCG
0x22
TCG Physical Presence execution
DXE
TCG
0xB1
TCG DXE common pass through
DXE
TCG
0xE3
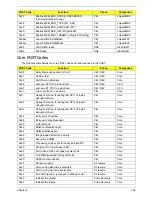
First Legacy BIOS Task table for legacy reset
LBT
Core
0x20
Verify that DRAM refresh is operating by polling the
refresh bit in PORTB.
LBT
Core
0xDA
Dummy PCIE Init entry, now handled by driver
LBT
Core
0x29
PMM (POST Memory Manager) init
LBT
Core
0xE5
WHEA init
LBT
Core
0x33
PDM (Post Dispatcher Manager) init
LBT
Core
0x01
IPMI init
LBT
Core
0xD8
ASF Init
LBT
Core
0x09
Set in-POST flag in CMOS that indicates we are in
POST. If this bit is not cleared by
postClearBootFlagJ (AEh), the TrustedCore on next
boot determines that the current configuration
caused POST to fail and uses default values for
configuration.
LBT
Core
0x2B
Enhanced CMOS init
LBT
Core
0xE0
EFI Variable Init
LBT
Core
0xC1
PEM (Post Error Manager) init
LBT
Core
0x3B
Debug Service Init (ROM Polit)
LBT
Core
0xDC
POST Update Error
LBT
Core
0x3A
Autosize external cache and program cache size for
enabling later in POST.
LBT
Core
0x0B
Enable CPU cache. Set bits in cmos related to
cache.
LBT
Core
0x0F
Enable the local bus IDE as primary or secondary
depending on other drives detected.
LBT
Core
0x10
Initialize Power Management.
LBT
Core
0x14
Verify that the 8742 keyboard controller is
responding. Send a self-test command to the 8742
and wait for results. Also read the switch inputs from
the 8742 and write the keyboard controller command
byte.
LBT
Core
POST Code
Function
Phase
Component
Содержание Aspire 7230
Страница 6: ...VI ...
Страница 10: ...X Table of Contents ...
Страница 54: ...44 Chapter 2 3 Reboot the system and key in the selected string qjjg9vy 07yqmjd etc for the BIOS user password ...
Страница 85: ...Chapter 3 75 5 Remove the bracket from the board 6 Remove the Finger Print Reader board from the Upper Cover ...
Страница 92: ...82 Chapter 3 4 Grasp the Subwoofer Module and lift it up to remove ...
Страница 94: ...84 Chapter 3 4 Lift the ExpressCard module away from the upper cover ...
Страница 101: ...Chapter 3 91 4 Lift up the bezel and remove it from the LCD Module ...
Страница 105: ...Chapter 3 95 5 Grasp the panel by both ends and lift to remove ...
Страница 107: ...Chapter 3 97 4 Remove the LCD brackets by pulling away from the LCD Panel as shown ...
Страница 110: ...100 Chapter 3 8 Connect the left and right Inverter cables 9 Connect the camera cable ...
Страница 113: ...Chapter 3 103 3 Tighten the four 4 captive screws on the heatsink 4 Connect the Fan cable to the Mainboard ...
Страница 118: ...108 Chapter 3 4 Connect the two FFC cables as shown 5 Connect the cable as shown ...
Страница 206: ...196 Appendix C ...

