background image

Copyright 1010music LLC 2023

Page 82 of 97

Page 83 of 97

Copyright 1010music LLC 2023

Bitbox MK2 2.1 User Manual

Mar 1, 2023

Bitbox MK2 2.1 User Manual

Mar 1, 2023

1.

Set up bitbox mk2 for MIDI Triggered
Recording as described above.

2.

Press the MIDI Note that maps to the pad you
want to record into, as shown in the map on
the right.

Bitbox mk2 will jump to the PADS screen and select the
corresponding pad. If the pad is empty, you will see the
recording screen and recording will begin, the same as if
you had touched the Rec button. Any armed Clips will
start to play.

Recording will end when you press the corresponding MIDI Note again, when the
recording reaches the length specified in the recording settings, or when you press the
STOP transport button. If you have RecToPlay set to ON and have specified a
recording length, the pad will start playing as soon as recording is finished.

While recording, If the MIDI Action note to Record the current pad is received, the
recording will stop. MIDI Clear notes and other MIDI Action notes will be ignored.

80

81

82

83
B5

76

77

78

79

72

73

74

75

68
G#4

69

70

71

MIDI Notes to Trigger

Pad Recording

Trigger Recording with the MIDI Note to Pad Mapping Approach

When you use MIDI Note to Pad Mapping, bitbox mk2 maps two MIDI notes to each
pad: one note starts and stops recording; the other note clears the pad. Recording will
only work if the pad is already empty. Clearing a pad removes the WAV file from the
pad, but does not delete the WAV file from the microSD card.

For MIDI triggered recording to work, the target pad must be empty. Bitbox mk2 will not
allow MIDI triggered recording to record into a loaded pad.

To Trigger Recording to a Specific Pad Using MIDI:

This recording method will only work if the target pad is empty.

MIDI Triggered Recording <New in 2.1>

MIDI triggered recording can help streamline the workflow for live looping, field
sampling, and more. With this feature, you can use a connected MIDI controller to start
and stop recording for an empty pad, clear a pad, and change pad selections.

There are two different techniques you can use for MIDI Triggered recording. The MIDI
Note to Pad mapping approach works well if you can dedicate 16 to 32 MIDI Notes to
the task. If you prefer to work with a range of 5 MIDI notes, use the MIDI Note Actions
mapping approach. In either case, the pad must be empty for recording to occur and
MIDI Recording must be enabled. You can only record to one pad at a time.

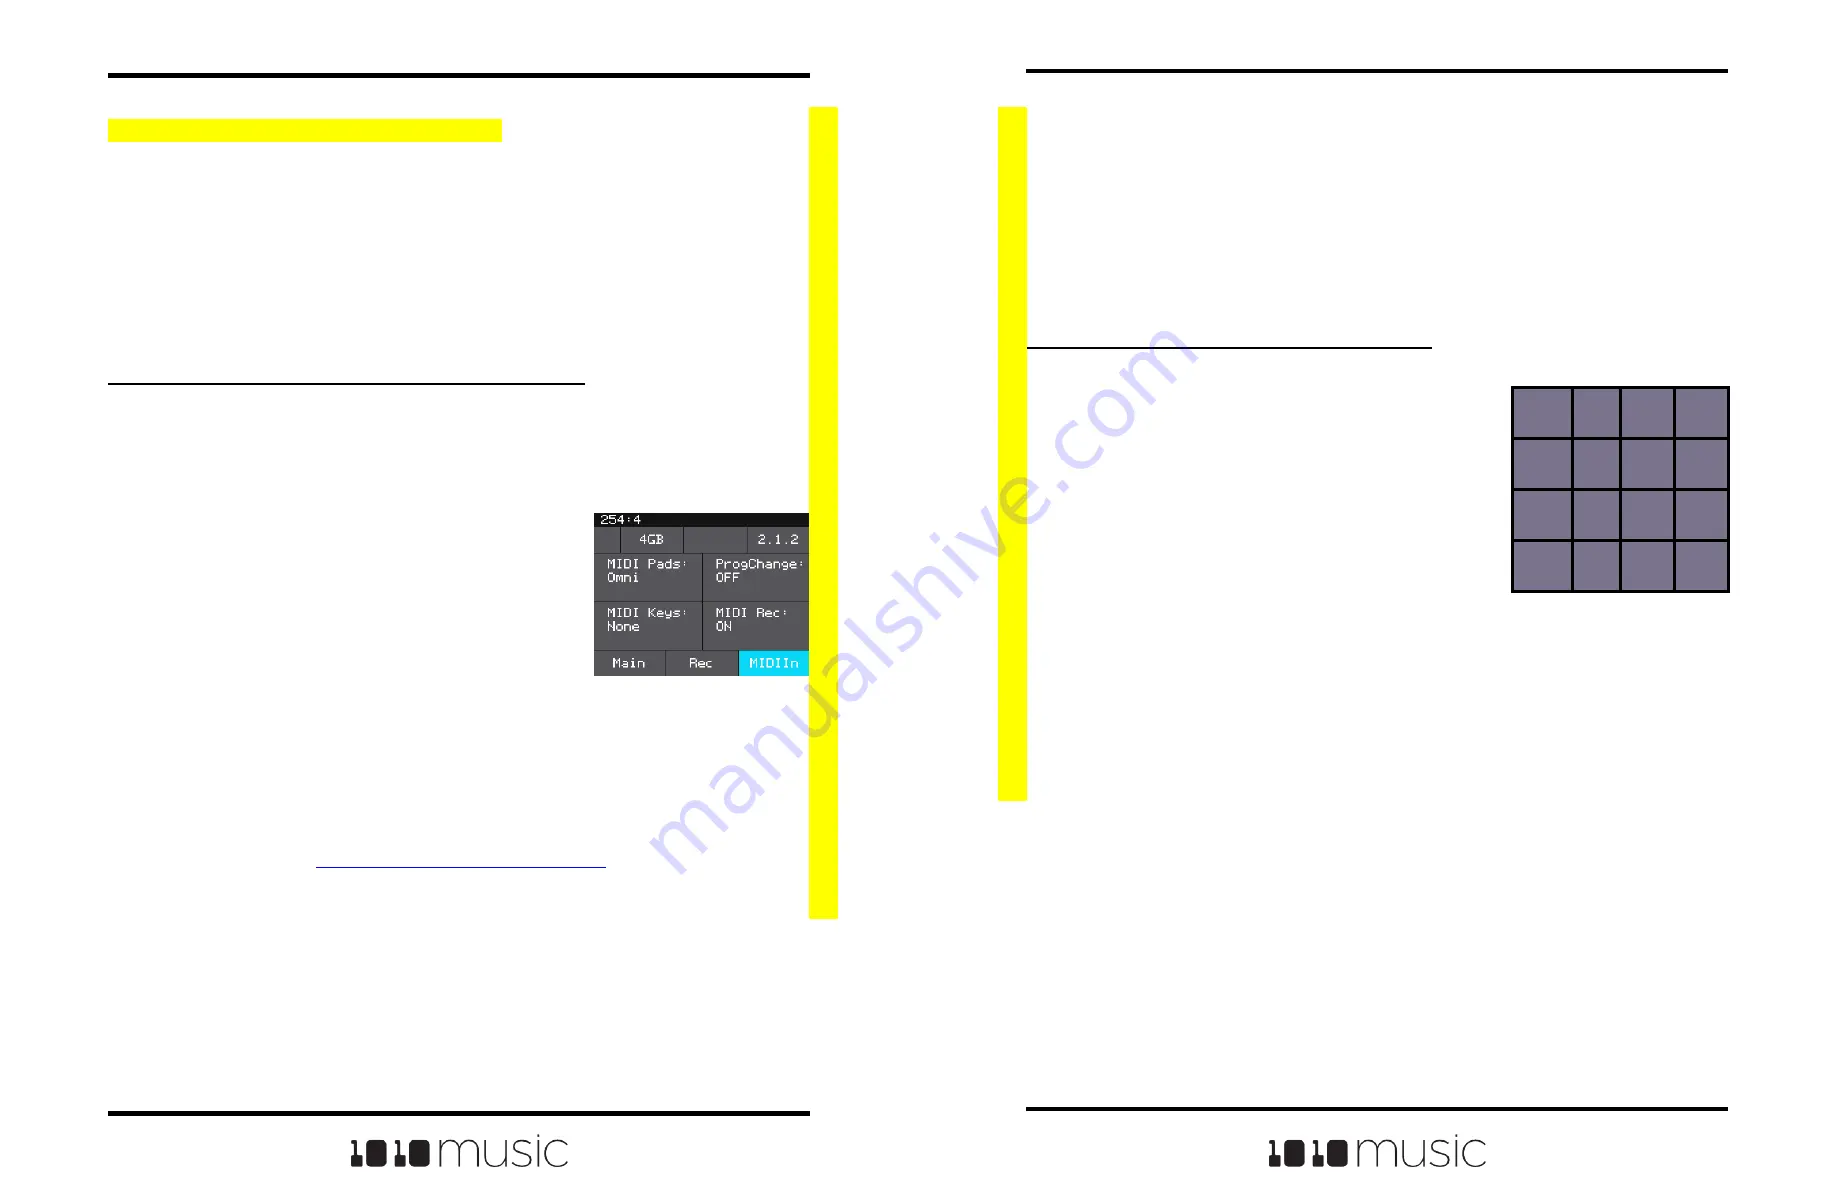
To Configure Bitbox MK2 to Use MIDI Triggered Recording:

Whether you will use MIDI Note to Pad mapping or MIDI Note to Actions mapping,
bitbox mk2 needs to be configured to allow MIDI Recording on the Tools page. You will
also need to set bitbox mk2 to receive MIDI Pads on the channel used for output by
your MIDI controller. Follow these steps to set up bitbox mk2 for MIDI Triggered
Recording:

1.

Push Home until you see the Menu Page.

2.

Touch Tools to open the Settings page.

3.

Touch the MIDI In tab.

4.

Set MIDI Rec to ON.

5.

Connect your MIDI controller to the MIDI jack
on bitbox mk2.

6.

Set the value of the MIDI Pads channel to the MIDI channel used by your
MIDI controller. Choose Omni to allow all incoming MIDI channels to control
Pads. Keep in mind that this also controls which channel will trigger pads and
sequences to play.

7.

You may also want to use Pad Templates to set up your pads in advance of
recording. See

Create Preset Templates for Re-Use

to learn how to do this.

MIDI Triggered recording is now enabled.

Tools - MIDI In Tab with

Recording Settings

Содержание Bitbox mk2 2.1

Страница 1: ...Copyright 1010music LLC 2023 Page 1 of 97 Mar 1 2023 Bitbox MK2 2 1 User Manual Bitbox mk2 2 1 User Manual ...

Страница 2: ...meters New in 2 1 26 Conf Pad Parameters 27 To Assign a Cell to an Exclusive Playback or Choke Group 29 Other Pad Parameters 29 Set up a Sample Cell 29 Pos Parameters for Sample Mode 30 Conf Parameters for Sample Mode 32 Set Up a Multi Sample Cell 33 Work with a Clip Cell 35 Pos Parameters 35 Tips for Synchronizing Clips 36 Set Up a Slicer Cell 37 Pos Parameters 37 To Use Auto Scan to Create Slice...

Страница 3: ... Preset 65 To Load a Preset 65 To Pack a Preset 66 To Delete a Preset 66 To Rename a Preset 67 To Save Current Changes as a New Preset 67 Work with Preset Files on the MicroSD Card 68 Preset Compatibility with 1010music Samplers 68 When will my legacy bitbox mk1 presets and WAV files get cleaned out of the root folder 69 Can I use my bitbox mk1 or blackbox microSD in my bitbox mk2 69 USE MIDI AND ...

Страница 4: ...e Mapping for Pads 89 Sharing of MIDI Input Channels 90 CREATE PRESET TEMPLATES FOR RE USE 91 To Configure a Pad without a WAV file 91 To Add a WAV file to a Template Pad 91 PROCESSOR MANAGEMENT TIPS 92 UPDATE AND SWAP FIRMWARE 93 Switch to a New MicroSD Card While Operating Bitbox mk2 93 Backup Your Presets and WAV Files 93 Install New Firmware 93 TECHNICAL SPECS 95 Module Specs 95 Pin Mapping fo...

Страница 5: ...es in interesting ways including slicing granular sounds and musically intelligent looping capabilities You can add more interaction by using CV and MIDI to trigger and modulate samples and effects You can stream large samples of up to 4 GB file size straight from the microSD card Tweak your configurations to get them just right then save them to presets for future reuse With its 3 5 inch touchscr...

Страница 6: ...Preset The preset stores all of the pad settings FX settings and Mix settings You can add a final touch to your song with the 4 band EQ The diagram on the next page shows the general navigation flow for bitbox mk2 In general you push INFO to drill down for more information and HOME to go back a screen At the highest level HOME will toggle between the Pads and Menu screens Push INFO to get more inf...

Страница 7: ...ee the Waveform screen for that pad Press INFO again to access the pad parameters Touch the tabs across the bottom to select the different pad parameter pages Press HOME to navigate back up the screen hierarchy You can also use the control knobs to scroll through the pads The top two knobs scroll horizontally and the bottom left knob scrolls vertically The control knobs allow you to select a pad w...

Страница 8: ...will discuss how to install the bitbox mk2 module in a Eurorack insert the microSD card and configure some general settings Choose an Orientation Bitbox mk2 can be configured so that the user interface will be right side up with either the touchscreen at the top of the module or at the bottom We originally designed the module to run with the touchscreen on the top of the module and the text on the...

Страница 9: ...l for a pad that pad will also play notes in response to signals received on this MIDI channel See the section Use MIDI and CV with Bitbox mk2 below for more information When this parameter is set to Omni notes will be triggered for the currently selected pad by all MIDI channels However any MIDI channel that is assigned as the MIDI In for a pad or as the MIDI Pads parameter will be excluded from ...

Страница 10: ...s shown in the diagram on the right EXT1 through EXT4 are assigned notes 55 to 52 for use as Recording triggers However these MIDI mappings for notes 52 to 55 do not work with modulation 48 49 50 51 D 3 55 44 45 46 47 54 40 41 42 43 53 36 C2 37 38 39 52 Default Mapping of MIDI Notes to Bitbox mk2 Cells and EXTs Copyright 1010music LLC 2023 Page 18 of 97 Page 19 of 97 Copyright 1010music LLC 2023 B...

Страница 11: ...screen with the new preset selected The new preset is loaded Push HOME to go back to the Pads screen Preset Management Screen Preset File Menu Keyboard Screen Note If you attempt to save the file using a name that is already in use on the microSD card bitbox mk2 will append 2 to the end of the name to make it unique Copyright 1010music LLC 2023 Page 20 of 97 Page 21 of 97 Copyright 1010music LLC 2...

Страница 12: ...en looking at the list of files list items that start with a slash are directories Load a directory to see its contents The file path is displayed above the list of files e g Piano in the example above Touch the caret to navigate back up the directory tree Touch the back arrow to go back to the previous screen Copyright 1010music LLC 2023 Page 22 of 97 Page 23 of 97 Copyright 1010music LLC 2023 Bi...

Страница 13: ...ht 1010music LLC 2023 Bitbox MK2 2 1 User Manual Mar 1 2023 Bitbox MK2 2 1 User Manual Mar 1 2023 You will now be on the Waveform screen There are a number of important features on the Waveform screen The grid icon in the top left of the screen provides a graphical representation of which pad in the grid you are configuring You can touch it to select a different pad The icon just to the right of t...

Страница 14: ...ross the top of various pad parameter pages can now be found on the Conf tab of the Pad Parameters page This is also where you can control the launch mode and MIDI mapping for the pad The new Poly Mode parameter found here can be used to optimize the polyphony pool allocation across pads Parameter Description Range of Values Mod Target Sustain The volume level that the sound maintains when you hol...

Страница 15: ...group is triggered Other Pad Parameters The remaining configuration options for a pad vary based on which pad mode is selected We will walk through the configuration of each of the pad modes next Sample Mode POS Parameters Set up a Sample Cell Use a sample pad when you want to play or loop through a single note or drum hit within a WAV file or you want to play a pad chromatically This pad mode sup...

Страница 16: ...d if you have the Launch Mode set to Trigger looping will happen for the duration of the Release phase of the note If you have the Launch Mode set to Gate looping plays through the gate pulse and the release time If you have the Launch Mode set to Toggle looping starts to play when the initial pulse is received and continues until the terminating toggle pulse is received If Loop Mode is Bidirect a...

Страница 17: ...ories Load a directory to see its contents The file path is displayed above the list of files Touch the caret to go back to the previous directory Highlight one of the files in the directory of samples that you want to load into the pad A good example of a directory to use with multi samples is Symplesound Housepiano You can select any file within that directory 5 Touch File and then Load All Bitb...

Страница 18: ...to which the clip will be synchronized Choose small settings like 1 16th for rhythmic or percussion clips Choose large settings like 1 bar for sustained tones or drones None playback will occur at the original rate Looping will happen as soon as the sample ends 1 16 1 8 1 4 1 2 1 bar Slice See To Use Slices to Synchronize Playback of Clip Pads below for more information No You can also use multi s...

Страница 19: ...you are playing is longer than one beat For example the WAV file might contain a 2 bar drum riff For a clip pad bitbox mk2 will make some assumptions about where the beats in your file occur In Clip mode the module will play the whole 2 bar riff when the note is triggered But the beats in the WAV file might not be playing at the same tempo as the clock speed If you leave Sync set to None the WAV f...

Страница 20: ... the slice point You can have as many or as few slices as you want Waveform Slicing Menu Parameter Description Range of Values Mod Target Quant Size Use Quant Size to quantize when the playback starts and stops Quantization will cause playback to snap to a musical grid with intervals specified by the Quant Size parameter When quantization is used the note trigger will cause playback to start and e...

Страница 21: ...At 200 it will progress through the WAV file at twice the original rate 0 to 200 Yes Window The length of file on either side of the current playback position from which the grains are selected When set to 0 the grains are always pulled from the same place in the WAV file When set to 100 the grains are pulled from a window of about a few seconds around the current playback position 0 0 to 100 0 No...

Страница 22: ...gle Beat Count Enter the number of beats in the clip file to give bitbox mk2more information to work with when synchronizing playback to the current song BPM Stored in the WAV acid tag Clip Slice Points The slice markers that are inserted into the file Some other software calls these Cue Points Stored in the WAV cue points Slicer Clip Parameter Description Range of Values Mod Target Root Note In g...

Страница 23: ...tomatically start to play the pad when recording ends ON OFF Length This parameter allows you to specify a length of time that you want to record in terms of notes and bars When Custom is selected touch the Stop button to stop recording Custom 1 4 1 2 1 bar 2 bars 4 bars 8 bars 16 bars 32 bars 64 bars 128 bars Note If you use an existing file name when you use Save As the old file will be overwrit...

Страница 24: ...the preset s folder on the microSD card into sound library folders on the card When you want to use these files in another preset point to the WAV files you moved to the library folders Then pack up those presets to preserve copies of the WAVs you used 6 Send a signal to the audio Input The source will play through the selected Mon Output if the Rec Mon setting is ON or Auto For best results when ...

Страница 25: ... the Pads screen 4 Touch a pad to select it With the pad selected press the right arrow button If the pad is empty bitbox will display the Load and Record screen If the pad is already loaded bitbox will display the Waveform screen If you are on the Waveform screen press the Pad Mode icon to the left of the WAV file name at the top of the screen and then touch New Multi You will now see the Load an...

Страница 26: ...th WAV Files on the microSD Card below for more information about file organization The WAV files will be named Filename MIDI Note Number MIDI Velocity For example if your preset name is Pet Sounds and your multi sample filename is Cat Meows an example file name would be Presets Pet Sounds Cat Meows Cat Meows 036 100 Each WAV file will have the Root Note parameter set based on the MIDI Note used t...

Страница 27: ...channel files with 16 24 or 32 bit resolution at any sample rate 48kHz is the preferred sample rate WAV file names may use Alpha Numeric Characters A Z 0 9 and some special characters The following characters are NOT allowed File names must be less than 256 characters including the path name Files that do not conform to these naming constraints will not be recognized by bitbox mk2 6 Pack up the ta...

Страница 28: ...tly selected pad Note If you delete move or rename a WAV file it will no longer be available for use by presets that were previously using it The name of the original WAV file will still appear in the Preset but the Waveform screen will be blank until you load a new WAV file into the pad To Delete Save As or Rename a WAV File When you use bitbox mk2 to delete a WAV file that file is removed from t...

Страница 29: ...ay with Keys bitbox mk2 will play the WAV file for that pad pitch shifted based on the triggered note The native sample will play with the root note and it will shift up or down the appropriate number of semitones based on the note you play When you select a slicer pad to play with Keys bitbox mk2 will map the slices in the pad to the notes on the keyboard When you use a multi sample pad with Keys...

Страница 30: ...nd the right key to match some music tap a root note on the grid while turning a knob to scan through the root notes Parameter Value Explanation Launch Mode Trigger This will cause the WAV slice to play from beginning to end when a trigger is received Other values will work but let s use this for the example Loop Mode OFF We will turn off looping for this example Slice 3 This does not impact how t...

Страница 31: ... No APPLY EFFECTS Bitbox mk2 has two effects that can be applied to as many pads as you want You apply an effect by selecting the send amount for the pad for each of the desired effects Delay and Reverb and then configuring the parameters for each effect All pads get the same parameter values for each effect The output of the effects the wet stereo signal is routed to Outs 1 and 2 The pad output w...

Страница 32: ...t the level of the currently selected pad 4 Turn one of the bottom two knobs to adjust the pan Mixer Screen To Mute and Unmute Pads The mixer screen also allows you to mute individual pads 1 Push HOME until you see the Menu screen then touch Mix to display the mixer screen 2 Push the INFO button to enter Mute Mode Active pads will have a green background and muted pads will have a red background 3...

Страница 33: ... bitbox mk2 loads a preset it loads the set of WAV files and configured parameters for each pad saved in the preset Review the loaded presets to see some examples of bitbox mk2 features in action The presets that are loaded on bitbox mk2 use only a small fraction of the WAV files that are available on the microSD card You can use the microSD card to load your own WAV files into bitbox mk2 as well ...

Страница 34: ... Touch the enter button to save the changes and go back to the Pads screen with the renamed preset loaded Note If you continue to add WAV files to your preset after you pack it the preset will still point to these WAV files in their source folders Pack the preset again to copy these files over If the Pack option is disabled then the preset is fully packed already Note You cannot undo deleting a pr...

Страница 35: ...ng to new firmware Keep in mind that if you move a preset file to another microSD card it will only work properly if the WAV files needed for that preset are on the new card in the same directory structure The pack function makes that much easier Note Bitbox mk2 stores all presets in self named folders under the Presets folder Bitbox mk2 will not find them if you move the XML files outside of thes...

Страница 36: ...er and the pad assigned to that MIDI channel will be played pitch shifted If the Root Note parameter for this pad is set to Default the original sample will be played for note C4 If the Root Note parameter is set to a specific note then the original sample will be played when this specific note is played When other notes are received the sample will be pitch shifted an amount that corresponds to t...

Страница 37: ... Connect a gate signal to the input jack below the screen that maps to the position of the pad on the screen The pad will be triggered when the gate signal goes high and continue to play until the gate goes low 8 Connect a CV signal to the EXT ports selected for the Pitch Modulation source The sample will be pitch shifted as the voltage input varies Note A CV signal of 2 volts will play the sample...

Страница 38: ...een will be used to trigger this pad Slice Seq None We will not use the Slice Sequencer in this example PlayThru OFF For this example we want to stop sample playback when we reach the end of the slice Control Slice Playback There are a few different ways to use CV and MIDI signals to control the playback of slicer pads You can use MIDI to map each slice to a MIDI Note You similarly map each slice ...

Страница 39: ...he MIDI channel configured for this pad Slice 1 will serve as the starting point for the sequencer MIDI Default We want the default behavior where the MIDI channel selected for MIDI Pads on the Tools screen will be used to trigger this pad Slice Seq Random This will cause the bitbox mk2 to select a slice at random each time the pad is triggered PlayThru OFF For this example we want to stop sample ...

Страница 40: ...rning the top knob 4 Push INFO to display the Modulation Parameters screen 5 Use the top knob to select the modulation parameter to edit There are sets of modulation parameters in the list one for each modulation slot Choose a Source for a modulation slot and then the other modulation parameters will be enabled The Source specifies which signal will be used to control this parameter Available sour...

Страница 41: ...es VEL PITCH MODW MVOL and MPAN only impact the pad if the modulation signal is received on the MIDI In channel for this pad EXT5 through EXT8 are the same jacks used to trigger the right column of pads If you have loaded a WAV into the pad that corresponds to an EXT jack a signal on that jack will both serve as a modulation source and as a trigger for the pad 6 Select a value for the Amount of mo...

Страница 42: ...Trigger Recording to a Specific Pad Using MIDI This recording method will only work if the target pad is empty MIDI Triggered Recording New in 2 1 MIDI triggered recording can help streamline the workflow for live looping field sampling and more With this feature you can use a connected MIDI controller to start and stop recording for an empty pad clear a pad and change pad selections There are two...

Страница 43: ...p bitbox mk2 for MIDI Triggered Recording as described above 2 Press the MIDI Note that maps to the pad you want to clear as shown in the map on the right Bitbox mk2 will open the PADS screen and select the corresponding pad Any existing mapping to WAV files for that pad will be cleared Pad parameters will not be cleared 96 97 98 99 D 7 92 93 94 95 88 89 90 91 84 C6 85 86 87 MIDI Notes to Clear Pa...

Страница 44: ...ently selected pad Trigger Recording with the MIDI Note Actions Mapping When using the MIDI Note Actions mapping you use a smaller number of MIDI notes that perform the actions of selecting next pad selecting previous pad playing the current pad recording into the current pad or clearing the current pad To Use MIDI Note Actions to Record or Clear a Pad Bitbox mk2 has allocated a range of MIDI Note...

Страница 45: ...eset the Clock You can use the following methods to reset the clock counter back to 0 0 Stop the CV clock input for a few seconds Send a Clock Start signal over MIDI Power down the module Use a MIDI Program Change to Load Presets Some MIDI controllers support a MIDI command to trigger a program change Bitbox mk2 can be configured to respond to MIDI program changes by loading a preset Bitbox mk2 wi...

Страница 46: ...s This gives you lots of flexibility but could result in confusing results if you aren t careful CREATE PRESET TEMPLATES FOR RE USE Preset template support was added to help users who like to set up their presets a certain way each time and those who want to configure different presets in preparation for a live performance Preset templates allow you to configure the pad mode output MIDI settings m...

Страница 47: ... microSD Card Fxbox and synthbox firmware will be available by the end of summer 2020 Switch to a New MicroSD Card While Operating Bitbox mk2 You can switch to a different microSD card while operating bitbox Simply remove the current card and insert the new one then load a preset from the new card as usual Backup Your Presets and WAV Files Before you re use a microSD to update or swap firmware bac...

Страница 48: ...mple Pads 16 24 bit ADC and DAC Pin Mapping for Mini TRS Jack to MIDI 5 Pin DIN Connectors The musical instrument industry currently uses several different ways of mapping MIDI 5 Pin DIN signals to mini TRS jack connectors The diagram below to the right shows the numbering of the pins on a MIDI connector and the labels of the connection components of a mini TRS jack 1010music bitbox mk2 is compati...

Страница 49: ...mk2 can reliably play up to 24 polyphonic notes across all pads when your samples fit in the 64 MB of internal memory or up to 8 larger samples streaming directly from the microSD card Additionally there is a per pad limit based on the pad mode The limit for each pad mode is identified in the table on the right Nothing in bitbox mk2 will prevent you from trying to play 24 voices on all 16 pads at ...

Отзывы: