control the four parameters within the focus ring. You can also touch and drag the knobs
to control them..
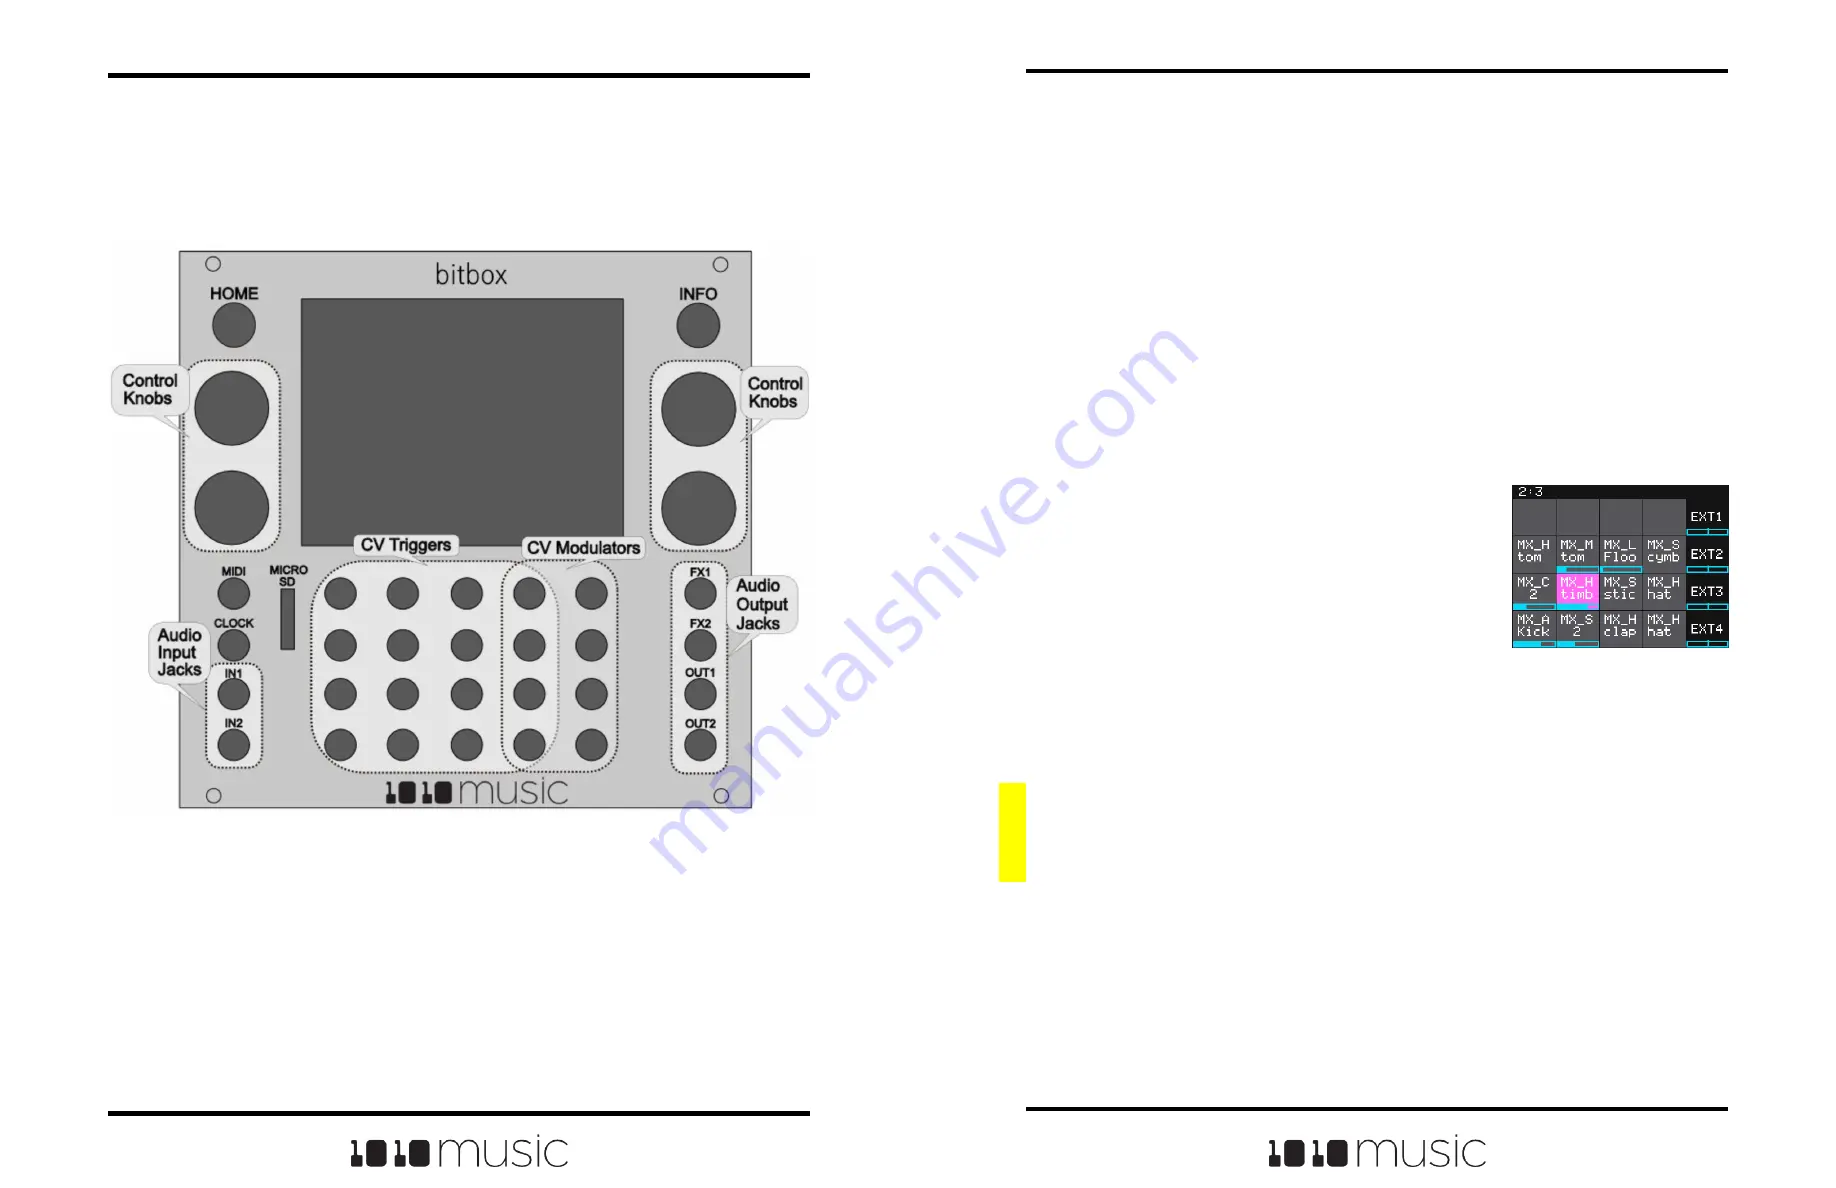
Below the screen and knobs there are a series of mini jacks that are used for MIDI and
control voltage input and output. The MIDI input jack allows you to trigger pads and
modulate signals. You can also use the MIDI clock to synchronize playback. The
CLOCK input is used to sync with a CV clock signal. The two audio inputs (IN1 and IN2)
are used to record WAV files and for more precise modulation. The grid of mini jacks
directly below the screen can accept CV signals to trigger pads. The right two columns
of jacks can be used to modulate parameters.
Bitbox mk2 allows the user to configure how the audio outputs of the pads are routed to
FX1, FX2, OUT1, and OUT2, either as mono or stereo signals.
The MICRO SD slot accepts a microSD card that is used to store WAV files and
presets. All of your data and settings are stored on the microSD card.
Pads Screen Overview
The Pads screen of the bitbox mk2 firmware provides
ready access to the WAV files in the selected preset. The
grid on the Pads screen contains 16 gray pads that can
each be assigned one WAV file or a folder of WAV files.
Each preset may contain a different configuration of WAV
files and parameters. The pads display the abbreviated
name of the selected WAV file or folder. A blue bar across
the bottom of the pad represents the playback state of
Pads Screen
the pad. The four pads along the right side of the screen, labeled EXT1 through EXT4,
are mapped to external inputs jacks. The column of jacks to the left of the EXT jacks
can also be used as additional external inputs EXT5 through EXT8, in addition to
simultaneously being used to trigger samples mapped to those pads.
You can touch a pad on the screen to select it and trigger it. The selected pad is
highlighted pink. Press the INFO button to drill down and see the Waveform screen for
that pad. Press INFO again to access the pad parameters. Touch the tabs across the
bottom to select the different pad parameter pages. Press HOME to navigate back up
the screen hierarchy. You can also use the control knobs to scroll through the pads. The
top two knobs scroll horizontally, and the bottom left knob scrolls vertically. The control
knobs allow you to select a pad without triggering it. The bottom right knob switches the
right column of the display to toggle between the EXT display and the clipboard menu.
A counter in the top left corner of the screen tracks the number of measures and beats
(e.g. 2:3 in the example) that have played since the clock started. Reset the measure
counter by powering down the module, stopping the CV clock input for a few seconds,
or sending a MIDI Start signal.
Copyright 1010music LLC 2023
Page 12 of 97
Page 13 of 97
Copyright 1010music LLC 2023
Bitbox MK2 2.1 User Manual
Mar 1, 2023
Bitbox MK2 2.1 User Manual
Mar 1, 2023
FRONT PANEL AND CONTROLS OVERVIEW
The front panel of bitbox mk2 contains a touch screen, control knobs, HOME and INFO
buttons, a MIDI input jack, a clock input jack, 2 audio input jacks, 20 CV input jacks and
4 audio output jacks as shown in Front Panel Overview. This manual will refer to the
controls, inputs and outputs of the module using the labels shown in this figure.
The touchscreen displays the firmware running on the module and allows you to use
touch gestures to interact with the firmware. The INFO and HOME buttons are used to
navigate the screens. Press INFO to view the information screen for the current
selection. In some cases, you can press INFO more than once to get to deeper
information. The HOME button takes you back a screen. If you get lost, you can push
HOME until you get back to the Pads screen.
The control knobs are used to cycle through options on the screen. When there is a list
of parameters on the screen, use the top knob to select the parameter and the bottom
knob to set it’s value. When there are virtual knobs on the screen, the physical knobs
Front Panel Overview


