Administrator’s Guide for SIP-T2 Series/T19(P) E2/T4 Series/CP860 IP Phones
290
2.
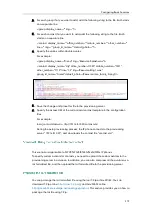
In the Directory block, enter the name and the office, mobile or other numbers in the
corresponding fields.
3.
Select the desired ring tone from the pull-down list of Ring Tone.
4.
Select the desired group from the pull-down list of Group.
5.
Select the desired account from the pull-down list of Account.
If Auto is selected, the IP phone will use the default account when placing calls to
the contact from the local directory.
6.
Click Add to add the contact.
To add a group to the local directory via phone user interface:
1.
Press Menu->Directory->Local Directory.
2.
Press the AddGr soft key.
3.
Enter the desired group name in the Name field.
4.
Press or , or the Switch soft key to select the desired group ring tone from
the Ring field.
5.
Press the Add soft key to accept the change.
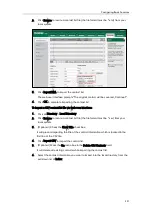
To import an XML contact list file via web user interface:
1.
Click on Directory->Local Directory.
Summary of Contents for CD860
Page 1: ......
Page 45: ...Getting Started 23 For SIP T42G T41P T40P Desk Mount Method Wall Mount Method Optional ...
Page 47: ...Getting Started 25 For SIP T23P T23G Desk Mount Method Wall Mount Method Optional ...
Page 122: ...Administrator s Guide for SIP T2 Series T19 P E2 T4 Series CP860 IP Phones 100 ...
Page 840: ...Administrator s Guide for SIP T2 Series T19 P E2 T4 Series CP860 IP Phones 818 ...
Page 995: ...Appendix 973 ...


