background image

38


2.9.4 Test stands should be equipped with the facilities for emergency engine 

stop in case of oil pressure drop, pressure rise of the crankcase blow-by gasses, or if the 

temperature of the coolant or rotation rate of the crankshaft exceeds the limits.


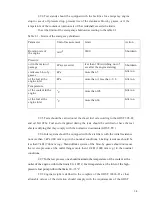
To set the limits of the emergency shutdown according to the table 2.1.


Table 2.1 - Limits of the emergency shutdown


Parameter


Unit of measurement


Limit


Action


Rotation rate of 
the engine


min-1


2400


Shutdown


Pressure:


oil in the main oil 
passage


kPa (excessive)


less than 100 (switching on in 5 
sec after the engine starting)


Shutdown


crankcase blow-by 
gasses


kPa


more than 5


Idle run


of the fuel at the 
engine inlet


kPa


more than +1 less than - 0.6


Idle run


Temperature


of the coolant in the 
engine


°

C


more than 105


Idle run


of the fuel at the 
engine inlet


°

C


more than 60


Idle run


2.9.5 Tests should be carried out at the diesel fuel oil according to the GOST 305-82 

and oil М-10Г2к. Fuel and oil applied during the tests should be certified or have the test 

sheets certifying that they comply with the normative documents (GOST, TU).


2.9.6 Inlet system should be equipped with the air filters with the initial resistance 

no more than 3 kPa (300 mm w.g.) in the nominal conditions. Limiting resistance should be 

less than 7 kPa (700 mm w.g.). Stand offtake system of the blow-by gasses should not cause 

the reverse pressure at the outlet flanges more than 10 kPa (1000 mm w.g.) in the nominal 

conditions.


2.9.7 In the test process one should maintain the temperature of the coolant at the 

outlet of the engine within the limits 80...100

°

C, fuel temperature at the inlet of the high-

pressure fuel pump within the limits 30...35

°

C. 

2.9.8 Engine weight is defined in the complete of the GOST 14846-81  at that 

allowable values of the deviation should comply with the requirements of the GOST 

Summary of Contents for ???-236

Page 1: ...Maintenance manual 236 01 01 RK for the engines 236 238 of all versions and specifications Yaroslavl 2014...

Page 2: ...ine disassembly 22 2 6 General technical requirements for cleaning washing of the components and units of the engine 24 2 7 General technical requirements for inspection of the components and assembly...

Page 3: ...10 1007 Valve 114 1007 Rocker pivot 117 1007 Rocker adjusting screw nut 118 1007 Push rod 120 1007 Lifter 122 1007 Lifter pin 126 1011 Two section oil pump 128 1011 Radiator box 131 1011 Master sectio...

Page 4: ...alve 157 1011 Idler gear of the drive 159 1011 Idler gear shaft 161 1012 Oil filter Filter body 163 1028 Centrifugal oil cleaner Oil cleaner body 165 1028 Centrifugal oil cleaner shaft 166 1028 Rotor...

Page 5: ...drive 204 1308 Gear of the fan drive 205 1601 Clutch Pressure disk 207 1601 Clutch pressure disk 209 1601 Centre clutch driving disk 211 1601 Clutch pressure spring 213 1601 Springs 215 Assembly of t...

Page 6: ...f oil housing 252 5 9 Installation of the cylinder head cast in block 253 5 10 Installation of the push rods and rockers with pivots Expansion gaps adjustment 254 5 11 Installation of the nozzles 255...

Page 7: ...ting up and operation of the engine 267 6 4 Timing of the engine 269 6 5 Engine acceptance test 275 6 6 Engine running in modes 278 6 7 Mode of the replicated tests 281 Supplements 284 Supplement Stan...

Page 8: ...nance manual In this Maintenance manual information provided in the Service instructions 236 3902150 and added with the details in engine repair was used There is no information on repair of bought it...

Page 9: ...N Kupriianov G V Olennikova L N Malyshev A A Bibikov D N Panaiotov S R Vaganov and others OJSC Avtodizel 2014 Reprinting duplication and translation whole or in part is prohibited without prior writte...

Page 10: ...e nominal horsepower and maximum torque as the 238M2 engine It differs with completeness and special oil pan that allows the operation at high trim and list 238 M2 engines is for permanent and cyclica...

Page 11: ...67 883 825 883 687 torque Nwm kgf m Rotation rate of the crankshaft 68 90 84 90 70 with the torque rpm no more than Rotation rate of the idle 1250 1450 1250 1450 1250 1450 1450 1600 1250 1450 cranksha...

Page 12: ...brication system Lubricating system Hybrid Pressure lubrication system lubricates all base and connecting rod bearings of crankshaft camshaft bearings small end bushings rocker bushings idler gear bus...

Page 13: ...800 7 0 8 0 100 130 1 0 1 3 5 2 5 6 180 230 1 8 2 3 200 250 2 0 2 5 700 800 7 0 8 0 100 130 1 0 1 3 5 2 5 6 180 230 1 8 2 3 200 250 2 0 2 5 700 800 7 0 8 0 100 130 1 0 1 3 5 2 5 6 180 230 1 8 2 3 200...

Page 14: ...ation Water pump Centrifugal driven with V shaped belt from the crankshaft pulley Fan Six bladed with gear drive Electrical equipment Generator 273 2 or 1322 3771 273 2 or 1322 3771 273 2 or 1322 3771...

Page 15: ...26 5 26 5 26 second speed 2 90 2 90 2 90 third speed 1 52 1 52 1 52 fourth speed 1 00 1 00 1 00 fifth speed 0 66 0 66 0 66 reverse gear 5 48 5 48 5 48 Gear change Remote mechanical control With the le...

Page 16: ...without radiator 21 29 29 28 29 29 Cooling system without radiator 17 20 20 20 20 20 Air filter 1 4 0 85 0 85 0 85 Variable timing device 0 16 0 16 0 16 0 16 0 16 0 16 Transmission gear box 5 5 5 5 5...

Page 17: ...re the regular check of its technical condition or main repair During the current repair engine is disassembled in the volume necessary for receiving access to the defective parts nods and units Timel...

Page 18: ...ination of interacting factors means of the repair executors strategies technologies and specifications and technical documentation Repair system guarantees the prevention of the failure or wear and g...

Page 19: ...item While accepting for the repair of the engine acceptance report is signed in three copies Name of the object its technical conditions and completeness name of the customer date of the acceptance f...

Page 20: ...y of the repair working culture and labour productivity engine should be cleaned from the mud washed if necessary electrical equipment should be provisionally removed before the disassembling oil shou...

Page 21: ...e details of the fuel and oil systems of the engine openings of the turbocharger should be closed with the closing plugs to avoid dirt accumulation 2 5 9 Plugs should be installed while the removing o...

Page 22: ...the parts with the quality standards having the necessary marking and which are approved by the administration of the repair plant Oil passages should be checked comparing with the control samples of...

Page 23: ...bathes using the submerge method with intensive stirring of the detergent solution with the concentration of 25 30 g l with the help of directed jets or compressed air barbotage The disadvantage of th...

Page 24: ...tress method The cleaning of the crankshaft cavities from the asphalt resinous deposits should be made in the bath with diesel fuel oil with the help of scraper and circular brush brush from the capro...

Page 25: ...26...

Page 26: ...27 2...

Page 27: ...tigue break down corrosive damage change of the physical and chemical properties of the details 2 7 3 Analysis of the technical condition reasons of the appearance of the damages and defects of the pa...

Page 28: ...s recommended to take measures and means of the technological equipment that provide objective estimation of the technological condition accuracy of the measurements and availability of application fo...

Page 29: ...ts of the simplicity of rotation and noise character in comparison with the approves quality standard Increase of the tip clearance in the bearings determined at the gauge should be less than 1 5 time...

Page 30: ...the GOST 8581 78 during the assembly 2 8 5 It is allowed to install paronite gaskets lubricated with non fluid oil to make assembly process more convenient One should lubricate one of the parts conne...

Page 31: ...e bolt screw head with diesel oil before the tightening It is necessary in order to decrease the friction in the thread and under the bolt head while tightening that will provide greater tension in th...

Page 32: ...parts 2 8 13 Assembling the joints with force fit and press fit one should heat the external part gear hub of the crankshaft to the temperature 180 200 degrees and to cool the internal part valve sit...

Page 33: ...el the axial clearance in the crankshaft bearing moving the crankshaft along its axis in the both sides with the help of mandrel tightening of the bolts on the crankshaft bearing caps and stretching b...

Page 34: ...egun from the long bolt Total clearance between the butts of the connecting rod big end and connecting rod journal axial play of the connecting rod should be within the limits 0 3 0 94 mm Measurement...

Page 35: ...ng mechanism Operation manual 236 3902150 RE To abject the clearance one need to ease the jam nut of the adjuster screw to put the gauge corresponding the thickness of the upper limit of the clearance...

Page 36: ...or requirements of this Manual to check the tension torques of the threaded joints correspondence of the clearance sizes in the joining parts quality of their interrelation and functions of the assem...

Page 37: ...ore than 60 Idle run 2 9 5 Tests should be carried out at the diesel fuel oil according to the GOST 305 82 and oil 10 2 Fuel and oil applied during the tests should be certified or have the test sheet...

Page 38: ...mption 2 9 10 Smoking at the exhaust is determined in accordance with the Principles of the UN Economic Commission for Europe 24 03 at the full load curve and free acceleration 2 9 11 Oil consumption...

Page 39: ...dez I 238 1002015 special cast iron II 236 1006037 A 5 5 5 III 236 1005152 35 10 IV 236 1005140 B 170 241 HB 180 no menos Number of the defect Location of the picture Possible defect Way for defect de...

Page 40: ......

Page 41: ......

Page 42: ...lock Cracks on the joining surface of the cylinder head Breaks on the holes for the crankshaft bearing liners Cracks on the walls of the cooling jacket and longitudinal water passage Cracks and breaks...

Page 43: ...the stiffening bars and dividing walls Inspection To weld 8 Cracks and breaks touching the holes for the pins of the cylinder head fasteners Deformaci n de superficies para culatas de cilindros To we...

Page 44: ...shaft pins Inside gauge 50 100 54 0 03 To replace the bushings and to process the hotels till the nominal or categorical repair dimension 14 Wear of the holes of the shaft bearers of the idle gear of...

Page 45: ...ng of the bushings of the crankshaft Inspection of the seating with the hammer tapering Inside gauge 68 0 03 To replace the bushings 19 Corrosive wear of the bearing surface of the cylinder liners led...

Page 46: ...no more than two threads 8 6 Inspection To calibrate the thread To install threaded insert M10 6H M10x1 6H M12 6H M12x1 25 6H M14 6H M14 1 5 6H M16x1 5 6g The same To calibrate the thread To replace t...

Page 47: ...sembling in kit 2 Measuring the dimension of the holes for the crankshaft bearing liners bolts at the fasteners of the crankshaft bearing caps should be tightened with the moment of force from 421 to...

Page 48: ...011 236 1002011 238 1002011 2 238 1002011 2 238 1002011 2 238 1002011 2 238 1002011 Table 2 Categorical dimensions of the assembled cylinder block Number of the defect Name of the dimension Repair dim...

Page 49: ...oil pump relatively to the hole 0 2 mm with radius 15 3 Tolerance of circularity and longitudinal section profile of the surfaces and 0 0075 mm diameters semi difference 13 4 Positional tolerance of t...

Page 50: ...faces Number of the defect Location of the picture Possible defect Method defect detection and control means Dimension and parameter mm Conclusion nominal maximum allowable without repair for repair 1...

Page 51: ...edge Inspection Magnifier 1 4 Scuffing is not allowed To process the bearing surfaces for the elimination of the defect within the nominal dimension of the backing ledge Table 3 Dimensional grades of...

Page 52: ...ct Location of the picture Possible defect Method defect detection and control means Dimension and parameter mm Conclusion nominal maximum allowable without repair for repair 1 2 Cracks and breaks Loo...

Page 53: ......

Page 54: ...8 1 6h 10 3H6 Inspection Inside gauge 100 160 1 See the table 3 To calibrate the thread To install threaded insert Table 3 Categorical repair dimensions of the upper block cover Number of the defect D...

Page 55: ...eel 20 80 no less Number of the defect Location of the picture Possible defect Method defect detection and control means Dimension and parameter mm Conclusion nominal maximum allowable without repair...

Page 56: ......

Page 57: ...N6 14 1 5 6 14 3 6 3 8 GOST 6111 52 Inspection Beam compass I 125 0 1 1 Proofing of the seating by hand Inspection Inspection 32 Dimension 14 1 1 5 M10x1 5 To weld To replace the pin To cut a thread o...

Page 58: ...defect Location of the picture Possible defect Method defect detection and control means Dimension and parameter mm Conclusion nominal maximum allowable without repair for repair 1 2 Throughwall crack...

Page 59: ......

Page 60: ...wable without repair for repair 3 4 Deformation of the flywheel surface Thread stripping no more than one thread 8 6 10 6 12 6 14 6 Inspection Slab 2 1 1000 630 2 1 1000 630 Ruler 150 Gauge 0 05 Inspe...

Page 61: ...or flatness of the surfaces 0 05 mm at the length 100 mm 3 2 Positional tolerance of the threaded holes with radius dependable tolerance for holes and 0 2mm for holes 0 25 mm 4 3 Dimension after the p...

Page 62: ...cylinder head 236 1003014 I3 236 1003014 I3 236 1003014 238 1003014 3 238 1003014 4 238 1003014 Material Hardness Number of the defect Location of the picture Possible defect Method defect detection a...

Page 63: ...des valve bushings nozzle barrels and seats of the valves Inspection Tests for sealing with water pressure 0 3 0 4 MPa 3 4 kfg cm during 2 min Inspection Tests for sealing with water pressure 0 3 0 4...

Page 64: ...236 238 1003014 3 236 238 1003014 4 236 238 1003014...

Page 65: ......

Page 66: ...allowable without repair for repair 3 4 Cracks except specified in the defects 1 and 2 Cracks on the valve seats To weld Discard 5 Damage of the sealing in the place of installation of the nozzle barr...

Page 67: ...ss of the surfaces E and at the whole length 0 05 236 236 0 06 238 238 12 0 019 To replace the bushing 8 9 11 Loosening seating of the valve seats Corrosive damages of the surface near the holes of th...

Page 68: ...6 238 238 at the whole length 2 Block head should have water pressure test for sealing from 0 3 to 0 4 MPa from 3 to 4 kfg cm 2 during 2 min or kerosene test during 2 min Water or kerosene leakage is...

Page 69: ...4 08 08 II 238 1003265 08 08 III 238 1003488 08 Number of the defect Location of the picture Possible defect Method defect detection and control means Dimension and parameter mm Conclusion nominal max...

Page 70: ......

Page 71: ...m Tolerance for flatness according to surface B 0 5 under the pressure785 Nw 80 kfg applied to 196 Nw 20 kfg the surfaces A Compression marks with the depth 2 without abrupt junctions To flatten Techn...

Page 72: ...80 no less Number of the defect Location of the picture Possible defect Method defect detection of the defect and method control Dimension and parameter mm Conclusion nominal maximum allowable withou...

Page 73: ......

Page 74: ...mostat Deformation of the surface of the pipe fitting flanges Thread stripping no more than one thread 8 6 1 4 GOST 6111 52 for 236 1003290 and 238 1003290 3 8 GOST 6111 52 Inspection Inspection Slab...

Page 75: ...the defect 1 Tolerance for flatness of the surface E 0 15 mm 4 2 Tolerance for flatness of the surfaces B relatively to the total joining flatness 0 2 mm 5 3 Dimension after the processing till the e...

Page 76: ...04110 Material Hardness Aluminium alloy Cast iron 15 7 90 111 for 236 1004015 90 120 for 238 B 1004015 4 135 160 for insert Number of the defect Location of the picture Possible defect Way for defect...

Page 77: ...rface of the piston Wear of the piston grooves for the compression rings for the scraper ring Clamp 150 Set of gauges 82102 See the table 6 0 10 0 17 0 063 0 107 To reject Table 6 Dimensional grades o...

Page 78: ...e part or assembly unit Marking Piston pin 236 1004020 236 1004020 01 Material Hardness 12 N3 for 236 1004020 16MnCr5 for 236 1004020 01 57 66 RC Number of the defect Location of the picture Possible...

Page 79: ...ssion marks on the surfaces of the pin Wear of the pin according to the external diameter Clamp 50 50 0 008 To process the surface till the eliminationof the defect within the limits of the pin dimens...

Page 80: ...36 41HRC Bronze no less than 72 RB Number of the defect Location of the picture Possible defect Method defect detection and means of control Dimension and parameter mm Conclusion nominal maximum allo...

Page 81: ......

Page 82: ...ithout repair for repair 4 Scuffs and wear of the holes for bushings Inspection Inside gauge 50 100 Thread and face bearings of the piston rod bolts should be lubricated with the oil which is used in...

Page 83: ...43 steel08 Surface V J I and 53 63 RC the rest surfaces 192 no less than 143 187 32 39HRC Number of the defect Location of the picture Possible defect Method defect detection and means of control Dime...

Page 84: ...ing in the kit Hole diameter after the re assembling of the piston rod with cover Technical requirements for the repaired assembly unit Number of the defect 1 Parallelity tolerance of the hole relativ...

Page 85: ......

Page 86: ...ackside main bearing at the length Wear of the bearing for the bushings front backside Inspection Calibre Wear of the bearing for the bushings Dimension C 56 0 14 64 0 2 140 0 014 56 20 To reject To p...

Page 87: ...To reject To replace the pins 10 Wear of the key slot Calibre Dimension 10 00 To weld and process according to the drawing dimension 11 Loosening of the seating of the counter balance Inspection of th...

Page 88: ...eflector Inspection of the seating with the light tapering of the hammer Dimension P 0 5 1 5 To replace the back 16 Breakage of the counter balance Inspection To replace the bolts and counter balances...

Page 89: ...o replace the gear 238 1005030 Table 7 Categorical repair dimensions of the crankshaft Number of the defect 2 Name of the dimension Diameter of the connecting rod bearings Repair dimensions mm 87 75 0...

Page 90: ...rfaces and Ra 1 25 micron 2 4 5 6 Gear position III and counter balance position II before the pressing on should be heated to the temperature from 408 to 458 from 135 to 185 C 11 13 7 Gear retaining...

Page 91: ...the defect Location of the picture Possible defect Method defect detection and means of control Dimension and parameter mm Conclusion nominal maximum allowable without repair for repair 1 2 Cracks an...

Page 92: ......

Page 93: ...50 0 039 To reject 4 Wear of the key slot Calibre Dimension To process the new slot displaced in a circular direction at180 according to worn one and to balance the pulley 5 Thread stripping 8 6 no m...

Page 94: ...defect Location of the picture Possible defect Method defect detection and means of control Dimension and parameter mm Conclusion nominal maximum allowable without repair for repair 1 2 Cracks and bre...

Page 95: ......

Page 96: ...ong the length Inspection Control sampler To replace rim 4 Wearing of the slot surfaces Beam compass I 125 0 1 1 Dimension 60 0 074 60 1 To build up and process till the nominaldimension 5 Wearing of...

Page 97: ...to the whole surface 2 2 At the surface K singe clean cavities are allowed with the most dimension 2 mm with the distance between their edges less than 3 mm and no more than 5 pieces 2 3 Moment of fo...

Page 98: ...Dimension and parameter mm Conclusion nominal maximum allowable without repair for repair 1 2 Scuffs on the working surface or wear of the half washer thickness Deformation of the bearing Deformation...

Page 99: ...control Dimension and parameter mm Conclusion nominal maximum allowable without repair for repair 3 Wearing of the slot surfaces Insider gauge 6 10 Dimension To reject Technical requirements for the...

Page 100: ...rest surfaces 167 207 Number of the defect Location of the picture Possible defect Method defect detection and means of control Dimension and parameter mm Conclusion nominal maximum allowable without...

Page 101: ......

Page 102: ...125 0 1 1 Dimension 42 2 41 0 To process the cams according to the template 5 Wearing of the key slot according to the width Calibre Dimension 6 02 To reject 6 Shaft bending V block PZ 2 0 Indicator...

Page 103: ...of the middle bearings relatively to the total axis of the end bearings afterthe correction 0 04 mm 6 2 Tolerance of circularity and longitudinal section profile of the surfaces and 0 005 mm 3 3 Roug...

Page 104: ...el 55 20G9 N4 P303 GOST 5632 72 Rod end Steel 40 GOST 4543 71 Building up of the seating cone alloy 3 Surface 51 59HRC the rest of surfaces 35 44 HRC 32 37 HRC 53 62 HRC 42 51 HRC Number of the defect...

Page 105: ...defect To process till the elimination of the defect Number of the defect Location of the picture Possible defect Way for defect detection and means of control Dimension and parameter mm Conclusion n...

Page 106: ...nce of the surface generator 0 01 0 02 Note Working valve face should be processed Technical requirements for the repaired assembly unit Number of the defect 1 After the processing till the eliminatio...

Page 107: ...47 Surface 54 59 RC the rest surfaces 167 212 Number of the defect Location of the picture Possible defect Method defect detection and means of control Dimension and parameter mm Conclusion nominal m...

Page 108: ...el 40 GOST 1050 88 2 236 1007148 Steel 40 GOST 4543 71 3 236 1007118 Band DPRNP 13 4 4 2 5 1 Surface 57 64 HRC the rest of surfaces 167 212 HB 2 207 241 HB spherical surface T HRC 48min Number of the...

Page 109: ...m Conclusion nominal maximum allowable without repair for repair 4 Wear of the working surface of the bushing for the push rod bushing inside gauge 18 50 25 06 To replace the bushing 5 Scuffs or the w...

Page 110: ...efect 1 Parallelity tolerance of the surface generator relatively to the axis of surface 0 15 mm for the length 100 mm 5 2 Roughness of the surfaces after the processing till the elimination of the de...

Page 111: ...ct detection and means of control Dimension and parameter mm Conclusion nominal maximum allowable without repair for repair 1 2 3 Cracks and breaks Wear of the spherical for surfaces of the fingers Be...

Page 112: ...B II 59 64HRC IV III 59 64HRC Number of the defect Location of the picture Possible defect Method defect detection and means of control Dimension and parameter mm Conclusion nominal maximum allowable...

Page 113: ......

Page 114: ...place the roller 5 Wear of the bushing surface for the lifter pin Inside gauge 18 50 To replace the bushings 6 Loosening of the seating of the roller axis in the push rod eyes Inspection of the seatin...

Page 115: ...of the defect 1 Parallelity tolerance of the surface J relatively to the axis of the hole 0 06 mm 4 7 2 Roller axis position III should be locked using the punching in three points from the both side...

Page 116: ...ture Possible defect Way for defect detection and means of control Dimension and parameter mm Conclusion nominal maximum allowable without repair for repair 1 2 3 Cracks and breaks Wear of the axis al...

Page 117: ...lowable without repair for repair 4 Thread stripping 1 4 OST37 001 311 83 no more than one thread Inspection To calibrate the thread Technical requirements for the repaired assembly unit Number of the...

Page 118: ...I 236 1011034 4 4 2 5 Filler ring Number of the defect Location of the picture Possible defect Method of detection of the defect and method control Dimension and parameter mm Conclusion nominal maximu...

Page 119: ......

Page 120: ...fs from the gears at the face surface Inspection Depth gauge 160 Dimension 55 0 046 Scuffs are not permitted To reject 5 Loosening of the seating of the pins Proofing of the seating by light hammer ta...

Page 121: ...e picture Possible defect Method of detection of the defect and method control Dimension and parameter mm Conclusion nominal maximum allowable without repair for repair 1 2 3 Cracks and breaks Wear of...

Page 122: ......

Page 123: ...tion and means of control Dimension and parameter mm Conclusion nominal maximum allowable without repair for repair 5 Wear of the seat surfacesfor the gears Inside gauge 50 100 43 07 To reject 6 Threa...

Page 124: ...Location of the picture Possible defect Method of detection of the defect and method control Dimension and parameter mm Conclusion nominal maximum allowable without repair for repair 1 2 3 4 Cracks or...

Page 125: ......

Page 126: ...w one or repaired with chrome plating 7 Loosening of the gear seating To proof the seating with the slight hammer tapering To replace the gear Technical requirements for the repaired assembly unit Num...

Page 127: ...64 RC Number of the defect Location of the picture Possible defect Method of detection of the defect and method control Dimension and parameter mm Conclusion nominal maximum allowable without repair...

Page 128: ......

Page 129: ...ir for repair 4 Wear of the gear according to the externalteeth diameter Clamp 50 To reject 5 Wear of the gear height Clamp 25 Dimension 6 Wear of the surface forgears Clamp 25 16 0 012 15 96 To repla...

Page 130: ...me of the part or assembly unit Marking Flow regulation valve Release valve 236 1011048 236 1011363 2 Material Hardness Number of the defect Location of the picture Possible defect Way for defect dete...

Page 131: ...11048 Notes 1 Opening start of the flow regulation valve 236 1011048 under the pressure in the cavitation from 0 7 to 0 8 P from 7 to 8 kfg cm2 should be provided with the installation of the washers...

Page 132: ...Number of the defect Location of the picture Possible defect Way for defect detection and means of control Dimension and parameter mm Conclusion nominal maximum allowable without repair for repair 1...

Page 133: ...Possible defect Way for defect detection and means of control Dimension and parameter mm Conclusion nominal maximum allowable without repair for repair 4 Wear of the hole for the axis or shaft Inside...

Page 134: ...no less Number of the defect Location of the picture Possible defect Way for defect detection and means of control Dimension and parameter mm Conclusion nominal maximum allowable without repair for r...

Page 135: ...nside gauge 18 50 35 0 039 35 09 To replace the bushing Technical requirements for the repaired assembly unit Number of the defect 1 Coaxiality tolerance of the hole V relatively to the axis of the pi...

Page 136: ...umber of the defect Location of the picture Possible defect Way for defect detection and means of control Dimension and parameter mm Conclusion nominal maximum allowable without repair for repair 1 Cr...

Page 137: ...epair 4 Thread stripping 12 6 no more than one thread Inspection Scuffs are not permitted To reject Technical requirements for the repaired assembly unit Number of the defect 1 Perpendicularity tolera...

Page 138: ...Location of the picture Possible defect Way for defect detection and means of control Dimension and parameter mm Conclusion nominal maximum allowable without repair for repair 1 Cracks and breaks Ins...

Page 139: ...Possible defect Way for defect detection and means of control Dimension and parameter mm Conclusion nominal maximum allowable without repair for repair 4 Wear of teeth thickness Calibre h 3 246 To re...

Page 140: ...2 238B 1011034 4 4 2 5 Number of the defect Location of the picture Possible defect Way for defect detection and means of control Dimension and parameter mm Conclusion nominal maximum allowable withou...

Page 141: ...046 65 09 To reject 5 5 Loosening of the seating of the adjusting pins Proofing by hand To reject 6 6 Thread stripping 8 6N Inspection 1 thread To reject 7 7 Thread stripping 8 6 Inspection 1 thread T...

Page 142: ......

Page 143: ...defect detection and means of control Dimension and parameter mm Conclusion nominal maximum allowable without repair without repair 1 1 Crank of the bushings Inspection To reject 2 2 Scuff of the fac...

Page 144: ......

Page 145: ...fect Location of the picture Possible defect Way for defect detection and means of control Dimension and parameter mm Conclusion nominal maximum allowable without repair without repair 1 1 Cracks brea...

Page 146: ...of the axis surface for the body bushings Clamp 2 To float to chrome plate with the following processing according to the drawing 17 95 5 5 Wear of the face surface or ring grooves Micrometer A To rej...

Page 147: ...ect Location of the picture Possible defect Way for defect detection and means of control Dimension and parameter mm Conclusion nominal maximum allowable without repair without repair 1 1 Cracks break...

Page 148: ...body bushings Clamp 2 To float to chrome plate with the following processing according to the drawing 17 95 5 5 Wear of the face surfaces or ring grooves Micrometer A To reject 64 85 6 6 Wear of the...

Page 149: ...ossible defect Way for defect detection and means of control Dimension and parameter mm Conclusion nominal maximum allowable without repair without repair 1 1 Thread stripping of the body Inspection 1...

Page 150: ......

Page 151: ...ay for defect detection and means of control Dimension and parameter mm Conclusion nominal maximum allowable without repair without repair 1 1 Stripping of the fitting thread 16 1 5 Inspection 1 threa...

Page 152: ...ired part Start of the opening of the valve 23160 11056 under the pressure in the cavity 520 560 kPa 5 2 5 6 kfg cm2 and should be provided installation of the part 312668 total amount no more than 5...

Page 153: ...GOST 4543 71 gears Band DPRNP 1 5 B TSS4 4 2 5 GOST 15885 77 bushings 241 286 HB Nitrogen hardening 450HV h 0 15 0 35 mm Number of the defect Marking Possible defect Method defect detection and contr...

Page 154: ...tooth at the thickness at h 3 246 Calibre gear gauge template To reject 0 07 3 925 0 01 4 4 Wear of the face surfaces Microgauge 50 1 GOST 6507 78 To reject 20 2 0 00 5 5 Wear of the surface of the bu...

Page 155: ......

Page 156: ...dness Steel 45 GOST 1050 74 169 212 HB Surface 57 64 HRC h1 2 Number of the defect Marking Possible defect Method defect detection and control means Dimension and parameter mm Conclusion nominal maxim...

Page 157: ...t 3 3 A Wear of the bearing surface Micrometer 50 1 GOST 6507 78 A To chrome plate float and to process according to the drawing 236 1011208 4 4 Wear of the bearing surface Depth gauge B To chrome pla...

Page 158: ......

Page 159: ...defect Method defect detection and means of control Dimension and parameter mm Conclusion nominal maximum allowable without repair for repair 1 2 3 Cracks and breaks Wear of the hole for overload rel...

Page 160: ......

Page 161: ...Material Hardness 7 2 80 120 Number of the defect Location of the picture Possible defect Method defect detection and means of control Dimension and parameter mm Conclusion nominal maximum allowable w...

Page 162: ...40 50 RC the rest of the surfaces 143 187 Number of the defect Location of the picture Possible defect Method defect detection and means of control Dimension and parameter mm Conclusion nominal maximu...

Page 163: ...To calibrate the thread Technical requirements for the repaired part Number of the defect 1 Axial runout tolerance of the surface B relatively to the surfaces and 0 025mm 2 2 Roughness of the surface...

Page 164: ...6 24 RC Number of the defect Location of the picture Possible defect Method defect detection and means of control Dimension and parameter mm Conclusion nominal maximum allowable without repair for rep...

Page 165: ......

Page 166: ...mm Conclusion nominal maximum allowable without repair for repair 5 Thread stripping no more than one thread 24 1 5 6g 8 1 6 Inspection To calibrate the thread Technical requirements for the repaired...

Page 167: ...6 2 1 236 1028242 236 1028250 25 3111 2666 Material Hardness 7 2 236 1028250 Armamid CB30 1 80 120 HB Number of the defect Location of the picture Possible defect Method defect detection and means of...

Page 168: ...1 2 Cracks and breaks Wear and deformation of the hole for 236 1028242 Inspection Inside gauge 18 50 25 0 045 To reject Note rubber filler ring 019 025 36 2 1 should be replaced for new one...

Page 169: ...40X 241 286 HB 450 HV Number of the defect Location of the picture Possible defect Method defect detection and means of control Dimension and parameter mm Conclusion nominal maximum allowable without...

Page 170: ...4 5 6 B Wear of the seating diameter Wear of teeth thickness Thread stripping 12 6 no more than one thread for 7511 1029116 10 Calibre Inspection h 3 218 To reject To calibrate the thread...

Page 171: ...on and means of control Dimension and parameter mm Conclusion nominal maximum allowable without repair for repair 1 2 3 B Cracks and breaks Wear of the shaft bearings under the bearings Wear of the be...

Page 172: ...part Number of the defect 1 Relatively to the axis of centres circular runout tolerance for surfaces B and 0 02 mm for surface 0 03 mm 2 3 4 2 Roughness of the surfaces according to the GOST 2789 73...

Page 173: ...n and means of control Dimension and parameter mm Conclusion nominal maximum allowable without repair for repair 1 2 A E Cracks or breaks Scuffs and wear of the face surfaces Inspection Inspection Mic...

Page 174: ...al requirements for the repaired part Number of the defect 1 Parallelity tolerance of the general joining flatness of the surfaces and relatively to the general joining flatness of the surfaces and 0...

Page 175: ...d defect detection and means of control Dimension and parameter mm Conclusion nominal maximum allowable without repair for repair 1 2 3 B Cracks or breaks Scuffs of the face surfaces of the bosses Thr...

Page 176: ...Technical requirements for the repaired part Number of the defect 1 Parallelity tolerance of the surface A relatively to the surface 0 1 mm 2...

Page 177: ...means of control Dimension and parameter mm Conclusion nominal maximum allowable without repair for repair 1 2 3 B Cracks and breaks Deformation of the joining surfaces of the manifolds to the cylinde...

Page 178: ...4 A induction manifold Thread stripping no more than one thread 10 6 20 1 5 6 To reject To calibrate the thread...

Page 179: ...21 238 1115021 238 1115021 Left induction manifold 236 1115024 236 1115024 238 1115024 238 1115024 Technical requirements for the repaired part Number of the defect 1 Tolerance for flatness of the sur...

Page 180: ...defect Location on the picture Possible defect Method of the defect detection and means of control Dimension or parameter mm Conclusion nominal Maximal allowable Without repair For repair 1 2 Cracks...

Page 181: ...no more than two threads Proofing of the seating by hand Inspection Inspection M8x1 25 10 1 5 To replace the pins To calibrate the thread The same To face and deepen Notes Water pump body should come...

Page 182: ...Location on the picture Possible defect Method of the defect detection and means of control Dimension or parameter mm Conclusion nominal Maximum allowable Without repair For repair 1 2 Cracks and bre...

Page 183: ...ds M8x1 4h Inside gauge 50 100 1 Proofing of the seating by hand Inspection 52 0 03 M8x1 25 To reject To replace the pins To calibrate the thread Technical requirements for the repaired assembly unit...

Page 184: ...efect detection and means of control Dimension or parameter mm Conclusion nominal Maximum allowable Without repair For repair 1 2 A Cracks or breaks Wear of the bushing bearings Inspection Clamp 25 Ca...

Page 185: ...hrome plate To calibrate the thread 3 01 Technical requirements for the repaired assembly unit Number of the defect 1 Circular runout tolerance of the surfaces B relatively to the axis centres 0 02 mm...

Page 186: ...or parameter mm Conclusion nominal Maximum allowable Without repair For repair 1 2 3 A Cracks or breaks Wear of the bearing for the bushings Wear of the surfaces for the vane and pulley pressing on I...

Page 187: ...2 Material Hardness 21 120 200 HB Number of the defect Location on the picture Possible defect Method of the defect detection and means of control Dimension or parameter mm Conclusion nominal Maximum...

Page 188: ...Location on the picture Possible defect Method of the defect detection and means of control Dimension or parameter mm Conclusion nominal Maximum allowable Without repair For repair 1 2 Cracks and brea...

Page 189: ...149 229 H Number of the defect Location on the picture Possible defect Method of the defect detection and means of control Dimension or parameter mm Conclusion nominal Maximum allowable Without repair...

Page 190: ...ote Defects 4 and 5 are controlled when it is necessary to disassembly the assembly unit Technical requirements for the repaired assembly unit Number of the defect 1 Symmetry tolerance of the key slot...

Page 191: ...ans of control Dimension or parameter mm Conclusion nominal Maximum allowable Without repair For repair 1 2 3 A Cracks or breaks Wearing of the pulley edges for the belt Wearing of the hole for roller...

Page 192: ...steel 08 II 236 1308014 Number of the defect Location on the picture Possible defect Method of the defect detection and means of control Dimension or parameter mm Conclusion nominal Maximum allowable...

Page 193: ...N u M a r Method defect detection and Dimension and parameter mm...

Page 194: ...e rivets with the slight hammer tapering 11 0 43 To flatten To reject using the proper parts To replace the gear Technical requirements for the repaired assembly unit Number of the defect 1 Parallelit...

Page 195: ...ethod defect detection and means of control Dimension and parameter mm Conclusion nominal maximum allowable without repair for repair 1 2 3 Cracks and breaks Wear of the hole bearings of the shaft Wea...

Page 196: ...0 relatively to the worn To reject 134 4 0 2 Dimensions 130 5 0 2 Technical requirements for the repaired assembly unit Number of the defect 1 Symmetry tolerance of the key slot relatively to the surf...

Page 197: ...hod defect detection and means of control Dimension and parameter mm Conclusion nominal maximum allowable without repair for repair 1 2 3 B E Wear of the bearing for the bushings Teeth wear splines We...

Page 198: ...ely to the worn one To calibrate the thread Technical requirements for the repaired assembly unit Number of the defect 1 Circular runout tolerance of the surfaces and relatively to the axis of the par...

Page 199: ...66 no less than Number of the Location of the Possible defect Method defect detection and means of control Dimension and parameter mm Conclusion nominal maximum allowable without repair for repair 1 2...

Page 200: ...Possible defect Method defect detection and means of control Dimension and parameter mm Conclusion nominal maximum allowable without repair for repair 1 2 3 Cracks or breaks Wear of the holes for the...

Page 201: ...4 Thread stripping M16 1 5 6H no more than two threads Inspection To calibrate the thread...

Page 202: ...Method defect detection and means of control Dimension and parameter mm Conclusion nominal maximum allowable without repair for repair 1 2 3 4 A A Cracks or breaks Chipping at the working inspection s...

Page 203: ...or repair 1 2 3 4 B A Cracks or breaks Scuffs hit tints or corrosion of the working surface of the disk Wear of the working surface of the disk Thread stripping no more than two threads 8 6 12 1 25 4...

Page 204: ...y treatment Technical requirements for the repaired assembly unit Number of the defect 1 Metal protrusion from the scuffs and dints at the surfaces of the disk are not permit 2 2 Dimension B after the...

Page 205: ...etection and means of control Dimension and parameter mm Conclusion nominal maximum allowable without repair for repair 1 2 3 Cracks or breaks Scuffs or wear at the working surface of the disk Wear of...

Page 206: ...up and process till the nominal dimension 16 3 Dimension E 59 7 0 06 59 5 Technical requirements for the repaired assembly unit Number of the defect 1 Tolerance for flatness of the surface 0 07 mm 2...

Page 207: ...mm Conclusion nominal maximum allowable without repair for repair 1 2 3 A Cracks or breaks Scuffs and wear of the working surface of the disk Wear of the studs Inspection Micrometer 50 1 Micrometer 75...

Page 208: ...Number of the defect 1 Tolerance for flatness of the surfaces A 0 07 mm 2 2 Cumulative tolerance of parallelity and flatness of the surfaces 0 15 mm 2 3 After the processing till the elimination of th...

Page 209: ...ection and means of control Dimension and parameter mm Conclusion nominal maximum allowable without repair for repair 1 2 3 Cracks or breaks Deformation of the spring Deformation of the spring at the...

Page 210: ...tection and means of control Dimension and parameter mm Conclusion nominal maximum allowable without repair for repair 1 2 3 4 Cracks or breaks Deformation of the spring Scuffs hit tints cavities from...

Page 211: ...1 A Internal valve spring Wire 65 2 3 5 GOST 1071 81 64 5 263 72 291 48 26 91 29 75 35 5 32 236 1011058 Spring of the flow regulation valve of the delivery section Wire 1 2 5 GOST 9389 75 59 5 61 5 16...

Page 212: ...sealant or red iron or zinc oxide 4 1 3 Plug gaskets of the water passages should be lubricated with the sealant Anaterm 505D It is allowed to use the joint sealant NTS 008 mixed with the solvent 646...

Page 213: ...same guide bushings of the cylinder head 7 in which they were installed before disassembly considering the location of the valves in the compartmented cassettes for the valves 4 2 2 Eduction valves sh...

Page 214: ...1003108 9 seat of the eduction valve 236 1003110 4 4 2 5 Quality of the valves and seats grinding should be checked for sealing pouring the diesel fuel oil alternatively in the eduction and induction...

Page 215: ...it is available for two three threads one should lubricate the plug and tap threads with the sealing Anagerm 100 or Anagerm 114 4 3 Pistons with connecting rods and rings 4 3 1 Pistons and connecting...

Page 216: ...cting rod 7 should be heated in the oil to the temperature from 353 to 373 K from 80 to 100 C Pin 5 should go into the holes of the piston bosses free without constraints Pin pressing on is not permit...

Page 217: ...ton with the marking up facing the bottom of the piston 4 3 12 After the installation of the piston pins at the piston it is necessary to check rotation of the rings in the piston grooves Rotating the...

Page 218: ...rive gear 2 of the fuel pump should be tightened with the moment of force from 32 to 44 Nwm from 3 2 to 4 4 kfg m Instead of bolts 7 bolts 310110 2 without spring washers could be installed At that be...

Page 219: ...Crankshaft 238 1005008 2 1 circular nut 236 1005055 2 front counter balance 238 1005026 3 gear 236 1005030 4 plug 313933 P 5 oil deflector 236 1005043 6 pin 236 1005042 7 crankshaft 238 1005015 dimens...

Page 220: ...f the pump parts should be lubricated with oil I 12A 4 6 2 Bolts 3 picture 4 6 of the fastener of idler gear shaft 2 should be tightened with the moment of force from 50 to 62 Nwm from 5 0 to 6 2 kfg...

Page 221: ...the drive 236 1011202 2 idler gear axis of the drive 236 1011208 3 bolt 310156 2 4 drive gear of the main section 236 1011040 5 gear wheel of the main section 236 1011030 6 gear wheel of the drive 23...

Page 222: ...323 from 40 to 50 C 4 6 10 Oil feed by the main section of the pump should be no less than 130 l min at output pressure from 570 to 630 kPa from 5 7 to 6 3 kfg cm 2 Oil feed by the radiator section sh...

Page 223: ...cap with spring 238 1012077 2 4 filtering element 840 1012040 12 or 840 1012040 14 or 840 1012040 15 5 ring 840 1012083 20 6 washer 312347 29 7 plunger of the overload relief valve 206D 1011055 8 sig...

Page 224: ...in the engine lubrication system 4 7 5 Installing the filtering element 4 it is necessary to coincide edges of the locking cover 2 with the grooves of the cap flanges 3 to press the spring of the cap...

Page 225: ...t jerks and constraints form the manual effort Clearance E should be from 0 5 to 1 0 mm 4 8 6 Cap nut 1 should be tightened with the moment of force from 15 to 20 Nwm from 1 5 to 2 0 kfg m 4 8 7 Centr...

Page 226: ...73 3 nut 250615 29 4 nut 311808 2 5 rotor cap 236 1028242 6 cap of the centrifugal oil cleaner 236 1028250 7 filler ring 236 1028246 8 housing of the rotor with the bushings 236 1028184 9 centrifugal...

Page 227: ...stop 4 9 2 Filter should be tested for sealing with the air under the pressure from 0 3 to 0 4 MPa from 3 to 4 kfg cm 2 dipping in water heated to the temperature from 313 to 323 from 40 to 50 C duri...

Page 228: ...h the oil which is applied in the engine lubrication system 4 10 3 Bolt 2 of the cap fasteners 5 with the filtering element to the filter cover 3 should be previously tightened so that the cap was dra...

Page 229: ...4 10 Fine fuel filter 236 1117010 4 1 plug 316121 29 2 filter bolt 201 1117122 3 filter cover 236 1117028 V 4 filler ring 236 1117032 5 filter cap 201 1117016 2 6 jet 240N 1117155 7 washer 252002 29...

Page 230: ...cavity 4 11 6 Nut 4 should be tightened with the moment of force from 36 to 50 Nwm from 3 6 to 5 0 kfg m and locked with the bending of two tongues of the washer 3 at the edge of the nut 4 11 7 Nut 1...

Page 231: ...3 3 washer 312536 29 4 nut 250636 29 5 roller 236 1307023 2 6 water ejecting device 201 1307026 7 ring 034 035 25 2 1 GOST 9833 73 8 thrust washer 236 1307035 3 9 washer 312484 P 10 cap nut 312115 P 1...

Page 232: ...t face surface of the vane was in one flatness with the roller surface B Pressing on should be performed with the bearing at the roller surface 4 12 6 After the pressing of the vane and flange one sho...

Page 233: ...er pump manifold 236 1307084 2 vane 236 1307032 2 3 water pump body 236 1307014 4 bearing 1160304 5 pulley 236 1307216 15 6 water pump roller 850 1307023 10 7 filler ring 240 1005582 8 ring 112 120 46...

Page 234: ...4 13 5 At the bolt B additional flat washer 6 with the increased external diameter should be installed Picture 4 12 Tension machine 236 1307155 1 tensions machine support 236 1307206 2 lever with the...

Page 235: ...w cap 16 cotter 6for9 17 201456 29 bolt 8 18 52135 2 washer 8 19 8 8402 bearing 20 8 8624 bearing 21 8 8984 bearing 22 8 8632 plug 4 14 3 Gripping of the part should be performed with micrometer posit...

Page 236: ...ush rods 5 1 5 Before the installation camshaft bushings installed in the cylinder block and camshaft bearings should be carefully wiped with fiberless napkins and lubricated with the oil which is app...

Page 237: ...2 4 Crankshaft bearings working surfaces of the liners and half washers of the thrust bearer should be lubricated with the oil which is applied in the engine lubrication system 5 2 5 Half washer of t...

Page 238: ...ased increased Picture 5 1 Installation of the drive gears of the devices 1 gear of the fuel pump drive 236 1029122 2 camshaft gear 236 1006214 2 3 crankshaft pulley 236 1005061 4 crankshaft gear 236...

Page 239: ...er liners should be blown with the compressed air before the installation 5 3 2 Rubber filler and anti cavitation rings as well as lead in chamfers of the block holes for the filler rings should be lu...

Page 240: ...is applied in the lubrication system of the engine 5 4 9 Fastening bolts of the connecting rod caps should be tightened in two steps beginning from the longest bolt previously with the moment of force...

Page 241: ...ge of the cuff of the flywheel housing should be lubricated with the oil applied in the engine lubrication system 5 6 5 Fastening bolts of the flywheel housing should be tightened with the moment of f...

Page 242: ...ts which satisfy the requirements of the engine operation 5 8 2 Joints of the compound parts of the oil housing gasket should be compact without clearances in the joints 5 8 3 Before screwing of the f...

Page 243: ...Before the installation of rockers adjusting screws should be screwed into the rockers for the whole thread 5 10 3 Rockers with the pivots should be installed at the heads of the cylinder block so th...

Page 244: ...eck the correctness of the clearance adjustment After the rotation of the crankshaft it is permitted to change the clearance dimension because of the possible surface runout of the joining parts of th...

Page 245: ...h the plates 236 1029260 2 2 driven half coupling 236 1029286 3 coupling of the lead fuel injection 60 1121010 12 4 plates 236 1029274 5 bolt 310055 29 6 nut 250513 29 7 bolt 310003 29 8 bolt 240 1029...

Page 246: ...water pump 5 13 1 Water pump gasket should be lubricated with the jointing compound 25 from the both sides 5 13 2 Nuts of the fastening of the water pump should be tightened to the hard stop 5 13 3 In...

Page 247: ...ifference in the length of the belts from one kit can be no more than 2 mm 5 15 2 Bending of each belt in the middle between the pulleys of the generator and fan compressor and generator drive while p...

Page 248: ...he generator within the length of the support holes for the fastening pins Relative displacement of the shafts of the pulley grooves is permitted no more than 0 8 mm at the length 400 mm After the adj...

Page 249: ...to check the clearance amount between the bolts of the flywheel fastening and the front disk Clearance should be no less than 1 5 mm It is allowed if necessary to cut the faces of the bolt heads to p...

Page 250: ...isk 238 1601092 7 belleville spring 238 1601102 dimension 5 18 11 Coil springs 3 should be installed with the buckled side to the spring rings 4 5 14 12 Bolts of the plate fastening 2 should be tighte...

Page 251: ...ifications Automobile MAZ Ural KrAZ marine engines combines tractors earth moving machies 238AM2 1 Haulers compactor MoAZ 238AM2 3 Combine Gomselmash 238 M Murom railway engine 238 M2 Excavators 238 M...

Page 252: ...hould perform without fan and generator For air cleaning one should use the technological filters of the dry type It is allowed to run in and test the engine with the technological air filter filled w...

Page 253: ...the engine 6 3 5 Coolant temperature discharging from the engine should be within the range 75 90 C In the beginning of the cold running in coolant temperature should be no less than 50 C above zero...

Page 254: ...rned off 6 3 11 After the replacement of the main parts nods devices and elimination of the defects engine should be run up and tested repeatedly at the mode of the repeated tests 6 4 Timing of the en...

Page 255: ...At this time compression stroke occurs in the first cylinder and both valves of this cylinder are closed Having inserted the gauge between the valve face and toe of the rocker one should check cleara...

Page 256: ...kshaft and in the stop of the lever of the regulator operation in the bolt of the maximal rotation rate limit to adjust the engine capacity in accordance with the tables 6 2 6 3 6 4 depending on the s...

Page 257: ...232 Gt 40 6 40 8 41 1 41 3 41 5 40 Ne 166 225 167 226 168 228 169 230 170 231 Gt 40 3 40 6 40 8 41 0 41 2 45 Ne 164 223 166 225 167 226 168 228 169 230 Gt 40 1 40 3 40 6 40 8 41 0 Table 6 4 238AM2 Fue...

Page 258: ...5 2 0 1 1 1 5 0 7 1 0 0 0 4 0 5 0 7 1 0 30 Ne 2 6 3 5 2 2 3 0 1 8 2 5 1 5 2 0 1 1 1 5 0 7 1 0 0 4 0 5 35 Ne 3 3 4 5 2 9 4 0 2 6 3 5 2 2 3 0 1 8 2 5 1 5 2 0 1 1 1 5 40 Ne 3 7 5 0 3 3 4 5 2 9 4 0 2 6 3...

Page 259: ...od two time measurement of the time of 500 diesel fuel consumption at that the results are defined as the arithmetic mean of two measurements which should differ one from another more than 2 To mainta...

Page 260: ...otation rate which should be 2200 2275 min 1 and for the engines 236 2 and 238 2 no more than 2340 min 1 Checking should be carried out at the operating lever stop with the regulator in bolt1 ric 6 2...

Page 261: ...nozzle barrel one should perform with the help of visual inspection of the gauge plate which is dipped in the clearance between the nozzle body and the nut of the fastening of the nozzle barrel If ne...

Page 262: ...3 Table 6 9 238KM2 238 M2 Number of the mode Rotation rate min 1 Load capacity kWt H P Time min 238KM2 238 M2 1 Control of the engine and units operation with the proof for leakage 1700 238 M2 2000 23...

Page 263: ...prepare the engine to the start up in according to the requirements of the chapter Preparation of the engine to the start up 6 6 1 3 Cold running in a To check the oil feeding to the bearings of the...

Page 264: ...0 88 120 140 190 8 Table 6 11 236 M2 Number of the mode Rotation rate min 1 Load capacity kWt H P 236 M2 Time min 1 1500 0 8 2 1600 44 60 8 Table 6 12 236M2 238M2 238AM2 Number of the mode Rotation ra...

Page 265: ...e to the normal heat mode e To adjust the minimal and to check the maximal idle rotation rate f To check and if necessary to adjust the engine capacity and fuel consumption per hour g To prepare the e...

Page 266: ...after the removal of the cylinder head to inspection of the parts of the cylinder piston group if the parts were replaced during the basic mode of the cold running in one should continue the running i...

Page 267: ...7 90 micrometer 25 1 micrometer 50 1 micrometer 75 1 Set of gauges 82102 U 2 034 0221197 011 91 Inside gauges with the division value 0 01 mm GOST 868 82 inside gauge 10 18 1 inside gauge 18 50 1 insi...

Page 268: ...ver clamps with gauge indicator GOST 11098 75 Clamp 25 Clamp 50 Clamp 25 Clamp 75 Clamp 125 Clamp 150 Depth gauge 160 GOST 162 90 Beam compasses with vernier reading GOST 166 89 beam compass I 125 0 1...

Page 269: ...20 150 12 15 Bolt of the starter fastening clamp 70 90 7 9 Bolts of the fastening of the starter supports 45 62 4 5 6 2 Bolts of the starter with the flange support 12 98 1 122 6 10 12 5 Bolts of the...

Page 270: ...ley shaft of the tension machine of the drive of the pneumatic brake compressor 120 150 12 15 Nut of the tension bolt of the tension machine of the compressor drive 10 20 1 2 Bolts of the fastening of...

Reviews: