12
Read this information first
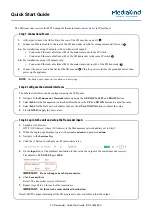
Names and Functions of Controls
①
②
③
④
⑤
⑥
⑦
⑧
⑨
⑩
⑪
⑫
⑬
⑭
⑮
⑯
⑰
⑱
⑲
⑳
a
Antenna terminal (SMA)*
b
Flashlight (White LED)
• This LED can be used as a small flashlight in a
dark place.
c
A-band BUSY/TX lamp
B-band BUSY/TX lamp
These lamps light green during reception and red
during transmission.
d
p
PTT switch
• While
p
switch is being pressed: Transmission.
• The Set mode ends when
p
switch is pressed
during the Set mode.
e
T
switch
USA/EXP version
While
T
is being pressed: Squelch OFF
European version
While
T
is being pressed: T.CALL (1750 Hz)
f
v
switch
• While pressing
v
, turn
O
: Volume level
adjustment
• Pressing
v
during the sound is being muted
cancels the Mute function.
g
P
Power switch
• Press and hold
P
over 1 second: Power on.
• Press and hold
P
over 1 second again:
Power off.
• Press
P
: Key lock
h
A
key
(switching between operating bands)
• Pressing
A
each time switches between
A-band and B-band.
• Press and hold
A
over 1 second: Changes
the Dual Band Reception mode to the Mono
Band Reception mode.
• While operating the transceiver in the Mono
Band Reception mode, press
F
and then
A
: Zooms in the display view.
i
M
key
• Pressing
M
each time switches between the
Frequency and BACKTRACK screen.
• Press and hold
M
over 1 second: Enters the
Set mode.
j
Battery pack*
k
O
Turn this dial to change the reception frequency or
select a memory channel.
l
GPS antenna
m
MIC/SP jack*
Connect a speaker microphone or earpiece
microphone to this jack.
It is not waterproofed when an external
microphone is connected.
Do not connect any microphone which is
not specified by Yaesu. A failure can result.
n
EXT DC IN jack*
• When charging the battery pack, connect the
battery charger (PA-48 or SAD-11B) to this jack.
•
In the USA/EXP market
, connect an external
power supply adapter with a cigarette lighter
plug (E-DC-5B) or an external power cable
(E-DC-6) to this jack.
Do not connect any battery charger which
is not specified by Yaesu. A failure can
result.
o
DATA terminal*
• Use this terminal when using a clone function or
updating the firmware.
• Connect the optional camera-equipped
microphone (MH-85A11U).
• For how to update the firmware, access our
home page.
p
Microphone
q
Display
This LCD displays reception frequencies and
various settings.
r
Speaker
s
15 keys
These keys are used to specify reception/
transmission frequency or select a function.
t
F
switch
• Press
F
Function switch
• Press and hold
F
over 1 second: Registers a
frequency to a memory channel.
* When the included antenna and battery pack
are installed and the MIC/SP jack, EXT DC
IN jack, DATA terminal, and micro SD slot are
securely covered with rubber caps, the FT1DR/
DE meets the waterproofing performance
conforming to IPX5 (See page 11).
FT1DR̲DE̲Eng.indb 12
FT1DR̲DE̲Eng.indb 12
13/06/28 15:15
13/06/28 15:15