background image

USER MANUAL 

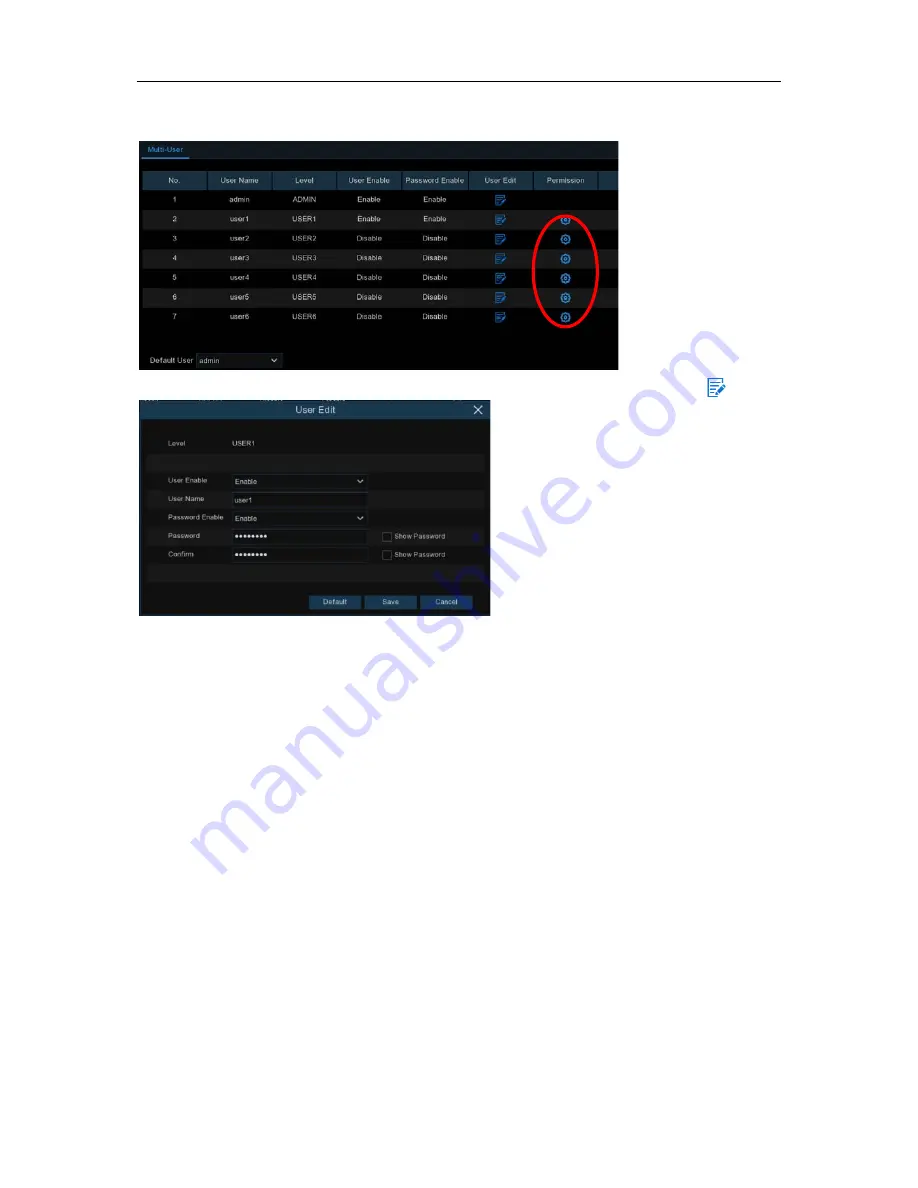
5.6.3.2 Add New Users 


1.  Select one of the user accounts that is currently disabled, click the User Edit icon 

.   


2.  Select 

Enable


from the drop-down next to 

User Enable

3.  Click the field next to 

User Name

 to change the user name for the account. 

4.  Select 

Enable


from the drop-down next to 

Password Enable

5.  Click the field next to


Password

 to enter the desired password. 

6.  Click the field next to 

Confirm


to reenter the password. 

7.  Click 

Save

. You will be required to input your Admin password to authenticate. 


68 

Summary of Contents for X2RN

Page 1: ......

Page 2: ...ARD 7 4 1 1 Start Wizard 7 4 1 2 Network Configuration 7 4 1 3 Date Time 8 4 1 4 IP Camera 10 4 1 5 Disk 12 4 1 6 Resolution 12 4 1 7 Mobile 13 4 1 8 Summary 13 4 2 LIVE VIEW SCREEN OVERVIEW 14 4 2 1 Camera Quick Toolbar 15 4 2 2 Taskbar 16 4 2 3 Start Menu 17 4 2 3 1 Unlock and Lock Screen 17 4 2 3 2 Shutdown 17 CHAPTER 5 NVR SYSTEM SETUP 18 5 1 CHANNEL 19 5 1 1 IP Channels 19 5 1 2 Protocol Mana...

Page 3: ...ALARM 49 5 3 1 Motion 49 5 3 2 I O 49 5 3 3 PTZ Linkage 50 5 3 4 Exception 50 5 4 NETWORK 51 5 4 1 General 52 5 4 4 1 PPPoE 53 5 4 1 3 Port Configuration 53 5 4 2 DDNS 54 5 4 3 Email 55 5 4 3 1 Email Configuration 55 5 4 3 2 Email Schedule 56 5 4 4 FTP 57 5 5 DEVICE 57 5 5 1 Disk 58 5 5 1 1 Disk Group 60 5 5 1 2 S M A R T 61 5 6 SYSTEM 62 5 6 1 General 62 5 6 1 1 Date and Time 63 5 6 1 2 NTP Setti...

Page 4: ... Video Clip Backup 79 6 1 2 Event Search Playback Backup 81 6 1 2 1 Event Playback Control 82 6 1 3 Sub periods Playback 83 6 1 4 Picture Search View 84 6 1 5 1 Picture Preview Control 85 CHAPTER 7 REMOTE ACCESS VIA WEB CLIENT 86 7 1 BASIC SYSTEM ENVIRONMENT REQUIREMENTS 86 7 2 WEB PLUGIN DOWNLOAD AND INSTALLATION 86 7 3 WEB CLIENT MANAGER 89 7 3 1 Live Interface 89 7 3 2 Playback 91 7 3 2 1 Playb...

Page 5: ...act the authorized dealer or service center 7 Do not try to remove the upper cover Warning Do not remove the cover of NVR so as to avoid electric shock 8 Handle with care If NVR does not work normally because of hitting on the hard object please contact the authorized dealer for repair or replacement 9 Use standard lithium battery Note Use the batteries attached or specified by the manufacturer Af...

Page 6: ... Sensor Alarm Connect to sensor or alarming device 5 HDMI Port HDMI high definition port 6 VGA Port Connect to VGA monitor such as PC monitor 7 LINE IN Intercom voice input 8 AUDIO OUTPUT Audio signal output RCA interface 9 WAN Port Network input interface of the router Connect to IP camera 10 LAN Port LAN network interface support POE can supply power to the camera 11 E SATA Optional Connect to e...

Page 7: ...ess to enter the selected menu item and edit the setting 9 Left Right key Decrease increase parameter value of control bar 10 Down arrow key Volume decrease 11 Press to rewind during video playback 12 Press to fast forward during video playback 13 Press to play recorded video or enter the recording search menu 14 Press to start manual recording 15 Press to stop manual recording or stop the video p...

Page 8: ...hile the device power is turned ON HDD Installation Note Above procedures are for reference only The practical operation may be different depending on the NVR you purchased a Connect the data and power cables to the two hard disk drives and place the hard disk drives on the NVR case b Carefully flip the NVR case and secure the hard disk drives to the NVR with the eight 8 screws 3 ...

Page 9: ... purchased 2 3 Power Supply Connection Caution Use only the supplied power adapter that came with the NVR Connect one end of the power adapter to the power connector on the back of the NVR Plug the other end of the power adapter into the wall outlet For some specific models you may need to press the Power switch to turn on the power Speaker 4 ...

Page 10: ...enu mode 2 Right Button o Click once to open the Taskbar on the Live Viewing screen View Taskbar on 4 2 2 Taskbar o In menus click to go back close menus 3 Scroll Wheel o In menus scroll to move up down through the menu content o While hovering over the volume control wheel scroll to turn system volume up down 3 2 Using the Virtual Keyboard You will see the virtual keyboard automatically on the sc...

Page 11: ...eses Default ID is 000000 View more about Device ID on 5 6 1 General New Admin name To set your own administrator name New Admin Password To set your own password The password must be a combination of 8 characters Corfirm Password Enter your own password again Click Apply to confirm your settings and goes to the login interface Enter your user name password to Login the NVR system NOTE If you forg...

Page 12: ... 4 1 2 Network Configuration If you connect to a router that supports DHCP please check the DHCP box The router will assign automatically all the network parameters for your NVR If the network is manually addressed use the below parameters IP Address The IP address identifies the NVR in the network It consists of four groups of numbers between 0 to 255 separated by periods For example 192 168 001 ...

Page 13: ...s please change it Client Port This is the port that the NVR will use to send information through e g using the mobile app If the default port 9000 is already taken by other applications please change it RTSP Port This is the port that the NVR will be allowed to transmit real time streaming to other device e g using a streaming Media player UPNP If you want to log in remotely to the NVR using Web ...

Page 14: ...e date and time automatically on the NVR over Internet Therefore the NVR needs to be connected to the Internet Check the NTP box and select the NTP server DST DST stands for Daylight Savings Time DST Enable if Daylight Saving Time DST is observed in your region Time Offset Select the amount of time to offset for DST Time Mode Choose to set the daylight saving time in weeks or in days Start Time En...

Page 15: ...he NVR Click Search to search IP cameras in the same network Choose the IP camera s you want to add and then click icon to add to the NVR Enter the camera s user name password to add the camera s You can also click button to add individual IP camera to a single channel 10 ...

Page 16: ...col Choose the protocol of the IP camera from the dropdown menu Private indicates X2C and X3C series can connect to internet automatically via Private Onvif indicates an open industry standard protocol established by Open Network Video Interface Focum and connect to the device of other manufacturer via Onvif Custom Consider for integrations protocol User Name User Name of the IP camera Password Pa...

Page 17: ...recordings are kept on the HDD To prevent overwriting any old recordings select Disable If you have disabled this function please check the HDD status regularly to make sure the HDD is not full Record On ESATA If your NVR comes with an e SATA port on the rear panel you can enable to record the video to e SATA HDD 4 1 6 Resolution Choose an output resolution matches to your monitor The NVR supports...

Page 18: ...ile app to view the NVR remotely 4 1 8 Summary You can check the system summary information you had set in the start wizard and finish the wizard Tick Don t show this window next time if you don t want to display Start Wizard when the system reboots next time Click Finish button to save exit 13 ...

Page 19: ...USER MANUAL 4 2 Live View Screen Overview 14 ...

Page 20: ... The analog camera is disconnected No Camera IP camera is disconnected Decoding Failed The NVR doesn t support this kind of IP camera compression standard please change to H 264 compression standard For details on changing Video Encode Type see 5 2 1 Encode Click to open Quick Add menu to add IP camera Click to edit current IP camera 4 2 1 Camera Quick Toolbar In live viewing click the left button...

Page 21: ...r live view Click to start viewing channels in a sequence Quick playback You can choose to play the latest recording for all channels from the beginning of the day or you can choose the playback from the latest 5s 10s 30s 1Min 5Min Click to adjust audio volume Click to switch all IP channels between mainstream and substream for live view resolution Click to switch among real time balanced or smoot...

Page 22: ... please view on 5 6 3 Multi user Search Playback View more on Chapter 6 Search Playback Backup NVR System Setup View on Chapter 5 NVR System Lock unlock screen View on 4 2 3 1 Unlock and Lock Screen Shutdown reboot logout the system View on 4 2 3 2 Shutdown The screen will be locked to protect unauthorized OSD operation while the NVR is not in menu operation 1 minute If necessary you can also lock...

Page 23: ...ystem the live viewing screen will be disappeared You will need to login the system for further operations Chapter 5 NVR System Setup You are able to configure the NVR for Channel Record Alarm Network Device System from Start Menu Setup 18 ...

Page 24: ...re the camera live view display manage IP cameras adjust IP camera s image PTZ setup motion setup convert mode and more 5 1 1 IP Channels Click Search to search IP cameras from local network click Add to add individual IP camera click Add All to add all IP cameras 19 ...

Page 25: ... Auto Assign IP to Camera s The added IP camera would not be able to connect if its IP address is not in the same network segment with NVR With this function to reassign an IP address to all added IP cameras Auto Mode allow you add IPC with PoE amtomatically Manual Mode allow you manually tick select the IPC Channel Delete Choose one or more added IP cameras and click this button to delete 5 1 2 P...

Page 26: ...SP available now Port Input the RTSP port of your IP camera Resources Path Input the RTSP address of your IP camera 5 1 2 Live To configure camera parameters Channel Display channel name Setup Click icon into the setup page 21 ...

Page 27: ...or the image color Refresh Rate of the camera for IP camera only To show the camera name in live view screen To show the system time in live view screen Choose a camera type Auto AHD TVI CVI for analog camera Choose an AHD EQ Enhanced Quality level depends on your camera video cable Check the box If you want to hide the live image of this channel Adjust the Hue value for the image color Click Defa...

Page 28: ...USER MANUAL 5 1 3 Image Control This menu allows you to control image settings for supported IP cameras Channel Channel name Setup Click icon into the setup page 23 ...

Page 29: ...e camera works properly both in the day and night Set the delay time of IR CUT switching Check to enable lens flip and angle flip Set the flip angle To enable or disable Backlight compensation Choose the backlight compensation level Choose a channel to configure To enable or disable 3D noise reduction function Set the 3D noise reduction level Set the WDR level Automatic Gain Control Configure whit...

Page 30: ...ility level of your PTZ capable camera DataBit StopBit The information between the NVR and PTZ capable camera is sent in individual packages The DataBit indicates the number of bits sent while the EndBit indicates the end of the package and the beginning of the next information package The available parameters for DataBit are 8 7 6 5 the available parameters for the StopBit are 1 or 2 Parity For e...

Page 31: ...C Menu If you have chosen protocol for this channel as COAX1 or COAX2 the UTC menu button will be display Click this icon to enter UTC OSD menu It is also the confirm button for your selection in the UTC OSD menu 4 Speed Speed Adjust the PTZ speed 5 Pointer Panel A Click the direction arrow to select the direction of the PTZ camera B Click up down left right arrow to move cursor in UTC OSD menu C ...

Page 32: ...ted preset point 14 Go to Click to set a specific preset point on a PTZ camera You can add up to 255 preset points for the NVR 5 1 5 Motion This menu allows you to configure motion parameters When motion has been detected by one or more cameras your NVR will alert you to a potential threat at your home It does this by sending you an email alert with an attached image from the camera to use as a re...

Page 33: ...r NVR support to connect to external alarm device you can set to emit an alarm tone Latch Time To configure the external alarm time when motion is detected Record Click icon and choose which channel s you want to record when the motion detection is triggered Motion Detection Area The whole screen is marked for motion detection red blocks as default If you want to disable the motion detection on a ...

Page 34: ...ted in a channel you will see that channel in full screen FTP Upload To upload alarm images to FTP server when motion is detected To enable FTP please view 5 4 4 FTP 5 1 7 Video Cover This menu allows you to create privacy zone s if you want to partially cover some certain part of the image You can create up to 4 privacy zones in any size and location on the camera image Enable the Privacy Zone an...

Page 35: ...tion Pedestrian Detection Face Detection and Cross Counting 5 1 8 1 PID Perimeter Intrusion Detection Perimeter Intrusion Detection function detects people vehicle or other objects which enter and loiter in a pre defined virtual region and some certain actions can be taken when the alarm is triggered Channel Select the channel you want to configure 30 ...

Page 36: ... When the detection is triggered the channel will be enlarged into full screen Record Channel to select the channel s you want to record when a detection is triggered Area Click Setup to draw a virtual region in the camera picture 1 Choose one of the Rule Number It is the number of PID area Maximum 4 areas can be set for PID function 2 To enable the detection in Rule Switch 3 Choose a Rule Type A ...

Page 37: ...on when the target pass through the edges corners 2 The shape of the regions shall not be too narrow small since it may fail to trigger the detection when the target passes through outside the perimeter 5 1 8 2 LCD Line Crossing Detection Line Crossing Detection function detects people vehicle or other objects which cross a pre defined virtual line and some certain actions can be taken when the al...

Page 38: ... is triggered the channel will be enlarged into full screen Record Channel to select the channel s you want to record when a detection is triggered Area Click Setup to draw a virtual line in the camera picture 1 Choose one of the Rule Number It is the number of LCD lines Maximum 4 lines you can draw 2 To enable the detection in Rule Switch 3 Choose a Rule Type A B NVR will only detect the action f...

Page 39: ... be set too short to avoid any failure to trigger an alarm when the target passes outside it 5 1 8 3 SOD Stationary Object Detection Stationary Object Detection function detects the objects left over or lost in the pre defined region such as the baggage purse dangerous materials etc and a series of actions can be taken when the alarm is triggered Channel to select the channel you want to configure...

Page 40: ... displayed on the screen when the intelligent detection is triggered Send Email If an alarm is triggered an Email will be sent to your preset email account Full Screen When the detection is triggered the channel will be enlarged into full screen Record Channel to select the channel s you want to record when a detection is triggered Area Click Setup to draw a virtual region in the camera picture 1 ...

Page 41: ... click the red box in the region and then click Remove button Click Remove All will delete all regions Notice 1 The area for detection shall be greater than or equal to the size of the detected object such as the detection of a white bottle 2 The detected object cannot be covered 5 1 8 4 PD Pedestrian Detection Pedestrian Detection function detects the moving people in a pre defined region and a s...

Page 42: ...sent to your preset email account Full Screen When the detection is triggered the channel will be enlarged into full screen Record Channel to select the channel s you want to record when a detection is triggered Area Click Setup to draw a virtual region in the camera picture 1 Choose one of the Rule Number It is the number of PD area Maximum 4 areas you can set for PD function 2 To enable the dete...

Page 43: ...tects the faces of moving people appear in a pre defined region and a series of actions can be taken when the alarm is triggered Channel to select the channel you want to configure Enable to enable or disable the FD function Buzzer to disable or to active the buzzer to emit an alarm tone in 10 20 40 or 60 seconds when the detection is triggered Level Small Middle Big Small level is recommended to ...

Page 44: ...irtual region in the camera picture 1 Choose one of the Rule Number It is the number of FD area Maximum 4 areas you can set for FD function 2 To enable the detection in Rule Switch 3 Choose a Rule Type only Normal available for this detection 4 Use your mouse to click 4 points in the camera picture to draw a virtual region The shape of the region should be a convex polygon Concave polygon will not...

Page 45: ...e to match with the place your camera installed Post Recording You can set how long after an event occurs that the NVR will continue to record Latch Time To configure the external alarm time when the detection is triggered Alarm Out If your NVR support to connect to external alarm device you can set to emit an alarm tone Show Message A letter S will be displayed on the screen when the intelligent ...

Page 46: ...ine From Side A to Side B is Enter from Side B to Side A is Exit 5 Click Save to save your settings 6 If you want to modify the position or length of the line click the red box in the line the color of the line will be changed to red color Long press the left button of your mouse to move the line or drag the terminals to modify the length or position of the line 7 If you want to remove one of the ...

Page 47: ... alarm when the target cross through it 2 The lines should be in the area that detected object can be reach 3 The lines shall not be set too short to avoid any failure to trigger an alarm when the target passes outside it You are able to search view the statistical result of cross counting in 5 1 8 7 Intelligent Analysis 42 ...

Page 48: ...USER MANUAL 5 1 8 7 Intelligent Analysis The statistical result can be queried by Daily Weekly Monthly Annual for Cross In Cross Out 5 1 8 8 Intelligent Schedule 43 ...

Page 49: ...mission picture quality Generally Mainstream defines the recording video quality which will be saved in the HDD Substream defines the video quality which is being viewed via remote access for example web client CMS Mobilestream defines the video quality which is being viewed via remote access via mobile devices Except X3C SER Series Resolution This parameter defines how large the recorded image wi...

Page 50: ...t higher bitrates will be of better quality 5 2 2 Record This menu allows you to configure the channel recording parameters 5 2 2 1 Record Record Switch Check to enable the recording in this channel Stream Mode Choose the recording quality If you choose Dualstream the system will record in both Mainstream Substream PreRecord If this option is enabled the NVR starts recording a few seconds before a...

Page 51: ...id only for one channel If you want to use the same recording schedule for other channels use Copy function Click Apply to save your settings Channel Select the channel to set its recording parameters Normal When the time slot is marked green this indicates the channel performs normal recording for that time slot Motion When the time slot is marked yellow this indicates the channel records only wh...

Page 52: ...le automatic capturing on the channel Stream Type Select the image resolution by mainstream or substream Normal Interval Time interval to capture an image in normal recording Alarm Interval Time interval to capture an image when motion IO alarm or PIR is triggered Manual Capture Enable or disable manual capture in the channel 47 ...

Page 53: ...is marked yellow this indicates the channel capture images only when a motion is detected during that time slot IO When the time slot is marked red this indicates the channel capture images only when the sensor is triggered during that time slot No Capture A time slot marked black means that it won t capture any images for the time slot but you can manually capture images if you enable the manual ...

Page 54: ...is triggered Alarm out Tick to enable external alarm device to emit an alarm tone when a sensor is triggered Latch Time you can set how long the buzzer will sound when external sensor is triggered 10s 20s 40s and 60s Record Click icon and choose which channel s you want to record when the motion detection is triggered Post Recording You can set how long alarm record will last when alarm ends 30s 1...

Page 55: ... when a motion or I O alarm happens Switch Enable or disable the PTZ linkage function Motion Motion detection alarm will trigger the PTZ linkage function if it is checked IO IO alarm will trigger the PTZ linkage function if it is checked PTZ Click icon to associate the PTZ cameras with preset points View preset point at 5 1 4 1 PTZ control 5 3 4 Exception This menu allows you to set the type of ev...

Page 56: ...s 40s 60s if your NVR support to connect external alarm device Alarm Out This is an optional function Click to enable the external alarm device to sound This is an optional function Show Message Check the box to display a message on the screen when No Space on Disk Disk Error or Video Loss event happens Send Email Set the NVR to send you an auto email when an event occurs 5 4 Network This menu all...

Page 57: ...Subnet Mask Subnet mask is a network parameter which defines a range of IP addresses that can be used in a network If IP address is like a street where you live then subnet mask is like a neighborhood The subnet address also consists of four groups of numbers separated by periods For example 255 255 000 000 Gateway This address allows the NVR to access the Internet The format of the Gateway addres...

Page 58: ...col that allows the NVR to connect to the network more directly via DSL modem Check the Enable PPPOE box and then enter the User name Password of the PPPoE Click Apply to save system will reboot to active the PPPoE setting 5 4 1 3 Port Configuration 53 ...

Page 59: ...not support UPnP make sure the port forwarding is completed manually 5 4 2 DDNS This menu allows you to configure DDNS settings The DDNS provides a static address to simplify remote connection to your NVR To use the DDNS you first need to open an account on the DDNS service provider s web page DDNS Check to enable DDNS Server Select the preferred DDNS server DDNS_3322 DYNDNS NO_IP CHANGEIP DNSEXIT...

Page 60: ...gered HDD becomes full HDD is in error state or Video Loss occurs 5 4 3 1 Email Configuration Email Check to enable Encryption Enable if your email server requires the SSL or TLS verification If you are not sure set to be Auto SMTP Port Enter the SMTP port of your email server for example 465 for Gmail SMTP Server Enter the SMTP server address of your email for example smtp gmail com 55 ...

Page 61: ...tings are correct click Test Email The system sends an automated email message to your inbox If you received the test email it means the configuration parameters are correct 5 4 3 2 Email Schedule You need to configure the schedule to fully implement the Email notification The color codes on email schedule have the following meanings Green Slot for Motion detection Yellow Slot for I O Alarm option...

Page 62: ...able FTP function Server IP Enter your FTP server IP address or domain name Port Enter the FTP port for file exchanges Name Password Enter your FTP server user name and password Directory Name Enter the default directory name for the FTP file exchanges Test FTP Click to test the FTP settings 5 5 Device In this section you can configure the internal HDD function 57 ...

Page 63: ...dings on the HDD when the HDD is full For example if you choose the option 7 days then only the last 7 days recordings are kept on the HDD To prevent overwriting any old recordings select OFF If you have disabled this function please check the HDD status regularly to make sure the HDD is not full Recording will be stopped if HDD is full Record on ESATA This menu is only displayed when your NVR has...

Page 64: ...ideo data from being overwritten during cyclic recording the HDD can be set as Read only mode New recording will be not able to save into this read only HDD You can still search recording from this read only HDD to play A Redundant HDD can be used to automatically backup video footage on the recording read write hard drive When a redundant HDD is set the system can be set to record cameras in para...

Page 65: ...ne hard drive and 5 8 to a second hard drive This can reduce the amount of wear on the hard drives and may extend the life of the hard drives 1 Use the dropdown next to Disk Group Type to select the type of group to configure 2 Use the dropdown next to Disk Group to select the specific group within the selected group type 3 Click the numbered boxes representing channels to record channels to HDDs ...

Page 66: ...eveloped a fault such as one or more bad sectors you can instruct your NVR to continue saving to the drive Self check Type There are three types available Short This test verifies major components of the hard drive such as read write heads electronics and internal memory Long This is a longer test that verifies the above as well as performing a surface scan to reveal problematic areas if any and f...

Page 67: ...passwords and permissions and more 5 6 1 General Device Name Enter the desired name for your NVR The name can include both letters and numbers Device ID Enter the desired ID for your NVR The device ID is used to identify the NVR and can only be composed of numbers For example 2pcs NVRs are installed in the same place the Device ID is 000000 for one of the NVRs and 111111 for another NVR When you w...

Page 68: ... drop down menu to select the time your NVR will exit the Main Menu when idle You can also disable this by selecting OFF password protection will be temporarily disabled Show Wizard Click the checkbox if you would like to display the Startup Wizard each time you turn on or reboot your NVR 5 6 1 1 Date and Time Date Time Date Click the calendar icon to change the date Time Click the dialogue box to...

Page 69: ...aving Time function allows you to select the amount of time that Daylight Saving has increased by in your particular time zone or region Enable DST If Daylight Saving applies to your time zone or region check this option to enable Check to enable the NTP and select a Server Address click Update Now to manually sync the date time Click Apply to save your settings When NTP function is enabled system...

Page 70: ...h a particular day and time when Daylight Saving starts and ends For example 2 a m on the first Sunday of a particular month Date Select the start date click the calendar icon end date and time when Daylight Saving starts and ends Start Time End Time Set the start time and end time for Daylight Saving 5 6 2 Output Configuration This menu allows you to configure video output parameters Video Output...

Page 71: ...n of the display screen to match your monitor or TV Click Setup button to adjust Click once or long press the left button of your mouse on the arrow to adjust the size and position or you can scroll the wheel of the mouse to adjust Click the right button of your mouse to exit and click Apply to save your modifications Cursor Hidden Delay Click the drop down menu to select the time your NVR will hi...

Page 72: ...et up multiple user accounts with varying levels of access to the system 5 6 3 1 Changing Password To change the password for the administrator or user accounts click the User Edit icon The password has to be a minimum of 8 characters and can contain a mixture of numbers and letters Enter your new password again to confirm and then click Save to save your new password You will be required to input...

Page 73: ...ext to User Enable 3 Click the field next to User Name to change the user name for the account 4 Select Enable from the drop down next to Password Enable 5 Click the field next to Password to enter the desired password 6 Click the field next to Confirm to reenter the password 7 Click Save You will be required to input your Admin password to authenticate 68 ...

Page 74: ...ons You can enable or disable access to certain menus and functions of each user account 1 Click the edit icon under Permission tab 2 Check the boxes next to any system menus or capabilities you would like the user to access Click All to check all boxes Click Clear to check none of the boxes 3 Click Save to save your modifications 69 ...

Page 75: ...efault settings upgrade the system export import system parameters and manager system auto reboot 5 6 4 1 Log The system log shows you important system events such as motion alarms and system warnings You can easily create a backup file of the system log for a set time period to a USB flash drive 70 ...

Page 76: ...mn Right click to return to your search results o Use the buttons in the bottom right corner of the menu to move between pages of system log events 6 Click Backup to create a backup of the system log for your search period Please make sure your flash derive has been connected to the NVR s USB port 7 The backup drive menu appears Navigate to the folder you want the backup file to be saved in then c...

Page 77: ...de 5 6 4 4 Parameter Management You can export the main menu settings you have configured to a USB flash drive or import an exported setting file from USB flash drive to the NVR Save Settings Click to save the NVR current system settings to the USB device You will be required to input the Admin password to authenticate Load Settings Once you have created a system settings export you can import the...

Page 78: ...ommended to leave this function enabled as it maintains the operational integrity of your NVR Auto Reboot Check to enable Time You can set the NVR to reboot by day week or month 5 6 5 IP Camera Maintain This menu allows you to upgrade the IP camera s firmware and restore default settings of IP camera 73 ...

Page 79: ...ck IPC Upgrade button to start upgrading You will be required to input the Admin password to authenticate Please do NOT power off the NVR and IP camera or remove the USB during the upgrading 5 6 5 2 Load Default Settings for IP Camera 1 Choose the IP cameras you want to restore 2 Click Load Default to restore settings You will be required to input the Admin password to authenticate 74 ...

Page 80: ...evice model name IP address MAC address firmware version and more If your NVR supports P2P function you will find the P2P ID P2P QR code in the information page You can scan this QR cord with mobile app to remote view the NVR 5 6 6 2 Channel Information View channel information for each connected camera such as alias mainstream and substream recording specifications motion detection status privacy...

Page 81: ...each connected camera such as bitrate stream type recording resolution and frame rate FPS 5 6 6 4 Network State View network information Total Band Width It shows the NVR s total input band width for IP cameras Used Band Width It shows the used band width of IP cameras 76 ...

Page 82: ... snapshots to a USB flash drive 6 1 Using Search Function Click Search button in the Start Menu to enter search section 1 Search Options the system provides various search playback methods General Events Sub periods Smart Pictures 2 Search Date search by a date to play back 3 Search Type the system provides different search types to narrow your search 4 Channel Selection to choose the channels you...

Page 83: ... snapshot image to your USB flash drive If the video playback is in split screen view move the mouse cursor to the channel you want to capture and then click the icon to save the snapshot 6 Timeline Continuous recordings are shown with colored bars to represent different types of recording legend shown in the bottom right corner of the display Use the timeframe options to view a smaller or larger ...

Page 84: ...00 to 24 00 5 Click button to start playback 6 Control the playback with buttons on Video Playback Controls 7 Use the timeframe options to view a smaller or larger time period 8 If you want to quickly save a section of video during playing back to a USB flash drive use the Video Clip backup function 6 1 1 1 Video Clip Backup 1 Insert your USB flash drive to the NVR 2 Start a video recording playba...

Page 85: ...ck to save the video clip 8 Select a file type for your backup files click Save button to save the video clips Please make sure your USB driver has enough space to save the video clips 9 The backup drive menu appears Navigate to the folder you want the backup files to save in 10 Click OK to begin The progress bar at the bottom of the window shows you the progress of the backup 80 ...

Page 86: ...t to search or check Channel to choose all channels 4 Click icon to start search 5 Events fitting your search criteria are displayed in list form You can double click the left button of your mouse upon one of the events to play the video immediately 6 Click icons in the bottom right corner of the menu to browse between pages of events or input the page you want to browse 7 You can switch the view ...

Page 87: ...ox next Select to select all events in the page 10 The number of selected files total size information will be displayed at the right bottom of the screen 11 After selecting file you can click icon to save the video to USB flash drive Or click icon into event playback control window to play the video 6 1 2 1 Event Playback Control 1 Event List you can select the events here 2 Click icon to save yo...

Page 88: ...reens you want the videos to be played in 3 Check the recording types you want to search or check Search Type to choose all 4 Choose the channels you want to search Please note that this function only supports to search play one channel at a time 5 Click the play button to start playing Control the playback with buttons on Video Playback Controls 6 Videos are being played in split screens 7 Click ...

Page 89: ...n to start search 5 Pictures fitting your search criteria are displayed in list form You can double click one of the pictures to get a larger view 6 Click icons in the bottom right corner of the menu to browse between pages of pictures or input the page you want to browse 7 You can switch the view of list form in by clicking below icons which is show at the right bottom corner of the screen Thumbn...

Page 90: ...SB flash drive Or click button to go into picture preview control window 6 1 5 1 Picture Preview Control 1 Picture List you can select the pictures here 2 Click button to save your selected pictures to a USB flash drive Click button to view the pictures in slideshow 3 Press button to exit preview control window and go back to picture search window Press button to pause press to resume slideshow Pr...

Page 91: ...et on NVR in the URL box 2 For the first time you run the web client system will require to install the web client plugin Click download to download the plugin and install to your computer Item Minimum Recommended CPU Intel Core i5 CPU Intel Core i5 CPU or higher RAM 4G or more 8G or more Hard Drive 500G or more 1000G or more Display RAM 2G or more 4G or more Display Resolution 1280 1024 1920 1080...

Page 92: ...e login page Input your user name and password to login the web client Note If you use Google Chrome please use Version V41 or below If you use V42 to V44 you need to enable NPAPI plugins Please enter chrome flags enable npapi on URL bar to find and enable NPAPI It doesn t support V45 or above so far 87 ...

Page 93: ...n NVR in the URL box 2 Download the plug in SurveillanceClient dmg locate the downloaded file and double click it 3 Click on Continue Install Enter user name and password for Mac computer Click on Install Software Close to finish installation 4 Close Safari and open again to repeat step 1 to open the Web Client login page 1 2 3 4 88 ...

Page 94: ...t Open the channel list for quick camera function Click button to display the Channel List Click button to hide the Channel List Turn the Live video stream on off The button is in blue color if the live video stream is on Manual Recording buttons Click to start manually recording live stream video Click again to stop recording Manual recordings are saved to your computer While in recording the but...

Page 95: ...nctions of the NVR setting menus Local Settings Set download locations for recordings and snapshots taken using Web Client and choose file type for video files 4 Information Hover over to see system details 5 Exit 6 Color Controls Click to display or hide the color controls 7 PTZ Controls Click to display or hide the PTZ controls for using PTZ cameras 8 PTZ Controls Directional Arrows Click to mov...

Page 96: ...s are saved to your computer Snapshot Click to save snapshots of all current displayed channels to your computer Digital Zoom Click upon on a live image then click and drag over an area of the live image to enlarge Right click to return to the normal display Volume Control Volume is mute 10 Navigation Shows current page number for the channels shown on screen Use the arrow keys to switch between p...

Page 97: ...Substream recordings please make sure you had set the NVR to record with Dualstream at 5 2 2 1 Record 5 Check the channels you would like to search for recordings from Check Synchronous playback to play all channels at once 6 Click Search 7 Recordings that fit your search will be displayed in the timeline Click a section of video where you would like to begin playback and click the play button 7 3...

Page 98: ... Press Stop Download button to stop Playback Speed Click to choose the playing speed Play All Channels Click to play all channels you have chosen to searched Only available when the Synchronous playback option is not checked Stop All Channels Click to stop playing all channels Only available when the Synchronous playback option is not checked Digital Zoom Click upon on a playing video then click a...

Page 99: ...cord Path Click to browse for and select the folder where you would like the manual video recordings to be saved on your computer Download Path Click to browse for and select the folder where you would like to save the download video recordings to your computer Snapshot Path Click to browse for and select the folder where you would like the manual capture snapshots to be saved on your computer Fil...

Page 100: ...l the software VideoPlayer_x x xx_xxxx_xx_xx exe for example VideoPlayer_1 0 15_2017_01_06 exe Minimum System Requirements Intel Pentium 4 or above Microsoft Windows XP Vista 7 8 10 256MB RAM 16MB video memory 1 Install the Video Player software in the CD and run 2 Copy the backup files to your computer 3 Click Open File button or click button on the Play List to load single or multiple video file...

Page 101: ...a folder 3 Play Controls Play Pause Stop Play frame by frame Click once to play a frame of the video Slow Play 1 2 1 4 and 1 8 1 16 speed Fast Forward x2 x4 x8 and x16 4 Volume control Multi screen play It allows to play multiple videos at a time When you choose multi screen you can drag the video in Play List to the play screen 5 Take snapshot To save a video clip to your computer Press once to s...

Page 102: ...the video play screen to full screen 6 Advanced Setup Menu allows to choose the OSD language of the video player and configure the setting of video player Basic Settings Set on top mode Capture Settings Set the format and the path to save snapshots 97 ...

Page 103: ...ccess via mobile devices based on Android iOS operating system 1 Search XIQ Mobile CMS from Google Play Store for android devices or App Store or iOS devices and install 2 Run the app it will display the live view screen 3 Touch the icon to open device list page touch to add device 98 ...

Page 104: ...USER MANUAL 4 Choose Manual and input the NVR information 5 After all settings completed touch Save to save the app will turn to Live view display if the device is well connected NVR NVR NVR NVR NVR 99 ...

Page 105: ...MANUAL 6 Touch icon to open the Menu list where you can check configure the live view playback local recorded videos captured pictures push alarm notifications Device manager Local Setting Help documents 100 ...

Page 106: ...time 4ch realtime Output Interface 1 HDMI up to 4K 1 VGA Display Resolution 1024 768 1280 720 1280 1024 1440 900 1920 1080 1680 1050 1600 1200 1900 1200 2560 1440 3840 2160 Alarm Input out 4ch in 1ch out Ethernet RJ 45 port 10 100M Smart Phone iOS Android Internal HDD 1 SATA HDD up to 8TB RS485 no e Sata no Line In yes USB 3x2 0 USB ONVIF yes Power Supply DC48V PoE Swith 48V Dimension W D H 300X22...

Page 107: ...utput Interface 1 HDMI up to 4K 1 VGA Display Resolution 1024 768 1280 720 1280 1024 1440 900 1920 1080 1680 1050 1600 1200 1900 1200 2560 1440 3840 2160 Alarm Input out 8ch in 1ch out Ethernet RJ 45 port 10 100M Smart Phone iOS Android Internal HDD 2 SATA HDD each HDD up to 8TB RS485 no e Sata No Line In yes USB 1x3 0 USB for backup upgrade 2x 2 0 USB for mouse ONVIF yes Power Supply DC48V PoE Sw...

Page 108: ...olution 1024 768 1280 720 1280 1024 1440 900 1920 1080 1680 1050 1600 1200 1900 1200 2560 1440 3840 2160 Alarm Input out 16ch in 1ch out Ethernet RJ 45 port 10 100 1000M Smart Phone iOS Android Internal HDD 2 SATA HDDs each HDD up to 6TB RS485 yes e Sata yes Line In yes USB 1x3 0 USB for backup upgrade 2x 2 0 USB for mouse ONVIF yes Power Supply AC 100 240V PoE Swith 48V Dimension W D H 380 340 50...

Page 109: ... Display Resolution 1024 768 1280 720 1280 1024 1440 900 1920 1080 1680 1050 1600 1200 1900 1200 2560 1440 3840 2160 Alarm Input out 16ch in 4ch out Ethernet RJ 45 port 1000M Smart Phone iOS Android Internal HDD 8 SATA HDDs each HDD up to 6TB RS485 yes e Sata yes Line In yes USB 1x3 0 USB for backup upgrade 2x 2 0 USB for mouse ONVIF yes Power Supply AC 100 240V PoE Swith 48V Dimension W D H 440 4...

Page 110: ...isplay Resolution 1024 768 1280 720 1280 1024 1440 900 1920 1080 Alarm Input out 8ch in 1ch out Ethernet RJ 45 port 10 100 1000M Smart Phone iOS Android Internal HDD 2 SATA HDDs each HDD up to 8TB RS485 no e Sata optional Line In yes USB 1x3 0 USB for backup upgrade 2x 2 0 USB for mouse ONVIF yes Power Supply DC48V PoE Swith 48V Dimension W D H 380 340 50mm VGA 16ch realtime 720P 8ch realtime 1080...

Page 111: ...ch realtime Output Interface 1 HDMI 1 VGA Display Resolution 1024 768 1280 720 1280 1024 1440 900 1920 1080 Alarm Input out 4ch in 1ch out Ethernet RJ 45 port 10 100 1000M Smart Phone iOS Android Internal HDD 1 SATA HDD up to 8TB RS485 no e Sata optional Line In yes USB 1x3 0 USB for backup upgrade 2x 2 0 USB for mouse ONVIF yes Power Supply DC48V PoE Swith 48V Dimension W D H 300 227 53mm 4K 4MP ...

Page 112: ...ut Interface 1 HDMI 1 VGA Display Resolution 1024 768 1280 720 1280 1024 1440 900 1920 1080 Bit Rate 64K 16M Alarm Input out 8ch input 1ch output Ethernet RJ 45 port 10 100 1000M Smart Phone iOS Android Internal HDD 2SATA HDDs each HDD up to 8TB USB 1x3 0 USB for backup upgrade 2x 2 0 USB for mouse ONVIF ONVIF Version 2 6 conformance POE 8 PoE ports Power Supply DC 48V Dimension W D H 380 340 50mm...

Page 113: ...ty and life of the NVR 5 Q The remote controller of NVR doesn t work while the monitor screen is OK and panel keys are functional Why A Operate again by aiming the remote controller at the IR receiver on front panel If it still doesn t work please check if the batteries in the remote controller are dying If not check if the remote controller is broken 6 Q I want to take out HDD from my PC and inst...

Page 114: ...lease change the setting to No Record To stop Startup recording please change record mode to scheduled recording or manual recording Then you may stop recording by the prescribed methods And another way of stopping recording is to set channel as off status in record setting 10 2 Usage Maintenance 1 To shut down NVR please firstly shut down the system and then turn off the power Do not turn off the...

Page 115: ...USER MANUAL 10 3 Accessories For reference only USB mouse CD Power Adapter Remote Controller Warranty Card 110 ...

Page 116: ...USER MANUAL 111 ...

Reviews: