background image


Related parameter 

Parameter   

Meaning   

Default 

setting 

Unit   

Setting range 

Modify    Effective   

P5-44 

Brake interlock/BK 

n.0000 

n.0000~n.0018 

Anytime   

At once 

P5-07 

Servo OFF delay 

time 

500 

1ms 

0

65535 

Servo bb 

At once 

-500~9999 

(after version 3760) 

P5-08 

Brake command 

output speed   

30 

rpm 

20

10000 

Servo bb 

At once 

P5-09 

Brake command wait 

time 

500 

ms 

0

65535 

Servo bb 

At once 


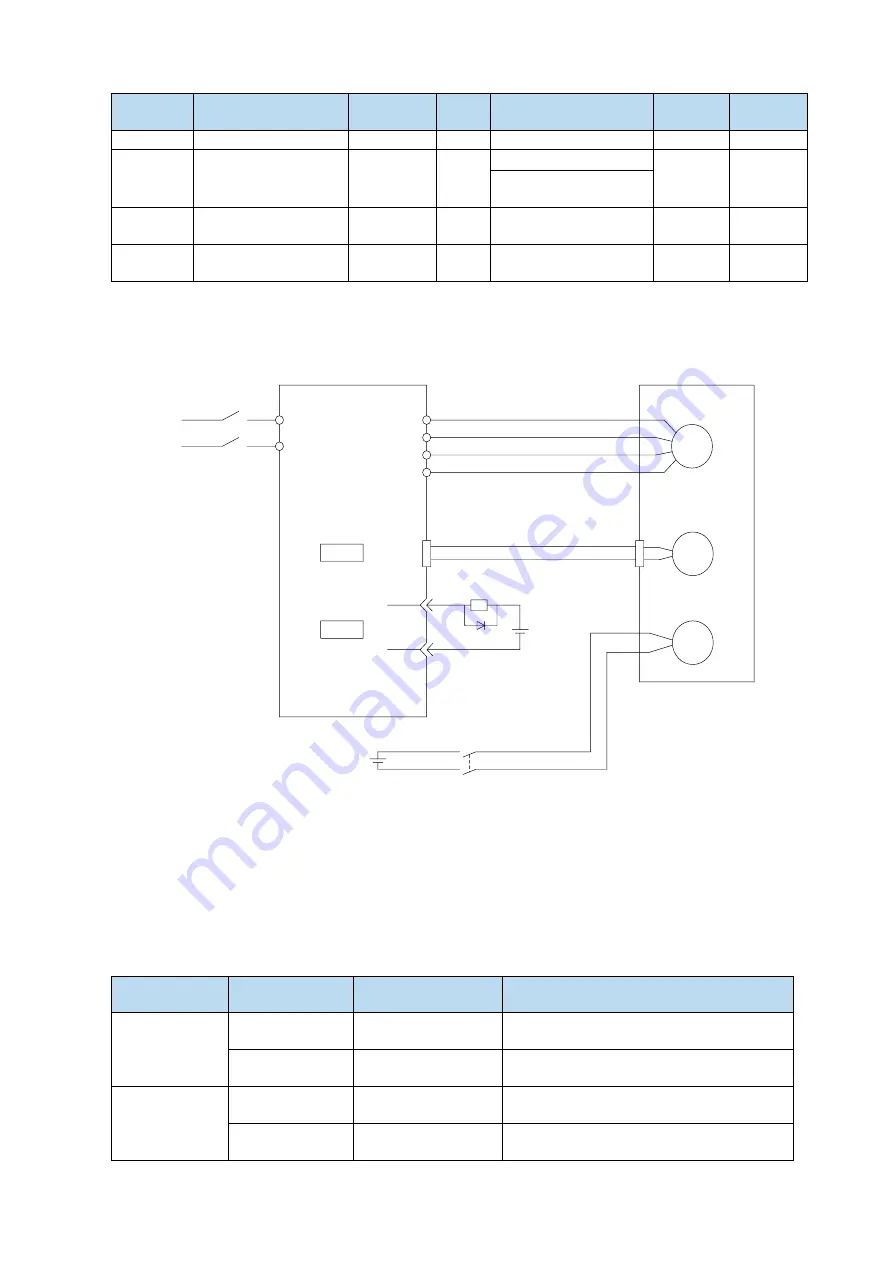
(1) Hardware wiring


The ON/OFF circuit of the brake is composed of the sequential output signal of the servo unit "/BK" 

and "brake power supply". A typical connection example is shown below. 

M

PG

BK

U

V

W

PE

24V

24V

CN0

SO1

COM

BK-RY

BK-RY

Power 

supply

Servo driver

Servo motor

CN2

L

N


Note: 

(1) The excitation voltage of the power-off brake is 24V. 
(2) If the holding brake current is more than 50mA, please transfer it through the relay to prevent 
terminal burnt out due to excessive current. 


(2) Software parameter settings


For the servo motor with holding brake, it is necessary to configure one SO terminal of servo driver as 
holding brake output /BK function, and determine the effective logic of SO terminal, that is, parameter 
P5-44 needs to be set. 


Parameter 

setting 

Servo status 

Signal/BK terminal 

output logic   

Servo motor status 

P5-44=n.000□ 

Servo bb 

Invalid       

Holding brake power off, motor in position 

locked state 

Servo run 

Valid   

The holding brake power is connected and 

the motor is in rotatable state 

P5-44=n.001□ 

Servo run 

Invalid   

Holding brake power off, motor in position 

locked state 

Servo bb 

Valid   

The holding brake power is connected and 

the motor is in rotatable state 

Summary of Contents for DS5K Series

Page 1: ...DS5K series servo driver User manual WUXI XINJE ELECTRIC CO LTD Data No SC5 03 20200217 1 1...

Page 2: ......

Page 3: ...laration of liability Although the contents of the manual have been carefully checked errors are inevitable and we cannot guarantee complete consistency We will often check the contents of the manual...

Page 4: ...ouch the conductive part of the product directly which may cause misoperation and malfunction Cautions for wiring 1 Please connect AC power to LN or L1 L2 L3 or R S T on the dedicated power terminal o...

Page 5: ...control it once in 2 minutes Maintenance and inspection 1 Do not touch the inside of servo driver and servo motor otherwise it may cause electric shock 2 When the power is started it is forbidden to r...

Page 6: ......

Page 7: ...CABLE INSTALLATION 16 2 3 1 Cable selection 16 2 3 2 Xinje cable specification 17 2 4 SERVO DRIVER DIMENSION 19 2 5 SERVO MOTOR DIMENSION 20 3 SERVO SYSTEM WIRING 24 3 1 MAIN CIRCUIT WIRING 25 3 1 1 S...

Page 8: ...5 7 3 Speed limit 83 5 7 4 I O signal distribution 83 5 7 5 Output terminal function 84 5 7 6 Input terminal function 89 5 7 7 Time limit curve of overload protection 90 5 8 ENCODER ABZ PHASE FREQUEN...

Page 9: ...ICATION PARAMETERS 143 8 3 COMMUNICATION PROTOCOL 145 8 3 1 Character structure 145 8 3 2 Communication data structure 145 8 4 COMMUNICATION EXAMPLE 147 8 4 1 Communication with Xinje PLC 147 9 APPEND...

Page 10: ...al if it can be turned smoothly by hand Servo motors with brakes however cannot be turned manually Is there any damage Check the overall appearance and check for damage or scratches that may have occu...

Page 11: ...Servo unit DS5K series servo drive Applicable encoder Standard 17 bit 23 bit communication encoder Input power supply DS5 2 P PTA Single three phases AC200 240V 50 60Hz single phase AC200 240V 50 60Hz...

Page 12: ...w inertia MS5G Middle inertia MS5H High inertia Name Seat number 60 60 seat 80 80 seat Name Product name ST Sine drive motor Name Encoder type C Magnetic encoder T Photoelectric encoder Name Rated tor...

Page 13: ...plug 05 5 08 8 12 12 16 16 20 20 B With battery box BM With battery box ZDL Full sized aviation plug Power cable Display Length M Display Plug type P 4 core amp plug W 6 core waterproof small aviation...

Page 14: ...2 Description of each part Encoder cable 1 Pin definition of encoder on servo driver side Connector appearance Pin definition No Definition 1 2 6 5 4 3 1 5V 2 GND 3 4 5 485 6 485 2 Cable connection o...

Page 15: ...nd has the function of replacing batteries when power cut The using life is more than two years Please refer to chapter 5 7 2 change battery Power cable 1 Pin definition of power cable on servo driver...

Page 16: ...ce is used to consume the regenerative power The servo motor driven by regenerative generator mode is as follows The deceleration stop period during acceleration and deceleration operation Running ver...

Page 17: ...S5K 20P4 PTA 40 40 100 Above 500W DS5K 20P7 PTA DS5K 21P5 PTA 25 25 50 Above 1000W DS5K 22P3 PTA DS5K 22P6 PTA DS5K 43P0 PTA 55 55 75 Above 1000W Note 1 The smaller the resistance is the faster the di...

Page 18: ...hown in the figure below This standard is applicable to the situation where multiple servo drivers are installed side by side in the control cabinet hereinafter referred to as when installed side by s...

Page 19: ...t using a cloth moistened with paint thinner 2 Avoid getting thinner on other parts of the servo motor 2 2 1 Environment condition When used in places with water droplets or oil droplets the protectio...

Page 20: ...ling or similar methods are used When the pulley is dismantled the pulley mover is used to prevent the bearing from being strongly impacted by the load To ensure safety protective covers or similar de...

Page 21: ...e connector from the side of the main circuit cable of the servo motor first and the grounding wire of the main cable must be connected reliably If one side of the encoder cable is connected first the...

Page 22: ...rrent of the motor For example the maximum current of the motor is 60A and the wire diameter of 6mm is selected In case of interference it is necessary to separate strong and weak current It is recomm...

Page 23: ...quipment The motor is properly grounded High current equipment shall be grounded separately Reasonable wiring Such as separation of strong and weak current cables Use metal shielding layer to shield a...

Page 24: ...2 0 3mm 3 8mm 1 4mm 32KW 4 0 2mm 2 0 3mm 3 12mm 1 4mm 3 Cable performance specification Performance Normal cable High flexible cable Ordinary temperature resistance 20 80 20 80 Encoder cable withstan...

Page 25: ...n DS5K 20P1 PTA DS5K 20P2 PTA DS5K 20P4 PTA Unit mm 173 2 175 1 166 0 5 5 5 5 174 6 DS5K 20P7 PTA Unit mm 181 30 181 3 48 75 172 5 5 5 5 60 183 DS5K 21P5 PTA DS5K 22P3 PTA DS5K 22P6 PTA Unit mm 192 18...

Page 26: ...Inertia level Normal With brake MS5S 40ST C 00330 20P1 S01 S02 89 5 119 Low inertia 60 series motor installation dimensions Unit mm a60 7 0 4 5 5 11 0 0 1 5 0 0 03 M5 8 50h7 30 0 5 14h6 2 LA 83 20 2 M...

Page 27: ...rtia MS5 series MS5S 80ST C 03230 21P0 S01 S02 128 165 MS5H 80ST C 02430 20P7 S01 S02 119 156 High inertia MS5H 80ST C 03230 21P0 S01 S02 140 177 MS 80ST T02430 20P7 150 199 MS 80ST T03520 20P7 179 21...

Page 28: ...MS5G 130STE C 10015B 21P5 S01 145 MS5G 130STE C 11515 21P8 S01 159 5 189 5 MS5G 130STE C 11515 41P8 S01 MS5G 130STE C 14615 22P3 S01 180 5 210 5 MS5G 130STE C 14615 42P3 S01 MS5G 130STE TL05415 20P8...

Page 29: ...r installation dimensions Unit mm LA 79 0 5 20 3 51 2 11 35h6 114 3h7 2 0 0 4 13 5 a180 30 0 0 1 10 0 0 03 M 1 2 1 6 Motor model LA 1 Inertia level Normal MS5G 180ST TL19015 42P9 S01 221 Medium inerti...

Page 30: ...e more than 30 cm apart 2 For the signal wire and the feedback wire of the encoder PG please use the multi stranded wire and the multi core stranded integral shielding wire 3 For wiring length the lon...

Page 31: ...erative resistor between P and C disconnect P and D P0 25 power value P0 26 resistor value W R 220V D P C U V T S DS5K 21P5 PTA DS5K 22P3 PTA DS5K 22P6 PTA Terminal Function Explanation R S T Power su...

Page 32: ...D 5 D P 24 SO1 COM SO3 SO4 SO2 485 485 SI2 SI1 NC GND SI3 24V SI5 SI4 OA OA OB OZ OZ OB 1 16 15 30 44 31 NC NC NC NC NC NC NC NC NC NC NC NC NC NC NC NC NC No Name Explanation No Name Explanation 1 P...

Page 33: ...inal 22 SI3 Input terminal 44 NC Empty terminal 3 1 3 2 CN2 terminal The terminals of the CN2 connector are arranged as follows faced solder plates 1 2 6 5 4 3 No Definition 1 5V 2 GND 3 4 5 485 6 485...

Page 34: ...se mode CW CCW 5 3 2 2 1 AB phase mode A phase B phase 2 Pulse direction mode pulse direction Open collector 24V voltage input signal is P pin 3 D pin 6 Input signal of differential mode 5V voltage is...

Page 35: ...ent If the relay is not small current it will cause bad contact Type Input terminal Function Digital input SI1 SI5 Multifunctional input signal terminal Defaulted assignment of input terminals Termina...

Page 36: ...vo driver upper device COM SO X3 COM 0V 24V Servo driver upper device 24V 0V COM X3 SO COM Note the maximum allowable voltage and current capacity of collector open output circuit are as follows Volta...

Page 37: ...code Present speed Alarm clear state Parameter Monitor Auxiliary Alarm STA ESC switch Parametric setting Px xx The first X represents the group number and the last two X represents the parameter seria...

Page 38: ...t rpm When the motor speed is higher than the rotating speed turn on the lamp Rotation detection speed P5 03 unit rpm P5 31 Zero clamp ZCLAMP When the zero clamp signal starts to operate turn on the l...

Page 39: ...her than the rotating speed turn on the lamp Rotation detection speed P5 03 unit rpm 2 Short code display contents Short code Display contents Standby status Servo OFF status The motor is in a non ele...

Page 40: ...0001 means S ON has input 0x0201 means S ON and SPD B has input U0 22 input signal status STA ESC INC DEC ENTER 11 12 13 14 15 16 17 18 19 20 Lighting means that the corresponding item has signal inpu...

Page 41: ...ady S RDY 6 Torque limit CLT 7 Speed limit detection VLT 8 Break lock BK 9 Warn WARN 10 Output near NEAR Note When reading through communication the binary numbers read from right to left correspond t...

Page 42: ...ers in the driver 0021 Read the encoder motor parameters successfully but the parameter value is 0 please set P0 53 0031 Read encoder motor parameters successfully but damaged CRC check error please s...

Page 43: ...ncoder F1 02 Current Sampling Zero correction 1 Test run F1 01 Before entering the test run mode please confirm that the motor shaft is not connected to the machine When the servo driver is connected...

Page 44: ...l which supports motion bus Set P0 03 2 F1 05 0 cancel enable enter bb status F1 05 1 forced enable servo is in RUN status Note 1 After power on again the forced enable set by F1 05 will fail 2 If it...

Page 45: ...decrease or shift after changing long press ENTER to confirm 8 END Note When the setting parameter exceeds the range that can be set the driver will not accept the setting value and the driver will r...

Page 46: ...nput the pulse train command into the servo unit and move it to the target position The position instruction can be given by the combination of external pulse input the total number of internal positi...

Page 47: ...1A can be distributed to other input terminal through P5 30 If the control mode needs to be switched through SI2 input signal P5 30 can be set to n 0002 0012 Refer to section 3 2 2 for hardware wiring...

Page 48: ...ct only when the servo is not enabled i e the panel is BB Related parameter parameter Meaning Default setting Unit Range Modify Take effect P3 18 JOG speed 100 1rpm 0 1000 Servo bb At once P3 18 is th...

Page 49: ...sRTU protocol communication or set to 1 through the panel 2 Power on enable Parameter setting P0 03 1 default P5 20 n 0010 This setting mode can make the servo system in the enabling state as soon as...

Page 50: ...op Stopping principle The servo driver is not enabled the servo motor is not powered and free deceleration to 0 The deceleration time is affected by mechanical inertia equipment friction etc The servo...

Page 51: ...meout alarm E 262 3 The so terminal of servo driver is equipped with holding brake function No matter P0 27 P0 29 0 or 2 it stops in deceleration mode 2 Stop mode in case of over travel The overtravel...

Page 52: ...que is P3 32 when decelerating stop and the stop timeout also plays a role in the overtravel process 2 During position control when the motor is stopped by over travel signal there may be position dev...

Page 53: ...n voltage of the power off brake is 24V 2 If the holding brake current is more than 50mA please transfer it through the relay to prevent terminal burnt out due to excessive current 2 Software paramete...

Page 54: ...lag P5 07 holding brake open Note the setting made here is the time when TGON of rotation detection is invalid when the motor is stopped Abnormal state holding brake timing When the alarm power suppl...

Page 55: ...running downward When the external load drives the motor to rotate Related parameter Parameter Meaning Default setting Unit Setting range Modify Effective P0 24 Discharge resistance type selection ve...

Page 56: ...erview The so called electronic gear function has two main applications 1 Determine the number of command pulses needed to rotate the motor for one revolution to ensure that the motor speed can reach...

Page 57: ...ectronic gear ratio denominator high bit 10000 0 1 65535 Servo OFF At once Note 1 P0 11 P0 14 is all about the parameters of electronic gear ratio P0 11 P0 12 is group 1 P0 13 P0 14 is group 2 but the...

Page 58: ...Confirm mechanical specifications Ball screw pitch 6mm Machine deceleration ratio 1 1 1 circle rotate angle 360 Deceleration ratio 1 3 Pulley diameter 100mm Deceleration ratio 1 2 2 Confirm the numbe...

Page 59: ...tput Anytime At once Refer to section 3 2 2 for hardware wiring details If it is necessary to output signal from SO2 P5 37 and P5 38 are set to n 0002 0012 Note that an SO terminal can only be used as...

Page 60: ...us COIN Signal status ON ON OFF U0 12 Pulse command COIN HOLD Signal status ON OFF P5 02 P5 02 2 Description of positioning completion width 1 The positioning completion width P5 00 changes proportion...

Page 61: ...gnal NEAR is output U0 08 Pulse offset COIN signal status ON NEAR signal status ON ON ON OFF OFF P5 00 P5 06 2 Description of approach signal output 1 The approach signal output width P5 06 changes pr...

Page 62: ...ration status INHIBIT terminal logic valid INHIBIT terminal logic invalid 5 internal position control Pause current segment INHIBIT signal is from ON OFF continue running from pause point 6 external p...

Page 63: ...deviation pulse exceeds a certain limit value an alarm will occur and this threshold value is the deviation pulse limit value Related parameters parameter Meaning Default setting Unit Range Change Eff...

Page 64: ...5 28 SPD A n 0000 Mode 3 internal speed selecting signal Range 0000 0015 distributes to input terminal through P5 28 When it set to 0001 it means input signal from SI1 Mode 5 find origin point at forw...

Page 65: ...lse command Parameter Overview Reference chapter P0 01 control mode selection Set to 6 external pulse mode 5 3 2 1 P0 10 pulse instruction form Set the pulse form 0 CW CCW 1 AB 2 P D 5 3 2 2 P0 11 Mot...

Page 66: ...e Change Effective P0 09 0 n xxx forward direction of pulse instruction 0 0 1 Servo bb Re power on P0 09 will change the counting direction of the internal counter in the servo system The counting dir...

Page 67: ...of pulse signal 0 falling edge is valid 4 Logical form of instruction pulse P0 10 0 Forward rotation Reverse rotation 0 CW CCW CCW CW OFF CCW CW OFF 1 AB 90 Phase A Phase B 90 Phase A Phase B 2 P D pu...

Page 68: ...eaving limit switch P4 01 speed of hitting the proximity switch P4 02 speed of leaving proximity switch P5 28 SPD A find reference origin on forward side in position mode P5 29 SPD B find reference or...

Page 69: ...l wait for the completion of motor positioning and pass the adjust time then start the next position command T1 is positioning time t2 is adjust time Refer to parameter P4 11 Wait mode 1 adjust time 0...

Page 70: ...ely when a new step change signal arrives 2 In this mode the step change signal CHGSTP is triggered by rising edge 3 After each operation completion positioning completion and positioning approach sig...

Page 71: ...oning approach signal are all effective 4 When the servo enable is off during a certain section of operation the motor stops according to the servo off shutdown mode After the shutdown the positioning...

Page 72: ...1 14 segment 6 position 1 1 1 0 15 segment 7 position 1 1 1 1 16 segment 8 position Note the rising edge of P5 35 step change signal triggers each position the rising edge is invalid during operation...

Page 73: ...16 n 1 7 Adjust time 0 ms 0 65535 Servo bb At once Notes 1 Set pulse number pulse number high bit 10000 pulse number low bit 2 In formula P4 10 n 1 7 n is the segment no of internal position the range...

Page 74: ...d values are set for No 1 No 8 sections Change step mode Setting Parameter Actions P4 03 1 0 P4 08 0 or P4 08 P4 04 P4 08 8 P4 04 4 start Segment 1 Segment 2 Segment 3 Segment 4 1 P4 08 P4 04 P4 08 2...

Page 75: ...ion 0 0 35 Anytime At once If this parameter is set to a certain segment number this segment position will be executed without step change signal Communication can be used to modify parameters For exa...

Page 76: ...ll be used when the motor must stop and enter lock state even the V REF input voltage is not zero When set ON the zero clamp function it will configure the position loop inside the servo the motor wil...

Page 77: ...MP signal is ON the setting speed is less than P3 13 switch to position control mode and servo is locked at this position At this time if setting speed is over P3 13 the motor will run again 5 4 1 3 S...

Page 78: ...ting of internal 3 segment speed in rpm 5 4 2 1 P5 28 internal speed selection SPD A P5 29 internal speed selection SPD B The combination of terminals determines the speed of corresponding section 5 4...

Page 79: ...erminal through P5 29 1 Correlation between running speed and terminal signal Input signal Running speed SPD D P5 27 SPD A P5 28 SPD B P5 29 0 forward run 0 0 Internal speed is zero 0 1 P3 05 SPEED1 1...

Page 80: ...000 No need external terminal input Invalid P5 27 n 000 SI terminal no signal input P5 27 n 001 SI terminal has signal input P5 27 n 0010 No need external terminal input Valid P5 27 n 000 SI terminal...

Page 81: ...ntity The wiring is the same as position command Select CW CCW mode or direction pulse mode AB phase pulse mode 5 4 3 2 Pulse frequency command Pulse frequency command is the same as external pulse co...

Page 82: ...me Default setting Suitable mode Meaning Modify Effective P5 43 VLT n 0000 1 2 Speed limit detection Anytime At once By default no terminal is allocated the parameter range is 0000 0014 and is allocat...

Page 83: ...used as incremental encoder Pararmeter Name setting Meaning Range P0 79 Absolute encoder battery undervolta ge alarm switch 0 Normally use absolute encoder and use battery to memorize position 0 2 1...

Page 84: ...ect the power supply of the servo unit again 7 Make sure the error display disappears and the servo unit can operate normally 5 6 3 The upper limit of turns The upper limit of rotating cycles can be u...

Page 85: ...Use U0 10 encoder feedback value Absolute value single turn position read 0x100A and 0x100B hexadecimal address through Modbus RTU U0 10 U0 11 10000 is present encoder single turn position U0 11 U0 91...

Page 86: ...us station number 1 Note refer to chapter 8 2 for communication parameters 5 6 5 Reset absolute position Parameters Name F1 06 Clear the turns of absolute encoder U0 94 Relative encoder feedback value...

Page 87: ...300 Anytime At once P3 38 Anti blocking alarm internal forward torque limit 300 0 300 Anytime At once P3 39 Anti blocking alarm internal reverse torque limit 300 0 300 Anytime At once Note 1 When P0...

Page 88: ...xternal torque limit Range 0000 0015 can be distributed to other input terminals through P5 25 Anyti me At once P5 26 N CL n 0000 The necessary condition to use reverse external torque limit Range 000...

Page 89: ...the signal to be always valid n 001x Input always close signal from SIx Note The basic filtering time refers to input terminal filtering time 2 default setting of input terminal Input terminal SI1 SI...

Page 90: ...hardware wiring details P5 41 parameter setting range is n 0000 0014 which is assigned to other output terminals through parameters If it is necessary to output signal from SO2 P5 41 can be set to n...

Page 91: ...val time of the action The action of small ring width is sensitive and frequent and the action of large ring width is slow It should be noted that the rotation detection speed P5 03 the same speed det...

Page 92: ...en the servo alarm SO2 and COM are connected and the alarm signal is output The parameter range is 0000 0014 which is assigned to the output interface by parameter P5 47 When set to 0001 the signal is...

Page 93: ...8 32767 All the modes Anytime At once P5 12 When P5 10 P5 11 or P5 10 P5 11 SOx output Setting value Function Default value Suitable mode Change Effective 0 P5 10 P5 11 SOx output 0 All the modes Anyt...

Page 94: ...once P5 15 The comparison value for the trigger condition of user defined output 2 Unit Default setting Range Suitable mode Change Effective Related to trigger condition 0 9999 9999 All the modes Anyt...

Page 95: ...al via parameter P5 21 5 7 6 2 Alarm reset ALM RST Alarm reset ALM RST Parameter Signal Default setting Suitable mode Meaning Modify effective P5 24 ALM RST n 0002 All Input normally open signal from...

Page 96: ...on of overload operation It is recommended to use it within the continuous operation stage of torque speed curve For the torque speed curve please refer to appendix 9 Applicable model motor code 5022...

Page 97: ...4032 4042 5042 4044 5044 5078 5079 5077 5877 9077 9877 Applicable model motor code 5175 9175 5975 9975 9166 916A 916B Applicable model motor code 5034 9034 5074 5874 9074 9874 9037 5037 5046 4046 904...

Page 98: ...number of feedback pulses per turn of encoder high order position Unit Default setting Range Suitable mode Modify Effective 10000 1 0 9999 All Servo OFF At once Note 1 Output pulses per turn P0 19 100...

Page 99: ...ase A behind phase B 90 Phase A Phase B 90 Phase A Phase B P0 87 0 Differential feedback output phase Z mode Setting value Function Default value Suitable mode Modify Effective 0 Only forward output e...

Page 100: ...following figure is the basic process of gain adjustment please adjust according to the current machine status and operation conditions Start adjusting Use adaptive 3kw auto tune function 3kw Are you...

Page 101: ...on loop there is also the gain of model loop which has a great influence on the servo responsiveness When the model loop is not open the servo responsiveness is determined by the gain of the position...

Page 102: ...model loop gain and notch filter are also adjusted automatically Model loop function Parameter Meaning Default setting Modification Effective P2 47 n 0 Model loop turn off n 0 At anytime At once n 1...

Page 103: ...odified to 85 The relevant parameters of this function no need to be set manually by users Parameter Meaning Default setting Modification Effective P2 00 n 0 Turn off of disturbance observer n 0 Servo...

Page 104: ...ol The presumptive tools of load moment of inertia are driver panel and XinjeServo software Operation tool Description Driver panel Driver firmware needs 3700 and higher version XinjeServo software Al...

Page 105: ...ll lead to inaccurate identification of inertia ratio torque limit too small P3 28 29 Initial inertia too small Maximum speed too large Torque limit too small Err 2 value error is too large when calcu...

Page 106: ...river has alarm press ESC key to exit the auto tuning interface check the alarm code first solve the alarm and then make inertia estimation Driver has alarm Estimate the inertia through XinJeServo sof...

Page 107: ...3 Set the auto tuning interface 4 Click ok to start inertia identification...

Page 108: ...arameters belongs to auto tuning mode 6 3 2 Fast adjustment steps 1 estimate the load inertia through servo driver panel or XinJeServo software refer to chapter 6 2 2 shut down adaptive mode set P2 01...

Page 109: ...2 35 Torque instruction filter P2 49 Model loop gain version 3700 3720 P2 49 Model loop gain version after 3730 1 20 31831 20 100 50 50 2 50 12732 50 100 80 80 3 70 9094 70 100 90 90 4 80 7957 80 100...

Page 110: ...000 57 2250 282 2250 10 6000 6000 58 2300 276 2300 10 6000 6000 59 2350 270 2350 10 6000 6000 60 2400 265 2400 10 6000 6000 61 2450 259 2450 10 6000 6000 62 2500 254 2500 10 6000 6000 63 2600 244 2600...

Page 111: ...eters can be set refer to chapter 6 7 vibration suppression Fast adjustment mode defaults to set a rigidity level If the gain does not meet the mechanical requirements please gradually increase or dec...

Page 112: ...Operation tools Limit item Internal instruction auto tuning external instruction auto tuning XinJeServo software All the versions support Driver panel Driver firmware needs 3700 and higher versions No...

Page 113: ...igidity of mechanism Err 2 Overtrip alarm in auto tuning process Please make sure that there is no overrun and alarm before auto tuning Err 6 Driver is not in bb state at the time of operation Please...

Page 114: ...3 set the auto tuning interface 4 click ok to estimate the inertia...

Page 115: ...e adjustment of rigid body system and other mechanisms with higher rigidity Auto tuning mode Description Soft Make a soft gain adjustment Besides gain adjustment notch filter is automatically adjusted...

Page 116: ...6 Start auto tuning 7 Wait for the end of the auto tuning...

Page 117: ...ion auto tuning Note in the auto tuning process press STA ESC will exit the auto tuning and use the gain parameters at the exit moment Panel error alarm in auto tuning process Error code Meaning Reaso...

Page 118: ...2 Select jog or manual setting to configure the trip of inertia identification 3 Set the auto tuning interface 4 Click ok to start the inertia identification...

Page 119: ...control overshoot In the use of positioning we should pay attention to adjusting without overshoot Besides gain adjustment the model loop gain and notch filter are automatically adjusted Load type Des...

Page 120: ...with higher rigidity 6 Start auto tune 7 Open the servo enable then click ok...

Page 121: ...ratio Gain performance parameters Yes P1 00 First speed loop gain P1 01 Integral time constant of the first speed loop P1 02 First position loop gain P2 00 0 Disturbance observer switch P2 01 0 Adapti...

Page 122: ...etting parameters No P2 86 auto tuning jog mode P2 87 auto tuning min limit position P2 88 auto tuning max limit position P2 89 auto tuning max speed P2 90 auto tuning acceleration deceleration time N...

Page 123: ...manual adjustment in the following occasions When the expected effect can not be achieved by fast adjusting the gain When the expected effect is not achieved by automatically adjusting the gain 6 5 2...

Page 124: ...stant is too large it will overshoot or prolong the positioning time which will make the response worse The relationship between the gain of the speed loop and the integral time constant of the speed...

Page 125: ...setting Unit Range Modify Effective P2 49 Model loop gain 500 0 1Hz 10 20000 Anytime At once 6 6 Adaptive 6 6 1 Overview Adaptive function means that no matter what kind of machine and load fluctuatio...

Page 126: ...inertia mode speed observer gain 40 Servo bb At once P6 12 Adaptive large inertia mode max inertia ratio 50 Servo bb At once Note 1 DS5 series servo 750W and below driver default value is 400 other p...

Page 127: ...without affecting the responsiveness Too large will produce vibration P2 08 P6 08 Speed observer gain 60 40 30 60 Reducing P2 08 and increasing P2 12 can greatly improve the inertia capability but it...

Page 128: ...ng or manually setting the vibration frequency After the vibration is eliminated if the responsiveness needs to be improved the gain can be further improved Note 1 Servo responsiveness will change aft...

Page 129: ...suppression parameters are automatically written into the second and first notches the second notches are preferred when there is only one vibration point The related parameters are detailed in 6 7 7...

Page 130: ...ics the resonance frequency is 328 Hz and the third notch filter can be used The parameters are as follows P2 69 n 1000 P2 77 328 Note In both adaptive and auto tuning modes if mechanical characterist...

Page 131: ...ue which is the value of P6 89 Press INC DEC to increase or decrease torque command When increasing the torque command it is recommended to increase it a little bit to avoid severe vibration of the eq...

Page 132: ...the third fourth and fifth are set manually The torque instruction filter and notch filter are in series in the system As shown in the figure below the switch of the notch filter is controlled by P2...

Page 133: ...requency 5000 Hz 50 5000 Anytime At once P2 81 Fourth notch attenuation 70 0 1dB 50 1000 Anytime At once P2 82 Fourth notch bandwidth 0 Hz 0 1000 Anytime At once P2 83 Fifth notch frequency 5000 Hz 50...

Page 134: ...hing Countermeasure 1 Reducing gain parameters 2 Optimize the instructions of the upper device and reduce the acceleration of the instructions 6 8 2 Vibration The following causes cause machine vibrat...

Page 135: ...o Servo run 2 E 022 Parameter conflict No Servo run 3 E 023 Sampling channel setting error Yes Servo run 4 E 024 parameter lost No Servo run 5 E 025 Erase FLASH error No Servo run 6 E 026 Initializati...

Page 136: ...rating ruler counter direction reverse Yes Servo off 8 E 238 Full closed loop external grating scale speed overrun Yes Servo off 24 0 E 240 Timing error in fetching encoder position data No Servo off...

Page 137: ...voltage whether the input phase is missing or the supply voltage is too low Contact agent or manufacturer 7 E 017 Processor Running Timeout Program damage Please contact the agent or the manufacturer...

Page 138: ...e chapter 1 4 1 for the selection of the external resistor Acceleration and deceleration time is too short Extending Acceleration and Deceleration Time Hardware Fault of Driver Internal Sampling Circu...

Page 139: ...ive ambient temperature 1 Enhance ventilation measures to reduce ambient temperature 2 Check whether the fan rotates when the servo is enabled when the module temperature U 06 45 the fan opens Fan dam...

Page 140: ...rcuit Discovered in Self Inspection Not match the motor code Check if the driver P0 33 is identical with the motor code of the motor label the number after MOTOR CODE if not please change to the same...

Page 141: ...be considered improper selection of the motor Increase the capacity of drivers and motors Extend the acceleration and deceleration time and reduce the load Monitor the U 00 whether it is running over...

Page 142: ...it is not servo control attention must be paid to the timing of brake opening and motor action 3 Monitor the actual output torque range of U0 02 and check whether the setting of P3 28 29 torque limit...

Page 143: ...ncoder error retry number register P0 56 Encoder interfered isolate interference source 2 E 222 Absolute value servo encoder battery low voltage alarm can shield this alarm Battery Voltage in Battery...

Page 144: ...ution exceeds the setting value of P9 02 Mechanism error The motor outputs the shaft position directly and reaches the moving platform through the mechanism The feedback of the grating ruler is direct...

Page 145: ...is too small which leads to the oscillation of positioning 1 Check the source of external force to see if there are any problems in mechanical installation 2 Increase the servo gain to improve the an...

Page 146: ...ent motor parameter performance Read the alarm shielding position of motor parameters through p0 53 and set the motor code of P0 33 correctly At this time the motor parameters are in the driver which...

Page 147: ...on protocol and the HMI can also be connected through the communication interface Realize the remote operation of the frequency converter by the user This series of servo Modbus communication protocol...

Page 148: ...ranch structure 3 Not recommended star connection Servo slave Servo slave Servo slave Servo slave Servo slave Servo slave PLC master PLC master Servo slave Servo slave Servo slave Servo slave A B PE A...

Page 149: ...n x xx Stop bit 0 0 2 bit 2 1 bit n xx Baud rate 06 00 300 01 600 02 1200 03 2400 04 4800 05 9600 06 19200 07 38400 08 57600 09 115200 0A 192000 0B 256000 0C 288000 0D 384000 0E 512000 0F 576000 10 7...

Page 150: ...nce Parameter setting Function Default setting Range n xxx Parity bit 0 0 no parity 1 odd 2 even n x xx Stop bit 0 0 2 bit 2 1 bit n xx Baud rate 06 00 300 01 600 02 1200 03 2400 04 4800 05 9600 06 19...

Page 151: ...1 2 3 4 5 6 7 Even parity Stop bit 1 8 1 format no parity Start bit 0 1 2 3 4 5 6 7 Stop bit The default data format of servo driver is 1 bit start bit 8 bit data bit 1 bit stop bit 8 3 2 Communicatio...

Page 152: ...register address 03H register address 03H 12H 12H Data content 01H Data content 01H 2CH 2CH CRC CHECK Low 29H CRC CHECK Low 29H CRC CHECK High C6H CRC CHECK High C6H 4 Parity code RTU mode double byte...

Page 153: ...1 8 1 even parity The setting parameters are as follows P7 00 Station No 1 2 P7 01 0 1 baud rate 06 P7 01 2 stop bit 2 P7 01 3 check bit 2 Note if the communication parameter settings of the upper com...

Page 154: ...0 PX XX 1 PX XX 2 PX XX 3 P0 XX Parameter Function Unit Default value Range Effective Suitable mode Reference chapter P0 01 Control mode 1 1 Internal Torque Mode 2 External Analog Torque Mode 3 Inter...

Page 155: ...ommand pulses required for motor rotation 1 pul 10000 0 99999999 5 6 5 3 1 1 P0 13 Electronic Gear Numerator 1 0 65535 5 6 5 3 1 1 P0 14 Denominator of Electronic Gear 1 0 65535 5 6 5 3 1 1 P0 15 Puls...

Page 156: ...0 5 2 4 P0 30 stop timeout time 1ms 20000 0 65535 1 2 3 4 5 6 7 8 9 10 5 2 3 P0 31 Deceleration stop time 1ms 25 0 5000 1 2 3 4 5 6 7 8 9 10 5 2 3 P0 33 Set the motor code 0 0 ffff 1 2 3 4 5 6 7 8 9 1...

Page 157: ...nator take effect when P0 11 P0 14 is 0 P0 94 1 P0 95 10000 1 1 9999 5 6 5 3 1 1 1 65535 P1 XX Parameter Function Unit Default value Range Effective Suitable mode Reference chapter P1 00 First speed l...

Page 158: ...e valid only during auto tuning 1 synchronous belt 2 screw rod 3 Rigid Connection 2 1 3 1 2 3 4 5 6 7 8 9 10 6 1 3 P2 03 3 Adaptive load type 0 Small Inertia Mode 1 Large Inertia Mode 0 0 1 1 2 3 4 5...

Page 159: ...6 5 3 P2 60 0 Active Vibration Suppression Switch 0 OFF 1 ON 0 0 1 3 4 5 6 7 10 6 4 6 P2 60 1 Active Suppression Auto tuning Switch 0 Active Vibration Suppression is not Configured in auto tuning 1 c...

Page 160: ...notch frequency Hz 5000 50 5000 1 2 3 4 5 6 7 8 9 10 6 7 7 P2 78 Third notch attenuation 0 1dB 70 50 1000 1 2 3 4 5 6 7 8 9 10 6 7 7 P2 79 Third notch band width Hz 0 0 1000 1 2 3 4 5 6 7 8 9 10 6 7...

Page 161: ...0 Version 3730 200 0 65535 3 4 7 5 4 1 1 P3 12 Zero speed clamping mode 0 0 3 3 4 7 5 4 1 2 P3 13 Zero speed clamping speed rpm 10 0 300 3 4 7 5 4 1 2 P3 14 Forward Maximum Speed Instruction Limit rpm...

Page 162: ...2 3 4 5 6 7 8 9 10 5 8 2 P3 30 external forward torque limit 300 0 1000 1 2 3 4 5 6 7 8 9 10 5 8 2 P3 31 external reverse torque limit 300 0 1000 1 2 3 4 5 6 7 8 9 10 5 8 2 P3 32 Brake torque 1 300 0...

Page 163: ...1 not wait positioning completion 0 0 1 5 5 3 3 1 P4 04 Valid segment number 0 0 35 5 5 3 3 2 P4 08 Internal position mode start segment No 1 0 35 5 5 3 3 3 P4 10 P4 11 First segment pulse 1pul 0 327...

Page 164: ...custom output 1 mode 0 0 3 1 2 3 4 5 6 7 8 9 10 5 8 5 7 P5 13 Setting custom output 1 hysteresis Relating to trigger condition 0 0 65535 1 2 3 4 5 6 7 8 9 10 5 8 5 7 P5 14 Custom Output 2 Trigger Cond...

Page 165: ...10 5 8 6 2 P5 24 2 SI terminal filtering time ms 0 0 f 1 2 3 4 5 6 7 8 9 10 5 8 4 1 P5 25 0 1 P CL External Torque Limitation at Forward Rotation Side 00 0 ff 1 2 3 4 5 6 7 8 9 10 5 8 2 P5 25 2 SI te...

Page 166: ...erminal 11 Output reverse signal from SO1 terminal 12 Output reverse signal from SO2 terminal 13 Output reverse Signal from SO3 terminal 0000 0 ffff 5 6 10 5 3 1 2 P5 38 COIN positioning completion 00...

Page 167: ...election 0 This terminal is turned on after initialization of the driver is completed 1 This terminal will not turn on until enabled 0 0 1 1 2 3 4 5 6 7 8 9 10 5 8 5 1 P5 71 Function Selection of Dire...

Page 168: ...bit 0 no parity 1 odd parity 2 even parity Parity bit 2 0 2 1 2 3 4 5 6 7 8 9 1 0 8 2 P7 02 RS485 communication protocol 1 Modbus Rtu protocol 2 Xnet bus protocol 3 read Xnet bus torque 1 1 255 1 2 3...

Page 169: ...07 38400 08 57600 09 115200 0A 192000 0B 256000 0C 288000 0D 384000 0E 512000 0F 576000 10 768000 11 1M 12 2M 13 3M 14 4M 15 5M 16 6M baud rate 06 0 16 1 2 3 4 5 6 7 8 9 1 0 8 2 P7 11 2 RS232 stop bi...

Page 170: ...00 U0 18 Torque current 0 01A U0 19 Analog input V REF value 0 01V U0 20 Analog input T REF value 0 01V U0 21 Input signal status 1 U0 22 Input signal status 2 U0 23 output signal status 1 U0 24 ouput...

Page 171: ...es U0 95 0000 65536 216 U0 96 0000 65536 232 U0 97 0000 65536 U0 98 High power motor temperature U1 XX Code Contents Unit U1 00 present alarm code U1 01 present warning code U1 02 U phase current when...

Page 172: ...running time from this time power on second U2 15 Average output power from the first time enabled average power in the process of enabling 1W U2 16 Average thermal power from the first time enabled...

Page 173: ...address is added 1 in turn from 0x0100 for example Modbus address of P1 10 is 0x010A P2 15 P2 xx 0x020F 0x0263 Modbus address is added 1 in turn from 0x020F for example Modbus address of P2 16 is 0x02...

Page 174: ...7 0x0007 7 P0 24 0x0018 24 P0 08 0x0008 8 P0 25 0x0019 25 P0 09 0x0009 9 P0 26 0x001A 26 P0 10 0x000A 10 P0 27 0x001B 27 P0 11 0x000B 11 P0 28 0x001C 28 P0 12 0x000C 12 P0 29 0x001D 29 P0 13 0x000D 13...

Page 175: ...801 P3 15 0x030F 783 P3 34 0x0322 802 P3 16 0x0310 784 P3 35 0x0323 803 P3 17 0x0311 785 P3 36 0x0324 804 P3 18 0x0312 786 Parameter Modbus address Parameter Modbus address Hex Decimal Hex Decimal P4...

Page 176: ...92 P7 10 0x070A 1802 P7 01 0x0701 1793 Monitoring status address of group U Parameter Modbus address Parameter Modbus address Hex Decimal Hex Decimal U0 00 0x1000 4096 U0 28 0x101C 4124 U0 01 0x1001 4...

Page 177: ...5 U1 08 0x1108 4360 U2 08 0x1208 4616 U1 09 0x1109 4361 U2 09 0x1209 4617 U1 10 0x110A 4362 U2 10 0x120A 4618 U1 11 0x110B 4363 U2 11 0x120B 4619 U1 12 0x110C 4364 U2 12 0x120C 4620 U1 13 0x110D 4365...

Page 178: ...I1 SI2 SI3 SI4 24V SO1 SO2 COM 1 P5 44 defines the terminal of the brake output signal As shown in the figure above the SO1 controls brake that is P5 44 0001 2 Extend the delay time of servo OFF P5 07...

Page 179: ...sistor please refer to chapter 1 4 1 1 P D C interface model Remove the short joint between P D and connect the external regenerative resistance to P C 2 P PB interface model connect external regenera...

Page 180: ...supply immediately and re check the wiring situation Long press ENTER Short press ENTER Press DEC Press INC C jog run Enter F1 00 Short press ENTER to enable the motor In the enabled status press INC...

Page 181: ...1 Make sure the work mode 6 2 It needs to judge whether 2 and 3 touch 1 when finding the symmetrical point first time The sign is servo output torque will increase It needs to use torque limit P3 28...

Page 182: ...e command state P0 10 2 Electronic gear ratio P0 11 0 P0 12 0 P0 13 16384 P0 14 625 Forward torque limit P3 28 150 Reverse torque limit P3 29 150 Positioning finished width P5 00 7 S ON P5 20 0010 CLR...

Page 183: ...inal to control the setting parameters of holding brake P5 47 alarm output ALM output alarm function setting through the SO terminal SO2 terminal default output is dynamic closing signal P7 00 RS485 S...

Page 184: ...e control general parameters Internal torque control Parameter Overview P0 01 control mode selection Set to 1 internal torque mode P3 33 Internal torque command given The given value is the percentage...

Page 185: ...peed mode P0 10 pulse command format Set the pulse format 0 CW CCW 1 AB 2 P D P0 15 Command pulse frequency at rated speed Determine the linear relationship between the command pulse frequency and the...

Page 186: ...Appendix 9 Torque speed characteristic curve...

Page 187: ......

Page 188: ......

Page 189: ...0P2 S01 CP T SP M length CM T P07 M length CB T P 03 length JAM P9 P4 P2 MS5H 60ST CM00630BZ 20P2 S01 CP T SP B M length CM T P07 M length CB T P 03 length JAM P9 P4 P2 MS5S 60ST CS01330B 20P4 S 01 DS...

Page 190: ...2430BZ 20P7 S01 CP T SP B M length CM T P07 M length CB T P 03 length JAM P9 P4 P2 MS 80ST T02430B 20P7 CP T SP B length CM T P07 length JAM P9 P4 MS 80ST T03520B 20P7 CP T SP B length CM T P07 length...

Page 191: ...L15 length JAM L15 L4 MS5S 110STE CM04830B 21P 5 CP T SL B length CM T L15 length JAM L15 L4 MS5S 110STE TL04830B 21P5 CP T SL B length CM T L15 length JAM L15 L4 MS 130ST T06025B 21P5 CP T SL B leng...

Page 192: ...5GB 22P3 CP T SL B length CM T L15 length JAM L15 L4 MS 130STE TL15015GB 22P3 F CP T SL B length CM T L15 length JAM L15 L4 MS 130STE T07730B 22P4 CP T SL B length CM T L15 length JAM L15 L4 MS 130STE...

Page 193: ...ength JAM L15 XL4 MS 130ST TL10030B Z 43P0 CP T SL B length CM T L15 length JAM L15 L4 MS5G 180STE TL28015B 44P4 DS5E C F 45P5 PTA CP T SL B length CM T XL6 0 length JAM L15 XL4 MS5G 180STE TL35015B 4...

Page 194: ...We chat ID WUXI XINJE ELECTRIC CO LTD 4th Floor Building 7 Originality Industry park Liyuan Development Zone Wuxi City Jiangsu Province 214072 Tel 510 85134136 Fax 510 85111290...

Reviews: