8.3 Communication protocol
When communicating in a MODBUS network, this protocol determines that each controller needs
to know their device address, identify messages sent by address, and decide what actions to take. If a
response is needed, the controller generates the feedback and sends it out using Modbus protocol. In
other networks, messages containing Modbus protocol are converted to frame or packet structure which
can be used in this network. This conversion also extends the method of solving node address, routing
path and error detection according to specific network.
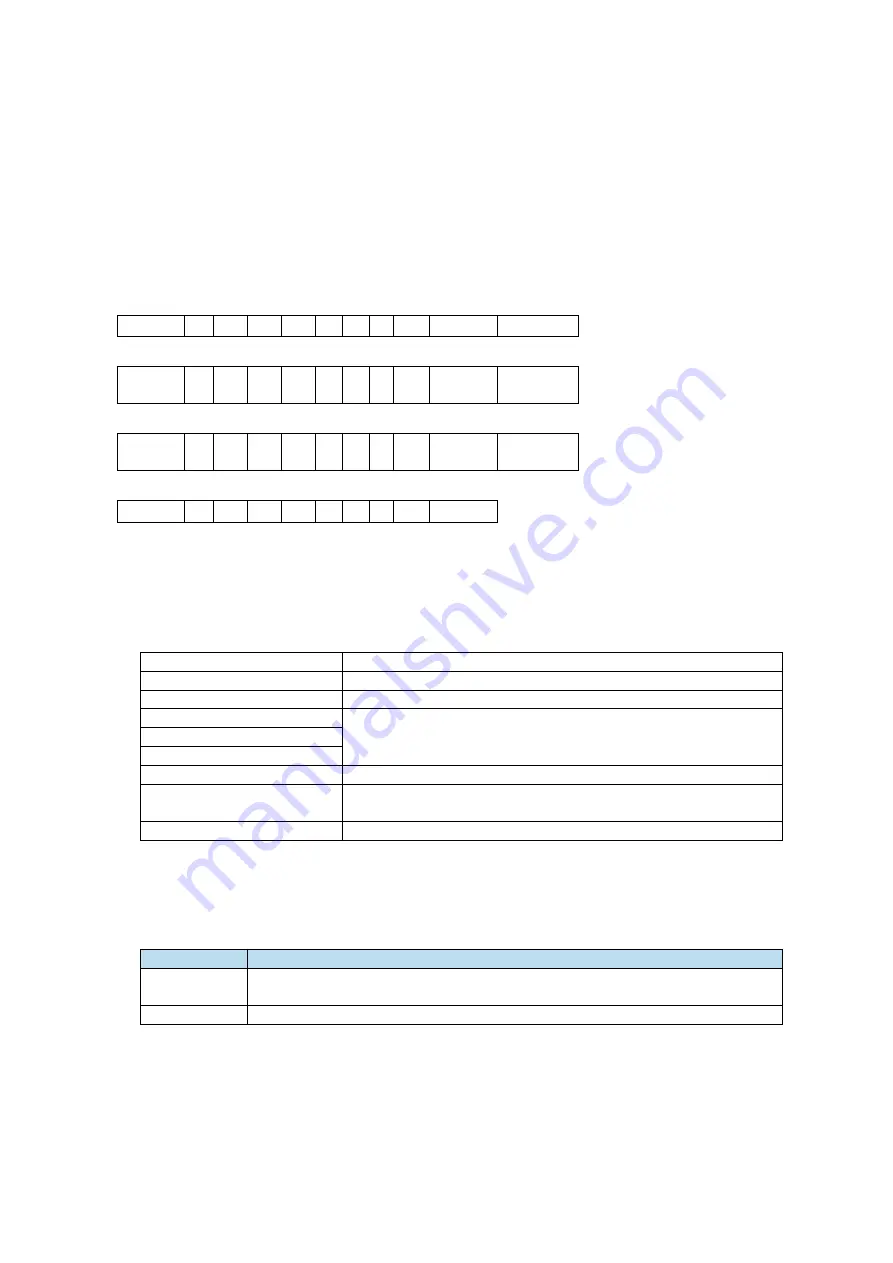
8.3.1 Character structure
(1
-
8
-
2 format, no parity)
Start bit
0
1
2
3
4
5 6
7
Stop bit
Stop bit
(1
-
8
-
1 format, odd parity)
Start bit
0
1
2
3
4
5 6
7
Odd
parity
Stop bit
(1
-
8
-
1 format, even parity)
Start bit
0
1
2
3
4
5 6
7
Even
parity
Stop bit
(1
-
8
-
1 format, no parity)
Start bit
0
1
2
3
4
5 6
7
Stop bit
The default data format of servo driver is: 1-bit start bit, 8-bit data bit, 1-bit stop bit.
8.3.2 Communication data structure
1. RTU mode:
START
Keep no input signal greater than or equal to 10ms
Address
Communication address: 8-bit binary address
Function
Function code: 8-bit binary address
DATA (n – 1)
Data content:
N*8-bit data, N<=8, max 8 bytes
……………
DATA 0
CRC CHK Low
CRC parity
CRC CHK High
16-bit CRC parity code consists of two 8-bit binary
combinations
END
Keep no input and output signal greater than or equal to 10ms
2. Communication address:
Modbus address is provided in the manual, and the corresponding table of Modbus address is queried in
Appendix 4.
3. Function code and data:
Function code
Explanation
03H
Read out the contents of registers, read out multiple registers, but not more than
31 at a time, and only read the data in the same group at a time
06H
Write the data to register
Summary of Contents for DS5K Series
Page 1: ...DS5K series servo driver User manual WUXI XINJE ELECTRIC CO LTD Data No SC5 03 20200217 1 1...
Page 2: ......
Page 6: ......
Page 107: ...3 Set the auto tuning interface 4 Click ok to start inertia identification...
Page 114: ...3 set the auto tuning interface 4 click ok to estimate the inertia...
Page 116: ...6 Start auto tuning 7 Wait for the end of the auto tuning...
Page 120: ...with higher rigidity 6 Start auto tune 7 Open the servo enable then click ok...
Page 186: ...Appendix 9 Torque speed characteristic curve...
Page 187: ......
Page 188: ......


