


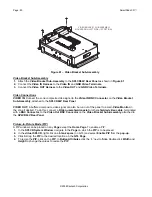


Page: 74
SmartPad LCD
™
© 2008 Xantech Corporation
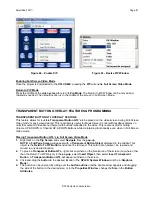
To place one or more of these objects on a
SPLCD Page
:
1.
Right click on a
blank
area of the background (no
GTL
or
PiP
).
2.
Select
Insert MRC88 Object
from the
pop-up
.
3.
Select the
MRC88 Object
:
Horizontal
or
Vertical Volume
,
EQ
or
Balance Bar, Informational
or
Status
Display.
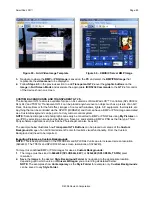
NOTE 1:
Once placed on a
SPLCD Page
, these objects can be
moved
to any desired
location
by clicking
and dragging the
object.
The
object colors
can be
modified
to match the
Style
of the
Background
and
Buttons
by clicking the
Properties Tab,
clicking
Border Color
or
Color
and changing the color selection
in the
pull-down
.
NOTE 2:
The
Horizontal
and
Vertical Bars
can be
resized
for
length
and
width
by clicking the
Properties
Tab
and changing the values under
Size
. The
Status
and
Informational Displays
cannot
be resized.
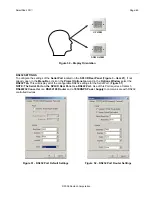
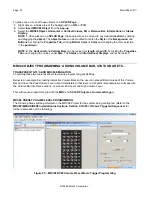
MRC88 OBJECT PROGRAMMING: ADDING VOLUME BAR, STATUS BAR ETC…
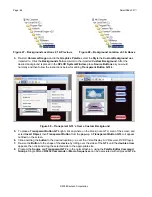
TRANSPARENT GTL’S AND MRC88 EMULATION
Combining these two features allows for unique programming possibilities.
Below is an example for creating Interactive Volume Bars so the user can press different areas of the Volume
Bar and have the Zone Volume Level
jump
immediately to that level. In this particular example we will separate
the Volume Bar into three sections, Low Level, Mid Level and High Volume Level.
This will require programming to
both
the
MRC
and
SPLCD Projects
in
Universal Dragon
.
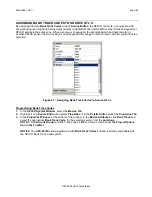
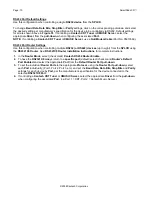
MRC88 PRESET VOLUME LEVEL PROGRAMMING
The following Steps will be performed in the MRC88 Project for the system being configured. (Refer to the
MRC88/MRAUDIO8X8 Installation Instructions
;
Section 5: RC68+ IR Code Triggered Sequencer
for
further explanation of the following):
Figure 55 – MRC88 RC68 Volume Preset Macro Trigger Programming


