


Page: 26
SmartPad LCD
™
© 2008 Xantech Corporation
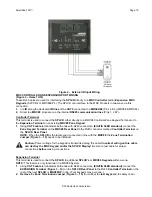
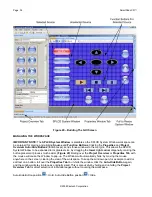
Configuring USB Port
To configure the
USB Port
for the first time, complete the following instructions:
1.
Connect
16V DC
to the
SPLCD
and allow to completely boot.
2.
Start the
PC
and allow to completely boot.
3.
Connect the
USB Cable
from a
USB Port
on the
PC
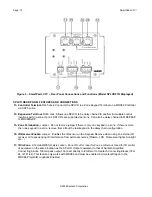
to the
USB Com Port
on the
SPLCD Front Panel
(
Figures 2a, 2b – Item 9
).
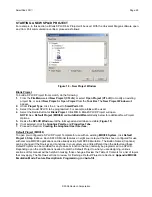
4.
A
Found New Hardware Window
should appear on the
PC
.
5.
Select
“Include this Location”
when Windows® prompts you for where to look for the driver.
6.
Click on
Browse
and navigate to
C:\Program Files\Xantech\Universal Dragon\Drivers.
Click
OK.
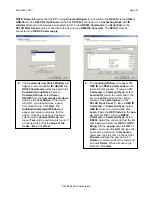
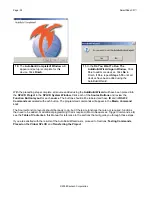
7.
In the Install Hardware Wizard Window, click
Next,
then
Finish
. If the
Install Wizard
appears again, repeat
Steps 4-5
.
8.
Click
OK
. The
PC
should now be able to communicate with the
SPLCD
via
USB
.
Selecting the Proper Com Port
Normally you would use Com Port 1 (USB will usually appear as COM 3 or above), but if it is already in use, it
will be necessary to use a different one. Select the Com Port as follows:
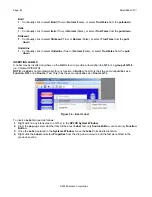
1.
In the
File Menu
click
Global Preferences
or simply press
CTRL+G
on your PC
keyboard.
The
Preferences Window
will appear.
2.
In the
Preferences Window
under
Available Ports
, select the appropriate
Port
from the
pull-down
, then
click
OK
.
VERIFYING COM PORT COMMUNICATION
Who Am I
Before starting a new project or doing any programming, it is highly recommended that a ‘Who Am I’ procedure
be performed to confirm the firmware version of the SPLCD. This will serve two purposes. One, it will confirm
the connection between the PC and the SPLCD that will be required for all programming; and two, it will assure
that the SPLCD is up to date with all of the latest features and fixes.
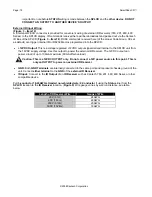
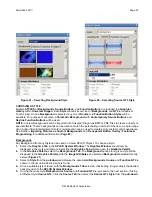
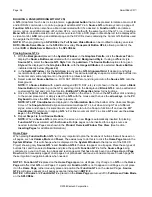
Figure 14 – Who Am I/SPLCD Figure 15 – Firmware Page Link
1.
Connect the included
DB9 Programming Cable
(Xantech P/N 05913778) to a
Serial Port
on the
PC
and
to the
RS232 COM Port
on the
SPLCD Front Panel
or connect the included
USB A-Type to mini USB
plug Cable
to a
USB Port
on the
PC
and to the
USB COM Port
on the
SPLCD Front Panel
.
2.
In the
Base Unit Menu
, select
WhoAmI
, then
SPLCD
. The
Who Am I? Window
will appear with all of the
firmware version information for the
SPLCD
.
3.
In the
Favorites Menu
, select
Xantech Firmware Page
. This will load the
Xantech Firmware Updates
Page
in the web browser.
4.
Compare the firmware version from
Who Am I?
to the version on the
Firmware Updates Page
. If the
version on the
Updates Page
has a
higher
version number, the firmware in the
SPLCD
should be updated
using the steps in the following section. If the firmware numbers are the
same
, click
OK
in the
Who Am I?
Window
and proceed to section:
Starting A New SPLCD Project, (Page 29)
.
NOTE:
If a message is returned stating:
‘Unable to connect to device. Please ensure that your device
is connected.’
this could be due to the following:
1.
The
SPLCD
is not powered
ON
. Check the power state of the unit.
2.
There is a
communication error
between the
PC
and the
SPLCD
. Verify the
DB9
or
USB cable
is
properly connected to the unit and there are
no Com Port conflicts
in your
PC
.


