


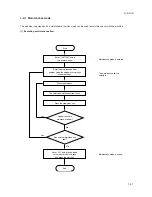


1-3-45
2DA/2DB
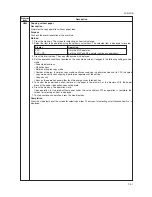
1-3-12 Installing the hard disk (option)
<Procedure>
1. Remove the two screws of the slot for OPT2 which is
on the machine right back, and then remove the
cover.
2. Insert the hard disk in the socket on the printer board
PCB.
3. Refit the cover which is removed with step 1.
4. Turn the power switch on and initialize the hard disk
at the printer menu.
5. Output the printer status report and confirm whether
the hard disk is recognized.
Figure 1-3-90
Hard disk
Socket
Summary of Contents for cd 1116
Page 1: ...Service Manual Copy CD 1116 CD 1120 Rev 1 ...
Page 2: ...Service Manual Copy DC 2116 DC 2120 Rev 1 ...
Page 4: ...This page is intentionally left blank ...
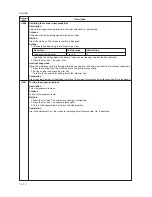
Page 247: ...2DA 2DB 1 2 3 2 Figure 2 3 2 Power source PCB silk screen diagram 220 240 V AC 120 V AC ...
Page 264: ...2DA 2DB 1 2 3 19 Figure 2 3 10 Operation unit PCB silk screen diagram ...


