


10-33
Troubleshooting > Troubleshooting
4
Press [+] or [-] to enter the values read from the chart and press [OK].
Press [+] to increase the value from 0 to 9. To decrease, press [-].
By pressing [-], the value changes from 0 to alphabetic letters, going from A to I. To move in the
reverse direction, press [+].
You cannot use the numeric keys to enter these values.
5
Repeat steps 3 and 4 to enter the registration values for each chart.
6
Press [Start] after all values have been entered. Color registration begins.
7
Press [OK] after color registration is complete.
Tone Curve Adjustment
After prolonged use, or from the effects of surrounding temperature or humidity, the printed output tone may differ from
the original. Perform this function to ensure consistency with the original tone. Before executing Tone Curve Adjustment,
execute calibration (see page 10-34). If calibration does not improve the tones, perform Tone Curve Adjustment.
A total of 3 pattern pages (No. 1 to 3) are printed during adjustment. The printed patterns are read sequentially during
the adjustment.
1
Display the screen.
1
Press the [
System Menu
] key.
2
Press [ ], [Adjustment/Maintenance], [ ] and then [Next] of "Tone Curve Adjustment".
2
Adjust the tone curve.
1
Press [Start]. A pattern is printed.
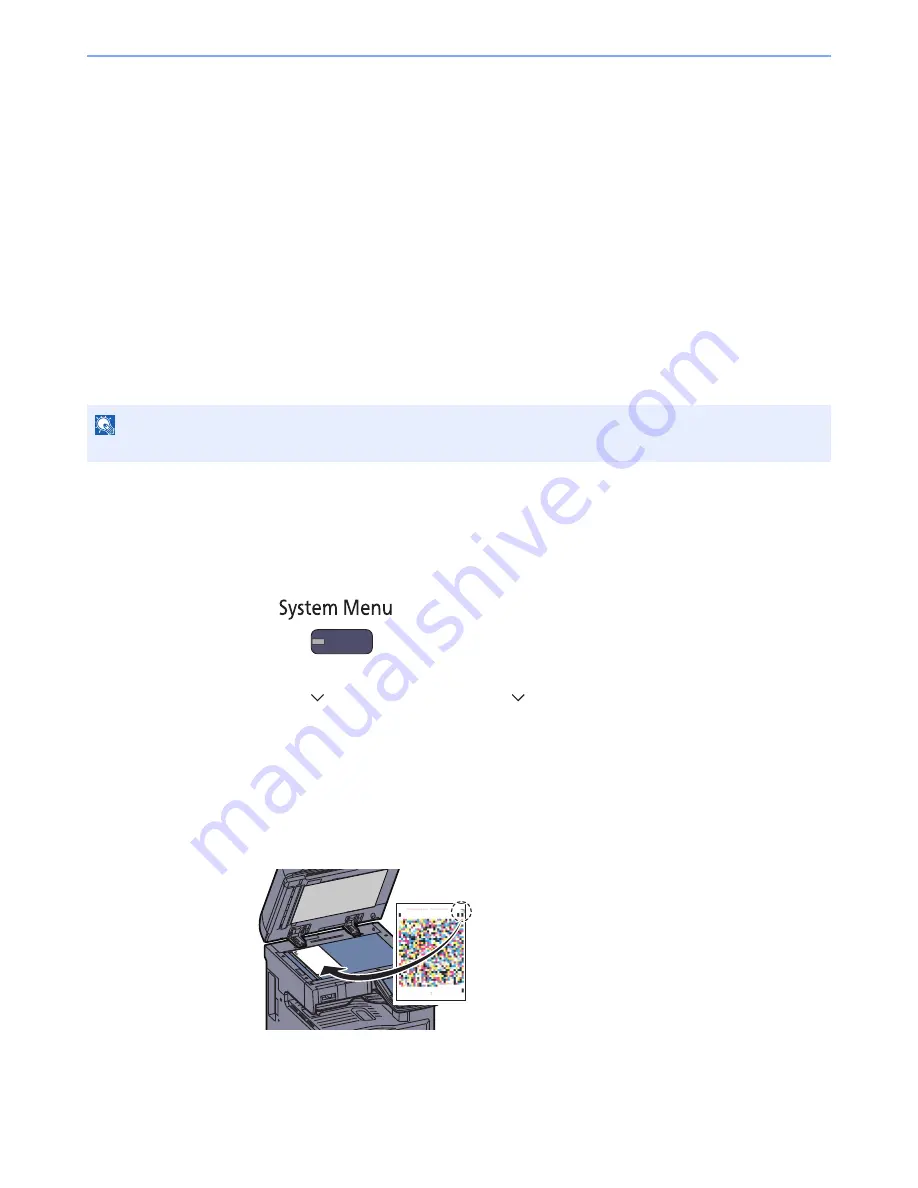
Check that the number "1" is printed at the bottom of the pattern.
2
As shown in the illustration, place the printed side down on the platen with the edge with
the arrows toward the back.
3
Press [Start]. The pattern is read and adjustment begins.
The second pattern is output.
NOTE
To perform tone curve adjustment, verify that either Letter or A4 paper is loaded into a cassette.
Summary of Contents for 2500ci
Page 1: ...USER MANUAL 2500ci Copy Print Scan Fax A3 DIGITAL MULTIFUNCTIONAL COLOUR SYSTEM ...
Page 17: ...xvi About the Operation Guide this Guide ...
Page 24: ...xxiii ...
Page 44: ...xliii Menu Map ...
Page 112: ...2 54 Installing and Setting up the Machine Transferring data from our other products ...
Page 162: ...3 50 Preparation before Use Registering Destinations in the Address Book ...
Page 174: ...4 12 Printing from PC Printing Data Saved on the Printer ...
Page 318: ...6 72 Using Various Functions Functions ...
Page 440: ...10 4 Troubleshooting Regular Maintenance DP 772 1 2 3 4 ...
Page 441: ...10 5 Troubleshooting Regular Maintenance DP 773 1 2 ...
Page 443: ...10 7 Troubleshooting Regular Maintenance 3 4 5 6 ...
Page 474: ...10 38 Troubleshooting Troubleshooting Cassette 2 1 2 ...
Page 476: ...10 40 Troubleshooting Troubleshooting Large Capacity Feeder 1 500 sheet x 2 1 2 3 B1 B2 ...
Page 477: ...10 41 Troubleshooting Troubleshooting Multi Purpose Tray 1 2 3 4 ...
Page 478: ...10 42 Troubleshooting Troubleshooting Duplex unit 1 2 ...
Page 479: ...10 43 Troubleshooting Troubleshooting Inner Tray Fixing unit 1 2 3 ...
Page 483: ...10 47 Troubleshooting Troubleshooting Job Separator 1 2 3 Bridge Unit Option 1 2 ...
Page 484: ...10 48 Troubleshooting Troubleshooting 1 000 Sheet Finisher Option 1 2 3 D1 D2 2 1 D3 ...
Page 485: ...10 49 Troubleshooting Troubleshooting Clearing a Staple Jam 1 2 3 2 1 CLICK ...
Page 486: ...10 50 Troubleshooting Troubleshooting ...
Page 518: ...11 32 Appendix Glossary ...
Page 527: ...Index 9 ...
Page 528: ...Index 10 ...
Page 529: ......