background image

37

DESTINATION SEARCH

D

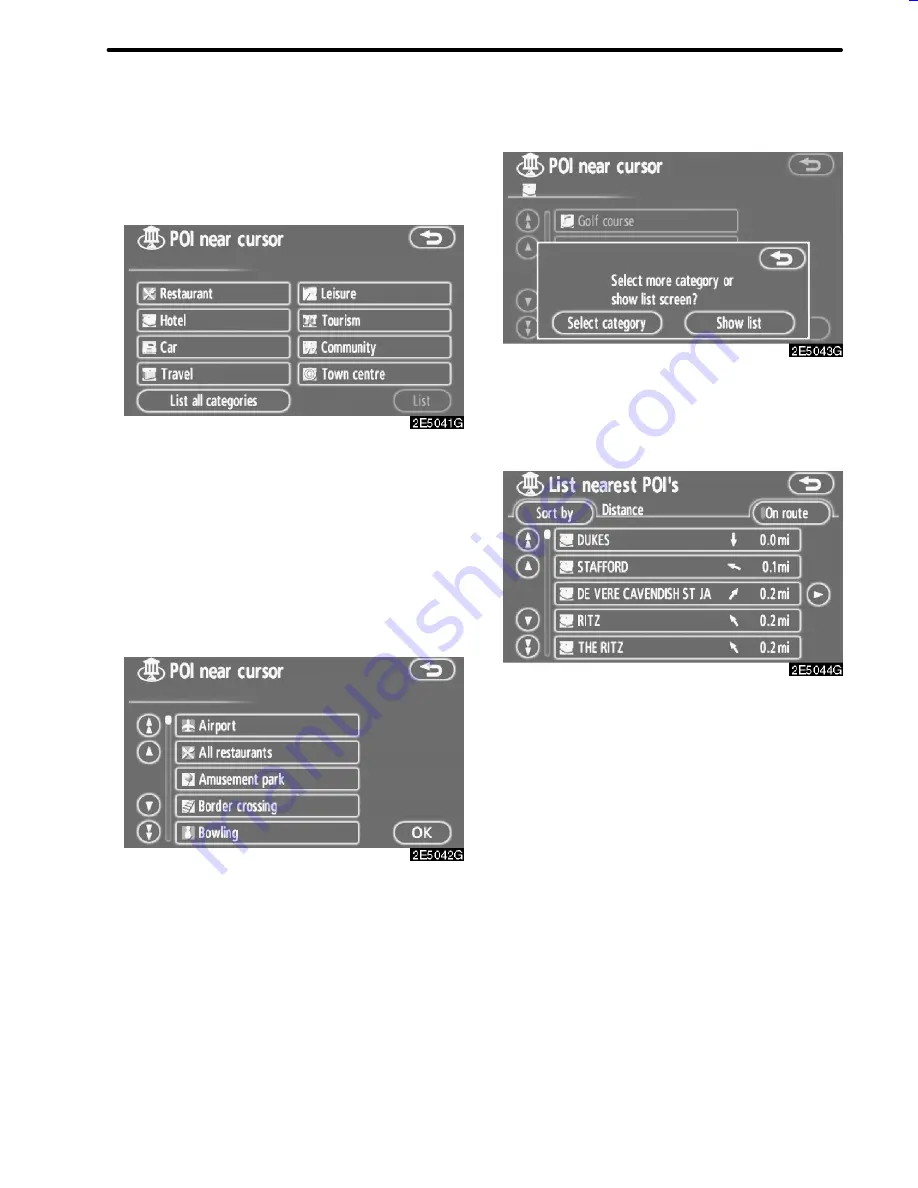
To search POIs near the search point

When the search point is set, the “POI near

cursor” screen will be displayed.

Select the desired POI categories.
“List”:

If the desired POI categories have al-

ready been selected, a list of POI will be dis-

played from among the selected categories.
The selected category icon appears on the

top left of the screen.
If the desired POI category is not on the

screen, touch

“List all categories”

to list all

POI categories.

Select the desired POI categories from

the list and touch “OK”.

The selected category icon appears on the

top left of the screen.

“Select category”:

To return to the POI

category selection screen.

“Show list”:

To display the list of POIs in the

selected categories.

By touching the button of the desired item,

the screen changes and displays the map

location of the selected destination and the

route preference. (See “Starting route guid-

ance” on page 42.)
The direction arrows of POIs are displayed

only when the current position is set as the

search point.

“On route”:

When the indicator is illumi-

nated by touching this button, the list of the

items searched along the route is displayed.

05CY_AVENSIS LCA AVN_EE

(L/O 0703)

Finish

Summary of Contents for TNS 700

Page 1: ...TNS700 Owner s manual ...

Page 2: ...in an efficientmanner Map database is made based on AISIN AW maps whose information source comes from NAVTEQmaps The calculated routes may not be the shortest nor the least traffic congested Your own personal local knowl edge or short cut may at times be faster than the calculated routes The navigation system s database includes about 40 Point of Interest categories to allow you to easily select d...

Page 3: ...tellite con dition road configuration vehicle condition or other circumstan ces For more information on the limitations of the system refer to pages 152 through 154 Order map update direct from www toyota mapupdates eu E 2007 TOYOTA MOTOR CORPORATION All rights reserved This material may not be reproduced or copied in whole or in part without the written permission of Toyota Motor Corpora tion ...

Page 4: ...hing the destination and if used properly can do so The driver is solely responsible for the safe operation of your vehicle and the safety of your passengers Do not use any feature of this system to the extent it becomes a distraction and prevents safe driving The first priority while driving should always be the safe operation of the vehicle While driving be sure to observe all traffic regulation...

Page 5: ...ne the current vehicle position correctly there is a possibility of incorrect late or non voice guidance The data in the system may occasionally be incomplete Road conditions including driv ing restrictions no left turns street closures etc frequently change Therefore before following any instruction from the system look to see whether the instruction can be done safely and legally This system can...

Page 6: ...formation before operationñ Display operation 2 Initial screen 2 Touch screen operation 4 Inputting letters and numbers List screen operation 5 Function help 8 Map screen operation 9 Current position display 9 Screen scroll operation 10 Switching the screens 14 Map scale 17 Orientation of the map 17 Example of navigation system operation 18 Guiding the route 18 Registering home 20 ...

Page 7: ...section 39 Destination search by Motorway ent exit 40 Destination search by Coordinates 41 Destination search by Phone no 42 Starting route guidance 42 III Route Guidance Route guidance screen 48 Typical voice guidance prompts 51 Distance and time to destination 53 Setting and deleting destination 54 Adding destinations 54 Reordering destinations 55 Deleting destinations 56 Setting route 57 Search...

Page 8: ...s 78 Registering home 79 Deleting home 79 Registering area to avoid 80 Editing area to avoid 81 Deleting area to avoid 83 Deleting previous points 84 Setup 84 RDS TMC 94 V Other Functions Maintenance information 104 Maintenance information setting 104 Dealer setting 106 Calendar with memo 108 Adding a memo 109 Editing a memo 110 Memo list 111 Screen adjustment 112 Screen setting 113 Beep setting 1...

Page 9: ... Using your audio system 121 Some basics 121 Radio operation 126 CD player operation 130 Audio remote controls 142 Audio system operating hints 143 VII Appendix Limitations of the navigation system 152 Map database information and updates 155 ...

Page 10: ...ix ...

Page 11: ...g the traffic information RDS TMC 94 Searching destination Page Searching the destination by home POI phone no etc 24 Changing the country 24 Operating the map location of the selected destination 42 hRoute guidancei Before starting route guidance Page Setting the destination 42 Viewing alternative routes 42 Starting route guidance 42 Before starting or during route guidance Page Viewing the route...

Page 12: ...ing route guidance volume 69 Deleting the destination 54 Displaying the entire route map 63 hUseful functionsi Memory points Page Registering memory points 73 Marking icons on the map 72 Information Page Displaying vehicle maintenance 104 Displaying the calendar 108 ...

Page 13: ...e crosses a borderline the na tional flag of that country is displayed 4 INFO button Push this button to display the Information screen 2 104 108 112 113 116 5 Zoom out switch Touch this switch to reduce the map scale 17 6 OPEN button When changing the Map DVD ROM push this button to open the display 132 156 7 Mark switch Touch this switch to register the cursor posi tion as a memory point 11 8 Ro...

Page 14: ...switch Touch this switchto changethe screenmode 14 14 MAP VOICE button Push this button to repeat a voice guidance cancel one touch scroll start guidance and display the current position 10 52 15 DEST button Push this button to display the Destination screen xiv 24 16 MENU button Push this button to display the Menu screen xvi 68 69 72 84 94 157 17 Distance and time to destination Displays the dis...

Page 15: ...e selected from any of the last 100 previously set destinations and from the previous starting point 38 5 Memory The location can be selected from the regis tered Memory points To register memory points see Registering memory points on page 73 38 6 Map A destination can be selected simply by touching the location on the displayed map 39 7 Intersection The names of two intersecting streets can be e...

Page 16: ...rectly To use this function it is necessary to set the Quick ac cess for each memory point To register a Quick Access see Editing memory points on page 74 26 12 Home touch screen button A personal home address can be selected without entering the address each time To use this function it is necessary to set Home for the memory point To register Home see Registering home on page 79 26 13 Phone no A...

Page 17: ... Map DVD Displays information regarding the disc ver sion or covered area 157 5 Select user Up to 3 different settings for different users can be memorized 70 6 Setup Enables various settings of the navigation system xvii 84 7 Memory Enables changes to Memory points Home and Areas to avoid Enables dele tion of the previous point 72 8 RDS TMC You can set traffic information 94 Menu screen ...

Page 18: ...oard layout Key layout can be changed 86 4 Time zone The desired time zone can be selected 87 5 function The choice whether to display each touch screen button and current street name on the map screen can be set 88 6 Display POI icons A selection of 6 icons displayed on the Dis play POI Icons top screen is possible 88 7 3D landmark Selection of either On or Off to display the 3D landmark is possi...

Page 19: ...tic voice guidance can be set 91 11 Pop up message Selection of either On or Off to display the pop up message is possible 91 12 Calibration Adjustment of the current vehicle position mark can be done manually or mis calcula tion by changing tyre will be adjusted 92 13 Default This touch screen button initializes all of the settings 84 14 Function help for the Setup screen can be viewed 8 ...

Page 20: ...ouch screen operation 4 D Inputting letters and numbers List screen operation 5 D Function help 8 D Map screen operation 9 Current position display 9 Screen scroll operation 10 Switching the screens 14 Map scale 17 Orientation of the map 17 D Example of navigation system operation 18 Guiding the route 18 Registering home 20 ...

Page 21: ...ur hand while the display is moving Otherwise you could be injured NOTICE Do not obstruct the display while it is moving It could damage your naviga tion system INFORMATION Under extremely cold conditions the display may react slowly or operation sound may become louder When the ignition switch is set at ACC or ON the initial screen will be displayed and the system will begin operating CAUTION Whe...

Page 22: ...Language is touched Then select a lan guage See Selecting a language on page 116 D Maintenance information This system informs about when to replace certainpartsorcomponentsandshowsdeal er information if registered on the screen When the vehicle reaches a previously set driving distance or date specified for a scheduled maintenance check the Infor mation screen will be displayed when the navigatio...

Page 23: ...screen To prevent damage to the screen lightly touch buttons on the screen with the fin ger When a button on the screen is touched a beep sounds Do not use objects other than your finger to touch the screen INFORMATION D If the system does not respond to a touch on a touch screen button move the finger away from the screen and then touch it again D Dimmed touch screen buttons can not be operated D...

Page 24: ...86 D To input letters To display the alphabet keys touch A Z or Enter letters by touching the alphabet keys directly Touchingthisbuttonerasesonelet ter By holding this button letters will continue to be erase On certain letterentry screens letters can be entered in upper or lower case To enter in lower case To enter in upper case Inputting letters and numbers List screen operation ...

Page 25: ... be erased Touching this button displays other symbols D To display the list To search for an address or a name touch List Matching items from the database are listed even if the entered address or name is incomplete If the number of matches is four or less the list is displayed without touching List INFORMATION The number of matching items is shown to the right side of the screen If the number of...

Page 26: ...splay Touch to scroll to the end of the name Touch to scroll to the beginning of the name D Sorting The order of a list displayed on the screen can be rearranged TYPE A 1 Touch Sort by 2 Select the desired sorting criteria Sorting criteria are as follows Distance To sort in the order of distance from your current location Date To sort in the order of the date Category To sort in the order of the c...

Page 27: ... current vehicle position up to the destination is displayed to the right of the name Name sort To sort in alphabetical order by name Explanations for the functions of the Des tination Setup and Menu screens can be viewed Touch To view the previous page To view the next page To return to the previous screen Function help ...

Page 28: ... screen by pushing the MAP VOICE but ton While driving the current vehicle position mark is fixed on the screen and the map moves The current position is automatically set as the vehicle receives signals from the GPS Global Positioning System If the current position is not correct it is automatically cor rected after the vehicle receives signals from the GPS INFORMATION D After battery disconnecti...

Page 29: ...ction is activated The current vehicle position mark will continue to move along your actual route and may move off the screen When the MAP VOICE button is pushed the current vehicle position mark re turns to the centre of the screen and the map moves as the vehicle proceeds along the designated route INFORMATION When the one touch scroll feature is used the current vehicle position mark may disap...

Page 30: ...h Mark When you touch Mark the following screen appears for a few seconds and then the map screen returns The registered point is shown by on the map To change the icon or name etc see Editing memory points on page 74 Up to 106 memory points can be registered If there is an attempt to register more than 106 a message appears for confirmation ...

Page 31: ...about an icon set the cursor on it POI INFORMATION When the cursor is set on a POI icon the name and Info are displayed on the top of the screen Touch Info Information such as the name address position and phone number are displayed If Enter is touched the position of the cursor is set as a destination ...

Page 32: ...s on page 60 MEMORY POINT INFORMATION When the cursor is set on a memory point icon the name and Info are displayed on the top of the screen Touch Info Information such as the name address position and phone number are displayed If Enter is touched the position of the cursor is set as a destination If there is already a set destination Add to and Replace are displayed Add to To add a destination R...

Page 33: ...creen Touch Info Information such as the name address position and phone number are displayed To delete a destination touch Delete Any one of the screen configurations can be selected 1 Touch this button to display the fol lowing screen 2 To select the desired screen configu ration touch one of the following but tons Switching the screens ...

Page 34: ...screen See page 16 To display the turn list screen See page 50 To display the arrow screen See page 50 To display the motorway information screen See page 48 To display the intersection guidance screen and the guidance screen on the motorway See page 49 D Screen configurations SINGLE MAP This is a regular map screen While on a different screen touching will display the single map screen The screen...

Page 35: ...K when you complete editing The screen returns to the dual map screen COMPASS MODE Current vehicle position is indicated with a compass not with a map While on a different screen touching will display the compass mode screen Information about the destination and cur rent position as well as a compass is dis played on the screen The destination mark is displayed in the di rection of the destination...

Page 36: ...route to the next destination by touching this button The map scale is displayed under the North up symbol or Heading up symbol at the top left of the screen INFORMATION When the map scale is at the maximum range of 500 km 300 miles is not shown When the map scale is at the minimum range of 50 m 50 yards is not shown North up screen Heading up screen The orientation of the map can be changed from ...

Page 37: ...h on page 24 3 Enter the name of the destination Every touch on a letter key narrows the selection Letters that cannot be selected in the data base are dimmed out When there are four or fewer database items these items are displayed in a list Even if the entered name is incomplete touching List displays the list 4 Select the destination from the dis played list Example of navigation system operati...

Page 38: ...plays recommended routes 6 Touch Guide Route guidance starts Guidance is done by both the screen and voice See Route guidance screen and Typical voice guidance prompts on pages 48 and 51 INFORMATION It is possible to change the route See Starting route guidance on page 42 ...

Page 39: ...NU button 2 Touch Memory 3 Touch Register 4 Touch Address 5 Enter the street name Every touch on a letter key narrows the selection Letters that cannot be selected in the data base are dimmed out When there are four or fewer database items these items are displayed in a list Even if the entered name is incomplete touching List displays the list Registering home ...

Page 40: ...st 7 Enter the house number 8 Touch Enter Registration of home is complete and the Memory points screen is displayed Registered Home information will be displayed The icon quick access name location and phone number can be changed See Editing memory points on page 74 ...

Page 41: ...22 BASIC FUNCTIONS ...

Page 42: ...stination search by Address 27 Destination search by POI 31 Destination search by POI near cursor 35 Destination search by Memory 38 Destination search by Previous 38 Destination search by Map 39 Destination search by Intersection 39 Destination search by Motorway ent exit 40 Destination search by Coordinates 41 Destination search by Phone no 42 D Starting route guidance 42 ...

Page 43: ...nbuttonmay be slow SELECTING THE SEARCH AREA ON THE DESTINATION SCREEN 1 Touch the search area touch screen buttononthe Destination screen todis play a map of the Europe divided into 23 countries For map database information andupdates see Mapdatabaseinformation and updates on page 155 2 Touch the button indicating the coun try to select a search area 3 Touch OK and the Destination screen returns ...

Page 44: ...ee Mapdatabaseinformationand updates on page 155 2 Touch the button indicating the coun try to select a search area 3 Touch OK and the previous screen returns Button Countries A Austria 1 AND Andorra B Belgium CH Switzerland 1 CZ Czech Republic D Germany DK Denmark E Spain 2 F France 3 FIN Finland FL Liechtenstein I Italy 4 IRL Ireland L Luxembourg MC Monaco N Norway NL Netherlands P Portugal PL P...

Page 45: ...to your home if Enter is touched even while driving Touch any of the quick access touch screen buttons on the Destination screen The screen changes and displays the map location of the quick access point and road preference See Starting route guidance on page 42 To use this function it is necessary to set Quick access for each memory point To register Quick access see page 76 INFORMATION Guidance ...

Page 46: ...1 Input the street name 2 Touch the button of the desired street name The screen changes and displays the map location of the selected destination and the road preference See Starting route guid ance on page 42 If the same street exists in more than one town the currentscreen changes to the town list screen Destination search by Address ...

Page 47: ...can be se lected If the same street exists in more than one town the currentscreen changes to the town list screen b Selecting a town to search Touch Town To search by town the following four meth ods are possible 1 Input the town name 2 Select from the nearest 5 towns 3 Input the postal code 4 Select from the last 5 towns INFORMATION D To change the search area touch Search area D To cancel the t...

Page 48: ...creen changes to the screen for inputting a street name After inputting a street name the screen may change to the screen for inputting a house number or a street map SELECTING FROM THE NEAREST 5 TOWNS 1 Touch Nearest 5 towns 2 Touch the button of the desired town name from the displayed list The current screen changes to the screen for inputting a street name After inputting a street name the scr...

Page 49: ...ter inputting a street name the screen may change to the screen for inputting a house number or a street map SELECTING FROM THE LAST 5 TOWNS Touch the button of the desired town name If the navigation has never been used no towns will be displayed on the screen The current screen changes to the screen for inputting a street name After inputting a street name the screen may change to the screen for...

Page 50: ...ng the name of a specific Point of Interest and there are two or more sites with the same name the list screen is dis played Touch the button of the desired destina tion If the same name exists in more than one town a search can be performed more easily with Town and Category See a Se lecting a town to search on page 32 and b Selecting from the categories on page 34 INFORMATION The desired Point o...

Page 51: ...wn name 2 Select from the nearest 5 towns 3 Input the postal code 4 Select from the last 5 towns INFORMATION D To change the search area touch Search area D To cancel the town setting touch Any town INPUTTING THE TOWN NAME 1 Touch Input town name 2 Input the town name 3 Touch the button of the desired town name from the displayed list ...

Page 52: ...OM THE NEAREST 5 TOWNS 1 Touch Nearest 5 towns 2 Touch the button of the desired town name INPUTTING THE POSTAL CODE 1 Touch Input postal code 2 Input the postal code 3 Touch the button of the desired postal code from the displayed list ...

Page 53: ...d on the screen b Selecting from the categories Touch Category If the desired POI category is on the screen touch the name to displaya detailedlistofthe POI category If the desired POI category is not on the screen touch List all categories to list all POI categories When the desired category is touched the POI name list or POI name input screen is displayed ...

Page 54: ...om any destination It is possible to display the names of POIs lo cated within approximately 30 km 20 miles from the selected search point INPUTTING THE TOWN CENTRE 1 Touch Input town centre 2 Input the town centre name 3 Touch the button of the desired city centre name When an arrow facing the desired point is touched themapscrolls inthatdirection Re leasing the finger from the arrow will stop th...

Page 55: ...mapscrolls inthatdirection Re leasing the finger from the arrow will stop the scrolling 2 Touch Enter The search pointis setand the POInearcur sor screen will be displayed SETTING THE SEARCH POINT FROM DESTINATIONS 1 Touch the destination buttons at the bottom of the screen When an arrow facing the desired point is touched themapscrolls inthatdirection Re leasing the finger from the arrow will sto...

Page 56: ... Select the desired POI categories from the list and touch OK The selected category icon appears on the top left of the screen Select category To return to the POI category selection screen Show list To display the list of POIs in the selected categories By touching the button of the desired item the screen changes and displays the map location of the selected destination and the route preference ...

Page 57: ...uid ance on page 42 1 Touch Previous on the Destina tion screen The previous starting point and up to 100 previously set destinations are displayed on the screen 2 Touch the button of the desired des tination The screen changes and displays the map location of the selected destination and the road preference See Starting route guid ance on page 42 INFORMATION The list of previous destinations can ...

Page 58: ...hile driving However the cursor cannot be moved 1 Touch Intersection on the second page of the Destination screen 2 Input the name of the two intersecting streets which are located near the des tination to be set 3 Touch the button of the desired item After inputting the two intersecting streets the screen changes and displays the map location of the selected destination and the road preference Se...

Page 59: ... selected destina tion and the road preference See Starting route guidance on page 42 1 To input a motorway entrance or exit touch Motorway ent exit on the second page of the Destination screen Be sure to use the complete name of the mo torway when entering the destination 2 Select the desired motorway by touching the button 3 Either a motorway Entrance or Exit can be selected Destination search b...

Page 60: ...applicablelistisdisplayed by touching this button and inputting the name 1 Touch Coordinates on the second page of the Destination screen 2 Input the latitude and the longitude 3 When the input is finished touch OK By touching the button of the desired point the screen changes and displays the map location of the selected destination and the road preference See Starting route guid ance on page 42 ...

Page 61: ... the destination the screen changes and displays the maplocation ofthe selected destination and the road prefer ence 1 When an arrow facing the desired point is touched the map scrolls in that direction Releasing the finger from the arrow will stop the scrolling 2 Touch Enter The system starts route search and displays recommended routes If there is already a set destination Add to and Replace are...

Page 62: ...oute forreturning may not be the same as that for going D The route guidance to the destination may not be the shortest route nor a route without traffic congestion D Route guidance may not be available if there is no road data for the speci fied location D When setting the destination on a map with a scale larger than 0 5 miles 1 km the map scale changes to 0 5 miles 500 m automatically Set the d...

Page 63: ...lculated route includes a trip by ferry the route guidance shows a sea route After you travel by ferry the current vehicle position may be incorrect Upon reception of GPS signals it is automatically corrected 3 ROUTES SELECTION 1 To select the desired route from three routes touch 3 routes 2 Touch Quick1 Quick2 or Short to select the desired route Quick1 Recommended route This route is indicated b...

Page 64: ...45 DESTINATION SEARCH 1 Time necessary for the entire trip 2 Distance of the entire trip 3 Toll road 4 Motorway 5 Ferry 6 Car train ...

Page 65: ...46 DESTINATION SEARCH ...

Page 66: ... to destination 53 D Setting and deleting destination 54 Adding destinations 54 Reordering destinations 55 Deleting destinations 56 D Setting route 57 Search condition 57 Detour setting 58 Road preference 59 Starting route from adjacent road 60 D Map view 60 Display POI icons 60 Route overview 63 Route preview 64 Route trace 65 ...

Page 67: ...t be traveled on D When you arrive at your destination the destination name will be dis played on the top of the screen Touching Off clears the display D During motorway driving During motorway driving this screen dis plays the distance to the next junction and exit or POIs in the vicinity of the motorway exit 1 Current position 2 Points of Interest that are close to a motorway exit or exit number...

Page 68: ...sappears and the map screen appears When touching or pushing the MAP VOICE button the guidance screen on mo torway reappears D When approaching an intersection When the vehicle approaches an intersec tion the intersection guidance screen will be displayed 1 Next street name 2 Distance to the intersection 3 Current position 4 Lane guidance The intersection guidance screen dis appears and the map sc...

Page 69: ...t street name or destination na me 2 Turn direction 3 Distance to the next turn 4 Current street name ARROW SCREEN On this screen information about next turns on the guidance route can be viewed Touching during guidance displays the arrow screen 1 Exit number street name containing number or next street name 2 Turn direction 3 Distance to the next turn 4 Current street name ...

Page 70: ...3 Exit coming up INFORMATION Even if the surface street and motorway have a similar configuration voice guidance will be made at the different point Thefollowingguidancewillbenarratedwhen the navigation system recognizes the next action of the vehicle is a U turn 1 In half a mile make a U turn 2 Make a U turn if possible Typical voice guidance prompts ...

Page 71: ... is now fin ished Bern 1 In 1 mile keep right 2 Keep right then keep right towards Bern INFORMATION D Voice guidance may be made early or delayed D If the system cannot determine the current position correctly you may not hear voice guidance or may not see the magnifiedintersection onthe screen D Ifyoudidnot hearthe voice guidance command push the MAP VOICE button to hear it D Toadjustthevoice gui...

Page 72: ...he area that includes IPD roads CAUTION Be sure to obey the traffic regulations and keep the road condition in mind es pecially when you are driving on IPD roads The route guidance may provide wrong information such as the direc tion of a one way street When the vehicle is on the guidance route the distance and the estimated travel arrival time to the destination are displayed When the vehicle is ...

Page 73: ...route the distance measured along the route is displayed Travel time and ar rival time is calculated based on the set vehicle speed information See page 85 However when the vehicle is noton the guidance route the distance is the linear distance between the current position and the destination Adding destinations and searching again for the routes can be done 1 Touch Route 2 Touch Add of Destinatio...

Page 74: ...on but ton Reordered number of arrival is displayed on the right side of the screen Touching Undo will cancel each selected order number from the previously input num ber 4 Afterselectingthe destinations touch OK The system searches for the guidance route again and displays the entire route Even if OK is not touched the entire route is dis played automatically within a few seconds when the order i...

Page 75: ...elete all To delete alldestinations onthe list A message appears to confirmthe requestto delete 4 To delete the destination s touch Yes If Yes is touched the data cannot be re covered If No is touched the previous screen will return 5 If more than one destination is set touch OK afterdeleting the destination s The system searches for the guidance route again and displays the entire route Deleting ...

Page 76: ...he destination 1 Touch Route 2 Touch Search condition 3 Touch Quick Quick1 Quick2 or Short and touch OK The entire route from the starting point to the destination is displayed Guide To start guidance Route To change a route See pages 54 and 57 Setting route Search condition ...

Page 77: ...o select the desired detour distance 1 mile km 3 miles km or 5 miles km Touch one of these buttons to start the detour process After detouring the sys tem returns to the original guidance route Whole route By touching this button the system will calculate an entire new route to the destination Around traffic If you touch this button the system will search for the route based on the traffic congest...

Page 78: ...m miles D The system may not be able to calcu late a detour route depending on the selected distance and surrounding road conditions A number of choices are provided on the conditions which the system uses to deter mine the route to the destination 1 Touch Route 2 Touch Road preference to change the conditions that determine the route to the destination 3 Select the desired road preference by touc...

Page 79: ... not be displayed Points of Interest such as petrol stations and restaurants can be displayed on the map screen You can also set their location as a destination and use them for route guidance 1 Touch Map view 2 Touch Display POI icons to display a particular type of Point ofInterest onthe screen A screen with a limited choice of Points of In terest will be displayed To change the dis played POI s...

Page 80: ...st POI s When searching for the nearest Point of Interest select the de sired category button then touch this button The system will list the points within 30 km 20 miles See page 62 Touch Other POI s on the Display POI icons screen When a Point of Interest category is selected from either the limited list orthe complete list the screen will display symbols of those loca tions on the map screen Se...

Page 81: ...tion screen touch More D To display the local POI list Points of Interest that are within 30 km 20 miles of the current position will be listed from among the selected categories 1 Touch List nearest POI s on the Display POI icons screen 2 Touch the button of the desired Point of Interest The selected Points of Interest are displayed on the map screen On route When the indicator is illumi nated by...

Page 82: ...d on the screen The distance shown is measured as a straight line from the current vehicle position to the POI 2 When the desired Point of Interest overlaps with the cursor touch Enter The screen changes and displays the map location of the selected destination and road preference See Starting route guidance on page 42 1 Touch Map view 2 Touch Route overview The entire route from the current posit...

Page 83: ...that runs through two ormore towns the name change will not appear on the list The street names will be displayed in order from the starting point along with the distance to the next turn These marks indicate the direction in which you should turn at an intersection Touch Map of the Turn list screen The point which you choose is displayed on the map screen 1 Touch Map view 2 Touch Route preview Ro...

Page 84: ...he previous destination or starting point To review the route to the previous destination or starting point in fast forward mode To indicate the previous destination or starting point It is possible to store the traveled route up to 200 km 124 miles and retrace the route on the display INFORMATION This feature is available onthe mapwith more detailed map scale than 50 km 30 miles Touch Map view Ro...

Page 85: ...he route trace Stop To stop recording the route trace If you touch Stop the following screen will be displayed Touching Yes stops recording and the route trace remains displayed on the screen Touching No stops recordingand theroute trace is erased ...

Page 86: ...nd resuming guidance 68 D Volume 69 D User selection 70 D Memory 72 Registering memory points 73 Editing memory points 74 Deleting memory points 78 Registering home 79 Deleting home 79 Registering area to avoid 80 Editing area to avoid 81 Deleting area to avoid 83 Deleting previous points 84 D Setup 84 D RDS TMC 94 ...

Page 87: ...N Without route guidance the Suspend guidance cannot be used The screen will return to the current position map without route guidance D To resume guidance 1 Push the MENU button 2 Touch Resume guidance The screen willchange tothe currentposition map with route guidance Suspending and resuming guidance ...

Page 88: ...re When selected the number or Off will be highlighted 3 Touch OK to confirm your selection INFORMATION During route guidance the voice guid ance continues even if the navigation screen is changed to other screens Adaptive volume control By turning Adaptive volume control on the volume is turned up automatically when the vehicle speed exceeds 80 km h 50 mph To turn the Adaptive volume control syst...

Page 89: ...e D Right screen of dual map D Road preference D Maintenance notification D RDS TMC 1 Push the MENU button 2 Touch Select user D To register 1 Touch Memorise The confirmation screen will be displayed 2 To register touch Yes To return to the previous screen touch No or When a button that is already registered is touched the following screen appears To replace touch Yes To cancel the re placement to...

Page 90: ...ange user Touch User number The above message appears then the map screen will be displayed D To delete user 1 Touch Delete The confirmation screen will be displayed 2 To delete touch Yes Toreturn tothe previous screen touch No or ...

Page 91: ...d 1 Registers memory points See Registering memory points on page 73 2 Edits memory points See Editing memory points on page 74 3 Deletes memory points See Deleting memory points on page 78 4 Registers or deletes home See Registering home on page 79 or Deleting home on page 79 5 Registers areas to avoid See Registering area to avoid on page 80 6 Edits areas to avoid See Editing area to avoid on pa...

Page 92: ...ation search See Destination search on page 24 After memory point registration is completed the Memory points screenwill bedisplayed 3 Touch OK To edit registered information see Edit ing memory points on page 74 INFORMATION Up to 106 memory points can be regis tered Registering memory points ...

Page 93: ...edited Icon To select icons to be displayed on the map See page 75 Quick access To set an attribute Memory points with a set attribute can be used as a Quick access or Home button See page 76 Name To edit memory point names The names can be displayed on the map See page 77 Location To edit location information See page 77 Phone no To edit telephone numbers See page 78 4 Touch OK Editing memory poi...

Page 94: ...ICONS When the vehicle approaches the memory point the selected sound will be heard 1 Touch With sound on the Change icon screen 2 Touch the desired sound icon The next screen appears when Bell with direction is touched Touch either or to adjust the direction Touch Enter The bell sounds only when the vehicle ap proaches this point in the direction that has been set ...

Page 95: ... page 26 and Destination search by Quick access on page 26 1 Touch Quick access on the Memory points screen 2 Touch the desired attribute It is possible to replace a registered attribute 3 To replace the attribute touch Yes To return to the previous screen touch No or INFORMATION One Home and five Quick access can be set DELETING Quick access 1 Touch Delete 2 To delete an attribute touch Yes To re...

Page 96: ...ayed DISPLAYING MEMORY POINT NAMES The name of a memory point that may be dis played on the map can be set To show the name touch On on the Memory points screen To not show it touch Off D To change Location 1 Touch Location on the Memory points screen 2 Touch the eight directional touch screen button to move the cursor to the desired point on the map 3 Touch Enter The previous screen will be displ...

Page 97: ...points screen 2 Enter the number using numeral keys 3 Touch OK The previous screen will be displayed 1 Touch Delete 2 Touch the button to be deleted Del all To delete all memory points in the system 3 To delete the memory point touch Yes To cancel the deletion touch No Deleting memory points ...

Page 98: ... 26 1 Touch Register 2 Enter the location in the same way as for a destination search See Destination search on page 24 When registration of home is completed the Memory points screen will be displayed 3 Touch OK To edit registered information see Edit ing memory points on page 74 1 Touch Delete 2 To delete home touch Yes To can cel the deletion touch No Registering home Deleting home ...

Page 99: ...ed point on the map 4 Touch Enter 5 Touch either or to change the size of the area to be avoided 6 Touch OK INFORMATION D If a destination is input in the area to avoid or the route calculation cannot be made without running through the area to avoid a route passing through the area to be avoided may be shown D Up to 10 locations can be registered as points areas to avoid If there are 10 locations...

Page 100: ...it the name of the area to avoid The names can be displayed on the map See page 82 Location To edit area location See page 82 Area size To edit area size See page 83 Active To turn on or off the area to avoid feature To turn on the feature touch On on the Edit area to avoid screen To turn off the feature touch Off on the Edit area to avoid screen 4 Touch OK Editing area to avoid ...

Page 101: ...NG NAMES OF AREAS TO BE AVOIDED The name of an area to be avoided that may be displayed on the map can be set To show the name touch On on the Edit area to avoid screen To not show it touch Off D To change Location 1 Touch Location on the Edit area to avoid screen 2 Touch the eight directional touch screen button to move the cursor to the desired point on the map 3 Touch Enter The previous screen ...

Page 102: ... either or to change the size of the area to be avoided 3 Touch OK The previous screen will be displayed 1 Touch Delete 2 Touch the button to be deleted Delete all To delete all registered areas to avoid in the system 3 To delete the area touch Yes To cancel the deletion touch No Deleting area to avoid ...

Page 103: ...ous points in the system 3 To delete the point touch Yes To cancel the deletion touch No Setting the items shown on the Setup screen can be done 1 Push the MENU button 2 Touch Setup 3 Touch the items to be set 4 Touch OK on the screen The previous screen will be displayed INFORMATION To reset all setup items touch De fault Deleting previous points Setup ...

Page 104: ...o switch language see Select ing a language on page 116 D Estimated travel time The speed that is used for the calculation of the estimated travel time and the estimated arrival time can be set 1 Touch Setup on the Menu screen 2 Touch Change speed of the Esti mated travel time 3 Touch or to set the average ve hicle speeds for Urban road Country road and Motorway To set the default speeds touch Def...

Page 105: ...dance route D The time shown on the screen may vary greatly depending on progress along the route which may be af fected by conditions such as traffic jams and construction work D It is possible to display upto 99hours 59 minutes D Input keyboard layout Keyboard layout can be changed 1 Touch Setup on the Menu screen 2 Touch ABC QWE or AZE of Keyboard layout to choose the key board layout ...

Page 106: ... changed 1 Touch Setup on the Menu screen 2 Touch Change of Time zone The Change time zone screen will be dis played on the display 3 Touch the desired time zone The selected button is highlighted Daylight saving time Daylight saving time can be set or cancelled To set daylight saving time touch On and to cancel it touch Off 4 Touch OK ...

Page 107: ...ange of function 3 Touch the button to be turned off The button becomes dimmed To set the default touch Default 4 Touch OK D POI category change Display POI icons Select from among the 6 icons displayed on the Display POI icons top screen so that setting of the icons to be displayed on the map screen can be done easily 1 Touch Setup on the Menu screen Then touch to display page 2 of the Set up scr...

Page 108: ...POI icons top screen 5 Touch OK D 3D landmark When the 3D landmark feature is turned on the system will display the 3D landmark on the map To turn the 3D landmark mode on 1 Touch Setup on the Menu screen Then touch to display page 2 of the Set up screen 2 Touch On of 3D landmark The selected button is highlighted 3 Touch OK ...

Page 109: ...fication The selected button is highlighted 3 Touch OK D Voice guide in all modes When the Voice guide in all modes feature is turned on the voice guide in all modes can be heard When the Voice guide in all modes feature is turned off the voice guide cannot be heard when using the audio system To turn the Voice guide in all modes on 1 Touch Setup on the Menu screen Then touch twice to display page...

Page 110: ...utomatic voice guidance mode on 1 Touch Setup on the Menu screen Then touch twice to display page 3 of the Setup screen 2 Touch On of Automatic voice guid ance The selected button is highlighted 3 Touch OK D Pop up message When the Pop up message is turned on the pop up message will be displayed To turn the Pop up message on 1 Touch Setup on the Menu screen Then touch twice to display page 3 of th...

Page 111: ...reen mode D Current position tyre change calibra tion The current vehicle position mark can be ad justed manually Miscalculation of the dis tance caused by tyre replacement can also be adjusted 1 Touch Setup on the Menu screen Then touch twice to display page 3 of the Setup screen 2 Touch Adjust of Calibration 3 Touch the desired button INFORMATION For additional information on the accu racy of a ...

Page 112: ...tion is poor due to loca tion you can manually adjust the current ve hicle position mark 1 Touch Position Direction 2 Touch the eight directional touch screen button to move the cursor to the desired point on the map 3 Touch Enter 4 Touch either the or to adjust the direction of the current vehicle posi tion mark 5 Touch Enter The map screen will be displayed ...

Page 113: ...correctly displayed To perform a distance calibration proce dure touch Tyre change on the Cal ibration screen The message appears and the quick dis tance calibration is automatically started A few seconds later a map screen will be dis played This system has a function by which you can receive the traffic information from the RDS TMC station based on FM multiple broad casting It assists the driver...

Page 114: ...CED FUNCTIONS a Show RDS TMC information 1 Push the MENU button to display the Menu screen and touch the RDS TMC 2 Touch Show RDS TMC info 3 Touch All on or All off and OK On map screen On Motor way mode screen ...

Page 115: ...tor comes on when TMC informa tion is received When regulatory information is received the indicator becomes a touch button Receiving Receiving regulatory information Receive regulatory information per taining to the route touch switch b Auto avoid traffic Using RDS TMC information the system automatically calculates a new route When the system calculates a new route a confirmation to accept the n...

Page 116: ...nce d Change area The system automatically changes the area according to the current vehicle position It is also possible to manually select a country as a search area 1 Push the MENU button to display the Menu screen and touch RDS TMC 2 Touch Manual to display a map of Europe divided into specific areas To select the search area touch the corre sponding country touch screen button and then OK The...

Page 117: ... touch RDS TMC 2 Touch Manual to display RDS TMC Radio station screen To select the station touch the correspond ing station touch screen button The screen returns to the previous screen to display the selected station f RDS TMC text information When you touch the RDS TMC icon on the map RDS TMC info bar appears on the top of the screen 1 Touch Info on the bar to display the Traffic information sc...

Page 118: ...e displayedon the top of the screen g Traffic on route 1 Push the MENU button to display the Menu screen and touch RDS TMC 2 Touch Traffic on route to display the Traffic on route screen Guidance route traffic information is dis played on the screen Touch Map or Detail See f RDS TMC text information on page 98 ...

Page 119: ... the All traffic events screen 3 Touch the desired road name from the list D When the system receives RDS TMC info from two or more countries the screen below appears Touch the country name from the list D When the system receives RDS TMC information from U K the screen be low appears To select road type touch the corre sponding touch screen button ...

Page 120: ...ADVANCED FUNCTIONS 4 All traffic information which the sys tem can receive from RDS TMC station is displayed regardless of the guidance route 5 Touch Map or Detail See f RDS TMC text information on page 98 ...

Page 121: ...102 ADVANCED FUNCTIONS ...

Page 122: ...Maintenance information 104 Maintenance information setting 104 Dealer setting 106 D Calendar with memo 108 Adding a memo 109 Editing a memo 110 Memo list 111 D Screen adjustment 112 D Screen setting 113 D Beep setting 116 D Selecting a language 116 ...

Page 123: ...ll conditions which have been inputted Reset all To reset the item which has sat isfied a condition Set dealer To register or edit dealer infor mation See Dealer setting on page 106 If On is selected the system gives mainte nance information with the Information screen and voice sound when the system is turned on See page 3 If Off is selected the Information screen is disabled When the vehicle nee...

Page 124: ...can be created separately from provided ones 4 Input the conditions Notice of Date The next maintenance date can be input Notice of Distance The driving distance until the next maintenance check can be in put Delete To cancel the date and distance conditions Reset To reset the date and distance con ditions 5 Touch OK The screen then returns to the Mainte nance screen INFORMATION D For scheduled ma...

Page 125: ...Destination search on page 24 When Set dealer registration is finished the edit dealer screen will be displayed 3 Touch the button to be edited Dealer To enter the name of a dealer See page 107 Contact To enter the name of a dealer member See page 107 Location To set a location See page 107 Phone no To set a telephone number See page 108 Delete dealer To delete the dealer infor mation displayed on...

Page 126: ...ng the alphanumer ic keys Up to 24 letters can be entered 3 Touch OK The previous screen will be displayed D To edit Location 1 Touch Location on the Set dealer screen 2 Touch the eight directional touch screen button to move the cursor to the desired point on the map 3 Touch Enter The previous screen will be displayed ...

Page 127: ...s turned on See page 4 Memos can also be used for route guidance if the memo has beenregistered withlocation information 1 Push the INFO button 2 Touch Calendar On this screen the currentdate ishighlighted in yellow or To change month or To change year Today To display the current month cal endar if another month will be displayed List To display the list of registered me mos See Memo list on page...

Page 128: ...nge the colour of the date To default the date colour touch Delete on the Date colour screen Prev day To go to the Memo screen of the previous date Today To go to the Memo screen for the current day Next day To go to the Memo screen of the next date If a memo is added the system informs of the memo entry when the system is started on the memo date See page 4 1 Touch the date you want to add a memo...

Page 129: ...me way as searching a destination See Destination search on page 24 The registered memo can be edited 1 Touch the day you want to edit a memo on the Calendar screen 2 Touch the memo to be edited 3 Touch the item to be edited Memo To edit a memo See Adding a memo on page 109 Location To change a registered loca tion See Addinga memo on page109 Enter To set the registered location as a destination S...

Page 130: ...nth To display the list of memos for the current month Future To display a list of future memos Past To display the list of past memos All To display the list of all memos Period To display the list of memos for a specified period See page 112 3 To delete and or edit the memo touch the desired memo button Del all To delete all the displayed me mos A message will be displayed 4 To delete touch Yes ...

Page 131: ...surroundings You can also turn the dis play off To display the Display screen push the DISPLAY button Contrast and brightness adjustment Contrast Strengthens the contrast of the screen Contrast Weakens thecontrast ofthe screen Brightness Brightens the screen Brightness Darkens the screen After adjusting the screen touch OK The screen goes off when Screen off is touched To turn the display screen b...

Page 132: ... even with the headlight switch on touch Day mode on the adjustment screen for bright ness and contrast control If the screen is set in the day mode with the headlight switch turned to on this condition is memorized in the system even with the en gine turned off 1 Push the INFO button to display the Information screen 2 Touch Screen setting Screen setting ...

Page 133: ...een fromthe audio screen Select On or Off andthen touch OK On The navigation screen automatically returns from the audio screen 20 seconds af ter the end of audio screen operation Off The audio screen remains on b Switch colour You can select the colour of the touch screen buttons Select Green or Orange and then touch OK ...

Page 134: ...D Maintenance information off setting D Memory points D Areas to avoid D Previous points D Route trace D User selection settings This function is available only when the ve hicle is not moving 1 Touch Delete personal data The Delete personal data screen appears 2 Touch Delete The Confirmation for deleting all personal data screen appears 3 Touch Yes ...

Page 135: ...nguage of the touch screen buttons pop up messages and the voice guidance can be changed 1 Push the INFO button 2 Touch Language On this screen you can select the language shown on the screen 3 Touch the desired button on the screen GB English D German F French I Italian NL Dutch E Spanish S Swedish DK Danish N Norwegian P Portuguese Beep setting Selecting a language ...

Page 136: ...en If a screen other than for the navigation sys tem is displayed the current screen would change to the CAUTION screen by pushing the MAP VOICE DEST or MENU but ton When you touch the language button on the CAUTION screen the Select language screen returns ...

Page 137: ...118 OTHER FUNCTIONS ...

Page 138: ... VI 119 AUDIO SYSTEM AUDIO SYSTEM D Quick reference 120 D Using your audio system 121 Some basics 121 Radio operation 126 CD player operation 130 D Audio remote controls 142 D Audio system operating hints 143 ...

Page 139: ...r details see pages 122 and 126 4 FM button Push this button to choose an FM sta tion For details see pages 122 and 126 5 DISC button Push this button to turn the CD player on Fordetails see pages 122 and 133 6 TA button Push this button to seek a station that broadcasts traffic information regularly For details see page 127 7 OPEN button Push this button to insert or eject a disc For details see ...

Page 140: ...and off and turn it to adjust the volu me For details see page 122 This section describes some ofthe basicfea tures on Toyota audio systems Some infor mation may not pertain to your system Your audio system works when the ignition switch is set at ACC or ON NOTICE To prevent the battery from being dis charged do not leave the audio system on longer than necessary when the en gine is not running Us...

Page 141: ... tomatic return to the previous screen from the audio screen See a Automatic transi tion on page 114 for details D Switching between functions Push AM FM or DISC button to turn on the desired mode The selected mode turns on immediately Push these buttons if you wantto switch from one mode to another If the disc is not set the CD does not dis play If the audio system was previously off then the ent...

Page 142: ...d Touch them lightly and directly on the screen The selected button is highlighted INFORMATION D If the system does not respond to a touch of a touch screen button move your finger away from the screen and then touch it again D You cannot operate dimmed touch screen buttons D Wipe off fingerprints on the surface of the display using a glass cleaning cloth ...

Page 143: ...n mind that if you are listening to a ste reo recording or broadcast changing the right left balance will increase the volume of one group of sounds while decreasing the volume of another 1 Touching SOUND displays the sound adjustment screen 2 Touch the desired button TREB or Adjusts high pitched tones MID or Adjusts mid pitched tones BASS or Adjusts low pitched tones FRONT or REAR Adjusts sound b...

Page 144: ... on the screen To turn off the system touch the OFF switch Equalizer system EQ The equalizersystemconsistsofthreediffer ent preset equalizer modes You can select from COMPACT SUV or SEDAN de pending on your vehicle body type To turn off the system touch the OFF switch D Your CD player When you insert a disc insert it with the label side up The CD player will play from track 1 through to the end of...

Page 145: ...from creating noise If the signal becomes extremely weak the radio switches from stereo to mono reception In this case ST disappears from the screen D Presetting a station 1 Tune in the desired station 2 Touch one of the channel selector but tons 1 6 you want and hold it until a beep is heard This sets the station to the touch screen but ton and the frequency appears on the touch screen button Eac...

Page 146: ...omatically stored in FM3 For example even if you autostore in FM1 the mode will change to FM3 If the radio cannot seek out any stations it will receive the frequency before you oper ated AST D RDS Radio Data System AF Alternative Frequency function A station providing good reception is auto matically selected if current reception wors ens Each touch of AF changes as in the fol lowing AF ON REG OFF...

Page 147: ...A Traffic Announce ment mode the radio will be switched to the traffic information program automatically by using the EON AF list After the traffic infor mation ends the radio will return to the initial program automatically One beep will sound to tell you when this feature starts and ends operation When listening to a disc With the TA button pushed in the CD mode a station broadcasting traffic in...

Page 148: ...r is playin g If the radio tunes to a related network sta tion for an alarm announcement it will return to the original station when the announce ment is finished If the CD player is playing play will stop for the announcement and re sume when the announcement is finished When TA is received next time the system compares the volume before TA is received and the memorized TAvolume andautomati cally...

Page 149: ...n for the CD player This product is a class I laser product D A laser beam leak may result in hazardous radiation exposure D Do not open the cover of the player or attempt to repair the unit your self Refer servicing to qualified personal D Laser power No hazardous a Inserting or ejecting disc The ignition switch must be set at ACC or ON D Setting a disc 1 Push the OPEN button briefly The display ...

Page 150: ...ly CAUTION D Do not place anything on the opened display as such items may be thrown about and possibly injure people in the vehicle during sudden braking or in an accident D Toreduce the chance ofinjury incase of an accident or sudden stop while driving keep the display closed D Take care not to jam your hand while the display is moving Otherwise you could be injured NOTICE Do not obstruct the di...

Page 151: ...on for the disc briefly At this time the orange indicators of the slot start blinking and the disc is ejected 3 After the blinking indicators stay on remove the disc If you do not remove the disc within 15 sec onds after it is ejected the beep will sound and the operation will be canceled automati cally ...

Page 152: ...disc are al ready loaded in the CD player The CD screen will be displayed c Operating an audio CD D Playing an audio CD Push the AUDIO button to display this screen CD text only The disc title and track title will appear on the screen when pushing the DISC button ...

Page 153: ...desired track number The CD player will start playing the selected track from the beginning By touching this button the list moves up by 6 track groups If this button is touched when the top page of the list is displayed the last page is displayed By touching this button the list moves down by 6 track groups If this button is touched when the last page of the list is dis played the top page is dis...

Page 154: ...h es the end of the disc it will continue scan ning at track 1 After all the tracks are scanned in one pass normal play resumes D Other functions RPT Use it for automatic repeat of the track you are currently listening to While the track is playing touch RPT briefly RPT appears on the screen When the track is finished the CD player will automati cally go back to the beginning of the track and play...

Page 155: ...e screen The system selects a track on the disc being listened to in random order To cancel it touch RAND once again If a CD TEXT disc is inserted the title of the disc and track will be displayed Up to 16 let ters can be displayed d Operating a MP3 WMA DISC D Playing a MP3 WMA disc Push the AUDIO button to display this screen ...

Page 156: ...age of the list is dis played the top page is displayed FILE The file list is displayed DETAIL Details of the file currently play ing is displayed This function is available only when the vehicle is not moving D Selecting a desired file SEEK TRACK button Use for direct ac cess to a desired file Push the or button of SEEK TRACK and repeat until the desired file number appears on the display As you ...

Page 157: ...n the disc you are currently listening to The file number appears on the display When RAND or FLD RPT is on all the files in the folder you are currently lis tening to can be stepped up or down FILE The desired file can be selected in a list This function is available only when the vehicle is not moving Touch FILE The file list is displayed ...

Page 158: ...f the list is dis played the top page is displayed FOLDER The folder list is displayed DETAIL Details of the file currently play ing is displayed This function is available only when the vehicle is not moving D Searching for a desired file While the disc is playing touch SCAN briefly SCAN appears on the screen The CD player will play the next file in the folder for 10 seconds then scan again To se...

Page 159: ... for automatic repeat of the file or folder you are currently listening to Repeating a file While the file is playing touch RPT briefly RPT appears on the screen When the file is finished the CD player will automatically go back to the beginning of the file and play the file again To cancel it touch RPT once again Repeating a folder While the folder is playing touch RPT and hold it until the FLD R...

Page 160: ...indi cates that there is no disc in the CD player If Check CD appears on the display It indicates that the disc dirty damaged or it was inserted upside down Clean the disc or insert it correctly If a disc which is not play able is inserted Check CD will also appear on the screen For appropriate discs for this player see Audio system operating hints on page 143 If CD error appears on the display Th...

Page 161: ... next pre set station To seek a station Push and hold the or switch until you hear a beep Do this again to find the next station If you push either the or switch in seek mode the seek mode will cancel CD player Use this button to skip up or down to a differ ent track or file in either direction To select a desired track or file Quickly push and release the or switch until the track or file you wan...

Page 162: ... which increase with the distance from the radio transmitter They are often accompanied by distortion Multi path FM signals are reflective making it possible for two signals to reach your antenna at the same time If this hap pens the signals will cancel each other out causing a momentary flutter or loss of recep tion Static and fluttering These occur when signals are blocked by buildings trees or ...

Page 163: ...not available for files recorded at these frequencies D The sound quality ofMP3 WMAfilesgen erally improves with higher bit rates In order to achieve a reasonable level of sound quality discs recorded with a bit rate of at least 128 kbps are recom mended Playable bit rates MP3 files MPEG1 LAYER3 64 to 320 kbps MPEG2 LSF LAYER3 64 to 160 kbps WMA files Ver 7 8 CBR 48 to 192 kbps Ver 9 CBR 48 to 320...

Page 164: ...tics scratches or dirt on the disc or dirt condensation etc on the lens of the unit D It may not be possible to play discs re corded on a personal computer depend ing on theapplication settingsand theen vironment Record with the correct format Fordetails contacttheappropri ate application manufacturers of the ap plications D CD R CD RW discs may be damaged by direct exposure to sunlight high tem p...

Page 165: ...ake your CD player skip D If moisture gets into your CD player you may not hear any sound even though your CD player appears to be working Remove the discs from the CD player and wait until it dries CAUTION CD player uses an invisible laser beam whichcouldcause hazardous radiation exposure if directed outside the unit Be sure to operate the player correctly CD player Audio CDs D Use only discs mar...

Page 166: ...special shaped transpar ent translucent low quality or la beled discs such as those shown in the illustrations The use of such discs may damage the player or changer or it may be impossible to eject the disc D This system is not designed for use of Dual Disc Do not use Dual Disc because it may cause damage to the player ...

Page 167: ...use the play er to skip or to repeat a section of a track To see a pin hole hold the disc up to the light D Remove discs from the player when you are not using them Store them in their plastic cases away from moisture heat and direct sunlight To clean a disc Wipe it with a soft lint free cloth that has been dampened with water Wipe in a straight line from the centre to the edge of the disc not in ...

Page 168: ...rmat This is the international standard for the for matting of CD ROM folders and files For the ISO 9660 format there are two levels of regulations Level 1 The file name is in 8 3 format 8 character file names with a 3 character file extension File names must be composed of one byte capi tal letters and numbers The _ symbol may also be included Level 2 The file name can have up to 31 characters in...

Page 169: ...150 AUDIO SYSTEM ...

Page 170: ...SECTION VII 151 APPENDIX APPENDIX D Limitations of the navigation system 152 D Map database information and updates 155 ...

Page 171: ...a few seconds When your vehicle is receiving signals from the satellites the GPS mark appears at the top left of the screen The GPS signal may be physically ob structed leading to inaccurate vehicle posi tion on the map display Tunnels tall build ings trucks oreventheplacementofobjects on the instrument panel may obstruct the GPS signals The GPS satellites may not send signals due to repairs or im...

Page 172: ...153 APPENDIX ...

Page 173: ... calibration see page 92 b Inappropriate route guidance may occur in the following cases D When turning at an intersection off the designated route guidance D If you set more than one destination but skip any of them auto reroute will display a route returning to the destination on the previous route D When turning at an intersection for which there is no route guidance D When passing through an i...

Page 174: ...re correct In order to provide you with as accurate map information as possible we are always gath ering information such as on road repairs and carrying out on site investigations However the names of roads streets facili ties and their locations frequently change In some places construction on roads may be in progress For that reason information on some areas in this system might be differ ent f...

Page 175: ...d Toyota deal er or repairer and most auto parts stores or anotherqualifiedprofessionalforinformation about the availability and pricing of an up date CAUTION Certification for the disc player This product is a class I laser product D A laser beam leak may result in hazardous radiation exposure D Do not open the cover of the player or attempt to repair the unit your self Refer servicing to qualifi...

Page 176: ...o not obstruct the display while it is moving It could damage your naviga tion system INFORMATION Under extremely cold conditions the display may react slowly or operation sound may become louder D To confirm the database version and disc coverage area 1 Push the MENU button 2 Touch Map DVD Make sure the version of the database on this screen To display the disc coverage area touch Covered area Co...

Page 177: ...158 APPENDIX ...

Page 178: ...www toyota europe com Publication no AOM 000 160 0 Printed in Belgium September 2007 PZ420 00332 DE ...

Reviews: