background image

108

COROLLA_COROLLA

HV(TMUK)_Navi_(EE)

4-1. Basic operation

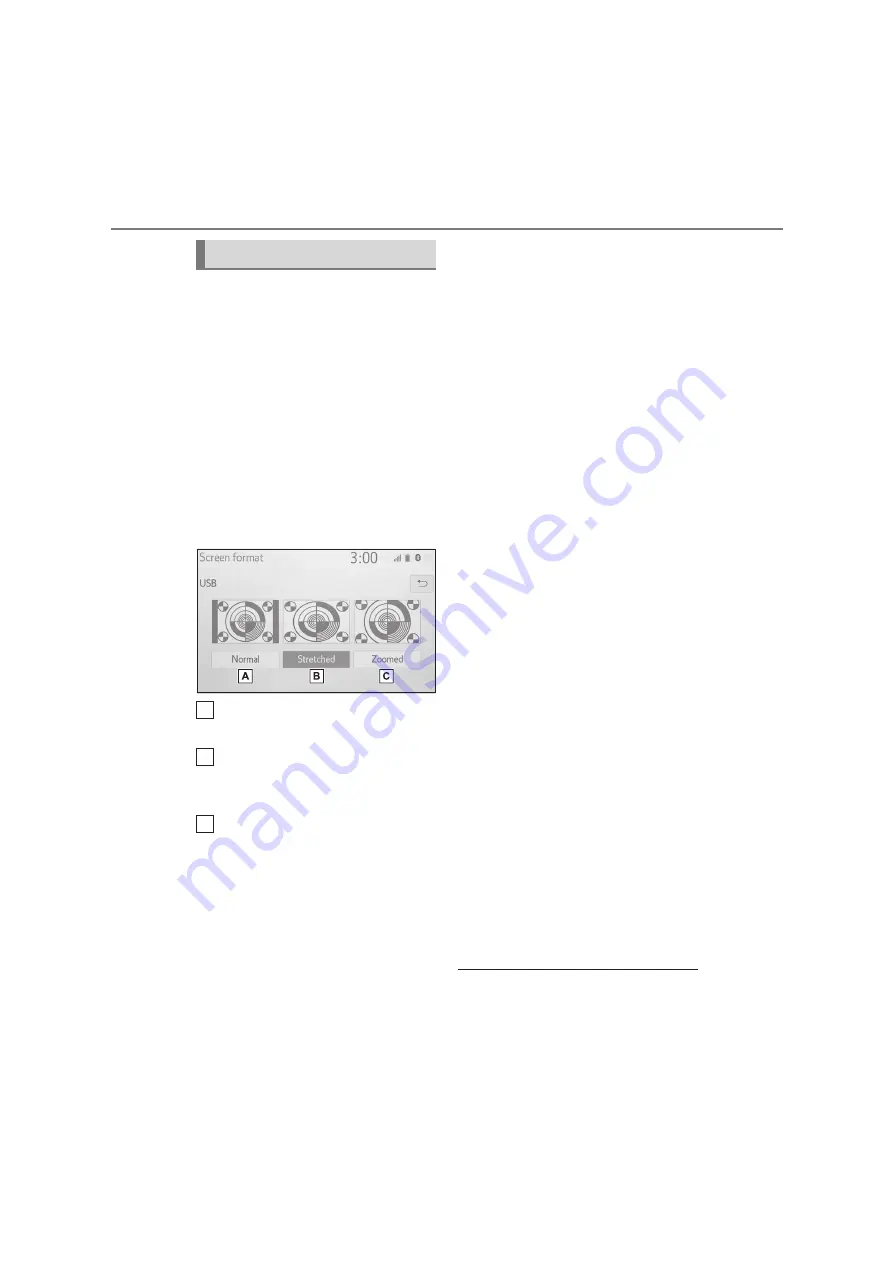
Screen format settings

The screen adjustment can be 
selected for USB video, 
MirrorLink™ and Miracast™.

From the audio settings screen

1

Press the “SETUP” button.

2

Select “Audio”.

3

Select “Common”.

4

Select “Screen format”.

5

Select the desired item to be 
adjusted.

Select to display a 4:3 screen, 
with either side in black.

Select to enlarge the image hori-
zontally and vertically to full 
screen.

Select to enlarge the image by 
the same ratio horizontally and 
vertically.

*

*

: USB video only

From the Miracast™ control 
screen

1

Display the Miracast™ control 
screen. (

P.125)

2

Select “Wide”.

3

Follow the steps in “From the 
audio settings screen” from step 

5

. (

P.108)

Colour, tone, contrast and 
brightness adjustment

The colour, tone, contrast and 
brightness of the screen can be 
adjusted.

From the audio settings screen

1

Press the “SETUP” button.

2

Select “Audio”.

3

Select “Common”.

4

Select “Display”.

5

Select the desired item to be 
adjusted.

“Colour”

“R”: Select to strengthen the red colour 
of the screen.
“G”: Select to strengthen the green 
colour of the screen.

“Tone”

“+”: Select to strengthen the tone of the 
screen.
“-”: Select to weaken the tone of the 
screen.

“Contrast”

“+”: Select to strengthen the contrast of 
the screen.
“-”: Select to weaken the contrast of the 
screen.

“Brightness”

“+”: Select to brighten the screen.
“-”: Select to darken the screen.

Depending on the audio source, some 

functions may not be available.

Audio screen adjustment

A

B

C

Summary of Contents for Corolla HV 2019

Page 1: ...ice Navigation system Operating the map screen Searching the map Activating the route guidance Audio visual system Listening to the radio Enjoying music and video Speech command system Operating the speech command system Peripheral monitoring system Checking the situation around the vehicle Phone Operating the phone Hands free system for cellular phones Toyota online Operating the Toyota online In...

Page 2: ...ng Bluetooth details 38 Connecting to internet Miracast MirrorLink via Wi Fi 45 2 3 Other settings General settings 49 Voice settings 51 Vehicle settings 52 3 1 Basic operation Navigation 56 Map screen operation 61 Map screen information 63 Traffic messages 67 3 2 Destination search Search operation 70 Starting route guidance 79 3 3 Route guidance Route guidance 82 Editing route 84 3 4 Favourite d...

Page 3: ...tem 150 Rear view monitor system pre cautions 152 Things you should know 157 7 1 Phone operation Hands free system for cellular phones Quick reference 160 Some basics 161 Placing a call using the Bluetooth hands free system 165 Receiving a call using the Bluetooth hands free system 169 Talking on the Bluetooth hands free system 169 Bluetooth phone message function 171 7 2 Setup Phone settings 176 ...

Page 4: ...4 COROLLA_COROLLA HV TMUK _Navi_ EE TABLE OF CONTENTS Alphabetical Index 204 Toyota Motor Europe NV SA Avenue du Bourget 60 1140 Brussels Belgium www toyota europe com Index ...

Page 5: ...rated by the U S Department of Defense Using these signals and other vehi cle sensors the system indicates your present position and assists in locating a desired destination The navigation system is designed to select efficient routes from your present starting location to your destination The system is also designed to direct you to a destina tion that is unfamiliar to you in an efficient manner...

Page 6: ...r change lanes or slow down Please be aware that all current vehicle navigation systems have certain limitations that may affect their ability to perform properly The accuracy of the vehicle s position depends on satellite conditions road configuration vehicle condi tion or other circumstances For more information on the limitations of the system refer to page 100 TOYOTA MOTOR CORPORATION ...

Page 7: ...s manual Symbols Meanings WARNING Explains something that if not obeyed could cause death or serious injury to people NOTICE Explains something that if not obeyed could cause damage to or a malfunction in the vehi cle or its equipment Indicates operating or working procedures Fol low the steps in numeri cal order Symbols in illustrations Symbols Meanings Indicates the action pushing turning etc us...

Page 8: ... first priority while driving should always be the safe opera tion of the vehicle While driving be sure to observe all traffic regula tions Prior to the actual use of this sys tem learn how to use it and become thoroughly familiar with it Read the entire manual to make sure you understand the system Do not allow other people to use this system until they have read and understood the instructions i...

Page 9: ...tly change Therefore before following any instructions from the system look to see whether the instruction can be done safely and legally This system cannot warn about such things as the safety of an area condition of streets and avail ability of emergency services If unsure about the safety of an area do not drive into it Under no circumstances is this sys tem a substitute for the driver s per so...

Page 10: ...10 COROLLA_COROLLA HV TMUK _Navi_ EE ...

Page 11: ...avi_ EE 1 Quick guide Quick guide 1 1 Basic function Buttons overview 12 Menu screen 13 Status icon 15 1 2 Quick reference Setup screen 17 1 3 Navigation operation Operating the map screen 19 Guiding the route 20 Registering home 21 ...

Page 12: ... Press to display the Setup screen P 17 Turn to change the radio station or skip to the next or previous track file P 110 115 117 119 Press to turn the audio visual system on and off and turn it to adjust the volume Press and hold to restart the system P 24 105 Press to display the map screen P 56 Press to access the audio visual system P 104 105 Press to display the Menu screen P 13 Press to disp...

Page 13: ...Select to display the application screen P 122 190 Select to display the fuel consumption or energy monitor 1 screen 2 Select to display the Setup screen P 17 Select to adjust the contrast and brightness of the screens etc P 31 1 Vehicles with hybrid system 2 Refer to the Owner s Manual With navigation function Displays the clock Select to display the clock settings screen P 50 Select to display t...

Page 14: ...n P 160 Select to display the application screen P 122 190 Select to display the fuel consumption or energy monitor 1 screen 2 Select to display the Setup screen P 17 Select to adjust the contrast and brightness of the screens etc P 31 1 Vehicles with hybrid system 2 Refer to the Owner s Manual D E F G H ...

Page 15: ...l displayed on the cellular phone The level of reception may not be displayed depending on the phone you have When the cellular phone is out of the service area or in a place inac cessible by radio waves is dis played Rm is displayed when receiving in a roaming area While roaming dis play Rm top left on the icon The receiving area may not be dis played depending on the type of Bluetooth phone you ...

Page 16: ...tion when a Bluetooth phone is used in the fol lowing conditions and or places The cellular phone is obstructed by certain objects such as when it is behind the seat or in the glove box or console box The cellular phone is touching or is covered with metal materials Leave the Bluetooth phone in a place where the condition of the Bluetooth connection is good Level Indicators No connection Poor Exce...

Page 17: ...elect to set audio settings P 131 Select to set the phone sound contacts settings etc P 176 Select to set the voice settings P 51 Select to set vehicle information P 52 Select to set Wi Fi connection settings P 45 Select to set MirrorLink set tings P 125 With navigation function Select to change the selected language operation sound set tings etc P 49 Select to set Bluetooth device and Bluetooth s...

Page 18: ... Select to set map settings traffic information route preferences settings etc P 93 96 98 Select to set Wi Fi connection settings P 45 Select to set Toyota online set tings P 193 200 Select to set MirrorLink set tings P 125 This function is not made available in some countries or areas F G H I J ...

Page 19: ...ng 3D map P 62 1 Select the desired point on the map screen Move the desired point on the centre of the map screen It is possible to do the drag or flick operation on the screen Press the MAP button to return to the current position For detailed operation about moving the map screen P 61 Zooming in the map 1 Select on the map screen 2 Select or pinch out on the screen P 61 Zooming out the map 1 Se...

Page 20: ...r switch to ACC or ON 2 Press the MAP button 3 Select on the map screen 4 There are different kinds of methods to search for a destina tion P 70 5 Select Go Check that the route overview is displayed P 79 6 Select Destination Guidance to the destination is displayed on the screen and can be heard via voice guidance Guiding the route Setting the destination ...

Page 21: ...hen more than 1 destination has been set the Stopover list will be displayed on the screen Select the item s to be deleted P 84 With navigation function 1 Turn the engine switch power switch to ACC or ON 2 Press the MAP button 3 Select on the map screen 4 Select Favourites 5 Select Home 6 Select Yes 7 There are different kinds of methods to search for your home P 70 8 Select Enter Registration of ...

Page 22: ...n 1 Press the MAP button 2 Select on the map screen 3 Select Favourites 4 Select Home Selecting routes other than the one recommended P 79 Guidance to the destination is displayed on the screen and can be heard via voice guidance Setting home as the destina tion ...

Page 23: ...n 27 Entering letters and num bers list screen operation 28 Screen adjustment 31 Linking multi information dis play and the system 33 2 2 Connectivity settings Registering Connecting a Bluetooth device 34 Setting Bluetooth details 38 Connecting to internet Miracast MirrorLink via Wi Fi 45 2 3 Other settings General settings 49 Voice settings 51 Vehicle settings 52 ...

Page 24: ...o the next screen When system response is extremely slow the system can be restarted 1 Press and hold the POWER VOLUME knob for 3 seconds or more Initial screen When the engine switch power switch is turned to ACC or ON the initial screen will be displayed and the sys tem will begin operating Caution screen WARNING When the vehicle is stopped with the engine running the hybrid sys tem operating al...

Page 25: ...ures Operation method Outline Main use Touch Quickly touch and release once Selecting an item on the screen Drag 1 Touch the screen with your finger and move the screen to the desired position Scrolling the lists Scrolling the map screen 2 Moving an item on a list Flick 1 Quickly move the screen by flicking with your finger Scrolling the main screen page Scrolling the map screen 2 Pinch in Pinch o...

Page 26: ...d on the screen select to return to the previous screen The operable areas of the capaci tive touch screen buttons use capacitive touch sensors and may not operate properly in the following situations If the screen is dirty or wet If a source of strong electromag netic waves is brought near the screen If a glove is worn during opera tion If the screen is touched by a fin gernail If a stylus is use...

Page 27: ...d when the engine switch power switch is changed to ACC or ON the but ton may not operate properly In this case remove anything touching the button turn the engine switch power switch to OFF and then turn it to ACC or ON or restart the system by press and hold the POWER VOLUME knob for 3 seconds or more Capacitive touch screen button sen sor sensitivity can be adjusted P 49 1 Press the HOME button...

Page 28: ... entering data letters and numbers can be entered via the screen Text field Entered character s will be displayed Select to erase one character Select and hold to continue erasing characters Select to choose a predictive text candidate for entered text P 29 Select to display a list of predic tive text candidates when there is more than one P 29 Select to enter desired charac ters Select to enter c...

Page 29: ... 2 Select the desired character and keyboard and select OK 1 Select Change type 2 Select the desired character Depending on the screen being dis played it may not be possible to change keyboard characters When text is input the system pre dicts the text that may complete the currently unconfirmed text and dis plays predictive replacement candi dates that match the beginning of the text 1 Input tex...

Page 30: ...d hold or to scroll through the displayed list Indicates the position of the dis played entries in the entire list To scroll up down pages drag the bar If appears to the right of an item name the complete name is too long to display 1 Select to scroll to the end of the name Select to move to the beginning of the name Matching items from the database are listed even if the entered address or name i...

Page 31: ...is displayed 1 Press the MENU button 2 Select Display 3 Select the desired items to be set Select to turn the screen off To Searching a list Screen adjustment The contrast and brightness of the screen display and the image of the camera display can be adjusted The screen can also be turned off and or changed to either day or night mode For information regarding audio visual screen adjust ment P 10...

Page 32: ...o day or night mode This feature is available when the head light is switched on 1 Select Day mode If the screen is set to day mode with the headlight switch turned on this condition is memorized even with the engine hybrid system turned off The contrast and brightness of the screen can be adjusted according to the brightness of your surroundings 1 Select General or Camera 2 Select the desired ite...

Page 33: ...ti informa tion display and the sys tem The following functions of the system are linked with the multi information display in the instrument cluster Phone Audio etc These functions can be oper ated using multi information display control switches on the steering wheel For details refer to Owner s Manual ...

Page 34: ...gister a phone 5 Select the desired Bluetooth device If the desired Bluetooth device is not on the list select If you cannot find and follow the guidance on the screen to try again or register from the device P 35 6 Register the Bluetooth device using your Bluetooth device For details about operating the Bluetooth device see the man Registering Connecting a Bluetooth device To use the hands free s...

Page 35: ...ding to the confirmation message 7 Check that the following screen is displayed indicating pairing was successful The system is connecting to the registered device At this stage the Bluetooth functions are not yet available 8 Check that Connected is dis played and registration is com plete If an error message is displayed follow the guidance on the screen to try again If a cellular phone does not ...

Page 36: ...one for the first time from step 7 P 34 To use the Bluetooth audio it is necessary to register an audio player with the system Once the player has been regis tered it is possible to use the Bluetooth audio This operation cannot be performed while driving For details about registering a Bluetooth device P 40 1 Turn the Bluetooth connection setting of your audio player on This function is not availa...

Page 37: ...1 2 This is a profile to use the Toyota online function PAN Personal Area Networking Recommended Ver 1 0 This is a profile to use the Toyota online function A2DP Advanced Audio Distribu tion Profile Ver 1 0 Recom mended Ver 1 3 This is a profile to transmit stereo audio or high quality sound to the audio visual system AVRCP Audio Video Remote Control Profile Ver 1 0 Recom mended Ver 1 6 This is a ...

Page 38: ...more than 1 Bluetooth device has been registered select which device to connect to 1 Display the Bluetooth settings screen P 38 2 Select Registered device 3 Select the device to be con nected Phone Audio player The profile icon for a currently connected device will be dis played in colour Selecting a profile icon which is not currently connected will switch the connection to the function If the de...

Page 39: ...Bluetooth device it is recommended to discon nect using this system P 162 P 176 P 121 Auto connection mode To turn auto connection mode on set Bluetooth power to on P 42 Leave the Bluetooth device in a location where the con nection can be established When the engine switch power switch is turned to ACC or ON the system searches for a nearby registered device The system will connect with the regis...

Page 40: ...P and audio players AVP can be registered simultaneously This operation cannot be performed while driving 1 Display the Bluetooth settings screen P 38 2 Select Add new device When another Bluetooth device is connected To disconnect the Bluetooth device select Yes When 5 Bluetooth devices have already been registered A registered device needs to be replaced Select Yes and select the device to be re...

Page 41: ...o be edited 4 Select Device info 5 Confirm and change the Bluetooth device information The name of the Bluetooth device Can be changed to a desired name P 42 Select to set the Bluetooth audio player connection method P 42 Device address is unique to the device and cannot be changed Phone number of the Bluetooth phone Compatibility profile of the Bluetooth device Select to reset all setup items If ...

Page 42: ... may be best As such refer to the manual that comes with the audio player The Bluetooth settings can be confirmed and changed 1 Display the Bluetooth settings screen P 38 2 Select Detailed settings 3 Select the desired item to be set Select to set Bluetooth connec tion on off P 42 Select to change the automatic connection priority of the regis tered Bluetooth devices P 43 Select to edit the system...

Page 43: ...ion priority on off Select to change the automatic connection priority of the regis tered Bluetooth phones P 43 Select to change the automatic connection priority of the regis tered Bluetooth audio players P 43 Select to reset all setup items Changing Bluetooth device automatic connection priority 1 Select Preferred phones or Preferred audio players 2 Select the desired Bluetooth device and select...

Page 44: ...code P 44 Device address is unique to the device and cannot be changed Select to set the connection sta tus display of the phone on off Select to set the connection sta tus display of the audio player on off Compatibility profile of the sys tem Select to reset all setup items Editing the system name 1 Select System name 2 Enter a name and select OK Editing the PIN code 1 Select System PIN code 2 E...

Page 45: ... to a WPS compatible Wi Fi device 1 P 46 Select to set the detailed Wi Fi settings 1 P 47 Displays status of the Miracast connection 2 On Connecting Off Not connecting Displays status of the MirrorLink connection 3 On Connecting Off Not connecting 1 With navigation function 2 Miracast status should be dis played only for Miracast supported models 3 MirrorLink status should be dis Connecting to int...

Page 46: ...word enter screen is displayed enter the password then select OK The network that is selected Pre ferred Network is marked with Details Select to display details about the network Add Wi Fi network Select to add a Wi Fi network that is not currently dis played Adding a Wi Fi network Available networks which are not displayed by searching can be added 1 Select Add Wi Fi network 2 Enter the network ...

Page 47: ... con nection message notification display on off Select to reset all setup items Any network connected to in the past is set as a preferred network The priority of the networks to con nect to can be changed 1 Select Reorder Remove pre ferred networks 2 Select the desired network and select Move up or Move down to change the connection priority of the network Remove Select to delete a network If a ...

Page 48: ...rs or implantable cardioverter defibrillators should maintain a rea sonable distance between them selves and the Wi Fi antennas The radio waves may affect the operation of such devices Before using Wi Fi devices users of any electrical medical device other than implantable cardiac pacemakers cardiac resynchronization therapy pace makers or implantable cardioverter defibrillators should consult the...

Page 49: ...ment Select to change the unit of measure for distance fuel consumption Auto change to screen Select to set automatic screen changes from the audio control screen to the home screen to on off When set to on the screen will automatically return to the home screen from the audio control screen after 20 seconds Delete keyboard history Select to delete the keyboard history Memorise keyboard history Se...

Page 50: ... Select the desired items to be set Select to change the time zone P 50 Select to set daylight saving time on off Select to set automatic adjust ment of the clock by GPS on off When set to off the clock can be manually adjusted P 50 Select to set the 24 hour time format on off When set to off the clock is dis played in 12 hour time format 1 Select Time zone 2 Select the desired time zone If Other ...

Page 51: ...ma tion screen appears Examples of settings that can be returned to their default conditions Navigation settings Audio settings Phone settings etc With navigation function 1 Press the SETUP button 2 Select Voice 3 Select the desired items to be set Select to adjust the volume of voice guidance Select to set the voice recogni tion prompts on off Select to set the street name guidance on off 1 Selec...

Page 52: ...navigation function 1 Press the SETUP button 2 Select Vehicle 3 Select the desired items to be set Select to set vehicle customization 1 Select to set driving mode 1 2 Select to set Valet mode P 53 E Vehicle settings Settings are available for vehi cle customization and valet mode Displaying the vehicle set tings screen Vehicle settings screen A B C ...

Page 53: ...digit personal code again and select OK The system will request that you input the security code again to confirm that you remember it cor rectly When valet mode activates the system stops and a security code 4 digit number standby screen is displayed P 53 If the 4 digit personal code is forgot ten please contact any Toyota retailer or Toyota authorized repairer or any reliable repairer 1 Enter th...

Page 54: ...54 COROLLA_COROLLA HV TMUK _Navi_ EE 2 3 Other settings ...

Page 55: ...tion search Search operation 70 Starting route guidance 79 3 3 Route guidance Route guidance 82 Editing route 84 3 4 Favourite destinations Registering an entry 89 Editing the entry information 91 3 5 Setup Map settings 93 Traffic message settings 96 Route preferences settings 98 3 6 Tips for operating the navi gation system GPS Global Positioning Sys tem 100 Navigation database updates 102 ...

Page 56: ... out the map scale P 61 Select to display the navigation menu screen P 60 Select to change the map layout P 62 Select to mute unmute the voice guidance P 83 Select to display the action menu screen P 58 Displays the distance to the next turn with the arrow indicating the turn direction When the arrow icon is selected the last navigation announcement will be repeated Displays information about the ...

Page 57: ...ime and remaining travel time to the destination Displays the name of the current street or the next street Displays traffic events on the route The remaining length and the remaining delay time are displayed Except for route guidance operation Select to zoom in out the map scale P 61 Select to display the navigation menu screen P 60 Select to change the map layout P 62 Select to display the actio...

Page 58: ... displays a list of traffic mes sages relating to the set route all traffic messages and warnings P 67 Select to display fuel station information The location and fuel price can also be checked P 198 Select to display parking lot information The location price and availa ble spaces of parking lots can be checked P 197 Select to display the route information screen Route options for the route calcu...

Page 59: ...of traffic mes sages relating to the set route all traffic messages and warnings P 67 Select to display fuel station information The location and fuel price can also be checked P 198 Select to display parking lot information The location price and availa ble spaces of parking lots can be checked P 197 Select to display the current position information screen P 85 A B C D ...

Page 60: ...I P 70 Select to set a destination from favourites The top 4 favourite destina tions home work and 2 favourites are displayed as quick access but tons Any favourite in the list can be used to start route guidance directly P 74 Select to search for a destination from a list of the last destinations P 74 Select to display the other search method Address POI phonebook of connected Bluetooth device an...

Page 61: ...ec tion or on a new vehicle the current position may not be correct As soon as the navigation system receives sig nals from the GPS the correct current position is displayed The map can be scrolled to view locations that are different than your current position Cursor mark Select to display the Street View Select to register in favourites list To change the icon name etc P 91 Select to set as a de...

Page 62: ...00 km 10 yd to 600 miles After the scale has been changed the new scale indicator will be displayed for a while The map layout can be changed between 3D heading up 2D head ing up and 2D north up by selecting the map layout button 1 Select the map layout button 3D Heading up symbol The direction of vehicle travel is always up Heading up symbol The direction of vehicle travel is always up North up s...

Page 63: ... feature is displayed on the map in zoom scales up to 50m 50yd Landmarks can be displayed in 3D on the map This feature is displayed on the map in zoom scales up to 50m 50yd Safety cameras can be displayed as icons on the map Safety camera location on the map Displays information about the safety camera icon and distance to safety camera The above items will be displayed depending on the map scale...

Page 64: ... screen can be selected P 95 Public POI icons Displaying POI icons List of POI icons Icon Name Library College University School Tourist office Cemetery funeral director Government Office Institu tion City hall Community gen Community Court house Place of Worship Accomodation Hotel Motel Pharmacy Convention Centre Exhibition Centre Finance Bank Cash Dispenser Post Office Business B Company B Gener...

Page 65: ...s Rent a Car Facility Parking Ferry Terminal Parking Open Parking Area P Area general Parking Garage Open P A P R Rest Area Motoring Organization Auto mobile Club Mover Moving Company Motorcycle Dealer Toyota Branded Lexus Branded Icon Name Multiple POI Bar Nightlife Leisure Cultural Centre The atre Music Centre Concert Hall Cinema Casino Café Bar Café Restaurant French Belgian Chinese German Gree...

Page 66: ...me Amusement Park Winery Museum Shopping Market Place Shopping Centre Factory Outlet Shop Department Store Drive through bottle shop Tourist Attractions Important Tourist Attractions Park Recreational Area Yacht Basin Harbour Camping Ground Grocery Store Historical Monument RV Park Camping Bookstore Hair Beauty Photography Shoe store Icon Name Wine Liquor Clothing Cleaning Laundry Displaying POI i...

Page 67: ...number P 169 Select to register the point in the favourites list P 89 Select to display the starting route guidance screen P 79 Traffic message icons on the map Traffic message list A B C D Traffic messages Traffic messages such as traf fic congestion accidents and road closures are displayed on the map or the list Traffic data can be received via radio broadcast or internet Traffic messages scree...

Page 68: ...n P 56 2 Select Traffic 3 Select the desired tab to select the list Select to display the traffic mes sages relating to the set route Select to display all traffic mes sages Select to display traffic mes sages and warnings relating to the detour route Traffic message icon on the map Icon Name Danger Black Weather Queuing traffic Stationary traffic Accident Roadworks Road narrowness Extreme danger ...

Page 69: ...ion such as street name city name region or country will be displayed Icon of an incident Icon of an incident on the route Icon of an incident that is detoured Distance to incident and direc tion from vehicle 5 Check that the detailed traffic message is displayed Select to display the previous or the next traffic message Displays the details of traffic message A B C A B ...

Page 70: ... names Phonebook from connected phone 1 Display the navigation menu screen P 60 To change the search country select the country flag icon P 71 2 Enter the desired search terms in the search box When 3 or more characters are entered the best match will be displayed in the single results box underneath the search box 3 Select Search or to show the result list Select to display the details screen P 7...

Page 71: ...een If a destination has already been set Replace Add and Can cel will be displayed Replace Select to delete the existing destination s and set a new one Add Select to add a destination to the current route Cancel Select to return to the current destination 1 Select the desired 2 Check that the detailed POI information is displayed If the result is a contact favourite recent destination or POI Sel...

Page 72: ...nu screen P 60 2 Select Favourites 3 Select desired quick access destinations To use this function it is neces sary to register a home a work and or a favourite location P 89 Automatic navigation is availa ble for the 4 favourite destina tions When the favourite has an address assigned is turned on P 72 The feature automatically pro poses guidances to the registered destination when you start the ...

Page 73: ...idance will continue 2 Select desired destination to start route guidance If is selected last active screen will display A pop up message is displayed when you start the vehicle in reg istered day time slot Automatic navigation is availa ble to the 4 favourite destinations home work and 2 other favour ites only To use this feature it is neces sary to register day time slots for the destinations To...

Page 74: ...tes are displayed as quick access buttons on navigation menu screen Transferred POIs and routes from an external device or the server will be stored in this list P 90 Transferred routes are marked by the specific icon 1 Display the navigation menu screen P 60 2 Select Recent 3 Select the desired entry Select to display and edit the entry information 91 Select to register the entry in the favourite...

Page 75: ...ode or street name 4 Select No or Intersection to enter a house number or inter section name It is not possible to enter a house number and intersection at the same time 5 Select Calculate If a unique street name is entered only 1 in the country then Calcu late can also be selected If Calcu late is selected when only Town or Code has been entered a route search starts with the centre of the town e...

Page 76: ...led setting about online search P 200 4 Check that the detailed POI information is displayed P 71 Then select Go 1 Select Nearby At destina tion Along route In a town or Select on map on the POI screen The text on this button is always showing the current search crite ria 2 Select the desired search method Select to set the search around the current position Select to set the search around the des...

Page 77: ...elect the desired POI 4 Check that the detailed POI information is displayed P 71 Then select Go 1 Select History on the POI screen 2 Select the desired previous search word Select to delete the search word 3 Select Search 4 Check that the search results are displayed Select the desired POI 5 Check that the detailed POI information is displayed P 71 Then select Go When the online search results is...

Page 78: ... availa ble will be displayed Before using this function it is nec essary to connect a Bluetooth phone If a contact does not have address information stored the entry will be dimmed 1 Select Phonebook 2 Select the desired entry Select to display the details screen P 71 Geo coordinates can be entered in DMS format Degrees Minutes Seconds and Decimal Only coor dinate values that can potentially exis...

Page 79: ...not be reached a pop up will be displayed to indicate this When the destination is set the route overview from the current position to the destination is dis played Depending on the navigation set tings either a single route or route alternatives will be displayed on the screen P 98 Recommended route screen Route alternatives screen The starting route guidance screen is displayed in 2D north up St...

Page 80: ...6 Select to display weather infor mation The weather information around the destination can be checked P 196 The default route preferences and avoidance criteria can be selected P 98 If Destination is selected and held demo mode will start Select Quit on the screen to end demo mode 1 Select 2 Select the desired item to adjust the route preferences Select to display the fastest route Select to disp...

Page 81: ...ayed on the map 1 Select one of the three types of route alternatives Displays information about the destination such as estimated arrival time and distance Select to display the avoidance criteria Select the desired item to adjust the avoidance criteria P 81 Select to display parking lot information The location and available spaces of parking lots around the destination can be checked P 197 Sele...

Page 82: ...maining length and the remaining delay time are displayed The name of the current street or the next street when approaching a turning point During freeway driving the highway information screen will be dis played Name of the freeway exit rest area Distance from the current posi tion to the freeway exit rest area POI s that are on the highway or close to a highway exit Select desired POIs to displ...

Page 83: ...isplayed on the windshield The voice guidance provides vari ous messages as you approach an intersection or other points where maneuvering the vehicle is neces sary The voice guidance can be muted by selecting the The last navigation announce ment can be repeated by select ing the arrow icon The voice guidance may not pro nounce certain street names correctly or clearly due to the limitations of t...

Page 84: ...just the route preferences P 80 Select to display the avoidance criteria Select the desired item to adjust the avoidance criteria P 81 Select to block a fixed distance on the road ahead A blocked route will be marked in the map P 86 Select to display the turn list to the destination P 86 WARNING Be sure to obey the traffic regula tions and keep the road condition in mind especially when you are dr...

Page 85: ...to the destination P 86 Select to display the destination information The destination can be checked and the current position can be registered P 85 Select to display the destination and stopovers information The destination and stopovers can be checked and edited P 86 When a destination is set 1 Display the route information screen P 84 2 Select 3 Check that the destination infor mation is displa...

Page 86: ...1 Display the route information screen P 84 2 Select Stopover list 3 Select of the desired stopo ver 4 Select Yes During the route guidance the route can be changed to detour around a section of the route 1 Display the route information screen P 84 2 Select 3 Select the desired block dis tance to detour Select Deactivate to cancel the blocked setting The blocked route will be marked in the map Aft...

Page 87: ...ck that the detail of the seg ment is displayed Detour Select to detour the segment P 87 1 Display the turn list P 86 2 Select the desired route seg ment to detour 3 Select Detour 1 Display the turn list P 86 2 Select Detour list 3 Check that the detours list is dis played Select the desired route segment Detour setting Detouring a route segment from the turn list Canceling the detoured setting ...

Page 88: ...ceived the route automatically changed A pop up message is displayed on the screen The route will be recalculated automatically When traffic messages of the guid ance route has been received select manually whether or not to change routes 1 A pop up message is displayed on the screen Select Show detour to display the detour route on the map Select Ignore to return to the previous screen 2 Select D...

Page 89: ...Enter the entry name and then select OK 5 Check that the entry is regis tered in the favourites list 4 favourite destinations home work and any 2 favourites are dis played as quick access buttons and directly start the route guidance Automatic navigation is available to the 4 favourite destinations 1 Display the favourites list P 89 2 Select Home Work Favour ite 1 and Favourite 2 if not registered...

Page 90: ...creen appears 3 Check that a progress bar is being displayed while the data loading is in progress To cancel this function select Cancel A confirmation screen is dis played when the operation is complete 4 Check that the entry is regis tered in the favourites list The POIs and routes that are regis tered on your Toyota portal site can be downloaded via the internet They will be stored in the favou...

Page 91: ...1 Select to change the entry name address Select to delete the entry Entries in the favourites list Route Select to display detailed entry information P 91 Select to edit the route P 92 Select to delete the entry Entries in the last destinations Select to display detailed entry information P 91 Select to delete the entry 1 Display the entry options screen P 91 2 Select Show details Editing the ent...

Page 92: ...ons 3 Check the details of the entry information The address will be marked on the map 1 Display the entry options screen P 91 2 Select Edit route 3 Select of the desired entry Select to delete destination and stopover 4 Select the desired item Editing the route ...

Page 93: ...p zoom Select to change the zoom level that is automatically zoomed into when an area requiring caution is approached POIs on map Select to set displayed POI icon cate gories P 95 Show guidance arrow Select to set the display of route guid ance arrow on off P 82 Show street name Select to set the display of the name of the current street or the next street on off P 82 Show 3D buildings Select to s...

Page 94: ...lay of the highway mode on off P 82 Country information This function goes to another screen where it is possible to Set country information screen when crossing the border on off See country information for any coun try in the database 1 Display the map settings screen P 93 2 Select Day Night mode 3 Select the desired item Select to change the map screen to day or night mode depending on the posi...

Page 95: ... POI catego ries Select to display all categories Select to hide all icons Select to display main catego ries and subcategories 1 Display the map settings screen P 93 2 Select Country information 3 Select the desired item Select to display the country information when the vehicle crosses a border on off Select to display the country information POIs on map Country information C A B C A B ...

Page 96: ... messages P 97 Select to set the dynamic reroute method P 97 1 Display the traffic settings screen P 96 2 Select Traffic messages 3 Select the desired item Select to receive traffic mes sages via the internet Select to receive traffic mes sages via the TMC Traffic mes sage channel Select to not receive the traffic messages 1 Display the traffic settings screen P 96 2 Select Traffic via internet se...

Page 97: ...f FM radio to auto matic or manual Radio station allows the user to manually select the preferred TMC station from a list of availa ble stations 1 Display the traffic settings screen P 96 2 Select Traffic message radius 3 Select desired radius This setting is for route calcula tion Only traffic messages within the radius are taken into account during calculation 1 Display the traffic settings scre...

Page 98: ...t manually whether or not to change routes 1 Press the SETUP button 2 Select Navigation 3 Select Route preference 4 Select the desired item to be set Select to change the recom mended route type to fastest route shortest route or ecologi cal route Select to use historical traffic information in the route calcula tion Select to display the 3 routes fastest shortest and ecological on the map after r...

Page 99: ...ess the SETUP button 2 Select Navigation 3 Select Manage stored destina tions 4 Select the desired item Select to delete all favourites Select to delete all recent desti nations The backup of the favourites on the USB device will be loaded into the list of favourites on the navigation system The navigation favourites will be sent to the connected USB device Setting the avoidance criteria for the r...

Page 100: ...t position may not be shown in the following cases When driving on a small angled Y shaped road When driving on a winding road When driving on a slippery road such as in sand gravel snow etc When driving on a long straight road When motorway and surface streets run in parallel After moving by ferry or vehicle car rier When a long route is searched during high speed driving When driving without set...

Page 101: ...y take a long time for auto reroute to oper ate In auto reroute a detour route may be shown After auto reroute the route may not be changed If an unnecessary U turn is shown or announced If a location has multiple names and the system announces 1 or more of them When a route cannot be searched If the route to your destination includes gravel unpaved roads or alleys the route guidance may not be sh...

Page 102: ...e database has updated successfully 5 Remove the USB device when prompted This restarts the navi gation system and completes the update process Updating may not complete correctly in the following cases If the navigation system is turned off before updating is complete If the USB device is removed before updating is complete The amount of time required to com plete the update process depends on th...

Page 103: ...e 104 Some basics 105 4 2 Radio operation AM FM DAB radio 110 4 3 Media operation USB memory 115 iPod 117 Bluetooth audio 119 MirrorLink 122 Miracast 125 AUX 128 4 4 Audio visual remote controls Steering switches 129 4 5 Setup Audio settings 131 4 6 Tips for operating the audio visual system Operating information 132 ...

Page 104: ...s the AUDIO button From the MENU button 1 Press the MENU button then select Audio Using the radio P 110 Playing a USB memory P 115 Playing an iPod P 117 Playing a Bluetooth device P 119 Using the MirrorLink P 122 Using the Miracast P 125 Using the AUX port P 128 Using the steering wheel audio switches P 129 Audio system settings P 131 Quick reference Functional overview ...

Page 105: ...age 1 Display the audio source selection screen P 105 2 Select Reorder 3 Select the desired audio source then or to reorder Some basics This section describes some of the basic features of the audio visual system Some information may not pertain to your system Your audio visual system works when the engine switch power switch is in ACC or ON NOTICE To prevent the 12 volt battery from being dischar...

Page 106: ...USB hub may not charge or be operable as the supply of current may be insufficient 1 Display the audio control screen P 105 2 Select Sound 3 Select the desired item to be set Type A Select to set the tre ble mid bass P 106 Select to set the fader balance P 107 Select to set the automatic sound leveliser P 107 Type B Select to set the tre ble mid bass P 106 Select to set the fader balance P 107 Sel...

Page 107: ...d that when listening to a stereo recording or broadcast changing the right left balance will increase the volume of 1 group of sounds while decreasing the vol ume of another 1 Select Fader Balance 2 Select the desired screen but ton Select to adjust the sound bal ance between the front and rear speakers Select to adjust the sound bal ance between the left and right speakers Automatic sound leveli...

Page 108: ...ect Wide 3 Follow the steps in From the audio settings screen from step 5 P 108 Colour tone contrast and brightness adjustment The colour tone contrast and brightness of the screen can be adjusted From the audio settings screen 1 Press the SETUP button 2 Select Audio 3 Select Common 4 Select Display 5 Select the desired item to be adjusted Colour R Select to strengthen the red colour of the screen...

Page 109: ...ontrol screen 1 Display the MirrorLink or Miracast control screen P 122 125 2 Select Display 3 Follow the steps in From the audio settings screen from step 5 P 108 1 Press this switch to operate the speech command system The speech command system and its list of commands can be operated P 142 Speech command system ...

Page 110: ...tions screen P 112 Select to display the sound set ting screen P 106 Select to tune to preset stations P 111 FM only DAB Select to display the audio source selection screen Select to display the favourites screen P 111 Select to display a list of receiv able service station Select to display the manual tuning screen P 112 Select to display the time shift control screen P 113 Select to display the ...

Page 111: ...elect preset services stations Service station list screen Turn to move up down the ser vice station Manual screen Turn to seek for service DAB time shift screen Turn to jump forward backwards The radio automatically changes to stereo reception when a stereo broad cast is received If the signal becomes weak the radio reduces the amount of channel sepa ration to prevent the weak signal from creatin...

Page 112: ...ired item FM Select to set the listing order of the station list between Broad caster and Alphabetical Select to set the FM traffic announcement on off P 113 Select to set the FM alternative frequency function on off P 113 Select to switch to a broadcast ing station within the same local program network Select to set the FM radio text feature on off DAB Select on off to set L band in the tune rang...

Page 113: ...e of the ser vice to be recorded the amount of DAB unit memory and the time at which reception of the broadcast began This feature allows your radio to receive station and programme information from radio stations which broadcast this information Depending on the availability of RDS infrastructure the service may not function properly A station providing good reception is automatically selected if...

Page 114: ...114 COROLLA_COROLLA HV TMUK _Navi_ EE 4 2 Radio operation operation resumes Traffic announcement volume function The volume level when receiving the traffic announcement is memo rized ...

Page 115: ...lect and hold to fast rewind Select to play pause Select to change the file track Select and hold to fast forward Select to set random playback P 116 Displays cover art USB video 1 Select Browse 2 Select Videos 3 Select the desired folder and file Select to display the audio source selection screen Select to return to the top screen Select to display a song list screen Select to display the play m...

Page 116: ... repeat folder album repeat off When random playback is on file track repeat off Files tracks or folders albums can be automatically and randomly selected 1 Select Each time is selected the mode changes as follows random 1 folder album random folder album random all folder album random off Control panel Repeating A B Random order WARNING Do not operate the player s controls or connect the USB memo...

Page 117: ...ck Press and hold to fast for ward rewind Turn to change the track Turn to move up down the list Also the knob can be used to enter selections on the list screens by pressing it Some functions may not be available depending on the type of model When an iPod is connected using a genuine iPod cable the iPod starts charging its battery Depending on the iPod the video sound may not be able to be heard...

Page 118: ...ne 4s or ear lier track repeat off When shuffle is on track repeat off Tracks or albums can be automati cally and randomly selected 1 Select Each time is selected the mode changes as follows shuffle 1 album shuffle album shuffle all album shuffle off Repeating Random order WARNING Do not operate the player s controls or connect the iPod while driving NOTICE Do not leave your portable player in the...

Page 119: ...e portable device connection screen P 121 Select to display the sound set ting screen P 106 Select to set repeat playback P 120 Select to change the track Select and hold to fast rewind Select to play pause Select to change the track Select and hold to fast forward Select to set random playback P 120 Displays cover art Bluetooth audio The Bluetooth audio system enables users to enjoy listen ing to...

Page 120: ...laying In the following conditions the system may not function The Bluetooth device is turned off The Bluetooth device is not con nected The Bluetooth device has a low bat tery When using the Bluetooth audio and Wi Fi functions at the same time the following problems may occur It may take longer than normal to con nect to the Bluetooth device The sound may cut out It may take time to connect the p...

Page 121: ...en the connection is complete If an error message is displayed follow the guidance on the screen to try again WARNING Do not operate the player s controls or connect to the Bluetooth audio system while driving Your audio unit is fitted with Bluetooth antennas People with implantable cardiac pacemakers cardiac resynchronization ther apy pacemakers or implantable cardioverter defibrillators should m...

Page 122: ...one about the confirma tion method and the release sched ule The MirrorLink function is not available if the connected device is not compatible with MirrorLink The MirrorLink operation screen can be reached by the following methods Press the MENU button then select Apps Connecting a MirrorLink device P 123 Application list screen Select to reorder the application P 124 Select to disconnect the Mir...

Page 123: ... port P 106 2 Display the application list screen P 122 3 Select MirrorLink USB 4 Check that MirrorLink opera tion screen is displayed and then select I agree MirrorLink function using the Wi Fi is available when certain settings are set as follows Wi Fi function is enabled WARNING Do not connect smartphone or operate the controls while driving NOTICE Do not leave your smartphone in the vehicle In...

Page 124: ...diately 5 Select Yes 6 Check that MirrorLink opera tion screen is displayed and then select I agree Depending on the device con nected it may take approxi mately 5 to 15 seconds before the this screen is displayed Wi Fi is a registered trademark of Wi Fi Alliance The signal strength status of the Wi Fi connection P2P mode is dis played on the upper right side of the screen P 15 To check the Mirror...

Page 125: ...f interference occurs con necting a Bluetooth cellular phone or portable device that is registered with the system may reduce the effects The Miracast control screen can be reached by the following meth Setting a MirrorLink con nection mode A B Miracast Miracast is a function that enables the audio visual sys tem to display smartphone s screen and play the smartphone s sound by con necting the sma...

Page 126: ...device to an appropriate level When a device that uses Bluetooth audio is used with Miracast no sound may be output from Miracast If this occurs disabling the Bluetooth audio may allow sound to be output from Miracast The Miracast screen displays the same image that is sent from the external device If the external device screen is vertically oriented the screen may also display a vertical image Mi...

Page 127: ...he system name on the smartphone 5 Select Yes 6 Check that Miracast operation screen is displayed Depending on the device con nected it may take approxi mately 5 to 15 seconds before the Miracast operation screen is displayed The signal strength status of the Wi Fi connection P2P mode is dis played on the upper right side of the screen P 15 To check the Miracast setting on the Wi Fi setting screen...

Page 128: ...view Control screen WARNING Do not connect portable audio device or operate the controls while driving NOTICE Do not leave your portable player in the vehicle In particular high tem peratures inside the vehicle may damage the portable player A B C Do not push down on or apply unnecessary pressure to the porta ble audio device while it is con nected as this may damage the portable audio device or i...

Page 129: ...Press Volume up down Press and hold Vol ume up down contin uously Mode Operation function AM FM DAB 1 AUX Press Change audio modes Press and hold Mute Press and hold again to resume the sound A B USB iPod Bluetooth audio MirrorLink 2 Press Change audio modes Press and hold Pause Press and hold again to resume the play mode Miracast Press Change audio modes Mode Operation function AM FM Press Prese...

Page 130: ... 1 Press Preset ser vices stations up down Favourites screen Service station up down Ser vice station list screen Seek up down Man ual tuning screen Press and hold Seek up down continu ously while the switch is being pressed Manual tun ing screen USB iPod Bluetooth audio MirrorLink 2 Press Track file up down Press and hold Fast forward rewind Mode Operation function ...

Page 131: ...tings screen P 131 2 Select Common 3 Select the desired items to be set Select to set the cover art dis play on off Select to prioritize the display of information from the Gracenote database Select to change the screen for mat for video output P 108 Select to display the image qual ity adjustment screen P 108 Depending on the audio source some functions may not be available Audio settings Detaile...

Page 132: ...e fad ing and drifting which increase with the distance from the radio trans mitter They are often accompanied by distortion Multi path FM signals are reflec tive making it possible for 2 signals to reach the vehicle s antenna at the same time If this happens the signals will cancel each other out causing a momentary flutter or loss of reception Static and fluttering These occur when signals are b...

Page 133: ...ulatory standards Please note that the use of this accessory with an Apple product may affect wireless performance iPhone iPod iPod nano iPod touch and Lightning are trade marks of Apple Inc registered in the U S and other countries Made for iPhone SE iPhone 6s iPhone 6s Plus iPhone 6 iPhone 6 Plus iPhone 5s iPhone 5c iPhone 5 iPhone 4s iPhone 4 iPhone 3GS iPhone 3G iPod touch 6th generation iPod ...

Page 134: ...tem USB Compatible file for mat MP3 WMA AAC WAV LPCM FLAC ALAC OGG Vorbis MP4 AVI WMV Compatible file format video MP4 AVI WMV Folders in the device Maximum 3000 Files in the device Maximum 9999 Files per folder Maximum 255 Corresponding sampling fre quency File type Frequency kHz MP3 files MPEG 1 LAYER 3 32 44 1 48 MP3 files MPEG 2 LSF LAYER 3 16 22 05 24 WMA files Ver 7 8 9 1 9 1 9 2 32 44 1 48 ...

Page 135: ...es with mp3 wma m4a file extensions as MP3 WMA AAC files respec tively To prevent noise and play back errors use the appropriate file extension MP3 files are compatible with the ID3 Tag Ver 1 0 Ver 1 1 Ver 2 2 and Ver 2 3 formats This system cannot display disc title track title and artist name in Corresponding bit rates 1 File type Bit rate kbps MP3 files MPEG 1 LAYER 3 32 320 MP3 files MPEG 2 LS...

Page 136: ...m patible with the audio player The player is compatible with VBR Variable Bit Rate When playing back files recorded as VBR Variable Bit Rate files the play time will not be correctly displayed if the fast forward or reverse operations are used It is not possible to check folders that do not include MP3 WMA AAC files MP3 WMA AAC files in folders up to 8 levels deep can be played However the start ...

Page 137: ...64 MPEG 4 AVC MPEG4 Audio codec AAC MP3 Corresponding screen size MAX 1920 1080 Corresponding frame rate MAX 60i 30p AVI Container Video codec H 264 MPEG 4 AVC MPEG4 WMV9 WMV9 Advanced profile Audio codec AAC MP3 WMA9 2 7 8 9 1 9 2 Corresponding screen size MAX 1920 1080 Corresponding frame rate MAX 60i 30p Windows Media Video Video codec WMV9 WMV9 Advanced profile Audio codec WMA9 2 7 8 9 1 9 2 C...

Page 138: ...t on conventional discs WMA WMA Windows Media Audio is an audio compression format developed by Microsoft It com presses files into a size smaller than that of MP3 files The decoding formats for WMA files are Ver 7 8 and 9 Trademark Acknowledgement Windows Media is either a regis tered trademark or trademark of Microsoft Corporation in the United States and or other coun tries This product include...

Page 139: ...indicates a problem in the iPod or its connec tion No music files found This indicates that there is no music data in the iPod Check the iPod firmware version This indicates that the firmware ver sion is not compat ible Perform the iPod firmware updates and try again iPod authorisa tion unsuccessful This indicates that it failed to author ize the iPod Please check your iPod Message Explanation Mus...

Page 140: ...140 COROLLA_COROLLA HV TMUK _Navi_ EE 4 6 Tips for operating the audio visual system ...

Page 141: ...OROLLA_COROLLA HV TMUK _Navi_ EE 5 Speech command system Speech command system 5 1 Speech command system operation Speech command system 142 Command list 144 5 2 Mobile Assistant operation Mobile Assistant 147 ...

Page 142: ... a low or high volume The roof or windows are open Passengers are talking while speech commands are spoken The fan speed of the air conditioning system is set at high The air conditioning vents are turned towards the microphone In the following conditions the system may not recognize the command properly and using speech commands may not be possible The command is incorrect or unclear Note that ce...

Page 143: ...voice recognition mode pressing and holding the talk switch for 1 or more seconds cancels voice recognition mode 2 After a beep sounds say the desired command or select the desired command Displaying the command list screen 1 Say More commands or select More commands on the speech command main menu screen 2 Say the desired command or select the desired command The command list is read out and the ...

Page 144: ...mmand list Command list overview Command list Command Action Correction Returns to the previous state Cancel Cancels the speech command system Command Action More commands Displays more commonly used commands Command Action Destination address Set a destination by saying address Enter country country name Set a destination by saying country name Enter city city name Set a destination by saying cit...

Page 145: ...1 Plays the selected track Play playlist playlist name 1 2 Plays tracks from the selected playlist Command Action Dial phone number Call the selected phone number Redial Call the phone number of the latest outgoing call Call contacts Call the selected phone contact Call contacts phone types Call the selected phone contact on its selected phone type Command Action Station station name Play the sele...

Page 146: ...ROLLA HV TMUK _Navi_ EE 5 1 Speech command system operation With navigation function Weather Displays weather information Weather at destination Displays weather information at your current destination Command Action ...

Page 147: ...s press the switch on the steering wheel Mobile Assistant can only be restarted after the system responds to a speech command After saying a command the Mobile Assistant function will automatically end to complete the requested Mobile Assistant The Mobile Assistant function is a voice input assist function Mobile Assist supports the Siri Eyes Free Mode and Google App Google App can be used only th...

Page 148: ...ation feature of the cellular phone ensure the active audio source is Bluetooth audio or iPod in order to hear turn by turn direction prompts Wait for the listening beeps before using the Mobile Assistant The Mobile Assistant may not recog nize commands in the following situa tions Spoken too quickly Spoken at a low or high volume The roof or windows are open Passengers are talking while the Mobil...

Page 149: ...A_COROLLA HV TMUK _Navi_ EE 6 Peripheral monitoring system Peripheral monitoring system 6 1 Rear view monitor system Rear view monitor system 150 Rear view monitor system pre cautions 152 Things you should know 157 ...

Page 150: ...hicle Be sure to back up slowly depress ing the brake pedal to control vehi cle speed The instructions given are only guide lines When and how much to turn the steering wheel will vary according to traffic conditions road surface conditions vehicle condi tion etc when parking It is neces sary to be fully aware of this before using the rear view monitor system When parking be sure to check that the...

Page 151: ... wider than the actual vehicle width Vehicle centre guide line This line indicates the estimated vehicle centre on the ground Distance guide line Shows distance behind the vehicle Displays a point approximately 0 5 m 1 5 ft red from the edge of the bumper Distance guide line Shows distance behind the vehicle Displays a point approximately 1 m 3 ft blue from the edge of the bumper The rear view mon...

Page 152: ...e to either cor ner of the bumper or under the bumper cannot be displayed The camera uses a special lens The distance of the image that appears on the screen differs from the actual dis tance Items which are located higher than the camera may not be displayed on the monitor The camera for the rear view moni tor system is located as shown in the illustration Hatchback Wagon Using the camera If dirt...

Page 153: ...n the road NOTICE The rear view monitor system may not operate properly in the following cases If the back of the vehicle is hit the position and mounting angle of the camera may change As the camera has a water proof construction do not detach disas semble or modify it This may cause incorrect operation When cleaning the camera lens flush the camera with a large quan tity of water and wipe it wit...

Page 154: ...jects will appear to be closer than they actually are In the same way there will be a margin of error between the guide lines and the actual distance course on the road When any part of the vehicle sags When any part of the vehicle sags due to the number of passengers or the distribution of the load there is a margin of error between the fixed guide lines on the screen and the actual distance cour...

Page 155: ...the case shown below the truck appears to be outside of the vehicle width guide lines and the vehicle does not look as if it hits the truck However the rear body of the truck may actually cross over the vehicle width guide lines In reality if you back up as guided by the vehicle width guide lines the vehicle may hit the truck Vehicle width guide lines Distance guide lines Visually check the surrou...

Page 156: ...156 COROLLA_COROLLA HV TMUK _Navi_ EE 6 1 Rear view monitor system ...

Page 157: ...eign matter mud etc is adhering to the camera Sunlight or headlights are shining directly into the camera The vehicle is under fluo rescent lights sodium lights mercury lights etc Back up while visually checking the vehicle s surroundings Use the monitor again once condi tions have been improved The procedure for adjusting the picture quality of the rear view monitor system is the same as the proc...

Page 158: ...ted by any Toyota retailer or Toyota authorized repairer or any reliable repairer The vehicle is tilted there is a heavy load on the vehicle tyre pressure is low due to a tyre punc ture etc The vehicle is used on an incline If this happens due to these causes it does not indicate a malfunction Back up while visually checking the vehicle s surroundings Symptom Likely cause Solution ...

Page 159: ...hones Quick reference 160 Some basics 161 Placing a call using the Bluetooth hands free system 165 Receiving a call using the Bluetooth hands free system 169 Talking on the Bluetooth hands free system 169 Bluetooth phone message function 171 7 2 Setup Phone settings 176 7 3 What to do if Troubleshooting 185 ...

Page 160: ...n be used on phone operation Registering connecting a Bluetooth device P 34 Placing a call using the Bluetooth hands free system P 165 Receiving a call using the Bluetooth hands free system P 169 Talking on the Bluetooth hands free system P 169 The following function can be used on message function Using the Bluetooth phone message function P 171 The following settings can be made in system Phone ...

Page 161: ...ree system Miracast or MirrorLink via Wi Fi the commu nication speed may decrease or mal functions may occur such as image distortion or audio skipping If a Bluetooth device is connected to the system the interference it may cause will be reduced When carrying a device with its Bluetooth connection enabled make sure to register it to the system and connect it or disable its Bluetooth function When...

Page 162: ... connection is complete If an error message is displayed follow the guidance on the screen to try again Bluetooth phone condition display The condition of the Bluetooth phone appears on the upper right side of the screen P 15 Steering switch By pressing the phone switch a call can be received or ended without taking your hands off the steering wheel WARNING Before using Bluetooth devices users of ...

Page 163: ...ith the other party on the phone If both parties speak at the same time the other party may not hear what has been said This is not a malfunction Keep call volume down Otherwise the other party s voice may be audible outside the vehicle and voice echo may increase When talking on the phone speak clearly towards the microphone The other party may not hear you clearly when Driving on an unpaved road...

Page 164: ...en a phone s registration is deleted the above mentioned data is also deleted A lot of personal data is registered when the hands free system is used When selling or disposing of the vehicle initialize the data P 51 The following data in the system can be initialized Contact data Call history data Favourites data Image data All phone settings Message settings Once initialized the data and settings...

Page 165: ...ct In this case select the number to make a call properly 3 Check that the dialing screen is displayed The icons of call type are displayed Missed call Incoming call Outgoing call When making a call to the same num ber continuously only the most recent call is listed in call history When a phone number registered in the contact list is received the name is displayed Number withheld calls are also ...

Page 166: ... 2 Select Contacts and select the desired contact 3 Select the desired number Add favourite Remove favourite Select to register remove the contact in the favourites list P 182 183 E mail addresses Select to display all registered e mail addresses for the contact 4 Check that the dialing screen is displayed For PBAP compatible Bluetooth phones when Automatic transfer is set to on P 179 Contacts are...

Page 167: ...sary to perform addi tional steps on the phone when trans ferring contact data The registered image in the contact list may not transfer depending on the type of Bluetooth phone connected 1 Display the phone top screen P 160 2 Select Keypad and enter the phone number 3 Select or press the switch on the steering wheel 4 Check that the dialing screen is displayed Depending on the type of Bluetooth p...

Page 168: ...ne top screen P 160 2 Select Favourites and select Toyota assistance 3 Select 4 Check that the dialing screen is displayed The current location of the vehi cle is displayed on the screen 1 Display the home screen P 27 2 Select the desired contact 3 Check that the dialing screen is displayed 1 Select and hold the screen but ton to add a contact 2 Select the desired contact 3 Select the desired numb...

Page 169: ...oth phone both the system and Bluetooth phone may ring simultane ously when there is an incoming call P 176 Select to display the keypad to send tones P 170 Select to send tones This but ton only appears when a num ber that contains a w is dialed in hands free mode P 170 Select to adjust your voice vol ume that the other party hears from their speaker P 170 Select to mute your voice to the other p...

Page 170: ...string that consists of numbers and the characters p or w e g 056133w0123p 1 When the p pause tone is used the tone data up until the next pause tone will be automatically sent after 2 sec onds have elapsed When the w pause tone is used the tone data up until the next pause tone will be auto matically sent after a user operation is performed Release tones can be used when automated operation of a ...

Page 171: ...switched This function may not be available depending on the type of cellular phone 1 Display the phone top screen P 160 2 Select Message A confirmation message appears when the Automatic message transfer function is set to off P 183 select Yes 3 Check that the message screen is displayed Phone Select to change to phone mode The account name is displayed on the left side of screen Account names ar...

Page 172: ...us with the system some information may not be displayed The pop up screen is separately avail able for incoming e mail and SMS MMS messages under the fol lowing conditions E mail Incoming E mail display is set to Full screen P 177 E mail notification pop up is set to on P 177 SMS MMS Incoming SMS MMS display is set to Full screen P 177 SMS MMS notification pop up is set to on P 177 1 Display the ...

Page 173: ...read to mark mail unread or read on the message screen This function is available when Update message read status on phone is set to on P 183 1 Display the message screen P 171 2 Select the desired outbox from the list displayed on the left side of the screen 3 Select the desired message from the list 4 Check that the message is dis played Re send Select to re send the mes sage This switch is disp...

Page 174: ...lect Send Cancel Select to cancel sending the message While the message is being sent a sending message screen is displayed 8 Check that a confirmation screen is displayed when the operation is complete If an error message is displayed follow the guidance on the screen to try again Depending on the type of Bluetooth phone reply function is not available Editing quick reply messages This operation ...

Page 175: ... that the dialing screen is displayed Calling from a number within a message Calls can be made to a number identified in a message s text area This operation cannot be performed while driving 1 Display the message screen P 171 2 Select a desired account name that is displayed on the left side of screen 3 Select the desired message 4 Select the text area Identified phone numbers con tained in the m...

Page 176: ...Message settings P 183 Toyota assistance settings P 184 With navigation function The call and ringtone volume can be adjusted A ringtone can be selected 1 Display the phone settings screen P 176 2 Select Sounds 3 Select the desired item to be set Select to set the desired ringtone Select or to adjust the ringtone volume Select or to adjust the default volume of the other party s voice Phone settin...

Page 177: ...sired item to be set Select to change the incoming call display Full screen When a call is received the incoming call screen is displayed and can be operated on the screen Drop down A message is displayed at the top of the screen Select to set the SMS MMS noti fication pop up on off Select to change the incoming SMS MMS display Full screen When an SMS MMS message is received the incoming SMS MMS d...

Page 178: ...d favourites can be added edited and deleted Also the call history can be deleted 1 Display the phone settings screen P 176 2 Select Contacts Call history 3 Select the desired item to be set For PBAP compatible Bluetooth phones Select to change the contact history transfer settings P 179 Select to update contacts from the connected phone or a USB memory P 180 Select to sort contacts by the first n...

Page 179: ...ed Select to update contacts from the connected phone P 179 Select to set the transferred contact image display on off Select to reset all setup items Updating contacts from phone 1 Select Update now Contacts are transferred auto matically 2 Check that a confirmation screen is displayed when the operation is complete This operation may be unneces sary depending on the type of cellular phone If ano...

Page 180: ...ne and replace the current one Add contact Select to transfer the desired contact data from the con nected cellular phone to add to the cur rent one 4 Transfer the contact data to the system using a Bluetooth phone This operation may be unneces sary depending on the type of cellular phone To cancel this function select Cancel 5 Check that a confirmation screen is displayed when the operation is co...

Page 181: ...If the USB device or Bluetooth phone is removed before downloading is complete New contact data can be regis tered Up to 4 numbers per person can be registered For PBAP compatible Bluetooth phones this function is available when Automatic transfer is set to off P 179 1 Select New contact 2 Enter the name and select OK 3 Enter the phone number and select OK 4 Select the phone type for the phone num...

Page 182: ...ect Add favourite 2 Select the desired contact to add to the favourites list Dimmed contacts are already stored as a favourites When 15 contacts have already been registered to the favourites list a registered contact needs to be replaced Select Yes when the confirma tion screen appears and select the contact to be replaced 3 Check that a confirmation screen is displayed when the operation is comp...

Page 183: ...omatic mes sage readout on off Select to set updating message read status on phone on off Select to set display of messag ing account names on the mes sage screen on off When set to on messaging account names used on the cel lular phone will be displayed Select to change the vehicle sig nature settings P 183 Select to reset all setup items Depending on the phone these func tions may not be availab...

Page 184: ...tance set tings 3 Select the country 4 Check that a confirmation screen is displayed when the operation is complete 1 Display the phone top screen P 160 2 Select Favourites 3 Select Toyota assistance 4 Select the registered country s screen button 5 Select the country 6 Select Yes when the confirma tion screen appears Toyota assistance set tings screen Registering a country Registering a country i...

Page 185: ...this system and the cellular phone then regis ter the cellular phone you wish to connect to this system P 40 Another Bluetooth device is already connected Manually connect the cellular phone you wish to use to this sys tem P 38 Bluetooth function is not enabled on the cellular phone Enable the Bluetooth function on the cellular phone Automatic Bluetooth connec tion on this system is set to off Set...

Page 186: ...is out of the ser vice area Move to where no longer appears on the display Automatic contact transfer function on this system is set to off Set automatic contact transfer func tion on this system to on P 178 Passcode has not been entered on the cellular phone Enter the passcode on the cellular phone if requested default passcode 1234 Transfer operation on the cel lular phone has not com pleted Com...

Page 187: ...ec tion confirmation display on this system to off P 42 The engine switch power switch is in ACC or ON The cellular phone is not close enough to this system Bring the cellular phone closer to this system Radio interference has occurred Turn off Wi Fi devices or other devices that may emit radio waves The cellular phone is the most likely cause of the symptom Turn the cellular phone off remove and ...

Page 188: ...llular phone s security software and close all applications Before using an application installed on the cellular phone carefully check its source and how its operation might affect this sys tem For details refer to the owner s man ual that came with the cellular phone ...

Page 189: ...nline Toyota online 8 1 Toyota online Toyota online 190 Settings required for using the service 193 Online search 194 Importing favourites and stored routes 194 Street View 196 Weather 196 Parking 197 Fuel price 198 8 2 Setup Toyota online settings 200 ...

Page 190: ...ars etc that are not registered in the system can be set as a destination Importing favourites and routes Establishments that were searched using a personal computer can be set as a destination and can be reg istered as favourites Street View The Street View of the desired location can be viewed Weather Weather information for a desired location can be displayed Fuel price Fuel price information f...

Page 191: ... the internet The Wi Fi CERTIFIEDTM Logo is a certification mark of the Wi Fi Alliance Name operation Your personal computer and Toyota portal site Access Toyota portal site and search POIs and routes Toyota portal site The POIs and routes are saved on Toyota portal site System Via the internet the POIs and routes are downloaded to the system For details about Toyota portal site refer to www my to...

Page 192: ...efore using Toyota online There are 2 methods to make new account P 193 Obtaining an account via Toyota Portal site P 193 Obtaining an account via the system P 193 When using a cellular phone to connect to the internet observe the following precautions In order to use this service a Wi Fi connection or Bluetooth PAN compatible cellular phone with sufficient network coverage and a SIM card with a c...

Page 193: ...Online 4 Select Toyota web account 5 Select Existing account 6 Input required information 1 Press the SETUP button 2 Select Online 3 Select Toyota Online 4 Select Toyota web account 5 Select New account 6 Input required information The system must be connected to the internet to use this service Via a Bluetooth device P 34 Via Wi Fi P 45 Settings required for using the service Obtaining Toyota por...

Page 194: ...searched on Toyota portal site can be downloaded to the system and saved as favourites There are 2 methods to download POIs and routes to the system a After saving the POIs and routes on Toyota portal site they can be downloaded via the internet b After saving the POIs and routes on Toyota portal site download them to a USB mem ory The POIs and routes can then be downloaded via the USB memory When...

Page 195: ...en if there is same name of favour ite it will be displayed on the list with out overwrite 1 Connect a device 2 Select Yes on the popup which tells Your USB device contains POIs and or routes Add these to the navigation favourites 3 Waiting the process 4 Complete screen will be dis played All routes and favourites are cop ied Favourites that are located outside of the map s data range cannot be re...

Page 196: ...ca tion of weather information P 196 Forecast Select to display the weather forecast for the next 5 days Current Select to display the weather for current time Select to update the weather infor mation 1 Display the weather screen P 196 2 Select Location 3 Select the desired item to search for a point At destination Select to set a location by using a current destination Current location Select to...

Page 197: ... Select on the map screen 3 Select Parking 4 POI list with parking will be dis played if there is any informa tion on offline or online database Select to sort by distance Select to sort alphabetically by POI name Select to sort by price This function needs an Internet con nection and a login on the Toyota server Select to display the list with map Parking Parking information for a desired locatio...

Page 198: ...te Select to sort by around cur rent route Only available if destination is set 1 Press the MAP button P 56 2 Select on the map screen 3 Select Fuel 4 POI list with fuel prices will be displayed if there is any infor mation on offline or online data base Select to sort by distance Select to sort by brand Select to sort by price This function needs an Internet con nection and a login on the Toyota ...

Page 199: ...uidance screen P 79 Call Select to call the registered phone number P 169 Select to display the Street View P 196 1 Display the fuel price screen P 198 2 Select search area Nearby Select to sort by around cur rent location Destination Select to sort by around destination On route Select to sort by around cur rent route Only available if destination is set Changing location ...

Page 200: ...ions which are downloaded on the system Selecting an application displays the application Information screen with a button on it which allows removing the respective application Select to change the order of application contents Select to choose which applica tion shall auto start after the system is started 1 Display the Toyota online set tings screen P 200 2 Select Toyota web account Toyota onli...

Page 201: ...arch engine the terms of use must be read and agreed to on Toyota portal site Depending on the conditions certain search engines cannot be selected 1 Display the Toyota online set tings screen P 200 2 Select Search provider 3 Select the desired search engine The selected search engine indi cator will illuminate It is possible to change the pre ferred fuel grade used for price information 1 Display...

Page 202: ...202 COROLLA_COROLLA HV TMUK _Navi_ EE 8 2 Setup ...

Page 203: ...203 COROLLA_COROLLA HV TMUK _Navi_ EE Index Alphabetical Index 204 ...

Page 204: ...for mation 41 Registering a Bluetooth device 40 Bluetooth device information 41 Bluetooth hands free system 160 Bluetooth phone message function 171 Calling the message sender 175 Checking received messages 172 Checking sent messages 173 Create new message 173 Displaying the message screen 171 Receiving a message 172 Replying to a message quick reply 174 C Clock settings 50 Command list 144 Connec...

Page 205: ...ing the system 24 iPod 117 L Linking multi information display and the system 33 M Map button Menu screen 13 56 Map screen information 63 Displaying POI information 66 Displaying various information on the map 63 POI icons 64 Map screen operation Current position display 19 61 Map layout 62 Map scale 19 61 Screen scroll operation 19 61 Map settings 93 Displaying map setting screen 93 MENU button 1...

Page 206: ...ad 153 Driving precautions 150 Precautions 152 Screen description 151 Things you should know 157 When approaching three dimen sional objects 155 Receiving a call using the Bluetooth hands free system 169 Registering an entry 89 Creating a new entry 89 Displaying favourites list 89 Downloading POIs and routes via the internet 90 Registering a quick access destina tions 89 Transferring POIs and rout...

Page 207: ...ng calls while a call is in pro gress 170 Transmit volume setting 170 Touch screen 25 Touch screen gestures 25 Touch screen operation 26 Toyota online 190 Before using Toyota online 192 Names and operations of each part 190 Toyota online settings 200 Toyota online settings screen 200 Traffic message settings 96 Displaying traffic settings screen 96 Traffic messages 67 Traffic message icon on the m...

Page 208: ..._Navi_ EE Alphabetical Index For more information about the following items see the Owner s Manual Energy monitor COROLLA HYBRID Fuel consumption Toyota parking assist sensor Vehicle customisation settings Drive mode customisation ...

Page 209: ...209 COROLLA_COROLLA HV TMUK _Navi_ EE Alphabetical Index ...

Page 210: ...210 COROLLA_COROLLA HV TMUK _Navi_ EE Map database information and updates ...

Page 211: ...211 COROLLA_COROLLA HV TMUK _Navi_ EE ...

Page 212: ...212 COROLLA_COROLLA HV TMUK _Navi_ EE ...

Page 213: ...213 COROLLA_COROLLA HV TMUK _Navi_ EE Certification ...

Page 214: ...214 COROLLA_COROLLA HV TMUK _Navi_ EE ...

Page 215: ...215 COROLLA_COROLLA HV TMUK _Navi_ EE ...

Page 216: ...216 COROLLA_COROLLA HV TMUK _Navi_ EE ...

Page 217: ...217 COROLLA_COROLLA HV TMUK _Navi_ EE ...

Page 218: ...218 COROLLA_COROLLA HV TMUK _Navi_ EE ...

Page 219: ...219 COROLLA_COROLLA HV TMUK _Navi_ EE ...

Page 220: ...220 COROLLA_COROLLA HV TMUK _Navi_ EE ...

Page 221: ...221 COROLLA_COROLLA HV TMUK _Navi_ EE ...

Page 222: ... TMUK _Navi_ EE Gracenote the Gracenote logo and logotype Powered by Gracenote MusicID Playlist Plus and MediaVOCS are either registered trademarks or trademarks of Gracenote Inc in the United States and or other coun tries ...

Reviews: