


About FIPS Mode,
cont...
When FIPS mode is enabled, the video system will operate
according to NIST FIPS 140-2 Level 1 requirements. This means
that only services and cryptographic algorithms that are accepted
according to this standard will be used. Options and menu items
which is not approved will be grayed out and/or not be selectable
in the menus.
Certificate management
NIST issues certificates to products that has been verified and
tested to comply with this standard, as of this writing TANDBERG
is in the process of obtaining such a certificate.
Uploading HTTPS certificate for FIPS Mode
When in FIPS mode, we recommend using HTTPS for web management
instead of HTTP. HTTPS in FIPS mode requires a user installed certificate
to operate.
Be sure to enable FIPS mode first (using either the remote control
or the dataport interface, then in a secure environment, use the
HTTP protocol to install the required certificates before doing
a restart to the video system. See the previous page on how to
enable FIPS Mode.
To ensure the authenticity of an endpoint, it is recommended that the
administrator issues/obtains and installs unique certificates to each
endpoint. This is done through the Web Interface.
To install a certificate, you need:
•
HTTPS certificate ( .PEM format)
•
Private key ( .PEM format)
•
Passphrase (optional)
•
The IP Address of the video system (see Control Panel > Diagnostics >
System Information)
The software upload procedure
NOTE!
The certificate must be installed AFTER enabling FIPS mode,
using HTTP (not HTTPS) access to the codec. This must be done by
an administrator in a secure environment, since the installation of the
certificate must occur over an unsecure link (HTTP) and sensitive files
(such as the private key) are being uploaded.
1.
Start a Web-browser on your PC and type in the
IP-ADDRESS
of your
video system.
2.
If the video system is setup with an IP Access Password you must
enter the password. The default IP Access Password is TANDBERG.
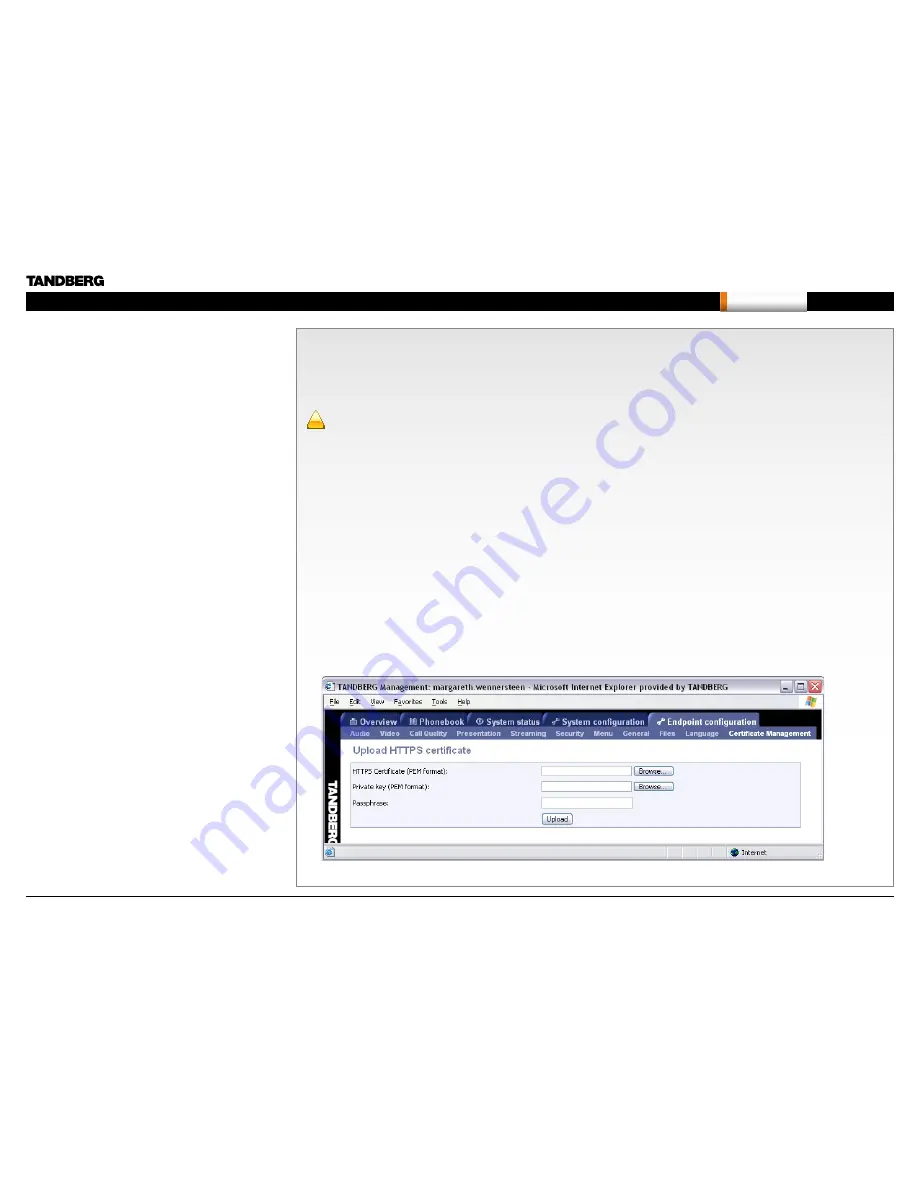
3.
Go to Endpoint Configuration > Certificate Management
4.
Press
BROWSE
to locate the files for the HTTPS certificate and Private
Key <
.pem format
>
5.
Type in the Passphrase and press
UPLOAD
to upload the certificate
and private key
After having uploaded the Certificate
1.
After the certificate installation, it is recommended to disable HTTP and
use only HTTPS. Go to Control Panel > Network > LAN Settings > IP
Services to disable
HTTP
(set to
OFF
) and enable
HTTPS
(set to
ON
).
2.
Press the
SAVE AND RESTART
button for the changes to take effect.
!
D14033.06—AUGUST 2010
326
MXP
Administrator Guide
Contents
Introduction
Getting started
The menu structure
The settings library
Using the system
Physical interfaces
Peripheral equipment
Contact us
Appendices
Appendices


