background image

3. 

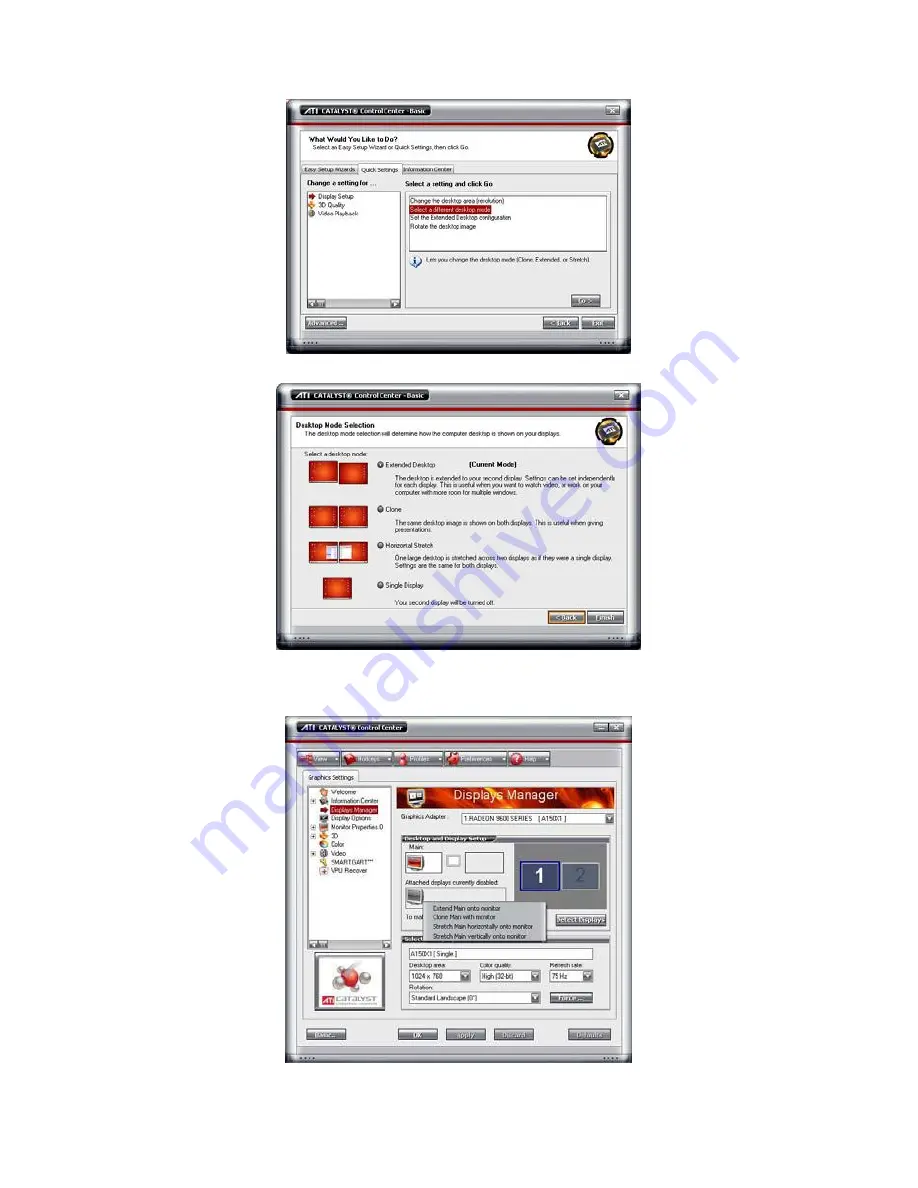
If user selected Basic mode, press the 

Quick Settings

 tab. Then select the 

Select a different 

desktop  mode

 and click 

Go

.  


4. 

Select the 

Extended Desktop

 and then click 

Finish


5. 

If user selected the Advanced mode, click the 

View

 button.  

6. 

In 

Display Manager

, right click on the second Display on the right side and select 

Extend Main 

onto monitor

.  


7. 

Adjust each monitor resolution to 1024x768 

1280x1024 ,1920x1200, 1440x900, or 1680x1050. 


3

Summary of Contents for CMPC

Page 1: ...CMPC Central Management System User Manual Version 7 3 Oct 2008...

Page 2: ...ufacturer be liable for direct indirect special incidental or consequential damages arising out of the use or inability to use this product or documentation even if advised of the possibility of such...

Page 3: ...Application 8 3 3 Using the MiniCenter Viewer 10 3 3 1 Remote Bakup 12 3 3 1 1 Remote Setup 14 System Setting 14 Camera Setting 16 Record Setting 17 Network Setting 19 Schedule Setting 22 Alarm Setti...

Page 4: ...g 57 4 7 1 3 To Set the MMS SMS Setting 58 4 7 1 4 Launch program 58 4 7 1 5 Popup Video 59 4 8 User Setting 61 CHAPTER 5 USING THE PLAYBACK FUNCTION 62 5 1 To Playback the video 62 5 2 Using the Loca...

Page 5: ...ke the DVR program the CMPC system also automatically records and displays video when an event has occurred on the remote side of the DVR server You can also playback video files locally or download f...

Page 6: ...on the upper right corner of the CMPC main screen Click About Register also see 3 2 1 On the Register dialog box note down the Activation number Send both the Activation number and Password to your d...

Page 7: ...ck Go 4 Select the Extended Desktop and then click Finish 5 If user selected the Advanced mode click the View button 6 In Display Manager right click on the second Display on the right side and select...

Page 8: ...eck the task bar The task bar will show on the first monitor only Monitor 1 Monitor 2 Manual Conventions The following conventions are used throughout this manual The caution symbol is intended to ale...

Page 9: ...l distributor Minimum System Requirements First must verify if the computer meets the minimum system requirements CPU Pentium 4 3 0GHz or above recommended OS Windows 2000 XP Professional Vista RAM 51...

Page 10: ...lation CD into the CD ROM drive then click Install CMPC And follow the on screen instructions 2 Enter the administrator ID and password 3 Click Finish 4 User may now run the CMPC program To run the ap...

Page 11: ...ick Start Programs CMPC CMPC For security purposes some of the features would require you to enter a User ID and Password before they can be accessed When the Authorization dialog box appears key in y...

Page 12: ...send video to the CMPC when an alarm has occurred The video stream before the eye indicates the latest occurrence Also there is a red frame which indicates the latest occurrence 1 2 3 4 5 6 7 8 9 10...

Page 13: ...If you are using a single monitor press ESC to revert back to the CMPC main application Switch to display live video from the selected DVR servers group If user is using a single monitor press ESC to...

Page 14: ...ation main screen Using the MiniCenter Viewer 13 1 2 3 4 12 5 6 Function View live video User can cancel the connection by clicking Disconnect button if the connecting time is too long Playback the al...

Page 15: ...is feature make sure the DVR remote server is enabled For more details on software usage please refer to the DVR user manual 10 Reset Alarm Clear the DVR server alarm list 11 Voice Phone Enable disabl...

Page 16: ...ow up and list all added DVR servers 3 Make sure CMPC is connecting to DVR servers If lost the connection with DVR server select the DVR server and click Reconnect button 4 Select the DVR server that...

Page 17: ...ckup Mode of DVR server will change to Manual 6 To execute manual backup select the file first Click File Select and select the files that user wants to backup and click OK 7 And then click Start to b...

Page 18: ...ant the system to automatically erase the event and alarm log files after a certain days enable the Delete event and alarm log after check box and enter the numbers of days in Days text box 3 Video St...

Page 19: ...playback the video Select date and time Select the date and time which user wants to playback Play the last file Automatically playback the video from the last hour Instant Playback Automatically play...

Page 20: ...lected camera When there is no video source on the camera we suggest disabling it so that the system won t detect it as video loss error 3 Camera Display Enable disable to show the video Even if the v...

Page 21: ...o select more than one camera Right click on the camera icon To select one camera only Left click on the camera icon The camera icon turns red when it is selected 2 Recording Mode The blocks from 00 t...

Page 22: ...pression level and uses more hard disk space 6 Frame Rate Set the maximum number of frames to be recorded during motion and motionless state The frame rate ranges from 1 to 30 for NTSC and 1 to 25 for...

Page 23: ...nfiguration Set the Server IP and Remote Console Port number The system will automatically detect your Server IP address You need this when accessing DVR server from the remote location via internet 4...

Page 24: ...st bar to set the Quality level and FrameRate level 7 WebCam Port Activate Enable Anonymous Login to remotely access the DVR server without the need of password The default of WebCam port is 5555 8 Vo...

Page 25: ...enable this option to make it work It is due to that DVR system has new security protocol and it s not compatible with old remote software Enable White List An access permit list for the remote acces...

Page 26: ...a that are not yet included in the archive To assign backup path click Make sure the backup folder and storage folder are not on the same drive Enable Network Activate DVR remote system to access at t...

Page 27: ...a selection 4 Click on the blocks to set the schedule Or click All to select all To store the setting click Save To remove the settings click Clear 5 To end Schedule Setting click OK to exit and acce...

Page 28: ...of the conditions or Trigger if all to activate if it falls to all conditions In Camera section select and click on the camera number 01 to 16 in Motion Detected and Video Loss to set the condition fo...

Page 29: ...Enable disable the Alarm Button check box to active manual alarm function To define alarm message of manually alarm trigger Click alarm button and select the alarm button and fill in the description...

Page 30: ...click Detail In the E mail Setting dialog box click OK to exit and save the setting and Cancel to exit without saving the setting 1 Mail Server Enter the SMTP Server and port If your e mail system req...

Page 31: ...s Setting to record the number of frames based on the Recording Setting or Max to record the maximum of frames based on the available speed 4 In the Stop Recording after text box set the number in sec...

Page 32: ...click OK to accept the new settings and Cancel to exit without saving 3 3 2 Using the MiniCenter PTZ Camera Controller 3 2 1 4 5 Name Function 1 AutoPan Operate the PTZ cameras automatically based on...

Page 33: ...application click the button to customize the CMPC system In the Authorization dialog box enter the administrator User ID and Password When the CMPC configuration setup selection appears select and cl...

Page 34: ...etwork service 2 Alarm Record Path By default the alarm folder is automatically generated to where the CMPC application is installed and for saving the alarm clip videos and log files The suggested ha...

Page 35: ...st click and select the language 4 Miscellaneous Date Format Select from different date formats 1 Click Setup 2 In the Authorization dialog box enter the administrator User ID and Password 3 Click Sys...

Page 36: ...Select model of the System Controller Port Select the com port that is connected with the System Controller Click Setup to configure com port value The com port value is shown in below table Baud rat...

Page 37: ...witch control to E map screen Switch control to Center screen Switch to view Monitor screens To call out Playback application Number button 1 Number button 2 Number button 3 Number button 4 Number but...

Page 38: ...W Switch to view Monitor screens To reset alarm status PLAYBACK To call out Playback application 1 Keyboard Number button 1 2 Keyboard Number button 2 3 Keyboard Number button 3 4 Keyboard Number butt...

Page 39: ...and date Play the recorded video file at the speed of 2x 4x 8x 16x or 32x Turn Right Play the record video file at the fast speed Turn Left Play the recorded video file at the speed of 1 2X 1 4X or 1...

Page 40: ...rs For example channel 10 press 1 0 FN To switch to split screen mode please press to enter function mode first Capture and save the screen shot either in jpg or bmp format in Playback mode Select the...

Page 41: ...n 0 To select the channel 1 9 press 0 channel number 1 9 or press channel 1 9 and wait about 1 second To select channel 10 32 Press 2 digital channel numbers For example channel 10 press 1 0 ESC Press...

Page 42: ...annel 1 9 and wait about 1 second To select channel 10 32 Press 2 digital channel numbers For example channel 10 press 1 0 ESC Press ESC to back to split mode from single channel view mode TAB 3 digit...

Page 43: ...and wait about 1 second Move to PTZ preset position 10 16 Press 2 digital numbers button For example preset position number 10 press 1 0 Please press button each time before press PTZ preset position...

Page 44: ...imes per day text box To check the graph on how fast the person response click Analysis When this feature is enabled the Attention dialog box would appear The person who is monitoring the system must...

Page 45: ...act information to let the personnel in the CMPC side know whom to get in touch with when an event has occurred 7 Select the Video Quality for video display on the CMPC system monitor screen When the...

Page 46: ...l transmitting frame rate depends on camera setting Click OK to save the setting i CMPC only supports two monitor set recording 5 After the Monitor set has been created select the DVR server And then...

Page 47: ...and click the radio button of type Hotspot Sequence Matrix Image or None Hotspot To set the channel for displaying selected camera channel video User can click and drag to select multiple channels as...

Page 48: ...the alarm event will display on screen until next alarm event come in On the DVR site user need to enable and configure the matrix to send to CMPC Image To insert an image on selected channel The imag...

Page 49: ...nd click and drag the monitor set to the monitor and press Refresh button To unselected monitor set click the mouse right button to unselect the monitor set Click and drag the monitor set to monitor f...

Page 50: ...Clcik to enable PTZ control panel 14 In Monitor screen user can click a channel to view in full screen Press Esc to back to multiple channel screen 46...

Page 51: ...ll the cameras to start video recording at the set time based on the Recording setting Backup Save another copy of all the data at the set time and specified backup path DVR automatically updates and...

Page 52: ...ic portion of time in that hour 1 Right click the colored blocks 2 In the Select time dialog box click to enable or disable the portion you want to set 3 Click OK to accept the setting and Cancel to e...

Page 53: ...when it is selected The block that appears in white doesn t have data If you want to set the specific time right click on the selected block Then set the time to start and end 4 Check the information...

Page 54: ...log box to stop archiving press Abort When done in the Backup Path list shows the archived item To burn the file in CD you need to have NERO 6 or above installed in your PC then select the item in the...

Page 55: ...E Map interface will show up in front of the CMPC application interface Press Esc or click Center button to switch back to CMPC application interface or press F3 to switch to E Map interface again 5...

Page 56: ...can double click the Map icon to view the map To edit and delete the map click the map icon and Edit and Delete button will appear on the Map interface Click Edit to modify the map see 4 4 1 1 5 6 To...

Page 57: ...er icon and the Edit and Delete buttons will appear on the Map interface Click Edit to modify the DVR server see 4 2 1 5 10 To delete the DVR server from the map click the DVR server icon and click De...

Page 58: ...ing To switch back to the main application press ESC To setup the E Map click button or right click the mouse button and select E Map setup and the E Map interface will switch to the E Map setup mode...

Page 59: ...setting and Cancel to exit without saving 4 7 1 To setup an alarm condition 1 Click the Add button to add a new alarm condition 2 Give the name of this alarm condition 3 Fill the simply description of...

Page 60: ...he phone number and description Click to select existing recorded sound and Record to make a new voice message When the Sound Recorder appears use the record control panel to record stop play rewind a...

Page 61: ...check if it is working click the Test Account button From Enter the sender e mail address To and CC Enter the recipient email address and separate it with comma or a semicolon Subject Enter the messa...

Page 62: ...you enable SMS setting just enter the message in the Message Text box Click SMS Test to verify the SMS setup is available If you enable MMS enter the Loing account Password APN name WAP IP MMS addres...

Page 63: ...ction of Popup video will be un gray and available for select The popup video will show up 4 windows at once On the upper right corner of popup video windows there two figures that are to represent na...

Page 64: ...see Chapter 3 3 To Setup Popup Video 1 Click Detail to call up Alarm Display Selection windows 2 Select the type of popup video Static View The DVR server only transmits one frame of video and popup o...

Page 65: ...ssword and Confirm password of the account 3 Select the DVR servers that allow this account user to preview and playback The DVR server with check mark means is selected 4 Select the Monitor set that...

Page 66: ...previously selected in Monitor and with the Record button enabled recorded can be recorded In the Video Playback Date Time Selection the numbers from 00 to 23 represent the time in 24 hour The number...

Page 67: ...of time While the red block indicates the selected recorded video for viewing 6 In the Time Selection screen click on the video thumbnail you want to download and open see also 5 3 Using the Download...

Page 68: ...e to switch to 9 16 and 13 split screen mode To zoom into an area on the screen Right click and Drag a square on the area you want to enlarge To view 32 channels click 16 split screen mode button to v...

Page 69: ...here to start playing the recorded video file 7 Status bar Display the recorded date time and play speed 8 Camera ID Show the number of cameras that are being viewed When you are in single screen mode...

Page 70: ...video file Show the number of cameras that are being viewed When you are in single screen mode click the camera ID number to switch and view other camera Export includes Snapshot Print Output Video Cl...

Page 71: ...ext event or changes in the motion detector frame You can use this when you are using Intelligent Search or Event Search function 11 Event Search from the recorded activities that take place in the sy...

Page 72: ...the specific time frame The Hour buttons represent the time in 24 hour clock The blue bar on top of the hour button indicates that there is a recorded video file on that period of time While the red...

Page 73: ...s on where to start playing the recorded video file 7 Camera ID Show the number of cameras that are being viewed When you are in single screen mode click the camera ID number to switch and view other...

Page 74: ...t click Segment button again 3 Click Output button to save the wanted clip 4 In the Save As dialog box locate on where you want to save the file type the filename and select the video format 5 6 To Se...

Page 75: ...o search If you select POS in the Find Text box type the word Then click OK to start searching The video search would stop at the frame that matches the condition To keep on searching click 4 You may...

Page 76: ...ar you may adjust the sensitivity bar and the motion detector frame size and location To set motion detector frame size and location left click and drag on the screen Then click OK to start searching...

Page 77: ...y display Alarm Motion DVR Reboot HDD fail Login DVR Connection Success Connection Loss Reset Alarm DVR Exit Login DVR or All Event Click Refresh to update the list and Export to output the event sear...

Reviews: