background image

8

Installation

Adjusting the running-length blocks

These adjustments must be made before the programming 
of the forces and the running-length.
Starting the programming procedure without correctly ad-
justed blocks may lead to damages on the garage door and 
the operator!

Vorgehensweise:

1. The operator is mounted and the door-arm is fixed to the gara-
ge-door. The trolley is locked to the chain and stands somewhere 
between the two blocks. If, however, trolley and chain need to be 
moved you may do this using the TEST/RUN button.

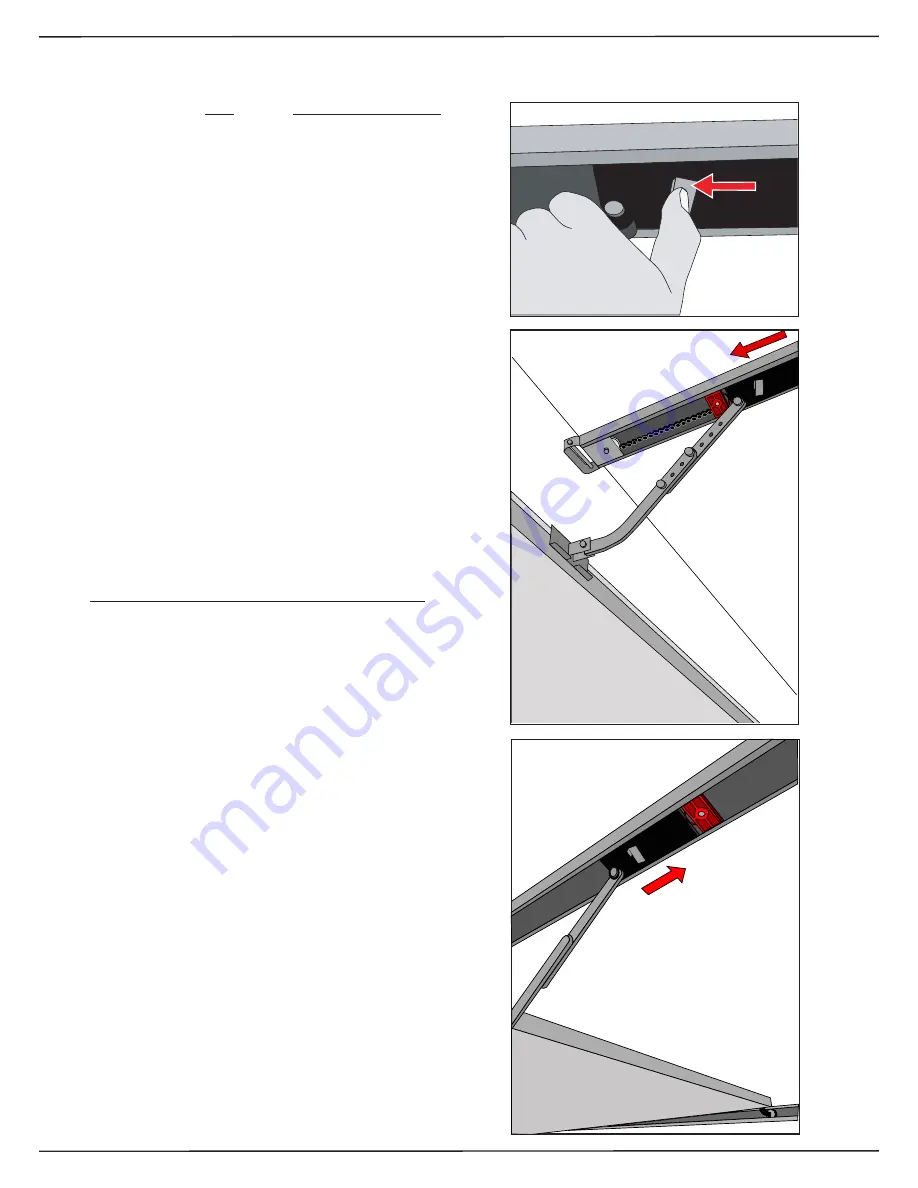
. Release the trolley (Pic. 1) and manually close the garage door.

3. The block for the closing direction is now right in front of the 
trolley (Pic. ). If not, the block must be moved until it touches the 
trolley.

4. Tighten the blocks‘ screw to keep it in place. Take care not to 
tighten it too strongly - the c-rail should not be bended.

5. Now the garage door needs to be opened manually. The trolley 
will lock into the chain - you have to release it once again to fully 
open the garage door. (Pic. 1).

6. The block for the opening direction is now right in front of the 
trolley (Pic. 3). If not, the block must be moved until it touches the 
trolley.
 
7. Tighten the blocks‘ screw to keep it in place. Take care not to 
tighten it too strongly - the c-rail should not be bended.

8. The trolley now needs to be locked back to the chain!


After that the programming procedure may be started (page 1 
onwards).

Summary of Contents for TS Akku II

Page 1: ...1V2 TS Akku II English Installation Instructions for the garage door operator This booklet must be handed over to the end user together with the user manual...

Page 2: ...on 2 Combined TEST LERN button functions Programming Running Length and Force 13 Information 1 Adjusting the running length blocks 2 Starting the programming mode 3 Start the learning cycle Quick Refe...

Page 3: ...s comply to the directives and the installation was made as to the manufacturers instructions the whole installa tion will normally be CE compliant Older Garage Doors When automating an older garage d...

Page 4: ...r according to the advises on page 3 and to the door manufacturer s manual If possible install the drive at a height of at least 2 10 m and the manual release at a height less than 1 80 m Locate the p...

Page 5: ...g situations If the garage door is higher than 2 250 mm you will need a c rail extension Two sizes of extensions are available 500mm and 1 000 mmm The operator may be extended by a maximum of 1 500mm...

Page 6: ...easure ment for the required running length When shipped the opera tor is programmed with a standard running length for factory testings If you want to run the operator for testing purposes you must f...

Page 7: ...ix the operator to the ceiling when you have made sure the C rail is running straight to the front Use the supplied bracket to fix the C rail to the ceiling pic 4 and 4a 5 Now fix the door arm to the...

Page 8: ...ck for the closing direction is now right in front of the trolley Pic 2 If not the block must be moved until it touches the trolley 4 Tighten the blocks screw to keep it in place Take care not to tigh...

Page 9: ...al opening cycle 4 Check the function of the emergency release together with a second person Stay inside the garage and close the door with the operator Let the second person open the door manually wi...

Page 10: ...batteries are shipped fully charged Usage The shelf will take two batteries The batteries may be used one after the other whilst one supplies the operator with power the other may be recharged by mea...

Page 11: ...on the status of the battery Usually it will be sufficient to leave the battery connected to the charger over night The charger is equipped with a automa tic cut off to pretend the battery from being...

Page 12: ...g advanced programming functions The LEARN button must be pressed for approx 3 sec the button can be released once the operator s light starts blinking Whilst the operator s light is blinking you can...

Page 13: ...he measured running length is now stored in the memory 3 4 The operator opens the garage door and measures the re quired opening force 3 5 The operator closes the garage door and measures the re quire...

Page 14: ...switched ON or OFF LED TEST FUNK is off pre warning is OFF LED TEST FUNK is glowing pre warning is ON 4 by shortly pressing the TEST RUN button the pre warning can be switched ON and OFF 5 after makin...

Page 15: ...or will procede with the remaining measurement runs When the operators light stops blinking all measured values are saved in the memory the BOTTOM soft stop now is in the programmed position Disabling...

Page 16: ...ong as the operators light in switched on it can therefore not be used for external remote receivers Receiver Module HF Modul Receiver Card Plug for a Seip receiver module Component Photocell without...

Page 17: ...stor The resistor on the P C B between Gnd and SLZ must therefore be removed 2 Hatch Door Contact A hatch door within the garage door can be secured with a switch when the switch is not activated e g...

Page 18: ...s instructions for programming Programming Transmitter and Receiver To use a hand transmitter it must first be registered programmed by the receiver Only one hand transmitter button can be used for on...

Page 19: ...teries run the lower the range will be Building materials of the garage In a garage made of concrete and steel you might reach a lower range than in an ordinary garage build of stone The more steel wa...

Page 20: ...pe Panasonic LC RA1212P Pre Warning Light adjustable Soft Stop in Closing Direction adjustable Net Running Length 2 640 mm Max Running Length with Extension 500 mm 4 050 mm Overall Length 3 200 mm Hei...

Page 21: ...on the electronics together with the red LED lamp on the outside of the housing With some of the messages the operators lighting will be blinking simultaneousely Messages from the red LED lamp and the...

Page 22: ...61000 3 2 2000 Limits for harmonic current emissions Grenzwerte f r Oberschwingstr me EN 61000 3 3 1995 Corrigendum 1997 A1 2001 Limitation of voltage changes voltage fluctuations and flicker in publ...

Page 23: ...other relevant provisions of the FTEG Article 3 of the R TTE Directive when used for its intended purpose bei bestimmungsgem er Verwendung den grundlegenden Anforderungen des 3 und den brigen einschl...

Page 24: ...24...

Reviews: