background image

LED R&D Lab(VD)

128

8. S-Box Installation and Connection

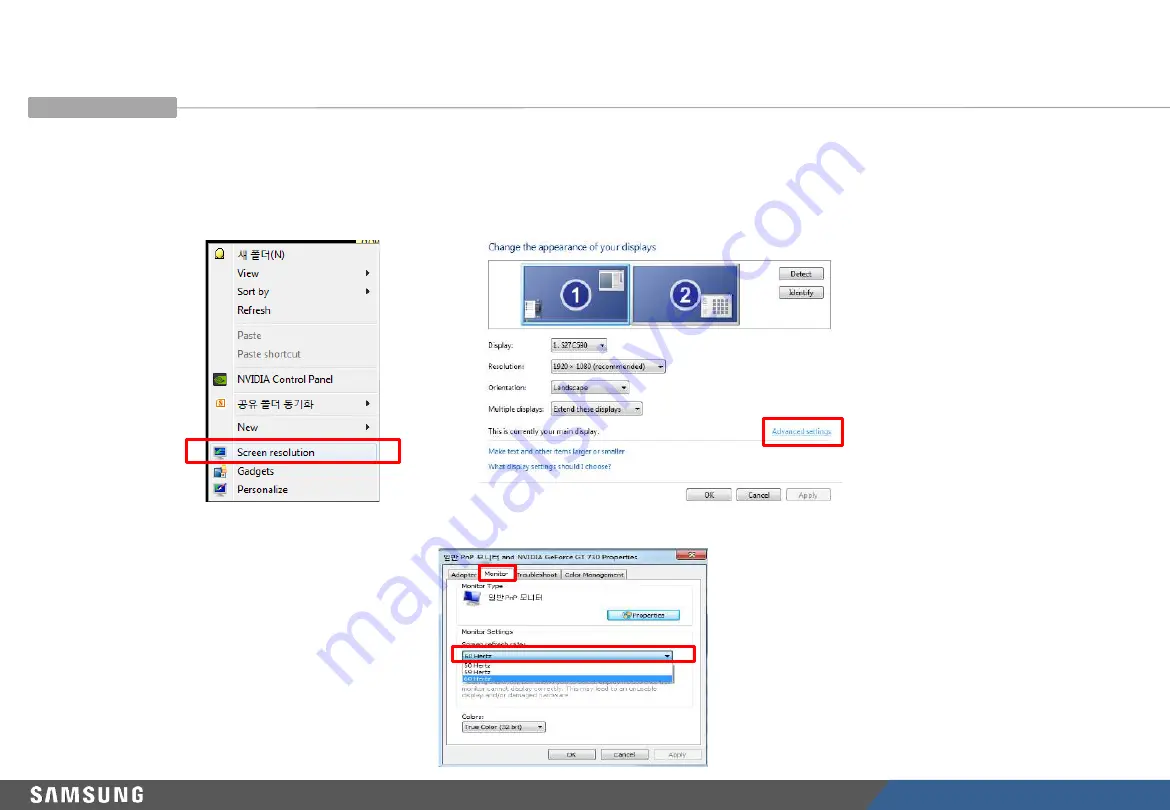
PC: Click the right button of mouse 

→ 

Click Screen resolution

→ 

Click Advanced settings

Click “Monitor” tap

→ 

Monitor Settings

→ 

Setup “Screen refresh rate” to 60Hz

• S-Box Connection (Panel Configuration)

Setup the resolution of input PC

Summary of Contents for IFA Series

Page 1: ...LED R D Lab VD LED Display Installation Manual IWA IFA Series LH0 IWA W LH0 IFA VS Ver 3 3 ...

Page 2: ...d P 53 54 Delete page reference text Part 2 7 1 7 2021 08 04 Some pages for Multiview were added in Appendix section 1 8 2021 08 06 Apply NADO requests 1 9 2021 09 03 Apply removing Grub bolt P 35 2 0 2021 10 26 Apply module concave shape problem solution P 38 39 2 1 2021 11 26 IWA P0 84 Power Consumption Update Page 10 126 2 2 2021 12 02 Horizontal resolution of 8K has been corrected 2 3 2021 12 ...

Page 3: ...hanged because of docking connector limitation Only power connection from docking can be cut by physical switch externally 3 0 2022 03 03 Modify contents of screw for UL corresponding structure and screw for y axis adjustment change of Assy Accessory screw components p 26 27 p38 p42 p63 3 1 2022 03 07 Add mandatory confirmation guide before installation p9 3 2 2022 04 13 Add Cable Only Connection ...

Page 4: ...rse than Samsung working condition 0 C 40 C 10 80 RH Case when it elapses longer than 7 days after unpacking them even though the environment condition satisfies Samsung working condition 0 C 40 C 10 80 RH Case when production date on the label elapses more than 6 months even though vacuum packaging is sealed Case when volatile chemicals such as oil paint solvent are used in same place of installa...

Page 5: ...quipped on the site while the screen is installed it is useful to analyze the cause of line defects 1 Play a specific pattern of LSM program without any cabinets This pattern should be used If other pattern is used it can cause line defects 2 Inspect cabinets with darker solid patterns W R G B and turn off cabinets It should take less than 30 seconds to show each solid patter and you can refer to ...

Page 6: ...tern is shown in it OCM cable connection can be checked through this Before turning off S Box turn off the cabinets first After being sure S Box plays this pattern turn on the cabinets 4 After completing installation of cabinets start 24hr dehumidification process 5 After finishing 24hr dehumidification process do edge correction and module calibration Dehumidification guidance during installation...

Page 7: ...dition When environment condition is exceed operation condition products are out of warranty Please check environment condition Even products are operating if the installed place have extra construction such as interior modification MUST do dehumidification following installation condition It is possible to happen dew condensation on surface of products even though working on operating condition W...

Page 8: ... is colder than environment temperature or hot humid air blow to cooled surface of products cf Principle of happening dew on surface of glass which have ice Case when dew condensation is happen on products it is possible to be the root of defect In this case it is possible to be out of warranty This contents must be noticed to customer Please print this page and hand it to user ...

Page 9: ...on may form depending on the ambient humidity and the temperature of the screen If the A C and the screen are close install a wind shield as shown in the figure below to prevent condensation Windshield This contents must be noticed to customer Please print this page and hand it to user Prevention of condensation by Air Conditioner ...

Page 10: ... installing the cabinet IWA do not use the cabinet with different LED rank and film rank Each cabinet has its own LED Film Rank information It must be installed as a set of the same rank Module Cabinet Box Module LED Rank Film Rank Cabinet LED Rank Box LED Rank Film Rank LED Rank 10 digit Film Rank 4 digit ...

Page 11: ...allation 3 Frame Kit Components 4 Frame Installation 5 Cabinet Frame Installation 6 Frame Bezel Components 7 Frame Bezel Installation 8 S Box Installation and Connection 9 Connections Power and Signal 10 Settings How to Use Appendix 1 S Box Network IP Setting Appendix 2 S Box SNOWJ U Setting Contents ...

Page 12: ...ries Package Type 60Hz Refresh Rate Compatible S Box SNOW JAU SNOW JMU SNOW RAF SNOW AAE Product Specification This manual is an installation manual for IWA IFA and can be applied to the following models Same installation specifications for each pitch SNOW AAE model is expected to be developed in June 2021 1 Product Information and Installation Precautions ...

Page 13: ...ntity 4 X 3 12EA Weight Cabinet 11 5 kg 11 2 kg Power Consumption W 140W 140W 150W Maximum Connection Quantity 110V 6EA 220V 10EA Power supply through a docking connection is available only when data is also supplied through same docking connection Brightness nit Max 500 800 1000 Peak 1600 1600 1400 Screen 4K 4x4 16EA 6x6 36EA 8x8 64EA 6K 6x6 36EA 9x9 81EA 12x12 144EA 8K 8x8 64EA 12x12 144EA 16x16...

Page 14: ...8 Module Quantity 4 X 3 12EA Weight Cabinet 12 kg 11 7 kg Power Consumption W 240W 210W 210W Maximum Connection Quantity 110V 4EA 220V 7EA Power supply through a docking connection is available only when data is also supplied through same docking connection Brightness nit Max 1000 1200 1200 Peak 1600 2400 1700 Screen FHD 5x5 25EA 6x6 36EA 10x10 100EA UHD 10x10 100EA 12x12 144EA 20x20 400EA ...

Page 15: ...VG LFA33SWW 3 3 9 Set VG LFA44SWW 4 4 16 Set VG LFA55SWW 5 5 25 Set Unfixed Horizontal bar VG LFAH8SWW Vertical bar Frame VG LFAV1SWW Level 1 VG LFAV2SWW Level 2 VG LFAV3SWW Level 3 VG LFAV4SWW Level 4 VG LFAV5SWW Level 5 L TYPE Inner VG LFAI4SLW Outer VG LFAO4SLW 1 Product Information and Installation Precautions ...

Page 16: ...LED R D Lab VD 15 Cabinet Product Info SBB SNOWJAU SBB SNOWJMU SBB SNOWRAF S Box I G IFA P4 2 IWA S Box IG SBB SNOWAAE S Box I G S Box IG 1 Product Information and Installation Precautions ...

Page 17: ...module be damaged due to the contact with the outside Beware not to put more than 12 layers Beware of LED Damage due to Static Electricity Beware not to touch LED screen with bare hands without putting gloves on Beware of LED Film Damage due to Metallic Substances Beware not to have metallic substances pulled in to the surface due to the magnetic force on the front side of the LED If any metallic ...

Page 18: ...factant halogen chlorine bromine and substances containing this component What to do if liquid comes in contact with the product If water gets on turn off the product immediately dry it enough for at least one day and then turn on the dehumidification mode Run to remove moisture inside the LED Refer to P74 Dehumidification mode using LSM If any liquid other than water gets on it remove it with alc...

Page 19: ...ff on screen surface can damage LED chip and film during cleaning Clear screen surface before cleaning Watch out for damage when cleaning gap between Half Cabinets Watch out for damage when cleaning gap between Modules Do not insert any cleaning tool or spay cleaner directly into the gap Do not wipe the LED surface with hard materials such as paper towels brushes comb or brush acrylic or steel Do ...

Page 20: ...tem be careful not to affect the product Air temperature measurement position Measure 300mm separated from the center of the product Air vent Aperture ratio Use the mesh type air vent If Aperture ratio is not 100 Separation Distance Minimum Separation Distance Aperture ratio 100 Aperture ratio 𝑐𝑐 𝑋𝑋 𝑑𝑑 𝑋𝑋 𝑁𝑁𝑁𝑁 𝑜𝑜𝑜𝑜 𝑣𝑣𝑣𝑣𝑣𝑣𝑣𝑣 ℎ𝑜𝑜𝑜𝑜𝑜𝑜 𝐴𝐴 𝑋𝑋 𝐵𝐵 A B d c wall Air Temperature measurement position 300mm 1...

Page 21: ... so sufficient margin is required Ebm papst http www ebmpapst com Example size 60 60 32 Example flow MAX 48 3 CFM Installation quantity 3ea per row delta fan http www delta fan com Example size 60 60 38 Example flow MAX 54 5 CFM Installation quantity 3ea per row Outside air 30 5 Cabinets Total flow 400 CFM 80 CFM 80 CFM 80 CFM 80 CFM 80 CFM FAN 5 Cabinets Select MODEL SCREEN Fan margin required fo...

Page 22: ...LED R D Lab VD 21 Vertical wall installation if fan is not applied WALL Air vent area At least 30mm set ceiling At least 30mm set floor 1 Product Information and Installation Precautions ...

Page 23: ...rture ratio 100 At least 30mm Aperture ratio 100 Recommended condition 500mm or more set floor Recommended condition 500mm or more set ceiling WALL 1 Product Information and Installation Precautions If aperture ratio is not 100 Separation Distance Minimum Separation Distance Aperture ratio 100 ...

Page 24: ...3 Vertical wall installation when fan is applied WALL Air vent area Left and right side sealing Sealed except for FAN At least 30mm set ceiling At least 30mm set floor 1 Product Information and Installation Precautions ...

Page 25: ...ast 30mm Aperture ratio 100 Recommended condition 500mm or more set floor Recommended condition 500mm or more set ceiling If aperture ratio is not 100 Separation Distance Minimum Separation Distance Aperture ratio 100 1 Product Information and Installation Precautions Left and right side sealing Sealed except for FAN ...

Page 26: ...secure a field of view of about 150mm Fig 2 Same as the heat dissipation specification a space of at least 30mm above and below is required WALL 150mm 150mm 150mm Need to secure a field of view to check the position of the side screw Working with a fist screwdriver Fig 1 Secure 150mm of left and right space for serviceability Fig 2 work guide 1 Product Information and Installation Precautions At l...

Page 27: ...inimum separation distance from wall 30mm or more Aperture ratio 100 If Aperture ratio is not 100 Separation Distance Minimum Separation Distance Aperture ratio 100 When installing inclined Same as general installation at an angle of 30 or less Angle 30 or less WALL At least 30 mm WALL At least 30 mm 1 Product Information and Installation Precautions ...

Page 28: ... included in the Frame Kit are on the Frame kit installation page Supplied in Set accessory BN96 54106C x4 Recommended standard When purchasing the product as an optional item it must be purchased together MODULE SEPARATE JIG BN81 21574A Seam adjustment wrench includes a frame kit set 1 Product Information and Installation Precautions SERVICE KEY BN81 21590A x2 x2 x2 x4 SCREW MACHINE 6001 001202 x...

Page 29: ... Power Cord Depends on the country provided AC Power Cable BN39 02752A OCM Cable BN39 02743A 1 Product Information and Installation Precautions Purchase of VG WA10PKIT is needed Purchase of VG WR00PKIT is needed Removed Removed from W48 2021 For Cover Rear support during installation SCREW M4 L10 2ea SPACER EVA ...

Page 30: ...e level installation that goes only with horizontal direction without vertical docking connection Redundancy Specification varied by resolutions Redundancy Introduced to protect screens from blackout caused by malfunction from its components IG Redundancy 4K Secure backward signal path using IG Backward port S Box Redundancy IWA 8K Duplication builds of signal using 2EA S Box and IG BWD port B2C M...

Page 31: ...Docking Connection Signal and AC Power Connection Docking Connection in detail OCM Connector AC Power Connector 1 Product Information and Installation Precautions If the docking between cabinets is not completely connected the screen may not be output correctly If there is something wrong with the screen output check the docking status ...

Page 32: ...move the four screws for docking and press them again in the up down direction After checking the status fasten the four screws and fix the docking Fig2 If a connection error occurs again after fastening four screws remove two screws for the upper dock bottom of the cabinet standard and press them in the up down direction to check the connection status Fig3 LED Module BRACKET FRAME 1 Product Infor...

Page 33: ...wer is turned on If No Video is not output recheck the AC power supply above is required The No Video is also displayed in the following cabinet connected to Docking Sequentially No Video is displayed in the cabinet in the following direction If the Cabinet No Video below is not output the connection terminal needs to be checked i After AC power Off Disassembly LED module AC power On ii After asse...

Page 34: ... 4 S Box Media Source PC etc S Box I G Board First Cabinet Connect to Left or Right Last Cabinet I G Board S Box Interface Gender I G Interface Gender I G Cable Connection Features by location 1 Product Information and Installation Precautions ...

Page 35: ...allation 3 Frame Kit Components 4 Frame Installation 5 Cabinet Frame Installation 6 Frame Bezel Components 7 Frame Bezel Installation 8 S Box Installation and Connection 9 Connections Power and Signal 10 Settings How to Use Appendix 1 S Box Network IP Setting Appendix 2 S Box SNOWJ U Setting Contents ...

Page 36: ...box Fig 2 Remove the Top cushion and bag shielding Grab the handle inside take out the cabinet and open Al Bag Then remove the filament tape and PAD EPE Check if the Sliding Bolts are fixed well Fig 3 Fig 1 Packing Component Fig 2 Opening of Box Fig 3 Check the Bolt Al Bag Open Bag Zipper SLIDING BOLT LED set Box Top Cushion Bottom Cushion Accessory ...

Page 37: ...assemble cover corners Fig 5 When removing cover corners place cushion TOP first on the ground and then lay down the Cabinets to prevent Cabinets from warpage Then remove the cover corners Fig 5 Cover Corner Removal SCREW POINT CUSHION TOP O X 2 Preparation for Cabinet Installation Switch Toggle Fig 4 Before checking the screen remove PAD SHEET and attach SPACER EVA PAD SHEET Attaching Spacer Eva ...

Page 38: ...KING TOP SWICH AC Power Input DOCKING TOP w Cover DOCKING BOTTOM w Cover Cover to prevent exposure of the power supply Proceed to delete before assembly 2 Preparation for Cabinet Installation Cover to prevent exposure of the power supply Proceed to delete before assembly ...

Page 39: ...creen if you press the Switch once more the Factory Info window appears Each time you press the switch in the factory info window it changes in the order of gray dark red dark green and dark blue If you press and release the switch for more than 3 seconds in the factory info window it moves to NO VIDEO If you need a bright pattern press and release the switch for more than 3 seconds in the dark pa...

Page 40: ...r Power of Cabinets the power cable connected in should be gone down like the picture below Let Cover Power go down to connect the power cable Caution Lowering Cover Power will disconnect AC power connection from lower cabinet Please maintain Cover Power in closed position except to connect primary AC power cable Fig 6 Remove screw Fig 8 Move Cover Power SCREW 2pcs SIDE VIEW Fasten it until it com...

Page 41: ...king Dust Cap Removal of Upper Docking Dust Cap Remove the hook pin protruding from the front by pulling it out completely then lift the dust cap upwards to remove it Since the lower part of the docking dust cap is made of rubber it can be removed by pulling it downward without special equipment As there is a risk of electric shock be sure to perform the work below with AC power removed REAR FRONT...

Page 42: ...line works as follows 1 Take out the Cabinet and lay it down on the Cushion BOT Take out the cushion from the box as well 2 Detach the Module frame and main frame 3 Remove the Top Docking Screws 4 Lower the Top Docking and fixed the screws 2 Preparation for Cabinet Installation 1 2 3 4 ...

Page 43: ... down the Cabinet on the cushion Detach the Frame It is easier to separate them one by one than to separate them into a bucket 2 Assembly Push the middle side Main board and bridge board docking part Put down the frame according to the guide of the separated module After matching the upper left and right holes put it down 2 Preparation for Cabinet Installation ...

Page 44: ...he screen is directly exposed to the light source or when module shaping concave Light Reworking instruction 1 Disassemble the module Lay down the Cabinet on the cushion Detach the Frame It is easier to separate them one by one than to separate them into a bucket Remove 4 screws ...

Page 45: ...ule shaping concave Reworking instruction 2 Rotate screws like below in the ASSY Module to counterclockwise Proceed by referring to the production date of the label attached to BOX As of November 2021 The production before November is applied to Case 1 1 The production after November is applied to Case 1 2 2021 11 Production Apply Case 1 2 ...

Page 46: ...urn 360º degrees Or Blue Circle 8point Screw 8ea Delete Screw counterclockwise Mark different colors pen on the opposite side of the driver tip start and end are different in color turn start and end are same in color 1 turn PH 0 driver 3 If no Z axis difference remains between modules in a cabinet assemble the module If z axis difference remains rework to refer next page Put down main frame on th...

Page 47: ...Screw counterclockwise Mark different colors pen on the opposite side of the driver tip start and end are different in color turn PH 0 driver 3 If no Z axis difference remains between modules in a cabinet assemble the module If z axis difference remains rework to refer next page Put down main frame on the separated module to the guide line Push the center Main board and bridge board docking part G...

Page 48: ...l to clockwise Bracket pin of the module with lower Z axis If bracket pin is too rotated module can be out So never rotate it over the marked position 6 7 5mm driver 2 More adjustment if the bracket pin of the module has higher Z axis has been modified Rotate bracket pin of the module has higher Z axis to counterclockwise but if Z axis dif remained proceed 1 method When Bracket pin is fixed becaus...

Page 49: ...allation 3 Frame Kit Components 4 Frame Installation 5 Cabinet Frame Installation 6 Frame Bezel Components 7 Frame Bezel Installation 8 S Box Installation and Connection 9 Connections Power and Signal 10 Settings How to Use Appendix 1 S Box Network IP Setting Appendix 2 S Box SNOWJ U Setting Contents ...

Page 50: ...als verticals and fix the screw Connection between upper and lower cabinets using brackets Install the cabinets of first level After installing 2nd level fasten the SIDE screws to fix modules Install horizontal shared side Sliding Laser Level Frame Right Assy frame H Assy frame V Frame Right Frame Left Attach Assy frame H to Assy frame V 3 Frame kit Components ...

Page 51: ...FRAME HORIZONTAL SINGLE 1 Wide ASSY FRAME HORIZONTAL DOUBLE 2 Wide Acc box Level Fixed Full kit 3x3 VG LFA33SWW 1 3 High 2 8 2 2 2 2 4x4 VG LFA44SWW 2 4 High 2 15 4 3 2 5x5 VG LFA55SWW 3 5 High 2 24 2 4 3 2 Unfixed Frame Horizontal VG LFAH1SWW 4 VG LFAH2SWW 4 Frame Vertical Level 1 VG LFAV1SWW 4 1 High 4 2 Level 2 VG LFAV2SWW 4 2 High 8 2 Level 3 VG LFAV3SWW 2 3 High 2 12 2 Level 4 VG LFAV4SWW 2 4...

Page 52: ... 28 36 44 10 SCREW MACHINE CH M3 L8 14 18 22 11 SPACER ETC 12 16 20 12 ANCHOR 22 26 32 13 SCREW TR 1종 L75 BK WASHER SPEC D19 WT1 22 26 32 14 TAPE WASHER 12 25 42 15 WRENCH 1 5mm 2 2 2 16 WRENCH 2 0mm 2 2 2 17 WRENCH 6 0mm 1 1 1 18 SCREW CH M2 x L2 3 10 10 10 19 HOLDER CABLE 8 10 12 20 WASHER 14 18 24 21 SCREW MACHINE PWH M3 L8 14 18 24 22 BRACKET SUPPORT 8 10 12 23 BRACKET SUPPORT SUB 8 10 12 24 T...

Page 53: ...allation 3 Frame Kit Components 4 Frame Installation 5 Cabinet Frame Installation 6 Frame Bezel Components 7 Frame Bezel Installation 8 S Box Installation and Connection 9 Connections Power and Signal 10 Settings How to Use Appendix 1 S Box Network IP Setting Appendix 2 S Box SNOWJ U Setting Contents ...

Page 54: ...LED R D Lab VD 53 4 Frame installation Precautions for Fastening the Screws ...

Page 55: ...ng 10 connected screws use it as a frame vertical L R Fig 2 The remaining HOLDER MAGNET VERTICAL is used when installing the extension Fig 3 Fig 1 Separation of ASSY FRAME MIDDLE FRAME VERTICAL R FRAME VERTICAL L Fig 3 HOLDER MAGNET VERTICAL 1 EA is used for expansion installation Fig 2 Placed at the left and right ends of the ASSY check the engraving FRAME VERTICAL R FRAME VERTICAL L HOLDER AMGNE...

Page 56: ...is carried out in the next step Extended by combining FRAME H according to the installation specifications and the last JOINT H is used only for extended installation Fig 2 Fig 1 ASSY FRAME H extension Note the guide position X 2 X 2 X 2 Fig 2 ASSY FRAME H extension changed according to the specification when installing alone the last JOINT H is separated 3X3 Double 2 Single 2 4X4 Double 4 5X5 Dou...

Page 57: ...SSY FRAME H using SCREW FH M4 L6 Fig 4 Fig 1 ASSY FRAME VERTICAL ASSY FRAME H assembly ASSY FRAME VERTICAL I G ASSY FRAME VERTICAL ASSY FRAME VERTICAL ASSY FRAME VERTICAL R ASSY FRAME VERTICAL L ASSY FRAME H ASSY FRAME H Fig 3 SCREW M6 L12 fastened with STUD as a guide Fig 2 1 Separate installation bracket joint separation Fig 2 2 Extended installation note the guide position M6 L12 M6 L12 M6 L12 ...

Page 58: ...ssary use SPACER ETC to adjust the flatness between the wall and the frame horizontal If necessary adjust the flatness between the wall and frame vertical by adjusting the HOLDER LEVER Fig 1 Fastening the assembled frame to the wall Adjustment of flatness between walls using Spacer ETC A Using a level Fig 2 Select and tighten the SCREW suitable for the installation environment Fig 3 FRAME VERTICAL...

Page 59: ...H and HOLDER MAGNET as extended installation specifications Fig 2 In the same way as a single installation connect the frame V H using M6 L12 SCREW and connect the BRACKET JOINT with M3 L8 SCREW between HOLDER MAGNET VERTICAL Fig 2 Assembling with consideration of the location of the fastening hole guide hole as an extended specification Fig 1 Vertical horizontal extension installation ...

Page 60: ...d Apply when it is difficult to adjust Z SEAM due to reduced module movement during extended installation Disassemble the screws FH M4 L6 in the adjustment area Fig 1 Separate the BRACKET SUPPORT by disassembling the screws BH M4 L6 in the ASSY FRAME VERTICAL which is the boundary of the 4th stage Fig 2 SCREW BH M4 L6 REMOVE Fig 2 DISASSEMBLE THE BRACKET SUPPORT Fig 1 FRAME H SCREW REMOVE ...

Page 61: ...usted up to 1 0mm If it is installed on the wall adjust the amount of wall mounted screw fastening so that the right FRAME KIT can be moved Reassemble the BRACKET SUPPORT using screws BH M4 L6 in the ASSY FRAME VERTICAL Fig 4 Fix ASSY FRAME H using SCREW FH M4 L6 Fig 5 BEFORE Fig 2 STUD location Movement Fig 4 Assemble the Bracket Support with screws AFTER BEFORE AFTER Fig 5 Fasten the screw to fi...

Page 62: ... bar placed on the left and right in both front and rear directions as shown below 2 Check the flatness by checking the contact state between the frame vertical bar placed in the middle and the solid line Case1 When the solid line touches the front Frame vertical bar protrudes to the front Case2 When the solid line touches the rear Frame Vertical bar is turned off toward the rear The amount of pro...

Page 63: ...Frame Kit composition 4 Frame installation 5 Cabinet Frame installation 6 Frame Bezel composition 7 Frame Bezel installation 8 S BOX installation and connection 9 Power and cable connection 10 Settings and instructions for use Appendix 1 S BOX Network IP setting Appendix 2 S BOX SNOWJ U setting Contents ...

Page 64: ...ng the top of the frame Fig 2 Fig 1 Imprinted guidelines during installation Guide line Guide line Sliding Screw Fig 2 Sliding up and down the cabinet Installation Guide line Settled Guide line Reference How to hold when lifting SET How to handle SET during installation 2 people required 5 Cabinet Frame installation CABINET installation structure ...

Page 65: ... installation structure If the CABINET does not fit with the seating line adjust the Y axis position using a screw Fig 1 Fig 1 Y axis adjustment with screws Settled Guide line Installation Guide line Settled Guide line Reference Adjust by turning a driver ...

Page 66: ... connected to Bridge Box IR ECO sensor module connects to IG Group 1 5 Cabinet Frame installation Bridge Box Bottom Sensor Bluetooth Wi Fi 24pin system Cable Bluetooth Wi Fi Cable HDBaseT Cable Interface Gender Sensor Top IR ECO Sensor OC Fiber Cable S Box instructions Connect the IR ECO sensor to IG Group 1 and use it ...

Page 67: ... top right of CABINET No 1 attached by magnet I G and BRIDGE BOX are connected to each other via USB 3 0 and each sensor and S BOX are connected Fig 2 In case of IFA model BRIDGE BOX and sensor are not needed when installing with SNOWJMU Fig 1 I G and B BOX arrangement 5 Cabinet Frame installation Fig 2 I G B BOX sensor cable connection I G B BOX B BOX I G Illuminance sensor Bluetooth wifi USB typ...

Page 68: ...sition the SWITCH of the I G toward the wall Fig 1 Placse the I G on the edge line of Frame X Axis and the top line of the magnet Y Axis Fig 2 5 Cabinet Frame installation I G B BOX Y Axis Guide 1st Magnet Top line X Axis Guide Bracket Edge Overlap Install the IG switch to the Bottom Fig 1 Switch Direction Fig 2 X Y Position Guide Watch out for interference ...

Page 69: ...CABLE to BRIDGE BOX 2 Fix C TYPE CABLE by attaching 1 HOLDER CABLE inside the yellow line end 3 After connecting C TYPE CABLE to I G arrange it using the shape of a hanger 2 1 3 S BOX Connection IG Bridge Box Specification SNOWAAE External IR ECO BT WIFI 5 Cabinet Frame installation ...

Page 70: ...ge by attaching 1 HOLDER CABLE inside the yellow line end 3 Insert the cable into the evacuation shape check the engraving position 4 To prevent separation attach and fix TAPE t a p i n g S BOX SNOWAAE S BOX Connection IG Bridge Box Specification SNOWAAE External IR ECO BT WIFI 5 Cabinet Frame installation ...

Page 71: ... S BOX SNOWAAE 1 2 1 Insert HDBT cable into BRIDGE BOX 2 VERTICAL FRAME Escape shape turn the cable to the right 3 Arrange cables by using a fixed hanger shape S BOX Connection IG Bridge Box Specification SNOWAAE External IR ECO BT WIFI 5 Cabinet Frame installation ...

Page 72: ...E BOX 2 Refer to the BRIDGE BOX attachment direction so that the WIFI CABLE is arranged to the bottom 3 Attach the fixed hanger shape to the FRAME HORIZONTAL escape shape and arrange the cable 1 2 S BOX Connection IG Bridge Box Specification SNOWAAE External IR ECO BT WIFI 5 Cabinet Frame installation ...

Page 73: ...alled on the side frame of the last CABINET in the top to connect Fig 2 For more information on IG location refer to Chapter 9 Power and Cable Connection 1 even I G B BOX I G Fig 1 I G placement when the last is an even numbered CABINET Fig 2 I G placement when the last is an odd numbered CABINET 1 odd I G B BOX I G last CABINET installation IWA P1 26 UHD SCREEN 36Cabinet 5 Cabinet Frame installat...

Page 74: ...Fig 1 When after installing up to 1 levels it fixes the CABINET position by adjusting the tanning bolts assembled on the bracket support Fig 2 Bracket Support is enclosed in Frame Kit The red points must be applied and the yellow points are selectively used according to the installation conditions Bracket Support CABINET installation IWA P1 26 UHD SCREEN 36Cabinet 5 Cabinet Frame installation SCRE...

Page 75: ... and DATA cables Fig 1 Use the DATA cables enclosed in S Box Connect the connected I G and BRIDGE BOX to the external S BOX Fig 1 Connect 1st CABINET and I G CABLE I G DATA IN DATA OUT CABINET installation IWA P1 26 UHD SCREEN 36Cabinet 5 Cabinet Frame installation ...

Page 76: ...Connect the POWER CABLE by pressing it with your hand until you hear a click sound Fig 2 Arrange the cables by using a fixed hanger shape Fig 1 After installing CABINET connect POWER CABLE POWER CABLE Fig 2 Press until you hear a click sound CABINET installation IWA P1 26 UHD SCREEN 36Cabinet 5 Cabinet Frame installation ...

Page 77: ...ever do not leave it on for more than 10 seconds before dehumidifying For more information on cable connection refer to Chapter 9 When installing a large screen refer to a separate guide Fig 1 POWER CABLE connection LED 1 2 3 4 5 6 Fig 2 Even numbered CABINET Data CABLE connection DATA CABLE cabling specification DATA OUT DATA IN 2 3 Fix the DATA CABLE to the frame and shape it CABINET installatio...

Page 78: ...first cabinet If you need to adjust the z axis step while installing the cabinet from the 2nd stage remove the cabinet installed at the bottom of the next cabinet adjust it and then reinstall it Fig 1 The reason for separating the cabinet is to facilitate movement between cabinets when adjusting the step difference LED LED LED 2 4 N N 1 N 2 General screen installation method Fig 1 Large screen ins...

Page 79: ...EAM can be adjusted using the adjustment device of the vertical bar using the 1 5mm wrench included in the frame kit The upper part controls the right and the lower part controls the left Fig 2 Fig 1 Check the Z axis step and move it to the front with the adsorber LED 2 Fig 2 Z axis step adjustment Un Lock Lock Absorber CABINET installation IWA P1 26 UHD SCREEN 36Cabinet 5 Cabinet Frame installati...

Page 80: ...p and down the horizontal shared surface must be assembled but the shared surface is inserted between the front and the frame Fig 1 After assembling the shared surface fix it with FH screw Fig 2 Install docking in the same way as 3 4 5 6 levels Fig 1 Assembling the horizontal shared plane Fig 2 Fixed with shared face screw FRAME FRONT CABINET installation IWA P1 26 UHD SCREEN 36Cabinet 5 Cabinet F...

Page 81: ...t LOCK status When attaching TAPE attach it to prevent bubbles as much as possible Fold the end before attachment to make it easy to remove TAPE after completion of work Do not exceed 30 minutes of OPP TAPE attachment time If the module has a tape adhesive layer left after removing the OPP TAPE be careful not to enter between the modules when removing it 100 130mm OPP TAPE Adsorption state LOCK PU...

Page 82: ...tom and the right side controls the top part Fig 2 When detaching and reinstalling the top CABINET Return the SEAM screw to initial position to prevent deformation Fig 3 Fig 1 Secure Gap with upper lower CABINET adsorber and fix with Gap Tool Fig 2 Z axis step adjustment Un Lock Lock Adsorber After inserting it in the horizontal direction it is fixed by turning it vertically 1 2 A S ASSY GAP TOOL ...

Page 83: ... when installing the first stage Fig 1 For more information on cable connection refer to Chapter 9 1st 3rd 5th 1 2 3 4 7 8 9 10 13 14 15 16 19 20 21 22 25 26 27 28 5 11 17 23 29 31 32 33 34 35 6 12 18 36 24 30 DATA OUT DATA IN DATA CABLE direction Fig 1 Upper cabinet cable connection 31 32 CABINET installation IWA P1 26 UHD SCREEN 36Cabinet 5 Cabinet Frame installation ...

Page 84: ... 19 20 21 22 25 26 27 28 5 11 17 23 29 31 32 33 34 35 6 12 18 36 24 30 Fig 1 Fixing the X axis position and attaching magnets by fastening the screw on the side 20x20 magnet Frame kit included CABINET installation IWA P1 26 UHD SCREEN 36Cabinet 5 Cabinet Frame installation MAGNET CASE 1 When there is no Z step No separate attachment specifications CASE 2 In case of step difference Attach 2 magnets...

Page 85: ...vice Jig Screen abnormality and seam inspection by executing low gradation White Red Green Blue Patten in the vertically connected cabinet Screen inspection using upper docking and service jig when installing cabinet 2 3 4 Click Click Click 13 7 1 1 8 2 1 Run Test Patten to review the stability of the upper and lower docking connections and Seam Patten Color changes every time you click Test Patte...

Page 86: ...Frame Kit composition 4 Frame installation 5 Cabinet Frame installation 6 Frame Bezel composition 7 Frame Bezel installation 8 S BOX installation and connection 9 Power and cable connection 10 Settings and instructions for use Appendix 1 S BOX Network IP setting Appendix 2 S BOX SNOWJ U setting Contents ...

Page 87: ...RAME BEZEL SIDE 5 ASSY FRAME BEZEL SIDE 4 ASSY FRAME BEZEL SIDE 3 ASSY FRAME BEZEL SIDE 1 ACCESSORY ASSY P MATERIAL MANUAL FRAME BEZEL ASSY FRAME BEZEL 1X1 VG LFA11SDW 1 1 2 1 1 1 3X3 VG LFA33SDW 1 1 1 1 2 1 1 1 4X4 VG LFA44SDW 2 2 2 1 1 1 5X5 VG LFA55SDW 2 1 2 1 2 1 1 1 ASSY FRAME BEZEL 3X3 ASSY FRAME BEZEL 4x4 ASSY FRAME BEZEL 5x5 ASSY FRAME BEZEL 1x1 6 FRAME BEZEL configuration ...

Page 88: ...ASSY ACCESSORY BRACKET LINK SCREW MACHINE 6001 002912 SCREW MACHINE 6001 002996 SCREW MACHINE 6001 000378 SHEET BEZEL GAP SHEET MAGNET SHEET PET SHEET MAGNET GAP SHEET T2 5 EXTENDED SHEET VG LFA11SDW 1X1 No Part Name Q ty 1 ASSY FRAME BEZEL TOP 1 1 2 ASSY FRAME BEZEL BOTTOM 1 1 3 ASSY FRAME BEZEL SIDE 1 2 4 ASSY ACCESSORY 1 4 1 BRACKET LINK 6 4 2 SHEET BEZEL 6 4 3 SCREW MACHINE M3 L3 10 4 4 SCREW ...

Page 89: ...Frame Kit composition 4 Frame installation 5 Cabinet Frame installation 6 Frame Bezel composition 7 Frame Bezel installation 8 S BOX installation and connection 9 Power and cable connection 10 Settings and instructions for use Appendix 1 S BOX Network IP setting Appendix 2 S BOX SNOWJ U setting Contents ...

Page 90: ...itional attachments Mounting position guide 1 Attached opposite the position of the lower MAGNET existing ASSY magnet 2 Bezel attached to the wall MAGNET SHEET upper lower MAGNET is floating direction Existing ASSY Magnet Attachment Location Attached over the bottom magnet MAGNET SHEET upper lower division Remove the double sided tape on the bottom and attach Attached with BEZEL Attach in the dire...

Page 91: ...sensor according to the sensor position The sensor is included in the S BOX component accessory as shown in the picture Based on 4x4 1 Sensor Bottom and 1 Bluetooth Wi Fi will be added Sensor only applies to IWA model Supported after IFA S box changes July 21 ACCESSORY Sensor Cable etc SENSOR BOTTOM IR Iight sensor Bluetooth Wi Fi 7 Frame Bezel installation ...

Page 92: ...r by removing only the Cover Cap as shown Installed when reclaimed but not used Select the sensor closest to the hole in the bezel and use it 7 Frame Bezel installation Bezel installation 1 2 3 4 5 6 7 8 9 10 11 12 13 14 15 16 SENSOR BOTTOM Bluetooth Wi Fi SENSOR BOTTOM IR Light sensor ...

Page 93: ...m of the first screen on the left Bridge Box connection WiFi BT I G 2 is installed at the Bottom of the right screen Connect the light sensor 7 Frame Bezel installation Bezel installation 1 2 3 4 5 6 7 8 9 10 11 12 13 14 15 16 Bridge BOX Bluetooth Wi Fi I G 1 I G 2 SENSOR BOTTOM IR Light sensor IR Light sensor can not be used by connecting more than one ...

Page 94: ...s connected to I G at the top while connected to Bluetooth Wi Fi BRIDGE BOX is attached to the rear part of the vertical sharing surface of the frame kit I G Bottom Sensor Bluetooth Wi Fi 7 Frame Bezel installation Bezel installation ...

Page 95: ...remove the cover cap at both ends and attach the SENSOR BOTTOM to the possible outside When attaching a sensor assemble it by pressing the hook part When assembling it must be clicked 7 Frame Bezel installation Bezel installation SENSOR BOTTOM ...

Page 96: ... BOTTOM it is attached after removing Cover Cap When attaching a sensor assemble it by pressing the hook part The Bluetooth Wi Fi sensor is installed at the bottom of the 1st cabinet When assembling it must be clicked Bottom Sensor Bluetooth Wi Fi 7 Frame Bezel installation Bezel installation ...

Page 97: ...LED R D Lab VD 96 6 Connect BRACKET LINK to the FRAME BEZEL TOP BOTTOM with M3 SCREW BRACKET LINK M3 L5 7 Frame Bezel installation Bezel installation ...

Page 98: ...OM between the bending parts of the Bracket Support on the lower side of the cabinet Bezel installation BEZEL Installation Order BOTTOM SIDE TOP DOCKING TOP COVER DOCKING BOTTOM COVER Cover for preventing exposure of power part Remove before BEZEL assembly 7 Frame Bezel installation ...

Page 99: ... L8 screw connect the frame bezel top bottom and the top hole of the cabinet 2 places If gap correction is required remove the gap sheet and adjust the separation distance GAP SHEET M4 L8 Bezel Top Cabinet Gap sheet GAP remove Bezel Bottom Gap sheet GAP remove 7 Frame Bezel installation Bezel installation ...

Page 100: ...4 L8 screw connect the frame bezel top bottom and the top hole of the cabinet 2 places If gap correction is required remove the gap sheet and adjust the separation distance GAP SHEET Bezel Top Cabinet Gap sheet GAP remove Bezel Bottom Gap sheet GAP remove M4 L8 7 Frame Bezel installation Bezel installation ...

Page 101: ...ach a sheet bezel so that the gap is not visible from the front Depending on the degree of separation the number of sheet bezels is successively added to complement 11 Using 6 M4 L8 screws connect the frame bezel top bottom and the top hole of the cabinet Fig 2 M4 L8 Fig 1 Fig 2 M3 L5 Sheet Bezel 7 Frame Bezel installation Bezel installation ...

Page 102: ...zel at the bottom of the cabinet in the same way as in steps 8 12 Be careful not to create a gap between the frame bezel side and frame bezel top boot M4 L8 M4 L8 M3 L5 M4 L8 M4 L8 M3 L5 M4 L8 7 Frame Bezel installation Bezel installation ...

Page 103: ...ht side of the cabinet and attach it to the front Fig 1 Add MAGNET SHEET specification for IWA model only Fig 2 Bezel installation FRONT 7 Frame Bezel 설치 MAGNET SHEET Fig 1 Attach BEZEL SIDE to CABINET FRONT Fig 2 Sheet and magnet attachment for IWA model BEZEL Installation Order BOTTOM SIDE TOP ...

Page 104: ...14 FRAME BEZEL SIDE INSTALLATION After attaching the BEZEL SIDE assemble the assembled BEZEL BOTTOM with the screw Fig 1 Bezel installation Fig 1 BEZEL SIDE and BEZEL BOTTOM screw assembly M3 L5 7 Frame Bezel installation ...

Page 105: ...104 Vertical Extension If it is a cabinet of 5 or more stages the FRAME BEZEL SIDE is extended through the connection of the BRACKET with the M3 L3 screws M3 L3 7 Frame Bezel installation Bezel Extension installation ...

Page 106: ...m the end to the end of the TOP cut the remaining part for use EXTENDED SHEET 사양 W3 5 L806 T2 0 If there is no GAP connect without attaching the SHEET 2 Attach GAP SHEET T2 5 to FRAME BEZEL TOP Attached according to the inner hole of the TOP Attached by Center Center GAP SHEET Specification RUBBER W9 L17 9 T2 5 double sided tape Bezel Extension Installation 7 Frame Bezel installation ...

Page 107: ...RAME BEZEL TOP INSTALLATION Assemble the FRAME BEZEL TOP between the bending parts of the Bracket Support on the upper side of the cabinet Bezel Installation BEZEL Installation Order BOTTOM SIDE TOP 7 Frame Bezel installation ...

Page 108: ...ne M4 L8 screw fasten the FRAME BEZEL TOP and the top hole of the cabinet 2 places If gap correction is necessary add a gap sheet to adjust the separation distance Bezel Installation GAP SHEET M4 L8 Bezel Top Cabinet Gap sheet GAP ADD Bezel Bottom Gap sheet GAP REMOVE 7 Frame Bezel installation ...

Page 109: ...ne M4 L8 screw fasten the FRAME BEZEL TOP and the top hole of the cabinet 2 places If gap correction is necessary add a gap sheet to adjust the separation distance Bezel Installation GAP SHEET M4 L8 Bezel Top Cabinet Gap sheet GAP ADD Bezel Bottom Gap sheet GAP REMOVE 7 Frame Bezel installation ...

Page 110: ...being seen from the front According to the degree of separation the number of SHEET BEZELs is added consecutively and supplemented 19 Using 6 M4 L8 screws fasten the FRAME BEZEL TOP and the hole at the top of the cabinet Fig 2 Bezel Installation M4 L8 Fig 1 Fig 2 M3 L5 Sheet Bezel SHEET BEZEL From the outside top of the BEZEL attached to the inside 7 Frame Bezel installation ...

Page 111: ...110 20 Assembly with FRAME BEZEL SIDE After attaching the bezel top assemble the assembled bezel side and screws Fig 1 Bezel Installation Fig 1 BEZEL TOP and BEZEL SIDE screw assembly M3 L5 7 Frame Bezel installation ...

Page 112: ...he six row cabinet three FRAME BEZEL TOP BOTTOMs 2 are connected and installed Bezel Extension Installation BRCKET LINK M3 SCREW BRCKET LINK M3 SCREW USING SHEET BEZEL When a gap occurs in the middle of the bezel attach a sheet bezel to prevent the gap from being seen from the front SHEET BEZEL SHEET BEZEL From the outside top of the BEZEL attached to the inside 7 Frame Bezel installation ...

Page 113: ...allation 3 Frame Kit Components 4 Frame Installation 5 Cabinet Frame Installation 6 Frame Bezel Components 7 Frame Bezel Installation 8 S Box Installation and Connection 9 Connections Power and Signal 10 Settings How to Use Appendix 1 S Box Network IP Setting Appendix 2 S Box SNOWJ U Setting Contents ...

Page 114: ...ront and back of the set Front side Rear side S BOX Connection SNOWAAE DVI OUT monitoring IR Rx Power Button USB 2 0 IR Tx Info LCD Jog Key LAN HDMI 1 HDMI 2 HDMI 3 HDMI 4 DC 24V DP CWDM 1 2 CWDM 3 4 CWDM 5 6 CWDM 7 8 HDBT Optical Sound RS232 Debug Remote Control Receiver Sender for Remote Control 8 S Box Installation and Connection ...

Page 115: ...hen the item is changed the S BOX is rebooted When operating with Multi HDMI it is converted to 4K and played When Screen Mirroring is activated it is converted to the resolution of the screen transmission device and played Connect the optical Rx of the AAE Box and the optical Rx of the IG side with an optical cable Connect optical Rx to IG s ONE CONNECT Displays the screen based on the cabinet at...

Page 116: ... Cable Bluetooth Wi Fi module and 24pin system cable are connected to Bridge Box IR ECO sensor module connects to IG 8 S Box Installation and Connection Bridge Box Bottom Sensor Bluetooth Wi Fi 24pin system Cable Bluetooth Wi Fi Cable HDBaseT Cable S Box Interface Gender Sensor Top IR Eco센서 OC Fiber Cable ...

Page 117: ... IG Switch settings decide Vx1 STB Power UART specification by screen type Settings by screen type AAE IG Specifications DIP Switch Default Cable less Primary IG Dip Switch Specifications by Switch numbers Switch No Function Specification High Low Used for 1 ETHERNET Open Short for Ethernet signal Open Short Cable Cable less STB_POWER Open Short for Cabinet Power Control Open Short 2 REDUNDANCY SW...

Page 118: ...n the optical modules Tx and Rx are connected they must be connected by an optical cable without FDF connection or optical fusion One port of One Connect Module Rx Optical cable inserted in One Connect of S Box Optical cable inserted to Module Rx in AAE IG input terminal 117 8 S Box Installation and Connection Optical Cable Connection ...

Page 119: ...stability of operating Do not contact with device sharp and rough Do not wipe the optical cable with rough materials and dissolvent The unconnected optical cable use a protect cap And cleans before connecting Unusable Single Mode OM1 OM2 type BIMMF Bend Insensitive Multimode Fiber 8 S Box Installation and Connection ...

Page 120: ...In the case of duplex type the locking structure is released and connected one by one like Simplex Before inserting the cable be careful not to contaminate the end and wipe it with a soft cloth for cleanliness S Box SNOW AAE Cabinet Cabinet Cabinet or Duplex Simplex 119 8 S Box Installation and Connection Cable Connection ...

Page 121: ...ap and connect the cable as below picture Insert with weak force until it sounds Click Keep the dust protection cap well for reuse Insert a protection cap on an unused port to protect from dust 12 8 S Box Installation and Connection Cable Connection ...

Page 122: ...1 Cable Connection Check it whether the cable is inserted well Install the optical cable carefully The optical cable does not have the tension of the upper lower and the left right 12 8 S Box Installation and Connection ...

Page 123: ...D 122 Cable Connection When you remove the cable press the detach clip to remove it Do not just pull the cable as below Do not force the optical cable by pulling it up and down 12 8 S Box Installation and Connection ...

Page 124: ...s If the optical cable is bent above the allowed bending radius Install cable below allowed bending radius Refer to below picture Be careful not to bend or twist like a right angle Refer to picture Do not step on the optical cable or press it in weight The cable can be broken by heavy things Do not use cable tie etc Loss or disconnection can be occur due to bending and compression 12 8 S Box Insta...

Page 125: ...d on the structure and type of cable Refer to cable specification Do not shock the optical cable In general the impact load of the optical cable is below 7J but the impact characteristics refer to each cable specification Do not twist the cable If the cable is twisted the optical cable can be damaged 8 S Box Installation and Connection Clamp tightening Tighten the clamp properly Fixed soft materia...

Page 126: ...r connector Power on using Power button from Remote controller enveloped or push button at the front 24V Adaptor Connection Adadptor Connection Caution When powering on off for the TEST give enough time more than 5mins to be stable 8 S Box Installation and Connection ...

Page 127: ... quality Please connect S Box and LED displays via LSM software properly The 1st LED Display I G must be connected to HDBT port 1 in S Box The Picture configuration will be set base on the model of the 1st Master LED display which is connected to HDBT port 1 in S Box If the S Box and LED Displays are not connected properly by LSM the picture quality might not be correct Connected condition in LSM ...

Page 128: ...S Box Grouping When S Box Grouping LED Picture size FHD cannot be used 2 When inputting an unsupported resolution the screen may not be visible or noise may occur on the screen Turn off the Video Wall function and change the frequency of the video output source to 50Hz or 60Hz After 13 06 the S Box Grouping function is provided through LSM Check the latest version of LSM S Box Connection Panel Con...

Page 129: ...on and Connection PC Click the right button of mouse Click Screen resolution Click Advanced settings Click Monitor tap Monitor Settings Setup Screen refresh rate to 60Hz S Box Connection Panel Configuration Setup the resolution of input PC ...

Page 130: ...LED R D Lab VD 129 8 S Box Installation and Connection S Box Grouping Support Frequency 1 2 ...

Page 131: ...LED R D Lab VD 130 8 S Box Installation and Connection S Box Grouping Support Frequency 2 2 ...

Page 132: ...rder to use S Box grouping both Dynamic Contrast and Black Tone functions should be turned off to reduce the image quality deviation between S Boxes Menu Picture Advanced Settings Dynamic Contrast default Medium Off Black Tone default Darker Off S Box Connection Panel configuration ...

Page 133: ...s a phenomenon in which the corresponding port output is fixed down scalin without a specific scaling algorithm and is not related to the actual LED cabinet screen output Connect a monitor to use SERIVCE PORT Network information is set in Menu Network Open Network Settings Check the network ping with a laptop etc Select RJ 45 from Home ID Settings PC Connection Cable menu Caution This port is for ...

Page 134: ...Wall Mode in an environment with multiple S boxes Wallpaper may not run at the same time for each S Box Simple wall mode Operation This is a function that allows users to simply display a wallpaper and use it when the user does not want to display a black screen while not using the product If the screen resolution is within the output resolution of S Box you can turn on Simple wall mode from the F...

Page 135: ...allation 3 Frame Kit Components 4 Frame Installation 5 Cabinet Frame Installation 6 Frame Bezel Components 7 Frame Bezel Installation 8 S Box Installation and Connection 9 Connections Power and Signal 10 Settings How to Use Appendix 1 S Box Network IP Setting Appendix 2 S Box SNOWJ U Setting Contents ...

Page 136: ...C power connecting exceed recommended maximum number of devices The label info which is attached behind product shows rated power of cabinet and rated current of outlet Model IWA IFA LED Pitch P0 84 P1 26 P1 68 P2 1 P2 52 P4 2 Power Consumption 140W 140W 150W 240W 210W 210W Max Q ty 110V 6EA 4EA 220V 10EA 7EA Power supply through a docking connection is available only when data is also supplied th...

Page 137: ...ld be set as Calibration to use Multi S Box Menu Picture Picture Mode Calibration Video Wall Mode should be set ON Home Video Wall Video Wall ON Picture Menu Settings Multi S BOX Connection S BOX Redundancy 9 Connections Power and Signal ...

Page 138: ...dant Video Control Video Control Video Control Video Control Video VBY1 Control Ethernet I2C UART Picture Mode while using Multi Box Calibration Menu Picture Picture mode Calibration Video wall mode on home Video Wall Video Wall on IWA B F B F F B F B Video Video Video Video IWA IWA IWA 9 Connections Power and Signal 9 2 S Box Connection and IG Settings by Screen Type ...

Page 139: ...ary IG 2 Primary Box Redundant Video Control Video Control IWA F B IWA S BOX Connection Redundancy B F IG 2 Redundant 9 Connections Power and Signal SBOX Connection Setting Sequence 1 Connect Box Redundant first to IG Primary and set LSM Cabinet information goes to Box Redundant when setting LSM ...

Page 140: ...G 2 Primary Box Redundant Video Control Video Control IWA F B IWA SBOX Connection Setting Sequence 2 Connect Box Primary and IG Primary and set New Connection at LSM Cabinet information goes to Box Primary when setting LSM B F IG 2 Redundant 9 Connections Power and Signal S BOX Connection Redundancy ...

Page 141: ...IG DIP Settings Box Primary IG 1 Primary IG 2 Primary Box Redundant Video Control Video Control IWA F B IWA SBOX Connection Setting Sequence 3 Connect Box Redundant and IG Redundant B F IG 2 Redundant 9 Connections Power and Signal S BOX Connection Redundancy ...

Page 142: ...et different IP to Box Primary and Box Redundant each Ex Box Primary 192 168 1 50 Box Redundant 192 168 1 60 2 Group 2 SBOX at LSM 3 SBOX Control should be done in Group window Caution In case of SBOX Control the changed value is set differently when setting in each SBOX rather than in Group so the image quality may be different during Redundant operation ...

Page 143: ...Primary IG 2 Primary SOURCE Video Video Control Video Control Video Control Video VBY1 Control Ethernet I2C UART IWA F B F B F B F B 1 2 5 6 Video Control IG 1 Redundant IG 2 Redundant Video Video IWA IWA IWA 9 Connections Power and Signal 9 2 S Box Connection and IG Settings by Screen Type ...

Page 144: ...ncy IG DIP Settings IWA IFA IEA IER IFR F B Box Primary Box Redundant IG 1 Primary IG 2 Redundant 9 Connections Power and Signal S BOX Connection Redundancy Video VBY1 Control Ethernet I2C UART Picture Mode while using Multi Box Calibration Menu Picture Picture mode Calibration Video wall mode on home Video Wall Video Wall on ...

Page 145: ...x IG 1 Forward Backward Video Control Video Only OCM Cable IWA IFA IEA IER IFR F B Normal OCM Cable Connection Screen Redundancy IG DIP Settings IWA IFA IEA IER IFR 9 Connections Power and Signal S BOX Connection Redundancy ...

Page 146: ...nu Picture Picture mode Calibration Video wall mode on home Video Wall Video Wall on OC Cable Video Control F B Box Primary IG 1 Primary IWA IFA IEA IER IFR Video Only F B Box Redundant IG 2 Redundant IWA IFA IEA IER IFR IWA IFA IEA IER IFR IWA IFA IEA IER IFR OC Cable OC Cable 9 Connections Power and Signal S BOX Connection Redundancy ex The lowest 4X1 area from IWA P0 84 5X5 Screen 4K 4K ...

Page 147: ...IG DIP Settings Box IG 1 Forward Backward Video Control Video Only OC Cable F B IWA IFA IEA IER IFR IWA IFA IEA IER IFR IWA IFA IEA IER IFR IWA IFA IEA IER IFR OC Cable OC Cable 9 Connections Power and Signal S BOX Connection Redundancy ex The lowest 4X1 area from IWA P0 84 5X5 Screen ...

Page 148: ...LED R D Lab VD 147 9 Connections Power and Signal 9 3 How to set by installation type IWA SBB SNOWAAE Z Order The Z Order installation method supports both SBB SNOWAE SBB MBOXACE ...

Page 149: ...9 Connections Power and Signal 9 3 How to set by installation type IWA SBB SNOWAAE N Order The N Order installation method only supports the SBB SNOWAAE model For the SBB MBOXACE model only the Z Order method is supported ...

Page 150: ...n Size 4K UHD Resolutions 3840 x 2160 Cabinet 4 x 4 16 Installation Type Cable less Redundancy IG Backward X IG add on S Box add on Q ty IG 2 S Box 1 Basic Cable less connection structure FHD FHD FHD FHD FHD FHD FHD FHD FHD FHD FHD FHD FHD FHD FHD FHD IG 1 IG 2 Forward Backward DATA M F B M F B F B F B F B F B F B F B IG 1 B F IG 2 B F M M ...

Page 151: ...lutions 3840 x 2160 Cabinet 4 x 4 16 Installation Type Cable less Redundancy IG Backward X IG add on O S Box add on O Q ty IG 2 2 S Box 1 1 Basic Cable less connection structure FHD FHD FHD FHD FHD FHD FHD FHD FHD FHD FHD FHD FHD FHD FHD FHD IG 1 IG 3 IG 2 IG 4 M F B M F B M F B M F B F B F B F B F B IG 1 B F IG 2 B F IG 3 B F IG 4 B F Forward Backward DATA ...

Page 152: ...s 3840 x 2160 Cabinet 6 x 6 36 Installation Type Cable less Redundancy IG Backward X IG add on S Box add on Q ty IG 4 S Box 1 Basic Cable less connection structure FHD FHD FHD FHD FHD FHD FHD FHD FHD FHD FHD FHD FHD FHD FHD FHD IG 1 IG 2 IG 3 IG 4 Forward Backward DATA F B F B F B M F B F B F B F B F B F B F B F B F B IG 1 B F IG 3 B F IG 2 B F IG 4 B F M M M M M ...

Page 153: ...6 x 6 36 Installation Type Cable less Redundancy IG Backward X IG add on O S Box add on O Q ty IG 4 4 S Box 1 1 Basic Cable less connection structure F B F B F B M F B F B F B F B F B F B F B F B F B IG 1 B F IG 3 B F IG 2 B F IG 4 B F M M M M M IG 1 B F IG 3 B F IG 2 B F IG 4 B F FHD FHD FHD FHD FHD FHD FHD FHD FHD FHD FHD FHD FHD FHD FHD FHD IG 1 IG 2 IG 3 IG 4 Forward Backward DATA ...

Page 154: ...160 Cabinet 8 x 8 64 Installation Type Cable less Redundancy IG Backward X IG add on S Box add on Q ty IG 4 S Box 1 Basic Cable less connection structure FHD FHD FHD FHD FHD FHD FHD FHD FHD FHD FHD FHD FHD FHD FHD FHD IG 1 IG 2 IG 3 IG 4 Forward Backward DATA M F B F B F B F B M F B F B F B F B F B F B F B F B F B F B F B F B IG 1 B F IG 3 B F IG 2 B F IG 4 B F M M M M M M ...

Page 155: ... Cabinet 8 x 8 64 Installation Type Cable less Redundancy IG Backward X IG add on O S Box add on O Q ty IG 4 4 S Box 1 1 M F B F B F B F B M F B F B F B F B F B F B F B F B F B F B F B F B IG 1 B F IG 3 B F IG 2 B F IG 4 B F IG 1 B F IG 2 B F IG 3 B F IG 4 B F M M M M M M FHD FHD FHD FHD FHD FHD FHD FHD FHD FHD FHD FHD FHD FHD FHD FHD IG 1 IG 2 IG 3 IG 4 Forward Backward DATA ...

Page 156: ...x 540 Screen Size 4K UHD Resolutions 3840 x 2160 Cabinet 4 x 4 16 Installation Type Cable Redundancy IG Backward IG add on X S Box add on X Q ty IG 2 S Box 1 Basic Cable connection structure FHD FHD FHD FHD FHD FHD FHD FHD FHD FHD FHD FHD FHD FHD FHD FHD IG 1 IG 2 Forward DATA M F B F B F B F B F B F B F B F B IG 1 B F IG 2 B F M ...

Page 157: ... Screen Size 4K UHD Resolutions 3840 x 2160 Cabinet 4 x 4 16 Installation Type Cable Redundancy IG Backward O IG add on X S Box add on X Q ty IG 2 S Box 1 Basic redundancy configuration FHD FHD FHD FHD FHD FHD FHD FHD FHD FHD FHD FHD FHD FHD FHD FHD IG 1 IG 2 Forward Backward DATA M F B F B F B F B F B F B F B F B IG 1 B F IG 2 B F M ...

Page 158: ...lutions 3840 x 2160 Cabinet 4 x 4 16 Installation Type Cable Redundancy IG Backward O IG add on X S Box add on X Q ty IG 2 S Box 1 No available install room at the rear for add on IG FHD FHD FHD FHD FHD FHD FHD FHD FHD FHD FHD FHD FHD FHD FHD FHD IG 1 IG 3 IG 2 IG 4 Forward Backward DATA M F B F B F B F B F B F B F B F B IG 1 B F IG 2 B F IG 3 B F IG 4 B F M ...

Page 159: ...ions 640 x 360 Screen Size 4K UHD Resolutions 3840 x 2160 Cabinet 6 x 6 36 Installation Type Cable Redundancy IG Backward X IG add on S Box add on Q ty IG 2 S Box 1 FHD FHD FHD FHD FHD FHD FHD FHD FHD FHD FHD FHD FHD FHD FHD FHD IG 1 IG 2 Forward DATA F B F B F B F B F B F B F B F B F B F B F B F B IG 1 B F IG 2 B F M M ...

Page 160: ...Size 4K UHD Resolutions 3840 x 2160 Cabinet 6 x 6 36 Installation Type Cable Redundancy IG Backward X IG add on O S Box add on O Q ty IG 2 2 S Box 1 1 F B F B F B M F B F B F B F B F B F B F B F B F B IG 1 B F IG 2 B F M IG 3 B F IG 4 B F FHD FHD FHD FHD FHD FHD FHD FHD FHD FHD FHD FHD FHD FHD FHD FHD IG 1 IG 3 IG 2 IG 4 Forward Backward DATA ...

Page 161: ... x 270 Screen Size 4K UHD Resolutions 3840 x 2160 Cabinet 8 x 8 64 Installation Type Cable Redundancy IG Backward X IG add on S Box add on Q ty IG 2 S Box 1 FHD FHD FHD FHD FHD FHD FHD FHD FHD FHD FHD FHD FHD FHD FHD FHD IG 1 IG 2 Forward DATA M F B F B F B F B F B F B F B F B F B F B F B F B F B F B F B F B IG 1 B F IG 2 B F M ...

Page 162: ...UHD Resolutions 3840 x 2160 Cabinet 8 x 8 64 Installation Type Cable Redundancy IG Backward X IG add on O S Box add on O Q ty IG 2 2 S Box 1 1 FHD FHD FHD FHD FHD FHD FHD FHD FHD FHD FHD FHD FHD FHD FHD FHD IG 1 IG 3 IG 2 IG 4 Forward Backward DATA M F B F B F B F B M F B F B F B F B F B F B F B F B F B F B F B F B IG 1 B F IG 2 B F IG 3 B F IG 4 B F ...

Page 163: ...G Backward IG add on X S Box add on X Q ty IG 6 S Box 1 N Order N order is not supported for SBB MBOXACE model No Redundancy IG Connection for the cabinet at the end of the signal FHD FHD FHD FHD FHD FHD FHD FHD FHD FHD FHD FHD FHD FHD FHD FHD IG 1 IG 3 IG 2 IG 4 IG 6 IG 5 F B F B F B F B F B F B IG 2 B F IG 4 B F M F B F B F B F B F B F B IG 1 B F IG 3 B F IG 6 B F IG 5 B F F B F B F B F B F B F ...

Page 164: ...ype Cable Redundancy IG Backward O IG add on X S Box add on X Q ty IG 6 S Box 1 N Order N order is not supported for SBB MBOXACE model FHD FHD FHD FHD FHD FHD FHD FHD FHD FHD FHD FHD FHD FHD FHD FHD IG 1 IG 3 IG 2 IG 4 IG 6 IG 5 Forward Backward DATA F B F B F B F B F B F B IG 2 B F IG 4 B F M F B F B F B F B F B F B IG 1 B F IG 3 B F IG 6 B F IG 5 B F F B F B F B F B F B F B F B F B F B F B F B F...

Page 165: ...ox add on X Q ty IG 2 S Box 1 N Order N order is not supported for SBB MBOXACE model No Redundancy IG Connection for the cabinet at the end of the signal FHD FHD FHD FHD FHD FHD FHD FHD FHD FHD FHD FHD FHD FHD FHD FHD IG 1 IG 3 IG 2 IG 4 IG 6 IG 5 F B F B F B F B F B F B F B F B F B F B F B F B F B F B F B F B F B F B IG 2 B F IG 4 B F IG 6 B F IG 1 B F IG 3 B F IG 5 B F F B F B F B F B F B F B F ...

Page 166: ...abinet 8 x 8 64 Installation Type Cable Redundancy IG Backward IG add on X S Box add on X Q ty IG 8 S Box 1 M F B F B M F B F B M F B F B M F B F B M F B F B M F B F B M F B F B M F B F B IG 3 B F IG 4 B F IG 1 B F IG 2 B F IG 7 B F IG 8 B F IG 5 B F IG 6 B F FHD FHD FHD FHD FHD FHD FHD FHD FHD FHD FHD FHD FHD FHD FHD FHD IG 1 IG 2 IG 3 IG 4 IG 5 IG 6 IG 7 IG 8 Forward DATA ...

Page 167: ...stallation Type Cable Redundancy IG Backward O IG add on X S Box add on X Q ty IG 8 S Box 1 Only available for IW008A M F B F B M F B F B M F B F B M F B F B M F B F B M F B F B M F B F B M F B F B IG 3 B F IG 4 B F IG 1 B F IG 2 B F IG 7 B F IG 8 B F IG 5 B F IG 6 B F FHD FHD FHD FHD FHD FHD FHD FHD FHD FHD FHD FHD FHD FHD FHD FHD IG 1 IG 2 IG 3 IG 4 IG 5 IG 6 IG 7 IG 8 Forward Backward DATA ...

Page 168: ...G 8 S Box 1 No Redundancy IG Connection for the cabinet at the end of the signal FHD FHD FHD FHD FHD FHD FHD FHD FHD FHD FHD FHD FHD FHD FHD FHD IG 1 IG 2 IG 3 IG 4 IG 7 IG 5 IG 8 IG 6 F B F B F B F B F B F B F B F B F B F B F B F B F B F B F B F B F B F B F B F B F B F B F B F B M M M M F B F B F B F B F B F B F B F B F B F B F B F B F B F B F B F B F B F B F B F B F B F B F B F B M M M M IG 1 B ...

Page 169: ...y IG 8 S Box 1 FHD FHD FHD FHD FHD FHD FHD FHD FHD FHD FHD FHD FHD FHD FHD FHD IG 1 IG 2 IG 3 IG 4 IG 7 IG 5 IG 8 IG 6 F B M F B F B F B F B M F B F B F B F B F B F B F B F B F B F B F B F B M F B F B F B F B M F B F B F B F B F B F B F B F B F B F B F B F B F B F B F B F B F B F B F B F B M F B F B F B F B M F B F B F B F B F B F B F B F B F B F B F B F B M F B F B F B F B M F B F B F B IG 1 B F ...

Page 170: ...FHD FHD FHD FHD FHD FHD FHD FHD FHD FHD IG 1 IG 2 IG 3 IG 4 IG 7 IG 5 IG 8 IG 6 F B M F B F B F B F B M F B F B F B F B F B F B F B F B F B F B F B F B M F B F B F B F B M F B F B F B F B F B F B F B F B F B F B F B F B F B F B F B F B F B F B F B F B M F B F B F B F B M F B F B F B F B F B F B F B F B F B F B F B F B M F B F B F B F B M F B F B F B IG 1 B F IG 2 B F IG 5 B F IG 6 B F IG 3 B F IG ...

Page 171: ... Pitch P2 1 Resolutions 384 x 216 Screen Size FHD Resolutions 1920 x 1080 Cabinet 5 x 5 10 Installation Type Cable Redundancy IG Backward X IG add on 1 S Box add on 1 Q ty IG 2 S Box 2 Basic Cable Connection Structure 2 S Box needed for JMU S box Redundancy IG 1 power power IG 2 Forward Backward DATA ...

Page 172: ... Pitch P2 52 Resolutions 320 x 180 Screen Size FHD Resolutions 1920 x 1080 Cabinet 6 x 6 12 Installation Type Cable Redundancy IG Backward X IG add on 1 S Box add on 1 Q ty IG 2 S Box 2 Basic Cable Connection Structure 2 S Box needed for JMU S box Redundancy IG 1 power power IG 2 Forward Backward DATA ...

Page 173: ... P4 2 Resolutions 192 x 108 Screen Size FHD Resolutions 1920 x 1080 Cabinet 10 x 10 100 Installation Type Cable Redundancy IG Backward X IG add on 1 S Box add on 1 Q ty IG 2 S Box 2 Basic Cable Connection Structure 2 S Box needed for JMU S box Redundancy power power F B IG 1 IG 2 power Forward Backward DATA ...

Page 174: ...allation 3 Frame Kit Components 4 Frame Installation 5 Cabinet Frame Installation 6 Frame Bezel Components 7 Frame Bezel Installation 8 S Box Installation and Connection 9 Connections Power and Signal 10 Settings How to Use Appendix 1 S Box Network IP Setting Appendix 2 S Box SNOWJ U Setting Contents ...

Page 175: ...of the LED cabinet LSM program download location Samsung Display Solutions https displaysolutions samsung com Solutions LED Signage Solution LED Signage Manager Partner login is required to download the program 10 Settings How to Use 10 1 Control Program for PC ...

Page 176: ... I2C UART Video VBY1 Control Ethernet I2C UART 1 Connect the PC to the S Box via Ethernet 2 Use a LAN cable to connect the S Box to the Interface Gender 3 Use an OCM cable to connect the Interface Gender to the first LED cabinet 4 Use OCM cables to connect the LED cabinets to one another in a daisy chain configuration 10 Settings How to Use 10 1 Control Program for PC ...

Page 177: ... page appears 2 To set a password enter the same password of your choice twice and click the Start button 3 If you do not want to use a password select the Don t use password checkbox If this checkbox is selected you not prompted for a password when the LSM is launched subsequently 10 1 Control Program for PC ...

Page 178: ...er it directly 2 Clicking the Add button adds the connection information to Setup and Connect 3 User can select S Box s Model Type A total of 6 types are provided For SNOW AAE connection you can select With Cabinet IP 8K or With Cabinet IP 4K Pillar according to the connection type Without Cabinet IP With Cabinet IP 2K With Cabinet IP 4K With Cabinet IP 4K Pillar With Cabinet IP 8K The Wall Luxury...

Page 179: ...d that a static IP address be used If DHCP is used and the IP address is changed the connection with LSM may be disconnected The 192 168 10 x band is used for internal communication with LED cabinets Use an IP address that does not belong to this band Use the IP address for LED x4 assigned by your IT administrator Do not assign an IP address arbitrarily 10 1 Control Program for PC If IP addresses ...

Page 180: ...urce the cabinet configuration and devices with errors Caution For internal communication between the S Box and LED cabinets use ports 1515 48484 48485 and 58585 When firewalls security network are in use make sure the corresponding port between the S Box and LED cabinets is enabled 10 1 Control Program for PC ...

Page 181: ... Layout 3 Device Information Setting View Shows LED cabinet information based on the following categories i Resolution Resolution of the input source ii ViewPort Width height video wall matrix x y coordinate settings iii LED Signage Cabinet X Y positions of LED cabinets 4 Show ID Select to cause each of all connected LED cabinets to display their ID 5 Save apply or cancel settings 3 2 1 5 4 10 1 C...

Page 182: ...nformation 2 Connection layout View Port Cabinet s layout 3 Category View Use the Home and Connections tabs to configure system settings 4 Device Information Setting View S Box Settings Cabinet Settings 5 Sub Information View Monitor window log Basic information of S Box and Cabinet 10 1 Control Program for PC 3 2 1 5 4 ...

Page 183: ... 2 Picture Picture Mode Brightness Contrast Sharpness Color Tint G R Color Temp K Gamma White Balance 3 Picture Options Color Tone HDMI Black Level Film Mode HDR 4 Advanced Settings Black Tone Flesh Tone Color Space Input Signal Plus 5 System Auto Power On Off Standby Control Clock Timer System Restart Interval Software Update ...

Page 184: ...ogram for PC 6 Cabinet Settings Pixel RGB Data Reload Request OnScreen Display On Off LED Brightness LED Frame Rate Multiplier Default x2 x3 x4 x5 Phase Offset Angle 0 359 Software Update 7 Cabinet Calibration Cabinet Module Edge Gradation Refer to next page ...

Page 185: ...LED R D Lab VD 184 10 Settings How to Use 10 1 Control Program for PC RGB CC control for Cabinet and Module Edge Correction RGB CC control Single Multi Gradation control ...

Page 186: ...ication records You can check the MDC communication log during extraction by Export button 2 LED Signage Cabinet Basic information ID Resolution Modules Pitch Temperature IC and Power information Software version 3 LED Signage Box Basic information IP address MAC address Serial number Versions Model Name ...

Page 187: ...Use 10 1 Control Program for PC 1 Options Command Retry Count Error Status Interval Enable Disable Temperature Alert 2 Support Language Advanced Log Management Mail alert Change Password 3 About Software Check current version Update for LSM ...

Page 188: ...LED R D Lab VD 187 10 Settings How to Use 10 1 Control Program for PC 1 S Box Click Dehumidification icon 2 Start Dehumidification mode 24 hours 3 Check progress 4 You can Stop it by Stop button ...

Page 189: ...ab VD 188 10 Settings How to Use 10 1 Control Program for PC 1 Test Patter of S Box When Test Pattern is turned ON OFF or changed the background screen may be displayed for a while due to Overlay layer switching ...

Page 190: ...tallation path B Open LEDDisplayManagement_Config xml file as Edit mode C Change value from 0 to 1 of ShowAdvancedSettings and Save it If changes are not saved due to Windows OS permission problems you can proceed by moving the file to the DESKTOP editing it and copying it back to the original folder D Run LSM again You can see the Power Mode like right side 3 If you click On LED Cabinet s power w...

Page 191: ... version of the products Make sure the blue parts are higher than the actual version of the products Cabinet Main L xxxMWWAC nnnn n xxx Pan name nnnn n version FPGA aabbc_dddef aa pixel pitch bb LED package type c year ddd date e hour f Driver IC Example IFA P2 5 Cabinet L IFAMWWAC 1003 1 FPGA 25252 31046 S box TB KTM2SBMDWWC_100x x Files are different according to update method LSM or USB for AM3...

Page 192: ...lect update file 4 Click Update button to start software update Info txt L IWAMWWAC 1001 0 FPGAFW bin Info txt Never choose info txt file It causes system failure 2 Click Software Update of Cabinet Settings L IERMWWAC 1001 0 FPGAFW 2525218466 10 2 Software Update Cabinet ...

Page 193: ...ply power while pressing the toggle switch on the back of the cabinet Apply AC power while pressing After AC power is applied press the switch for 4 seconds to proceed with the update 4 After attaching and detaching power enter the test pattern and check the cabinet info How to enter the test pattern Refer to Page 21 AM3352 has different files to update to LSM USB A separate tool is required to up...

Page 194: ... Choose S Box to be updated from the list and click The version of the selected file is lower than or equal to the current software version of S Box Please prepare a higher version of the file The version name version TAG of the selected file does not match the software version name of the current S Box Please prepare the correct file The info txt file does not exist Please check the file 10 2 Sof...

Page 195: ...f and then turn on again 3 After completing the upgrade check the firmware version The new version has a higher number than the old version Note Since it is recognized as a file name it is safe to have other model upgrade files together Note After upgrading the software the setting values specified by the existing user are returned to the default values We recommend that you write down the current...

Page 196: ...AWWC folder to the USB root 2 Connect USB 3 Click the MENU key on the remote control 4 Select the Customer Support menu 5 Select the Software Update menu 6 Select the Update Now menu to start the upgrade 7 Wait for the upgrade to complete 8 Check the SW version 10 Settings How to Use Update via USB ...

Page 197: ... about 1 2 minutes 1 Save the OSPMICOM_LXTV_SS bin file to the USB root 2 Connect USB 3 Enter the factory mode 4 Select the SVC UPGRADE menu 5 Move the cursor to the SUBMICOM UPGRADE menu 6 Click the Enter button 7 Press the button on the remote control to start the upgrade 10 Settings How to Use Update via USB ...

Page 198: ...SBKU060AWWF1 folder KU060 2 Under the SBKU060AWWF2 folder K325T SBK325TAWWF folder IG K325T SBL325TIGWWF folder 2 Connect USB 3 Enter the factory mode 4 In Factory go to SVC Upgrade FW Update FW Update 5 Move the cursor to the item you want to update 6 Click the Enter button on the remote control to start the upgrade 10 Settings How to Use Update via USB Screen blinking may occur during Firmware u...

Page 199: ...bout 20 minutes 1 Save the TB VSTXSHWWS bin and TB VSRXSHWWS bin files to the USB root 2 Connect USB 3 Enter the factory mode 4 Select the SVC UPGRADE menu 5 Move the cursor to the VALENS UPGRADE menu 6 Click the Enter button 7 Press the button on the remote control to start the upgrade 10 Settings How to Use Update via USB ...

Page 200: ...Thank you ...

Page 201: ...k the MDC Protocol setting status 5 If the IP setting is successful the Change Type to RJ45 button is displayed If the connection between LSM and S Box works normally click Change Type to RJ45 to change the S Box connection mode to RJ45 3 1 2 4 Caution It is recommended to set a static IP address when setting up the S Box network If the IP is changed when using DHCP the LSM connection may be lost ...

Page 202: ...t When installing multiple S Boxes install them at least 1U 44 45mm away from the top product When installing on a wall the product must be 10mm or more apart from the wall in the vertical left and right and in the case of a cable port install it 50mm or more apart for cable connection Keep the residual heat inside the rack below 35 C Be careful not to let liquids etc enter the product s ventilati...

Page 203: ...g OCM Cable from the DATA OUT terminal of the Interface Gender When using an input of FHD or higher add an input signal through the Input signal Plus menu Menu Picture Advanced Settings Input signal plus Input signal selection Default OFF when the item is changed the S Box is rebooted Displays the screen based on the cabinet at the top left To view the screen connect to the HDBT OUT1 terminal of S...

Page 204: ...cables tightly in bundling Do not bundle HDBase T cables with any AC power cable Keep away from electromagnetic interference environments ex high voltage cables electric motor based devices such as elevators or refrigerators fluorescent lamps lighting equipment etc HDBT Keep the distance between AC power cables Keep at least 12 30 48cm away from AC power cables HDBT cables from one S Box can be ma...

Page 205: ...o the load bar of the RJ45 connector as shown below in the conductor structure T 568B Plastic load bar is absolutely necessary because the thickness of the CAT6 cable is not located flat on the RJ45 connector like the general CAT5 Finishing method for HDBase T Cable Load bar Wires aligned with Load bar Load bar and Drain wire S Box Connection Appendix 2 S Box Installation and Connection ...

Page 206: ...th a wire cutter Ground is reinforced using drain wire refer to next page Without drain wire Reinforced by contacting the connector shell as shown below using copper foil Copper foil Fold Al foil or Braid back and wrap it with Copper foil Connector shell Drain wire S Box Connection Finishing method for HDBase T Cable Appendix 2 S Box Installation and Connection ...

Page 207: ...the metal part of the RJ45 connector After soldering the drain wire to the metal part of the RJ45 connector cut off unnecessary parts Conductors and shield continuity check with cable tester Finishing method for HDBase T Cable Recommended Drain wire soldering Copper foil S Box Connection Appendix 2 S Box Installation and Connection ...

Page 208: ...n is required Connect to the DATA OUT terminal of the last cabinet using OCM Cable from the DATA IN terminal of the Interface Gender For HDBT signal stability use a 15 100m CAT6 STP FTP cable Do not bundle or break multiple cables SNOW J U Appendix 2 S Box Installation and Connection ...

Page 209: ...ector of the Multi Link HDR Cable sold separately to the Multi Link HDR Port of each S Box Caution Connect the connector structure facing up Menu Picture LED HDR Multi Link HDR Settings ON Setting the number of connected S Box 2 3 4 S Box ID Setting Caution It is necessary to set the ID so that ID does not overlap between connected S Boxes UP SIDE Only for SBB SNOWJMU Appendix 2 S Box Installation...

Page 210: ...cable according to the number of S Box to be connected 2 3 4 connecting cables Check the number of connectors Multi Link HDR Cable Multi Link HDR Port No supports for models under SBB SNOWJAU Appendix 2 S Box Installation and Connection ...

Page 211: ...t S Box Settings Software Update from the LSM menu Select Browser and navigate to the folder where the FPGA update file TB XCKUSBMWWF bin Info txt is located The version of the Info txt file must be higher than the currently installed version Select the TB XCKUSBMWWF bin file Select the Update button to start the upgrade Note For sites where it is difficult to remove the Multi Link HDR Cable the A...

Page 212: ...nsmission distance 100M 2 000m 2 000m 2 000m 2 000m 1G 275m 550m 550m 1 000m 10G 33m 82m 300m 550m 100G 100m 150m Cable Loss according to Random mating Grade Random mating Cable loss Garde A 0 07 dB Grade A 0 15 dB Garde B 0 12 dB Grade B 0 25 dB Garde C 0 25 dB Grade C 0 50 dB Garde D 0 50 dB Grade D 1 00 dB The difference of Multi Mode Cables ...

Page 213: ...LED R D Lab VD 212 Accessories configuration SNOW JMU Appendix 3 S BOX Accessory List ...

Page 214: ... BN39 02776A BN96 49229A BN96 49132A BN59 01317A BN39 02473C BN61 16067A 6003 000133 6003 001150 BN63 18456A BN39 02466B BN96 54035A Accessories configuration SNOW AAE Appendix 3 S BOX Accessory List POWER CODE US 3903 001117 EU 3903 001118 KOREA 3903 001074 CHINA 3903 001075 Power cord by Region ...

Page 215: ...0 Hz DP HDMI 4 3840 x 2160 60 Hz HDMI 1 3 Output 4K 120Hz 8K 120Hz Platform SOC OSCAR P Scaler SE19HM FPGA KU060 K325T SW OS TIZEN 6 0 Magic Info Magic Info 9 Additional Function External BT Wifi External IR ECO Sensor RJ45 wired Ethernet Power Consumption Voltage AC 100 to 240 60Hz 50Hz Maximum Power Consumption MAX 110W DPVS 0 3W 0 5W Frequency sync Horizontal HDMI 1 3 30 135 kHz DP HDMI 4 30 26...

Page 216: ...en appears depending on the number of the connected devices Note the following when any 8K content is input through HDMI 2 1 When the Screen Mirroring is activated through HDMI the message indicating the unavailable content appears 4K content is supported up to 60 Hz through HDMI connection When using Multi HDMI content is played back after converting to 4K Interlaced mode input is not recommended...

Page 217: ...HDMI 설정 방법 Select Multi View in Source menu Select 4 HDMI Borderless Borderless Layout Video 8K60Hz Audio HDMI1 Select 4HDMI Select one of them and change the size Appendix 5 AAE S Box How to set Multiview function Select Multi View in Source menu ...

Page 218: ...ze can be changed to large or small Exit to full screen Change forused source to full screen Large option Small option Saving Layout Configuration It is possible to save layouts Choose the return button on remote Select the Save Exit button Layout name can modified Auto Save mode supported Appendix 5 AAE S Box How to set Multiview function ...

Page 219: ...LED R D Lab VD 218 Supported resolution list Appendix 5 AAE S Box How to set Multiview function ...

Reviews: