


2A3/4
3-6-31
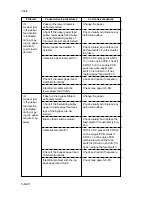
Broken deck paper conveying
motor gear.
Paper is extremely curled.
Defective paper path sensor 2.
Electrical problem with the
paper conveying clutch.
The paper side guides are
deformed.
Mechanical problem with the
paper conveying clutch.
Defective interface PCB.
Defective deck main PCB.
Problem
Causes/check procedures
Corrective measures
Check visually and replace the
deck paper conveying motor or
its gear if necessary.
Change the paper.
With a 5/0 V DC pulse signal
output at CN1-1 on the deck
main PCB, check if a 2/0 V DC
pulse signal is output at CN1-6
on the deck main PCB with
paper path sensor 2 is turned
on by holding a sheet of paper
level about 10 to 20 mm below
the bottom of the paper
conveying base. If not, paper
path sensor 2 or the interface
PCB is defective. Check the
interface PCB and, if it is okay,
replace paper path sensor 2.
Check (see page 3-6-98).
Remedy or replace.
Check the installation condition.
Check for continuity across
CN1-6 & CN5-2 and CN2-6 &
CN4-8 on the interface PCB. If
none, replace the interface
PCB.
Check if the voltage at CN1-6
on the deck main PCB changes
in the pattern 2 V DC/0 V DC
(pulse) /0 V DC. If it does,
replace the deck main PCB.
(2)
A paper jam
in the large
paper deck is
indicated
during
copying
(paper failing
to reach
PPS1 in large
paper deck
horizontal
paper path).
Summary of Contents for Ri 4230
Page 3: ...SERVICE MANUAL Ri 4230 5230 ...
Page 13: ...4230 5230 S M MCA THEORY AND CONSTRUCTION SECTION I I Theory and Construction Section ...
Page 14: ...1 1 5 2A3 4 CONTENTS 1 1 Specifications 1 1 1 Specifications 1 1 1 ...
Page 100: ...4230 5230 S M MCA ELECTRICAL SECTION II II Electrical Section ...
Page 119: ......
Page 138: ......
Page 159: ...4230 5230 S M MCA III Set Up and Adjustment Section III SET UP AND ADJUSTMENT SECTION ...
Page 448: ...2A3 4 3 6 3 25 Toner scatters at the leading edge of the image See page 3 6 17 ...