


2A3/4
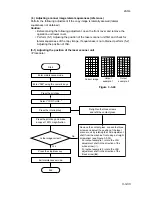
3-3-27
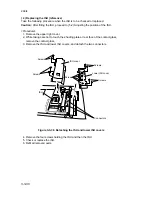
17. Loosen the two screws securing the mirror 2 frame.
18. Insert the mirror 1 lower frame into the scanner unit and seat it on the positioning
holes.
19. Insert the two frame securing tools into the positioning holes in the front and rear of
the scanner unit and determine the positions of the mirror 1 lower frame and mirror
2 frame.
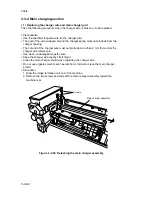
20. While holding the scanner wire on the mirror 1 lower frame, secure the wire
retainers at the front and rear of the mirror 1 lower frame using the two screws for
each.
Screws
Screws
Frame securing tool
Mirror 2 frame
Wire retainer
Mirror 1 lower frame
Wire retainer
Frame securing tool
Mirror 2 frame
Mirror 1 lower frame
Figure 3-3-33 Securing the scanner wire
21. Retighten the two screws securing the mirror 2 frame.
22. Remove the two screws holding each of the two frame securing tools and then the
tools.
23. Refit all removed parts.
Summary of Contents for Ri 4230
Page 3: ...SERVICE MANUAL Ri 4230 5230 ...
Page 13: ...4230 5230 S M MCA THEORY AND CONSTRUCTION SECTION I I Theory and Construction Section ...
Page 14: ...1 1 5 2A3 4 CONTENTS 1 1 Specifications 1 1 1 Specifications 1 1 1 ...
Page 100: ...4230 5230 S M MCA ELECTRICAL SECTION II II Electrical Section ...
Page 119: ......
Page 138: ......
Page 159: ...4230 5230 S M MCA III Set Up and Adjustment Section III SET UP AND ADJUSTMENT SECTION ...
Page 448: ...2A3 4 3 6 3 25 Toner scatters at the leading edge of the image See page 3 6 17 ...