28
Subject to change without notice
10.2. References
References are sets of data which consist of settings informa-
tion and A/D converter data. These may be stored and recalled
internally or externally. There are a maximum of 4 reference
memories (REF1 ... REF4) into which data can be reloaded,
the contents of these can also be displayed. The main feature
of references is the fact that all information like vertical gain,
time base setting, A/D converter data is always stored along
with the data proper; this allows to compare the reference
with live signals. If the key SAVE/RECALL is pushed and the
menu item
REFERENCES
selected, a changeover into the menu
IMPORT/EXPORT
is possible; here the standard menu of the
data manager will appear which allows you to copy references
between the internal memory and an external USB stick. (See
chapter 10.1 for a detailed description.)
There is a special key REF provided in the CHANNEL CONTROL
section of the front panel. If this key is pushed, it will light up
white and open a short menu for selecting the 4 possible re-
ference curves REF1 .. REF4; the selection is done by pushing
the respective soft menu key. The reference selected will be
displayed. In the short menu the displayed reference curves
will be marked with red dots.
The store and load menu will be opened by fi rst pushing the
key REF and then the key MENU in the CHANNEL CONTROL
section of the front panel.
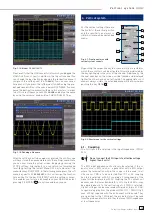
Fig. 10.5: Loading and storing of references
After activating the top menu item with the respective key, the
desired reference into which the data shall be loaded can be
selected with the universal knob. In order to select the reference
curve to be loaded, push the menu key LOAD and select the
desired data in the data manager. If the data were, e.g., loaded
into the „REF1“ curve in order to store a reference, select the
channel (push the key next to
STORE
and select the channel
with the universal knob), check whether the selected name for
the data is the desired one, and store the reference by pushing
the soft menu key next to
DATA NAME
. If another name and/or a
commentary is desired, push the key next to
STORE AS
in order
to access the appropriate menu.
This standard menu allows you to select the location, the data
name, and a commentary and to store all of this by pushing the
respective menu key.
10.3. Curves
In addition to references, the pure A/D converter data can be
stored, however, only on external USB sticks, not internally.
The following formats are available:
Binary format:
A binary data set may contain bytes of any length. The curves
will be stored without any time information.
CSV (Comma Separated Values):
CSV data sets store the curves in tables, the lines are separated
by commas.
HRT (HAMEG Reference Time):
Data sets with this code contain data of curves vs. time. If a
curve was stored in this format, it can be used in the reference
menu. With the HRT format it is also possible to generate
data sets which may be reloaded into the oscilloscope via the
reference menu.
In order to store curves, push the key SAVE/RECALL and select
in the main menu the item CURVES by pushing the respective
soft menu key.
Fig. 10.6: Menu for storing curves
In this menu which will open, the top item allows the selection
of the front or rear panel USB port. This choice is only possible
if the instrument recognized a USB stick at the designated port.
If a stick is present and the port selection done by pushing the
respective soft key, the fi rst time this happens, the data manager
will appear with the associated menu. Here, a listing of desti-
nations can be selected or generated. Confi rm the selection of
the destination listing by pushing
OK
, this will recall the menu
for storing curves. Pushing the soft key next to the second
menu item
(CURVE)
will activate this function as indicated by
the blue background: now the channel can be selected from
which the curve shall be taken by turning the universal knob.
Only channels which have been activated are eligible. Pushing
the menu key next to
DATA NAME
will open the menu for entering
names: in order to do this fi rst push the CURSOR/SELECT key,
then use this menu and the universal knob to enter the desired
name which will be stored by pushing
ACCEPT
. This will recall
again the menu for storing curves.
Now push the soft key
FORMAT
, this will open a window for
selecting the format. The selection is performed again with
the universal knob. Additionally, a commentary can be stored
along with a curve. This is done by pushing the menu key next
to
COMMENTARY
, this will open a window for the entry. After
entering the commentary and storing it by pushing
ACCEPT
,
again the menu for storing curves will appear. After completion
of all these entries, pushing the menu key next to
STORE
will
store the curve according to the selected settings.
D o c u m e n t a t i o n , s t o r i n g a n d r e c a l l i n g


