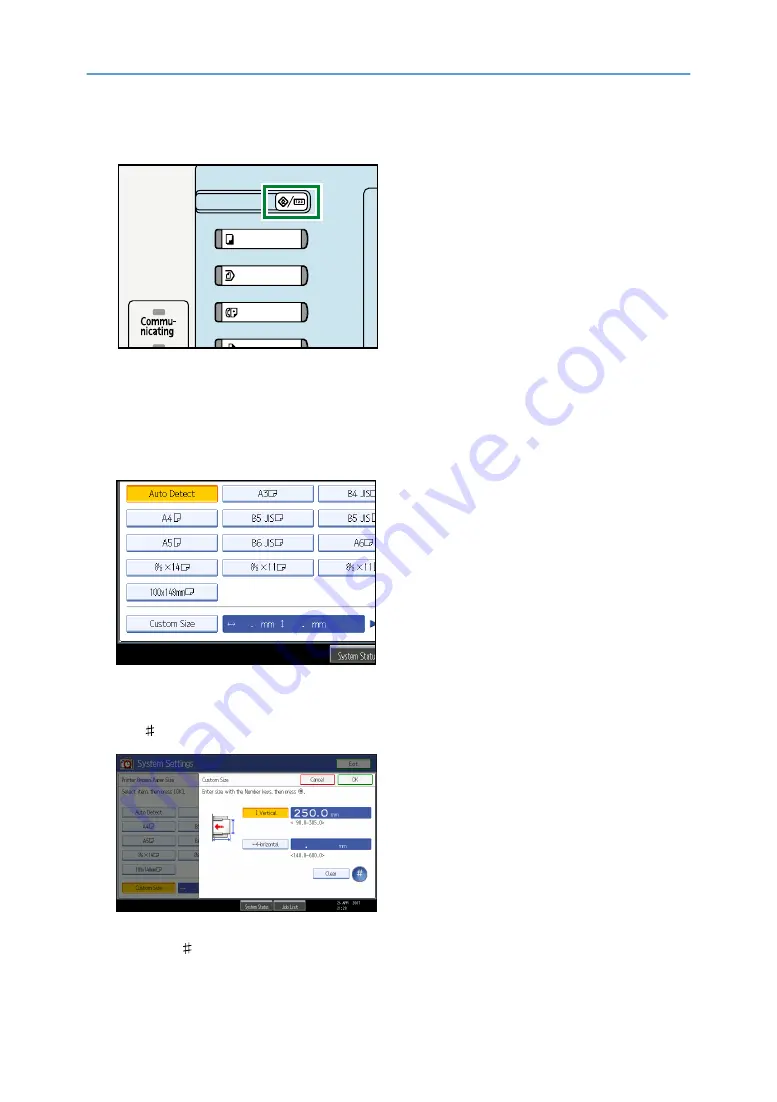
background image

1.

Press the [User Tools/Counter] key on the control panel.

BAC001S

2.

Press [System Settings].

3.

Press the [Tray Paper Settings] tab.

4.

Press [Printer Bypass Paper Size].

5.

Press [Custom Size].

If a custom size is already set, press [Change Size].

6.

Press [Vertical], enter the vertical size of the paper using the number keys, and then press
the [ ] key.

7.

Press [Horizontal], enter the horizontal size of the paper using the number keys, and then
press the [ ] key.

20

Summary of Contents for LD528

Page 1: ...e For safe and correct use be sure to read the Safety Information in About This Machine before using the machine Preparing the Machine Setting Up the Printer Driver Other Print Operations Saving and Printing Using the Document Server Appendix 1 2 3 4 5 Printer Reference Operating Instructions ...

Page 2: ...es bank drafts checks passports driver s licenses The preceding list is meant as a guide only and is not inclusive We assume no responsibility for its completeness or accuracy If you have any questions concerning the legality of copying or printing certain items consult with your legal advisor Notes Some illustrations in this manual might be slightly different from the machine Certain options migh...

Page 3: ... machine how to enter text and how to install the CD ROMs provided Troubleshooting Provides a guide to solving common problems and explains how to replace paper toner staples and other consumables Copy Document Server Reference Explains Copier and Document Server functions and operations Also refer to this manual for explanations on how to place originals Facsimile Reference Explains Facsimile fun...

Page 4: ...ced security functions or user and administrator authentication PostScript 3 Supplement Explains how to set up and use PostScript 3 Information Contains general notes on the machine and information about the trademarks of product names used in the manuals Other Manuals UNIX Supplement Extended Feature Settings Reference Device Version Extended Feature Settings Reference Web Version App2Me Start Gu...

Page 5: ... Setting Custom Size Paper Using the Control Panel 19 Setting Thick Paper Thin Paper or OHP Transparencies Using the Control Panel 21 Setting Envelopes Using the Control Panel 23 1 Preparing the Machine Confirming the Connection Method 27 Network Connection 27 Local Connection 29 Installing the Printer Driver 31 Quick Install 31 Installing the Printer Driver for the Selected Port 32 Using as a Win...

Page 6: ...P Windows Server 2003 2003 R2 Accessing the Printer Properties 61 Windows Vista Windows Server 2008 Accessing the Printer Properties 64 3 Other Print Operations Printing a PDF File Directly 67 Printing Method 67 Using DeskTopBinder Lite 67 PDF Direct Print Properties 69 Using Commands 70 Using the Print Job Function 71 Selecting the Initial Print Job List 74 Printing from the Print Job Screen 76 S...

Page 7: ...112 Inserting Chapter Slip Sheets 112 Slip Sheet 114 Specifying the Paper Type with the Printer Driver 116 Using the Virtual Printer 117 Adding a Virtual Printer 117 Changing a Virtual Printer Configuration 118 Confirming a Virtual Printer Configuration 118 Deleting a Virtual Printer 119 Printing Using a Virtual Printer 119 4 Saving and Printing Using the Document Server Accessing the Document Ser...

Page 8: ...aper misfeeds damage to originals or loss of data Be sure to read these explanations Indicates supplementary explanations of the machine s functions and instructions on resolving user errors This symbol is located at the end of sections It indicates where you can find further relevant information Indicates the names of keys on the machine s display or control panels 6 ...

Page 9: ...20 to 240 V model Indicates information that is specific to the 120 V model Check the label on the rear of the machine to identify the model BDJ008S Dimensions in this manual are given in two units of measure metric and inch If your machine is the 220 to 240 V model refer to the metric units If your printer is the 120 V model refer to the inch units 7 ...

Page 10: ... specify an item on the control panel it becomes highlighted Keys dimmed for example cannot be used BDJ003S 1 Operational status or messages Displays current machine status such as Ready Offline and Printing Information about the print job user ID and document name appears in this section 2 Online Offline Press to switch the machine between online and offline When the machine is online it can rece...

Page 11: ...lay spooled jobs 8 Paper Tray Status indicators The paper tray settings appear When the power is turned on the copier display is shown This is a factory default This initial setting can be changed See System Settings General Settings Guide Simplified Display This section explains how to switch to the simplified display When you press the Simplified Display key the screen changes from the initial d...

Page 12: ...Example of a simplified display To return to the initial display press the Simplified Display key again Certain keys do not appear on the simplified display 10 ...

Page 13: ...the facsimile function and scanner function are not displayed in the job list Job List Screen This section explains displays and icons that appear in the Job List screen The Job List screen varies depending on whether Job Order is selected with Print Priority for the System Settings For details about setting procedure see System Settings General Settings Guide When Job Order is not selected The jo...

Page 14: ...obs Job printed using copy function Job printed using printer function Job printed using Document Server function Job printed using DeskTopBinder Job printed using Web Image Monitor Checking Jobs in the Job List You can check the contents of jobs in the job list 1 Press Job List 2 Select a job whose contents you want to check 3 Press Details and then check the contents 4 Press Exit 12 ...

Page 15: ...ob list 1 Press Job List 2 Select a job whose order you want to change 3 Press Change Order 4 Change the order using Top Previous or Next 5 Press OK Holding Jobs You can hold jobs that are queued or currently printing 1 Press Job List 2 Select a job you want to hold 13 ...

Page 16: ... You can delete a job that is queued or currently printing 1 Press Job List 2 Select a job you want to delete To delete multiple print jobs select all print jobs you want to delete 3 Press Delete Reservation 4 Press OK Checking the Job History You can view the history and contents of completed print jobs 1 Press Job List 2 Press Job History A list of completed print jobs appears 3 Select a job who...

Page 17: ...ay Duplex Booklet printing when the optional Finisher SR790 Finisher SR3000 or SR3050 is installed Auto Tray Select Auto Tray Switching Rotating Collate Staple when the optional Finisher SR790 Finisher SR3000 or SR3050 is installed Punch when the optional Finisher SR3000 and Punch Unit are installed Printing onto paper with specific orientation When printing onto paper that has specific orientatio...

Page 18: ...facing down into the bypass tray until the beeper sounds and then adjust the paper guide to the paper size If the paper size of the paper guide and the paper do not match skewing and misfeeds might occur Do not stack paper over the limit mark otherwise a skewed image or misfeeds might occur Fan the paper to get air between the sheets to avoid a multi sheet feed BCU009S 1 Extender 16 ...

Page 19: ...nter drivers see the printer driver Help Setting the Paper Size Using the Control Panel Follow the procedure below to set the machine using the control panel when loading standard size paper onto the bypass tray The following procedures are not required if you select Driver Command from Bypass Tray Setting Priority in System of Printer Features see Printer Features General Settings Guide In that c...

Page 20: ...1 Press the User Tools Counter key on the control panel BAC001S 2 Press System Settings 3 Press the Tray Paper Settings tab 4 Press Printer Bypass Paper Size 18 ...

Page 21: ... the bypass tray The following procedures are not required if you select Driver Command from Bypass Tray Setting Priority in System of Printer Features see Printer Features General Settings Guide In that case set the paper size using the printer driver If you select Machine Settings from Bypass Tray Setting Priority in System of Printer Features see PrinterFeatures GeneralSettingsGuide thesettings...

Page 22: ...ings tab 4 Press Printer Bypass Paper Size 5 Press Custom Size If a custom size is already set press Change Size 6 Press Vertical enter the vertical size of the paper using the number keys and then press the key 7 Press Horizontal enter the horizontal size of the paper using the number keys and then press the key 20 ...

Page 23: ...Printer Features see PrinterFeatures GeneralSettingsGuide thesettingsmadeusingthecontrolpanelhavepriority over the printer driver settings If the printer driver is not used select Machine Settings from Bypass Tray Setting Priority in System of Printer Features see Printer Features General Settings Guide Set the paper size using the control panel When printing onto OHP transparencies paper thinner ...

Page 24: ...s 7 Press OK The paper type selected is displayed 8 Press the User Tools Counter key The initial screen appears Printing on special paper such as thick paper thin paper or OHP transparencies may be slower than printing on plain paper The settings made will remain valid until they are reset again After printing on OHP transparencies or thick paper thin paper make sure to clear settings for the next...

Page 25: ...ut badly creased load the envelopes in the opposite direction and then rotate the print object by 180 degrees using the printer driver before printing For details see the printer driver Help Check there is no air in the envelopes before loading You cannot print envelopes with duplex function Load only one size and type of envelope at a time Before loading envelopes flatten leading edges the side g...

Page 26: ...ngs tab 7 Press Printer Bypass Paper Size 8 Press Custom Size If a custom size is already set press Change Size 9 Press Vertical enter the vertical size of the paper using the number keys and then press the key 10 Press Horizontal enter the horizontal size of the paper using the number keys and then press the key 24 ...

Page 27: ...Press Paper Type Bypass Tray 15 Press Thick Paper on the Paper Type area 16 Press OK The paper type selected is displayed 17 Press the User Tools Counter key The initial screen appears When entering the horizontal size for Recommended Paper Sizes and Types including the opened out flap in the measurement 25 ...

Page 28: ...BAT029S 1 Vertical size 2 Horizontal size For details about envelopes see Envelope About This Machine 26 ...

Page 29: ... the machine is connected Follow the driver installation procedure that is appropriate to the connection method Network Connection This machine can be used as a Windows printing port or network printer Using this machine as the Windows printing port Network connections can be established through Ethernet and Wireless LAN Available ports are determined based on the combination of Windows operating ...

Page 30: ... port For details about Standard TCP IP port see Installing the Printer Driver For details about IPP port see Installing the Printer Driver For details about LPR port see Installing the Printer Driver For details about WSD port see Installing the Printer Driver For details about SmartDeviceMonitor for Client port see Installing the Printer Driver p 31 Installing the Printer Driver Using as a netwo...

Page 31: ...Printer p 45 Using as a NetWare Print Server Remote Printer Local Connection Local connections can be established via parallel USB and Bluetooth connections See the explanation about how to install the printer driver for each method of connections For details about Bluetooth connections see Printing with Bluetooth Connection Network Guide For details about USB connections see Installing the Printe...

Page 32: ... p 52 Printing with Parallel Connection 1 Preparing the Machine 30 1 ...

Page 33: ...ee PostScript 3 Supplement Quick Install You can install the printer drivers easily from the CD ROM provided with this machine Using Quick Install the PCL printer driver is installed under network environment and the TCP IP port will be set Manage Printers permission is required to install the drivers Log on as an Administrators group member If you connect using USB see Installing the Printer Driv...

Page 34: ...For details about bidirectional communication between the machine and computer see Making Option Settings for the Printer p 48 Installing the Printer Driver Using USB p 54 Making Option Settings for the Printer Installing the Printer Driver for the Selected Port Using the Standard TCP IP port This describes how to install the PCL printer driver using the Standard TCP IP port Manage Printers permis...

Page 35: ...appear 12 Click Next in the Add Standard TCP IP Printer Port Wizard dialog box 13 Enter the printer name or IP address in the Printer Name or IP Address box The Port Name text box automatically obtains a port name Change this name if necessary When the device selection appears select RICOH NetworkPrinter Driver C Model 14 Click Next 15 Click Finish in the Add Standard TCP IP Printer Port Wizard di...

Page 36: ... Port To print via IPP SSL under Windows Vista or Windows Server 2008 you must install the certificate on your computer before you install the printer driver using the IPP port For details consult your administrator Installing the PCL printer driver 1 Quit all applications currently running 2 On the Start menu click Printers and Faxes 3 Click Add a printer The Add printer Wizard dialog box appears...

Page 37: ...g the SmartDeviceMonitor for Client port Using the LPR port This describes how to install the PCL printer driver using the LPR port Manage Printers permission is required to install the driver Log on as an Administrators or Power Users group member In an IPv6 environment you cannot use the Standard TCP IP Port Use the SmartDeviceMonitor for Client port Installing the PCL Printer Driver 1 Quit all ...

Page 38: ...essary 16 Click Continue The printer driver installation starts 17 After the installation is completed select one of the options to restart the computer either now or later and then click Finish Restart the computer to complete installation To stop installation of the selected software click Cancel before installation is complete Auto Run may not work with certain operating system settings In that...

Page 39: ...vanced 7 Insert the provided CD ROM into the computer s CD ROM drive If the AutoPlay dialog box appears click the close button and then proceed to step 8 8 Click Browse and then specify a location for the printer driver If the CD ROM drive letter is D the printer driver s source files are stored in D DRIVERS PCL5E XP_VISTA Language DISK1 or D DRIVERS PCL6 XP_VISTA MUI DISK1 The PCL 6 printer drive...

Page 40: ...plications currently running 2 Insert the CD ROM into the CD ROM drive The installer starts 3 Select an interface language and then click OK The default interface language is English 4 Click PCL Printer Driver 5 The software license agreement appears in the License Agreement dialog box After reading the agreement click I accept the agreement and then click Next 6 Select the printer driver you want...

Page 41: ...s launch Setup exe on the CD ROM root directory A message appears if there is a newer version of the printer driver already installed If there is you cannot install the printer driver using Auto Run If you still want to install the printer driver use Add Printer See When a Message Appears during Installation of the Printer Driver Troubleshooting Installing the PCL printer driver IPP Manage Printer...

Page 42: ... 15 16 http 192 168 15 16 printer https 192 168 15 16 printer You can enter http printer s IP address ipp as the printer s address 14 Enter a name for identifying the printer in IPP Port Name Use a name different from the one of any existing ports If a name is not specified here the address entered in the Printer URL box becomes the IPP port name 15 Click Detailed Settings to make necessary settin...

Page 43: ...cedure below to change the SmartDeviceMonitor for Client settings such as TCP IP timeout recovery parallel printing and printer groups Windows 2000 1 On the Start menu point to Settings and then click Printers The Printers window appears 2 Click the icon of the machine you want to use On the File menu click Properties 3 On the Ports tab click Configure Port The Configuration dialog box appears Win...

Page 44: ...l to close the Port Configuration dialog box 2 Start SmartDeviceMonitor for Client and then right click the SmartDeviceMonitor for Client icon on the tasktray 3 Point to Properties and then click Extended Features Settings 4 Select the Set Recovery Parallel Printing for each port check box 5 Click OK to close the Extended Features Settings dialog box For details about these settings see Using Smar...

Page 45: ...sed with the client You can install the printer driver from the CD ROM provided with this machine or download it from the supplier s Website If your operating system is Windows XP Professional Vista x64 Windows Server 2003 2003 R2 2008 x64 you must download the printer driver from the manufacturer s Website Select this printer and the operating system you are using and then download it Installing ...

Page 46: ...to configure the printer as default 17 Click Continue The printer driver installation starts 18 After the installation is completed select one of the options to restart the computer either now or later and then click Finish Restart the computer to complete installation To stop installation of the selected software click Cancel before installation is complete Auto Run may not work with certain oper...

Page 47: ...e used in the example NetWare version 4 1 File server name CAREE Queue name R QUEUE 1 Insert the CD ROM into the CD ROM drive The installer starts Auto Run may not work with certain operating system settings In that case launch Setup exe on the CD ROM root directory 2 Select an interface language and then click OK The default interface language is English 3 Click PCL Printer Driver 4 The software ...

Page 48: ...e computer launch the Printers and Faxes window and then open the printer properties Under Windows 2000 or Windows Server 2003 2003 R2 open the printer properties from the Printers window 18 Click the NetWare setting tab Under Windows Server 2003 2003 R2 on the Printer Settings tab clear the Form Feed and Enable Banner check boxes Do not select these check boxes since they are automatically select...

Page 49: ... pages according to the operating system used Clear the Enable banner check box on the NetWare Settings tab in the printer properties dialog box Printing after Resetting the Printer Printer to print server connection requires 30 40 seconds to resume after the printer is reset During this period jobs may be accepted depending on NetWare specifications but not printed To print after resetting the pr...

Page 50: ... be installed from the CD ROM provided with this machine If the printer driver is not already installed follow the printer s plug and play instructions to install it from the provided CD ROM 1 Check that the power of the machine is off 2 Connect the machine to the computer using a USB cable Connect the USB cable firmly 3 Turn on the power of the machine Found New Hardware Wizard starts and USB Pri...

Page 51: ...t used Found New Hardware Wizard starts and USB Printing Support is installed automatically If the printer driver is already installed and plug and play is enabled the icon of the printer connected to the USB port appears in the Printers and Faxes window The printer drivers can be installed from the CD ROM provided with this machine If the printer driver is not already installed follow the printer...

Page 52: ...essed until the computer finishes reading from the CD ROM The number after USB varies depending on the number of printers that the computer is connected to Windows Vista Windows Server 2008 USB To install a printer driver you must have Administrators privilege Log on using an account that has Administrators privilege If the printer driver is already installed and plug and play is enabled the icon ...

Page 53: ...isher of this software display appears in the installation select the Install this driver software anyway 6 Click Exit If the installation is successful the icon of the printer connected to the USB001 port appears in the Printers window To disable Auto Run press the left Shift key when inserting the CD ROM into the drive and keep it pressed until the computer finishes reading from the CD ROM The n...

Page 54: ... OK The default interface language is English 4 Click PCL Printer Driver 5 The software license agreement appears in the License Agreement dialog box After reading the agreement click I accept the agreement and then click Next 6 Select the printer driver you want to use in the Select Program dialog box You can select several printer drivers The PCL 6 printer driver is installed in the language spe...

Page 55: ...plete Auto Run may not work with certain operating system settings In that case launch Setup exe on the CD ROM root directory A message appears if there is a newer version of the printer driver already installed If there is you cannot install the printer driver using Auto Run If you still want to install the printer driver use Add Printer See When a Message Appears during Installation of the Print...

Page 56: ...0 Enable bidirectional support must be selected and Enable printer pooling must not be selected on the Ports tab with the printer driver When connected with the network The machine must support bidirectional communication The standard TCP IP must be used Enable bidirectional support must be selected and Enable printer pooling must not be selected on the Ports tab with the printer driver In additio...

Page 57: ...ow appears 2 Click the icon of the printer you want to use 3 On the File menu click Properties When using Windows Vista or Windows Server 2008 right click the icon of the printer you want to use and then click the Properties 4 Click the Accessories tab If options in the Accessories tab are disabled bidirectional connection is enabled In this case no change is necessary for option settings 5 Select...

Page 58: ...d to install Font Manager Log on as an Administrators group member 1 Quit all applications currently running 2 Insert the CD ROM into the CD ROM drive The installer starts 3 Click Font Manager 4 Follow the instructions on the display 1 Preparing the Machine 56 1 ...

Page 59: ...n The directory is C PM6 RSRC PPD4 For PageMaker 6 5 default installation The directory is C PM65 RSRC USENGLISH PPD4 The USENGLISH may vary depending on your language selection For PageMaker 7 0 default installation The directory is C PM7 RSRC USENGLISH PPD4 The USENGLISH may vary depending on your language selection If the driver is not set correctly after copying the ppd file printing may not b...

Page 60: ...1 Preparing the Machine 58 1 ...

Page 61: ...r Properties dialog box are applied to all users 1 On the Start menu point to Settings and then click Printers The Printers window appears 2 Click the icon of the printer you want to use 3 On the File menu click Properties The Printer Properties dialog box appears 4 Make the settings you require and then click OK The settings you make here are used as the default settings for all applications For ...

Page 62: ...ecific application open the Printing Preferences dialog box from that application The following procedure explains making printer settings for Windows 2000 WordPad as an example of how to make printer settings for a specific application 1 Open the application 2 On the File menu click Print The Print dialog box appears 3 Select the printer you want to use in the Select Printer list and then click t...

Page 63: ...eferences dialog box appears 3 Make the settings you require 4 Click Register Current Settings Enter a name and comment that describe the setting and then click OK The newly registered icon appears with its registered name in the One Click Preset List area 5 Click OK UnderWindowsoperatingsystems thisfunctionisavailablethroughthePCL6andPostScript3printer driver When using this function using the Po...

Page 64: ...axes window appears 2 Click the icon of the printer you want to use 3 On the File menu click Printing Preferences The Printing Preferences dialog box appears 4 Make the settings you require and then click OK The setting is temporarily registered as Unregistered in the One Click Presets list area The settings you make here are used as the default settings for all applications The Unregistered setti...

Page 65: ...s This section explains how to register and use one click presets Each function explained in this chapter is preconfigured and registered under One Click Presets List on the One Click Presets tab You can apply the relevant setting simply by clicking on the one click preset name This helps to avoid incorrect settings and misprints One click presets can be added modified and deleted as required They...

Page 66: ...ter Properties dialog box are applied to all users 1 On the Start menu click Control Panel The Control Panel window appears 2 Click Printer in Hardware and Sound 3 Right click the icon of the printer you want to use and then click Properties 4 Make the settings you require and then click OK The settings you make here are used as the default settings for all applications For details see the printer...

Page 67: ...er settings for a specific application 1 On the File menu click Print The Print dialog box appears 2 Select the printer you want to use in the Select Printer list and then click Preferences 3 Make the settings you require and then click OK Procedures for opening the Printing Preferences dialog box vary depending on the application For details see the manuals provided with the application Any setti...

Page 68: ...es dialog box in the document s native application The Printing Preferences dialog box appears 3 Make the settings you require 4 Click Register Current Settings Enter a name and comment that describe the setting and then click OK The newly registered icon appears with its registered name in the One Click Preset List area 5 Click OK UnderWindowsoperatingsystems thisfunctionisavailablethroughthePCL6...

Page 69: ... optional contents or page size exceeds 5 08 m cannot be printed PDF version 1 7 Acrobat 8 0 files created without any functions that are exclusive to PDF version 1 7 can be printed If memory is insufficient or there are other problems direct printing of High Compression PDF files created using this device s scanner function might not be possible Paper size errors may occur when printing on custom...

Page 70: ...r functions that are already configured through DeskTopBinder Lite enhancement Using these buttons you can print Windows files preview printouts convert images and register scanners for documents without having to open DeskTopBinder Lite You can also use these functions simply by dragging a target file to the button corresponding to the required function and dropping it there 1 On the Start menu p...

Page 71: ...14 1 Setting name Displays the plug in configuration name up to 63 single byte characters 2 Change Icon Changes the icon displayed on the tool bar 3 Printer Displays printer s IP address or hostname 4 Duplex Prints on both sides of sheets 5 Layout Prints multiple pages on a single sheet 6 Punch Punches holes in printed sheets 7 Staple Staples together printed sheets 8 Display this dialog box befor...

Page 72: ...rintout paper size Specify the paper size you want copies to be printed onto 14 Color Black and White not available for this machine Specify color or black and white printing 15 Resolution Specify a print resolution Using Commands You can print PDF files directly using commands such as ftp sftp and lpr For details about UNIX commands see Network Guide 3 Other Print Operations 70 3 ...

Page 73: ...eleted after printing is completed If you select Stored Print the files remain in the machine even after printing is finished If you press Print Jobs on the Printer screen the Complete List or the List Per User ID screen appears depending on which list type you select from Initial Print Job List Complete List If you select Complete List from Initial Print Job List the following screen appears 1 2 ...

Page 74: ...he password press Change Password enter the current password and then enter the new password on the confirmation screen To delete the password press Change Password leave the entering confirming a new password box blank and then press OK You can also set passwords to the Stored Print files that do not currently have passwords 12 Clear All Clears all selections 13 Select All Jobs Selects all files ...

Page 75: ...ess the selected print jobs again The display is not updated if a new file is stored while the list of stored files is displayed To update the display press Exit to return to the Printer screen and then press Print Jobs again If a large number of print jobs is stored in the machine processing may slow temporarily depending on which functions are used If you press List Per User ID in the Complete L...

Page 76: ...ow it Selecting the Initial Print Job List 1 Press the User Tools Counter key BAC001S 2 Press Printer Features The Printer Features menu appears 3 On the System tab press Initial Print Job List 4 Select either Complete List or List Per User ID After configuring the settings the selected type of print job list is displayed 3 Other Print Operations 74 3 ...

Page 77: ...Displaying a Print Job List 1 Press the Printer key BAC003S 2 Press Print Jobs Either the Complete List or List Per User ID screen appears Using the Print Job Function 75 3 ...

Page 78: ...Supplement If a Sample Print file has not been stored properly check the error log on the control panel Even after you turn off the machine stored documents in the machine remain However the Auto Delete Temporary Print Jobs or Auto Delete Stored Print Jobs settings are applied first If the application has a collate option make sure it is not selected before sending a print job By default Sample Pr...

Page 79: ...printer driver s properties For details about configuring the printer drivers see the relevant Help files 2 Start printing from the application s Print dialog box Make sure to set more than two copies The Sample Print job is sent to the machine and the first set is printed 3 On the machine s control panel press the Printer key to display the Printer screen 4 Press Print Jobs A list of print files ...

Page 80: ...sets The number you specify will be the number of copy sets printed for each document If you do not specify a number of copy sets on the confirmation screen the number of copy sets printed for each document will be the number specified in the printer driver minus one If the number of copy sets specified in the printer driver is 1 one copy set will be printed for each document When printing accumul...

Page 81: ...n printing confidential documents on the machine over a shared network Usually it is possible to print data using the control panel once it is stored in this machine When using Locked Print it is not possible to print unless a password is entered on the machine s control panel Your confidential documents will be safe from being viewed by other people A Locked Print file cannot be stored if the tot...

Page 82: ...ttings Guide p 98 Checking the Error Log Printing a Locked Print File The following procedure describes how to print a Locked Print file with the PCL 6 5e printer driver For details about how to print a Locked Print file with the PostScript 3 printer driver see PostScript 3 Supplement included as a PDF file on the CD ROM Applications with their own drivers such as PageMaker do not support this fun...

Page 83: ...ears 8 Enter the password using the number keys and then press OK The print confirmation screen appears A confirmation screen will appear if the password is not entered correctly Press Exit to enter the password again If multiple print files are selected the machine prints files that correspond to the entered password The number of files to be printed is displayed on the confirmation screen If you...

Page 84: ...s certain print jobs may not be displayed 4 Select the file you want to delete and then press Delete The password screen is displayed 5 Enter the password using the number keys and then press OK The delete confirmation screen appears A confirmation screen will appear if the password is not entered correctly Press Exit to enter the password again If you forget your password ask your file administra...

Page 85: ... collated by the printer driver If a collate option is selected from the application s Print dialog box more prints than intended may be produced For details about the error log on the control panel see Checking the Error Log For details about the Auto Delete Temporary Print Jobs and Auto Delete Stored Print Jobs see Printer Features General Settings Guide p 98 Checking the Error Log Printing a Ho...

Page 86: ...e printer screen 6 Press Print Jobs 7 Press Hold Print Job List A list of Hold print files stored in the machine appears Depending on the security settings certain print jobs may not be displayed 8 Select the file you want to print and press Print The confirmation screen appears 9 Press Yes The Hold Print file is printed Press No to cancel printing 3 Other Print Operations 84 3 ...

Page 87: ...chine appears Depending on the security settings certain print jobs may not be displayed 4 Select the file you want to delete and then press Delete The delete confirmation screen appears 5 Press Yes to delete the file The selected file is deleted If you do not want to delete the file press No If you select multiple files the confirmation screen displays the total number of files to be deleted Stor...

Page 88: ...password of a Stored Print file For details about a password setting see the printer driver Help For details about the error log on the control panel see Checking the Error Log For details about the Auto Delete Temporary Print Jobs and Auto Delete Stored Print Jobs see Printer Features General Settings Guide p 98 Checking the Error Log Printing a Stored Print File The following procedure describes...

Page 89: ...ialog box The Stored Print job is sent to the machine and stored 5 On the machine s control panel press the Printer key to display the Printer screen 6 Press Print Jobs 7 Press Stored Print Job List A list of Stored Print files stored in the machine appears 8 Select the file you want to print and press Print The confirmation screen appears If you set a password in the printer driver a password con...

Page 90: ...ecified in the printer driver minus one When printing accumulated stored print documents you cannot change the numbers of sets To stop printing after printing has started press Exit until the Printer screen appears and then press Job Reset A Stored Print file is not deleted even if Job Reset is pressed The Stored Print file that sent to the machine is not deleted unless you delete a file or select...

Page 91: ...nt files are selected and some of these require a password the machine deletes files correspond to the entered password and files that do not require a password The number of files to be deleted is displayed on the confirmation screen If you forgot your password ask your file administrator for help 5 Press Yes to delete the file The selected file is deleted If you do not want to delete the file pr...

Page 92: ... the Printer key The Printer screen appears 2 On the Printer screen press Print Jobs A list of user IDs whose files are stored in the machine appears 3 Press the user ID whose file you want to print You cannot select multiple user IDs at the same time Press Previous or Next to scroll through the list Press Clear to cancel a selection 3 Other Print Operations 90 3 ...

Page 93: ...ob again To clear all selections press Clear All 6 Press Print The confirmation screen appears 7 Press Yes The selected files are printed If you select multiple files the confirmation screen displays the total number of files to be printed Printing All Print Jobs 1 Press the Printer key The Printer screen appears Printing from the Jobs Per User ID Screen 91 3 ...

Page 94: ... whose file you want to print You cannot select multiple user IDs at the same time Press Previous or Next to scroll through the list Press Clear to cancel a selection 4 Press Print All Jobs If the selected user ID has multiple types of print jobs the selection screen of the print job type appears 3 Other Print Operations 92 3 ...

Page 95: ...opy sets printed for each document will be the number specified in the printer driver minus one If the number of copy sets specified in the printer driver is 1 one copy set will be printed for each document If you select Stored Print the number you set on the confirmation screen is applied to all files of the selected print job type If you do not set a quantity the minimum number is applied to all...

Page 96: ... the settings Staple Punch Duplex If Auto Continue is selected form fed paper is printed after a set interval See Printer Features General Settings Guide Printing from a Selected Tray If the machine does not have a tray for the selected paper size or paper type or if the selected paper loaded in the machine has run out a caution message appears If this message appears do the following procedure 1 ...

Page 97: ...ing If the machine is shared by multiple computers be careful not to accidentally cancel someone else s print jobs Under Windows if the machine is connected to the computer using a parallel cable sent print jobs may be canceled if Reset All Jobs is pressed while Waiting for print data is on the control panel After the interval set in I O Timeout in Printer Features has passed the next print job ca...

Page 98: ...Reset All Jobs Reset the Job cancels the print job currently being processed Reset All Jobs cancels all jobs in the print queue Resume Printing resumes printing print jobs A confirmation message appears 4 Press Yes to cancel the print job 5 Press No to return to the previous display Windows Canceling a Print Job from the computer You can cancel a print job from the computer if transferring print j...

Page 99: ...eled if Reset All Jobs is pressed while Waiting for print data is on the control panel After the interval set in I O Timeout in Printer Features has passed the next print job can be sent A print job sent from a different client computer will not be canceled in this case Under Windows XP Vista Windows Server 2003 2003 R2 2008 click Cancel on the Document menu UnderWindows2000 youcanalsoopentheprint...

Page 100: ...an check any of these print jobs for error log information Sample Print Locked Print Hold Print Stored Print If the main power switch is turned off the error log is deleted 1 Press the Printer key The Printer screen appears 2 Press Error Log An error log list appears Depending on the security settings certain errors may not be displayed 3 Press the desired job list You can select job list from Com...

Page 101: ...hat appear in the error log resend them after stored files have been printed or deleted Error Log is not available in simplified display mode To view the error log you must first switch to normal display mode by pressing Simplified Display to turn into the normal display mode Checking the Error Log 99 3 ...

Page 102: ...e Network Guide or Help for more information Using telnet Type in spoolsw spool on to set Spool Printing For details see Network Guide for more information about telnet Viewing a list of spool jobs on the control panel If Spool Printing is set a list of spooled jobs can be viewed on the control panel screen Press the Printer key and then press Spooling Job List A list of spooled jobs appears Delet...

Page 103: ...ion is available with the PCL 5e printer driver only If Document Server is selected under Job Type User Defined Page cannot be used If User Defined Pages is selected under Paper Selection on the Paper tab Layout cannot be selected BAC028S For details see the printer driver Help User Defined Pages 101 3 ...

Page 104: ...rint dialog box If Collate is enabled in the application printing will not be as intended When printing restarts after removing jammed paper the printing position may be different depending on the location of the jam If the paper jam occurred in the optional finisher printing will restart from the top page of the data currently being printed or from the page where the paper jam occurred If the pap...

Page 105: ...tions General Settings Guide For printing methods see the printer driver Help Stapling precautions Stapling can be done only with the optional finisher installed Staple printing will be canceled under the following conditions If the number of pages to staple exceeds maximum If a paper size that cannot be stapled is selected If a paper type that cannot be stapled is selected If positions other than...

Page 106: ...ectly in the printer driver Correct option settings in the printer driver For details see the printer driver Help When the finisher is being used for another function s job for example a copy job printing will start after that job ends Be sure to set paper size and orientation in the printer driver when stapling When duplex printing is selected adjust staple positions to the binding orientation De...

Page 107: ...sitions will vary slightly from page to page as holes are punched into each sheet individually The number of holes that can be punched varies according to country For details about paper sizes that can be punched see Supplementary Informations Copy Document Server Reference For details about printing methods see the printer driver Help Printing with the Finisher 105 3 ...

Page 108: ...he specified position when printing on letterhead paper If you cannot make punch settings even with the optional finisher installed options may not be set correctly in the printer driver Correct option settings in the printer driver For details see the printer driver Help When duplex print is selected adjust the punch position to the binding direction Be sure to set the punch position as same as t...

Page 109: ... Printed output is assembled as sets in sequential order BAC016S Rotating Collate Every other print set is rotated by 90 degrees BAC017S Shift Collate The optional finisher is required for this function BAC018S The finisher shift tray moves backward or forward when a job or set is output causing the next to shift so you can separate them When Rotate Collate is cancelled If the following functions ...

Page 110: ...tating Collate has been selected printing speed will be slower than with other collate functions Separation sheets cannot be inserted if Slip Sheet is specified Set Collate and Rotating Collate in the printer driver If you cannot make Shift Collate even with the optional finisher installed options may not be set up correctly in the printer driver Correct the printer driver s option settings For de...

Page 111: ...size and orientation as the body paper Cover sheet Prints the first page of the document on the sheet for the cover page Print on one side Prints on one side of the cover sheet only even when duplex printing is selected BAC021S Print on both sides Prints on both sides of the cover sheet when duplex printing is selected Cover sheet printed on both sides BAC022S Cover sheet printed on one side BAC02...

Page 112: ... side Prints on one side of the cover sheet only even when duplex printing is selected BDJ004S Print on both sides Prints on both sides of the cover sheets when duplex printing is selected Back cover page face inside and the number of pages is odd BDJ005S Back cover page face inside and the number of pages is even 3 Other Print Operations 110 3 ...

Page 113: ... is set as the paper feed tray for the body paper the paper will be delivered from a tray containing paper in the orientation Therefore if the cover paper is set to the orientation the orientation of the output cover and body will be different For printing methods see the printer driver Help Covers 111 3 ...

Page 114: ...the first page BAC037S This function is only valid with duplex printing You can designate up to 100 locations using the printer driver This function can be used together with combine layout printing For printing methods see the printer driver Help Inserting Chapter Slip Sheets Insert chapter slip sheets before the specified page Print Prints on the chapter slip sheets When duplex printing is selec...

Page 115: ...perfeedtrayforthebodypaper thepaperwillbedelivered from a tray containing paper in the orientation Therefore when the slip sheet has been set to the orientation the orientation of the output slip sheet and body will be different The same paper feed tray cannot be set for the body of the document and the slip sheet For details about printing methods see the printer driver Help Chaptering 113 3 ...

Page 116: ...slip sheet between OHP transparencies Print BAC025S Blank BAC020S Collate cannot be set when using slip sheets When the duplex printing or cover printing is set you cannot insert slip sheets The slip sheet should be the same size and orientation as the body paper 3 Other Print Operations 114 3 ...

Page 117: ...vered from a tray containing paper in orientation Therefore when the slip sheet has been set to orientation the orientation of the output slip sheet and body paper will be different The same paper feed tray cannot be set for the body of the document and slip sheets Slip Sheet 115 3 ...

Page 118: ...t the paper sizes you can select with the printer driver might not match those displayed on the machine s printer or copy display When specifying the paper type with the printer driver make sure that paper of the type you are selecting is actually loaded in one of the trays You can specify the paper type on the Tray Paper Settings tab in System Settings For information about Paper Type see System ...

Page 119: ...ecified Normal TCP IP DIPRINT TCP IP RHPP AppleTalk and NetWare 1 Log on to Web Image Monitor as an administrator For details about login user names and passwords see Using Web Image Monitor Network Guide 2 Inthemenuarea click Configuration andthenclick VirtualPrinterSettings inthe Printer category A list of the available virtual printers appears 3 Click Add The screen for adding virtual printers ...

Page 120: ...iguration see Web Image Monitor Help Confirming a Virtual Printer Configuration Use this procedure to confirm a virtual printer configuration 1 Start Web Image Monitor For details about login user names and passwords see Using Web Image Monitor Network Guide 2 Inthemenuarea click Configuration andthenclick VirtualPrinterSettings inthe Printer category A list of available virtual printers appears 3...

Page 121: ...r s default virtual printer Delete appears only if you have already added a virtual printer Printing Using a Virtual Printer To print directly from a specified virtual printer assign the virtual printer in the print command Before printing for the first time specify the virtual printer you want to use 1 Log on to Web Image Monitor in administrator mode For details about login user name and passwor...

Page 122: ...ftp ftp put path name file name Virtual Printer Name 3 Other Print Operations 120 3 ...

Page 123: ... to eight alphanumeric characters You should enter a Password and File Name to distinguish the job from others Up to 3 000 files can be stored in the Document Server New files cannot be stored when 3 000 files have already stored Even if less than 3 000 files are stored new files cannot be stored when a file to be stored contains more than 1 000 pages the machine s sent or stored files total over ...

Page 124: ...out Document Server functions see Document Server General Settings Guide For details about how to access Document Server from a client see the printer driver Help 4 Saving and Printing Using the Document Server 122 4 ...

Page 125: ... speeds depend on the machine Check which type of machine you have See General Settings Guide Interface Standard Ethernet interface 100BASE TX 10BASE T USB 2 0 interface Option Giga Ethernet Interface 1000BASE TX 100 BASE TX 10 BASE T IEEE 1284 parallel interface Use a standard 36 pin printer cable not longer than 3 meters 10 feet IEEE 802 11a b g wireless LAN interface Bluetooth interface Network...

Page 126: ...ndows Server 2003 2003 R2 2008 MacOS 10 3 3 or later Transmission spec USB 2 0 Standard Connectable Device Devices corresponding to USB 2 0 Standard When using Mac OS use only the standard USB Interface The optional USB interface board is not supported When using the USB Interface Standard with Mac OS 10 3 3 USB2 0 is supported 5 Appendix 124 5 ...

Page 127: ...red during printing Menu List You can print a Menu List showing the machine s function menus PCL Configuration Font Page You can print the current PCL configuration and installed PCL font list PS Configuration Font Page You can print the current PS configuration and installed PostScript font list This menu can be selected only when the optional PostScript 3 unit is installed PDF Configuration Font...

Page 128: ...ete all IPDS captured fonts System Menu Description Print Error Report You can print an error report when a printer or memory error occurs Auto Continue You can select this to enable Auto Continue When it is On printing continues after a system error occurs Memory Overflow Select this to have a memory overflow error report printed Job Separation You can enable Job Separation This menu can be selec...

Page 129: ...n specify how long the machine waits to receive a print job before allowing other functions such as the copier and scanner functions to interrupt it Printer Language You can specify the printer language Sub Paper Size You can enable the Auto Substitute Paper Size A4 LT feature Page Size You can select the default paper size Letterhead Setting You can rotate original images when printing When print...

Page 130: ...t the number of lines per page Font Source You can set the storage location of the default font Font Number You can set the ID of the default font you want to use Point Size You can set the point size you want to use for the selected font Font Pitch Youcansetthenumberofcharactersperinchfortheselected font Symbol Set You can specify the set of print characters for the selected font Courier Font You...

Page 131: ...cate to it Emulation Mode Specifies the emulation mode Print Mode Specifies the print mode Default Code Page Specifies the default code page The default value is 037 Default FGID Specifies the default FGID Font Typeface Global Identifier which identifies the printer s default resident font The default FGID is 416 Courier 10 point Characters Per Inch Specifies the number of characters per inch pitc...

Page 132: ...t color specification controls are processed on a monochrome laser printer Suppress Staple Count Nacks Lets you select whether or not to notify the user when stapling errors occur Suppress Punch Nacks Lets you select whether or not to notify the user when punching errors occur Tray Mapping Map the media source input tray to an ID the host uses for the media source Corner Staple Angle Lets you sele...

Page 133: ... For details about Copier Features and System Settings see Copy Document Server Reference and General Settings Guide Printer Features Menu 131 5 ...

Page 134: ...5 Appendix 132 5 ...

Page 135: ... How to Read This Manual 6 I Initial Display 8 Initial Print Job List 74 Inserting Chapter Slip Sheets 112 Installing the Printer Driver 31 IPP 39 LPR port 35 NetWare print server remote printer 45 parallel connection 52 SmartDeviceMonitor for Client port 38 Standard TCP IP port 32 TCP IP 38 USB connection 48 Windows network printer 43 WSD port 36 IPP 39 J Job List 11 14 change order 13 checking j...

Page 136: ... Quick Install 31 R Remote Printer 45 S Sample Print 76 deleting 79 printing 77 Simplified Display 9 Slip Sheet 114 SmartDeviceMonitor for Client Port 38 41 Specifications 123 Spool printing 100 Standard TCP IP Port 32 Staple 102 Stored Print 85 deleting 88 printing 86 T TCP IP 38 Thick Paper 21 Thin Paper 21 U USB Connection 48 Windows 2000 48 Windows Vista 50 Windows XP Windows Server 2003 2003 ...

Page 137: ...MEMO 135 ...

Page 138: ...MEMO 136 EN GB EN US EN AU D383 ...

Page 139: ...ght be trademarks of their respective companies We disclaim any and all rights to those marks The proper names of the Windows operating systems are as follows The product names of Windows 2000 are as follows Microsoft Windows 2000 Professional Microsoft Windows 2000 Server Microsoft Windows 2000 Advanced Server The product names of Windows XP are as follows Microsoft Windows XP Professional Micros...

Page 140: ...Operating Instructions Printer Reference D383 7301 EN US ...

Reviews: