Section 3: Getting Started
17
Digital Label and Decal Press 2 UserÕs Manual
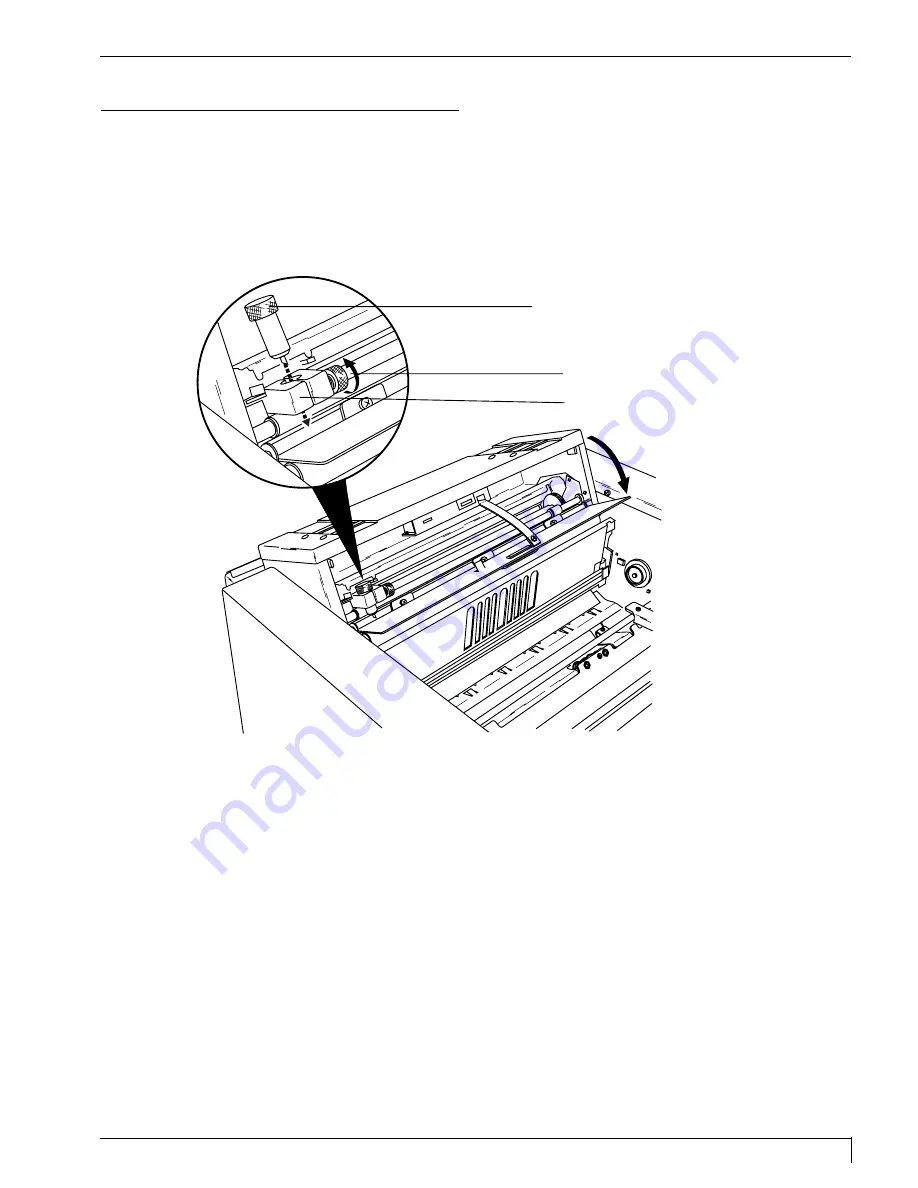
F. INSTALLING THE BLADE HOLDER
Refer to the following steps to install the Blade Holder into the cutter.
1.
Open the Cutter Door by pulling down on the doorÕs handle.
2.
Locate the black, plastic Cutter Arm. This is what holds the aluminum Blade
Holder in place.
3.
Place the Blade Holder into the Cutter Arm and tighten the gold-colored
Securing Knob by turning it toward the front of the printer. Tighten only until
the Blade Holder fits securely within the Cutter Arm. To verify proper
tightness, try rotating the Blade Holder clockwise within the Cutter Arm. If it
rotates, the Securing Knob needs to be further tightened.
Do not over-tighten!
You are now ready to go on to Section 4 to learn about print ribbons, print media,
and how each is loaded into the printer.
Cutter Arm
Blade Holder
Securing Knob
DLDP2.qxd 3/29/99 9:56 AM Page 17
Summary of Contents for Impressa 2
Page 1: ......
Page 9: ...4 Section 1 Introduction Digital Label and Decal Press 2 User s Manual...
Page 14: ...Section 2 Safety Precautions 9 Digital Label and Decal Press 2 User s Manual...
Page 15: ...10 Section 2 Safety Precautions Digital Label and Decal Press 2 User s Manual...
Page 23: ...18 Section 3 Getting Started Digital Label and Decal Press 2 User s Manual...
Page 35: ...30 Section 4 Ribbons and Print Media Digital Label and Decal Press 2 User s Manual...
Page 41: ...36 Section 5 Connecting the Unit Digital Label and Decal Press 2 User s Manual...
Page 89: ...84 Section 8 Maintenance Digital Label and Decal Press 2 User s Manual...
Page 104: ...Printed in the United States of America P N 510183...


