Pitney Bowes dm300m series Operator'S Manual Download Page 91

7-9

SDC2036A

7 • Maintenance

Maintaining the Moistener (DM400M/DM475M) Cont.

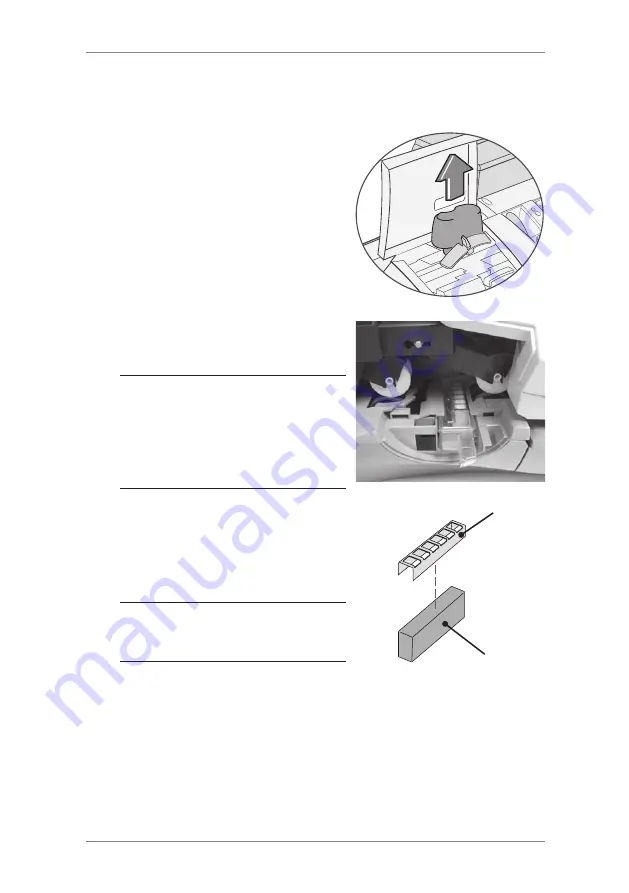
1.  Open the feeder cover and 

remove the moistener bottle. 

Leave the moistener bottle out 

until instructed to replace it.

2.  Remove the stripper blade and 

brush assembly.

Cleaning the Shield and Wick

3.  Pull the moistener tank straight 

out towards you. Gently lift the 

tank up and out.

IMPORTANT:

  The moistener 

tank may be full of sealing 

solution. If so, you can pour the 

solution back into the moistener 

bottle, or drain the tank into a 

receptacle. 

4.  Pull up and remove the shield 

and wick from the moistener tank.

5.  Separate wick from the shield. 

Clean the wick in plain water, and 

rinse thoroughly.

NOTE:

  If the wick and shield 

cannot be cleaned thoroughly, 

they will need to be replaced.

6.  Place the wick back into the shield.
7.  Push the wick and shield back into moistener tank.
8.  Slide the tank back in place.
9.  Replace the stripper blade and brush assembly by pushing up 

on the release lever and sliding the assembly back on its track 

until it snaps into position.

10.  Replace the moistener bottle and close the feeder cover.

Shield

Wick

Summary of Contents for dm300m series

Page 1: ...Digital Mailing System DM300M DM400M DM475M series Operator Guide UK Version ...

Page 2: ......

Page 3: ...1 Moving the DM300M 400c 2 12 Warning Do Not Move the DM475M by Yourself 2 12 Chapter 3 Running Mail Before You Begin 3 3 Checklist 3 3 Home Screen 3 3 Selecting Postage 3 4 Using the Weighing Platform Scale 3 4 Standard Operation 3 4 Differential Weighing 3 5 Entering Weight Manually 3 6 WOW Weight on the way Pricing in Proportion DM475M 3 6 Surcharge Payments 3 7 Parcelforce FrankPay 3 7 Other R...

Page 4: ...a Custom Preset 4 7 Printing a Record of the Batch Count 3 10 Clearing the Batch Count 3 11 Printing Mail 3 12 Manually Feeding Envelopes DM300M 3 12 Automatically Feeding Envelopes DM400M DM475M 3 13 Printing Tapes 3 14 WOW Mode DM475M only 3 15 Printing Options 3 16 Seal the Envelope Only 3 16 Printing Date Time or Envelope Messaging on Incoming Mail 3 17 Permit Printing 3 17 Text Messages 3 18 ...

Page 5: ... Postage by Phone System 5 3 How does the system operate 5 3 Preparing to Refill with Postage 5 3 LAN or PC Meter Connect 5 3 Connecting Your System to a LAN 5 4 Connecting Your System Using PC Meter Connect 5 5 Checking Funds Postage Available in your System 5 5 Checking Your Postage by Phone Account Balance 5 5 Refill Postage 5 6 Secure Refill 5 6 Printing a Funds Postage Report 5 7 Downloads fr...

Page 6: ...etting the Scale Location Code 6 10 Connecting to the Data Centre 6 11 Check for Updates 6 11 Distributor Settings 6 12 Access the Distributor Settings 6 12 Parameter Descriptions 6 13 Network Settings 6 14 Firewall Settings 6 14 Connection Mode 6 14 Advanced Options 6 14 Run Install Mode 6 14 Meter Withdrawal 6 14 Chapter 7 Maintenance Replacing the Ink Cartridge Printhead 7 2 Filling the Moisten...

Page 7: ...oblems 8 10 Viewing System Configuration Levels 8 10 Chapter 9 Supplies and Options Options 9 2 Weighing Platforms 9 2 Moistener 9 2 Envelope Messaging Ads 9 2 Departmental Accounting 9 2 How to Order 9 3 Supplies 9 3 Maintaining the Moistener DM300M Only 7 10 Removing the Moistener 7 10 Removing the Moistener Brush 7 10 Removing the Shield and Wick 7 12 Running Print Tests 7 13 Test Print 7 13 Cl...

Page 8: ...ount 11 10 Chapter 12 INVIEW Budget Manager Accounting Introduction 12 4 Turning INVIEW Budget Manager On 12 4 Turning INVIEW Budget Manager Off 12 4 Logging On to INVIEW Budget Manager 12 5 If your system is setup for Operators 12 5 If your system is not setup for Operators 12 5 If your system is Locked 12 5 Chapter 10 Reports Overview of Reports 10 2 Last 5 Refills Report 10 2 Funds Report 10 2 ...

Page 9: ...nter 12 13 Preparing Barcodes 12 13 Configuring Operators 12 14 Enabling Operators 12 14 Setup Operators 12 15 Important Notes Regarding Operator Functions 12 16 INVIEW Budget Manager Account Structure 12 16 Turning Account Passwords On Off 12 18 Creating Accounts 12 18 Creating a Subaccount or Subsubaccount 12 20 Viewing or Editing Accounts 12 21 Deleting Accounts 12 22 Clearing Account Data 12 2...

Page 10: ...9 Viewing and Editing a Custom Report 12 40 Deleting a Custom Report 12 41 Transaction Report 12 41 Account Summary Report 12 41 Budget Performance Budget Manager Only 12 41 Invoice Budget Manager Only 12 41 Quick Profile Report 12 41 Accounting Setup Report 12 42 Account List Report 12 42 Account Speed Code List Report 12 42 Operator List Report 12 42 Weight Break Reports 12 42 INVIEW Budget Mana...

Page 11: ... the key features of your mailing system tells you what s in this book and presents important safety information About Your Digital Mailing System 1 2 About IntelliLink 1 3 Postal Requirements 1 3 Safety 1 4 Specifications 1 6 DM300M DM400M DM475M ...

Page 12: ...ime stamp for use on incoming mail or on sensitive documents Optional Accounting feature tracks postage costs by department certain models only Password protection limits access to authorised personnel Report printing capability provides hard copy records of your postage transactions In line moistener wets and seals envelopes USB communication ports for exporting report data to a PC or for adding ...

Page 13: ... show Data Upload Required and you MUST make a connection before your franking machine will allow you to continue processing mail The tapes for putting postage on larger items must conform to postal specifications For best performance obtain tapes direct from your machine supplier About IntelliLink Your mailing system takes full advantage of IntelliLink your digital gateway to an entire suite of s...

Page 14: ...ing moving parts or materials while the machine is in use Keep hands loose clothing jewellery and long hair away from all moving parts Do not remove covers or defeat safety interlock switches Covers enclose hazardous parts that should only be accessed by properly trained service personnel Immediately report to service any damaged or non functioning components that renders the unit unsafe Place the...

Page 15: ...imum operating performance and could cause the equipment to malfunction Contact your machine supplier for required service schedule Read all instructions before attempting to operate the equipment Use this equipment only for its intended purpose Always follow the specific occupational safety and health standards for your workplace This device is not intended for use in the direct field of view at ...

Page 16: ...ts 3 USB 1 RJ 11 3 USB 1 RJ 11 3 USB 1 RJ 11 1 RJ 45 Operating Temperature 4 C to 43 C LCD Display Size 88 x 44mm 88 x 44mm 95 x 44mm Colour Throughput Actual Throughput will vary depending on the material used machine condition use of moistener and the skill of the operator 65 letters per minute 95 or 120 letters per minute 95 or 120 letters per minute Up to 90 letters per minute WOW Print Resolu...

Page 17: ...re manufactured in accordance with Royal Mail s Franking Machine Standards This includes ascending register security which will lock the ascending registers when the first frank takes the most significant digit of the ascending register to 9 It is certified that the system complies with all applicable Directives of the European Union The system has been designed to work on all Pan European Analogu...

Page 18: ...ope Size see Figure Below Minimum 89 x 127mm Maximum 330 x 381mm Non WOW 330 x 356mm WOW Mode DM475M Envelope Flap Depth 22mm Min 72mm Max Envelope Thickness Minimum 0 20mm Maximum DM300M 9 5mm Maximum DM400M DM475M 8mm Stack Height for Mail 60mm Envelope Weight 1g Min 500g Max 381mm Non WOW 356mm WOW Mode DM475M 72mm 330mm 127mm 89mm 22mm Maximum Minimum ...

Page 19: ...DM400M 2 4 Machine Features Front DM475M 2 6 Control Panel 2 8 Machine Features DM300M 400c Rear 2 10 Machine Features DM475M Rear 2 11 Moving the DM300M 400c 2 12 Warning Do Not Move the DM475M by Yourself 2 12 In this chapter you ll find out where everything is and what it does DM300M DM400M DM475M ...

Page 20: ...2 2 SDC2036A 2 Getting to Know Your System 4 7 10 6 5 8 9 2 3 Machine Features Front DM300M 1 ...

Page 21: ...7 Maintenance for instructions 6 Stacker Tray Allows the neat stacking of finished mail pieces The slot allows convenient storage of your Quick Reference Guide 7 Printer Clearance Lever two positions Home transport rollers engaged for processing mail normal Released transport rollers disengaged so you can clear a stalled mail piece NOTE The machine will not process mail when left in the released p...

Page 22: ...2 4 SDC2036A 2 Getting to Know Your System 4 8 1 6 5 9 10 2 3 Machine Features Front DM400M 7 11 12 ...

Page 23: ...setup information on your machine see page 2 8 for details 7 Printer Clearance Lever two position Home transport rollers engaged for processing mail normal Released transport rollers disengaged so you can clear a stalled mail piece NOTE The machine will not process mail when left in the released position 8 Moistener Applies sealing fluid to the envelope flap You can seal envelopes or leave them un...

Page 24: ...velope sealing on and off 3 Sealing Fluid Level Indicator Allows you to see how much sealing fluid is left in the tank red band indicates low level 4 Tape Feeder Holds and feeds tape strips for printing 5 Weighing Platform optional Allows you to weigh a mail piece so your system can calculate postage based on the service selected 6 Ink Access Cover under optional scale Opens up to allow replacemen...

Page 25: ...er mechanism 13 Feeder WOW Deck Supports your mail piece as it feeds through the feeder WOW section 14 Moistener Applies sealing fluid to the envelope flap you can seal envelopes or leave them unsealed depending on the position of Seal No Seal lever 15 Side Guide Reduces the skewing of pieces of mail as you feed them into the feeder 16 Moistener Clearance Lever two position under cover Home printe...

Page 26: ...he display lines you may press the corresponding Screen Selection key to select that line 4 Operator Display Shows the current status of your system and prompts you through all setup operations 5 Page Up Page Down Scroll Keys Allows you to scroll up and down through menu choices in the operator display If a Page Up Down key is lit it indicates additional choices are available in a menu up or down ...

Page 27: ...r 5 Adding Postage for details Funds Allows you to check your postage funds and number of mail pieces processed See Chapter 5 Adding Postage for details Weigh Rate Allows you to weigh and calculate postage based on service selected See Chapter 3 Running Mail for details Options Allows you to access system setup information such as date time postage limits accounts setup phone parameters etc See Ch...

Page 28: ...terface and peripherals scanner external scale INVIEW accounting Also allows connection to a PC for use with PC Meter Connect software 2 Power Receptacle Connects to AC power cord supplied 3 Power Switch Turns power ON or OFF to machine Machine Features Rear 2 Machine Features DM300M D400M Rear 1 3 ...

Page 29: ...herals scanner external scale INVIEW accounting Also allows connection to a PC for use with PC Meter Connect software 3 Power Switch Turns power ON or OFF to machine 4 Power Receptacle Connects to AC power cord supplied NOTE Take care not to move your system when connecting and disconnecting Phone LAN USB or Power connectors as it could disturb existing connections See page 2 12 for further inform...

Page 30: ...not Move the DM475M by Yourself You should not move the DM475M machine by yourself Call Pitney Bowes to arrange a Service visit DM475M CAUTION Do not move the DM475M by yourself The machine is made to separate into two sections and by moving without proper disassembly you may Cause serious injury to yourself Cause serious damage to the machine Cause the WOW module to go out of calibration Void any...

Page 31: ...stage 3 4 Using the Weighing Platform Scale 3 4 Standard Operation 3 4 Differential Weighing 3 5 Entering Weight Manually 3 6 WOW Weight on the way Pricing in Proportion DM475M 3 6 This chapter explains how to run mail your printing options and using the weighing platform DM300M DM400M DM475M ...

Page 32: ... the Batch Count 3 10 Printing a Record of the Batch Count 3 10 Clearing the Batch Count 3 11 Printing Mail 3 12 Printing Options 3 16 Seal the Envelope Only 3 16 Printing Date Time or Envelope Messaging on Incoming Mail 3 17 Permit Printing 3 17 Text Messages 3 18 What is a Text Message 3 18 Selecting a Text Message 3 18 Viewing a Text Message 3 18 Creating a Text Message 3 19 Delete a Text Messa...

Page 33: ...k that you have enough postage for your mail run Press Funds key to view your current balance Home Screen When you power up your system the Home screen appears on the operating display If your system has been set up to require a lock code or password you are prompted to enter it A typical Home screen is shown below your screen may vary dependant on options selected Select Postage Use Page Down and...

Page 34: ...cess large mail pieces and parcels that can t be run through the machine use the optional tapes see Chapter 10 Supplies and Options for ordering tapes Apply the postage tapes on the mail piece or parcel in the proper location Using the Weighing Platform Scale Standard Operation 1 Make sure scale is activated you will see scale weight and 0g on the display See Chapter 6 System Options to turn your ...

Page 35: ...e the scroll keys to see additional classes 3 If there is no value next to the class name more information is needed Follow the prompts for the options and or services available for this class of service 4 Press the Weigh Rate key 5 Select Differential Weighing 6 Place the mail pieces onto the weighing platform They can be placed onto the platform in a container if required 7 Remove the first mail...

Page 36: ...eck so the system can determine the correct postage of each item You can feed mail pieces having various weights 10g 20g 30g etc into the machine and the machine will weigh and apply the correct postage to each piece automatically NOTE The maximum length of a mail piece that can be processed is 380mm when running in non WOW mode and 355mm when running in a WOW mode IMPORTANT To avoid mail processi...

Page 37: ...alue you require confirm the amount and take a Frank in the normal way Parcelforce FrankPay To enter a value for Parcelforce FrankPay select Class then Royal Mail Page down and select Parcelforce Select FrankPay then Enter Amt Once the correct amount has been entered select Done then take a Frank on a Tape Sheet Other Royal Mail Services Other Royal Mail services are also available Keepsafe Group ...

Page 38: ...ount name using the alphanumeric keys Select the account or press Enter to select the first account for the character You can enter more than one character to advance your search 3 If a password has been assigned to this account you will be prompted to enter one Key in the 4 digit password if necessary 4 You return to the Home screen with the name of the account listed alongside Account NOTE If yo...

Page 39: ...he printed date to the current date You cannot change the printed date to a date earlier than the system s internally held date in an effort to backdate the mail The number of days you can advance the print is limited to 30 days This limit is set by Royal Mail 1 Press Options 2 Select Printing Options 3 Select Set or Advance Date The system displays the current date You may either Select Set to to...

Page 40: ... or reset the batch count to zero Printing a Record of the Batch Count information 1 Press Funds 2 Press Options and select Print Funds Report 3 At the prompt either Feed an envelope DM300M Place the envelope up against the back wall of the system and slide it to the right until the system grasps it DM400M DM475M Load an envelope onto the feeder and press Start or Press the Tape key The Funds Repo...

Page 41: ...h piece registers return to zero and the machine returns to the funds screen NOTE This function may require entry of the Supervisor Password If this is the case enter the 4 digit Supervisor Password The batch value and batch piece registers return to zero 4 Press Home to return to the Home screen CAUTION Make sure you really want to clear the batch register once you do you can t restore the data ...

Page 42: ...ages 3 4 to 3 11 Manually Feeding Envelopes DM300M 1 If using the moistener place the envelope flap under the moistener stripper and move the envelope towards the right 2 Position the envelope against the registration wall of the system and slide it to the right until the system grasps it The system prints the digital meter stamp and ejects the envelope Mr John Smith 1925 Main Street Your Town US ...

Page 43: ...o large mail may pass through without printing 3 Select seal or no seal using the Seal No Seal Lever Mr Jo hn Sm it h 19 25 Ma in St re et Yo ur To wn US 12 34 5 Start button Side Guide Seal No Seal Lever Model Shown DM400M IMPORTANT Always ensure that your prints are clear and complete Poor prints may be rejected by Royal Mail If you notice missing lines in the print as shown in the illustration ...

Page 44: ...er 6 System Options Configuring the Tape Button If the system is ready to print postage and on the Home screen simply type in the number of tapes you wish to print and press the Tape button OR Press the Tape button You will be prompted to enter the tape quantity Press the Start button to begin printing tapes NOTE If the machine is set for WOW operation tapes cannot be taken Select a non WOW rate t...

Page 45: ... Select a class of mail which is capable of Automatic Pricing 3 Load and run the mail see p3 13 IMPORTANT Always ensure that your prints are clear and complete Poor prints may be rejected by Royal Mail If you notice missing lines in the print as shown in the illustration perform a printhead purge as described on page 7 14 of this guide The indicia above is a black and white representation of the a...

Page 46: ... These may not be available on your model Seal the Envelope Only You can set up your mailing system to seal envelopes without printing a digital meter stamp on them 1 Press Options 2 Select Printing Options 3 Select Seal Only No Printing The Seal Only MODE NO PRINTING screen appears 4 Process the envelopes as described on pages 3 12 and 3 13 On the DM400M DM475M make sure the Seal No Seal Lever is...

Page 47: ...Text This option allows you to select a Text Message to print on the envelope tape Refer to page 3 18 Text Messages for more information 4 Feed envelopes as described on page 3 12 3 13 NOTE Make sure you orient the mail piece so the date and time prints on a blank section of the mail piece 5 Select Return to Normal Mode when finished to return you to the Home screen Permit Printing This option all...

Page 48: ... the machine Selecting a Text Message 1 Press Page Down if necessary 2 Select Text Msg The display lists all messages created on your system 3 Press Page Down to see additional choices if available 4 Select the message you want to use You return to the Home screen with the name of the message on the screen Viewing a Text Message 1 Press Options then Page Down 2 Select Text Messages 3 Select View E...

Page 49: ... 1 Press Options then Page Down 2 Select Text Messages 3 Select Create New Message and continue from step 3 above Delete a Text Message 1 Press Options and then Page Down 2 Select Text Messages then Delete Message The display lists all messages created on your system 3 Press Page Down to see additional choices if available 4 Select the message you want to delete 5 You will be asked to confirm the ...

Page 50: ...ete IMPORTANT INFORMATION In accordance with Postal and Advertising Standards requirements the Envelope Messaging Ad slogan and Text must not be obscene defamatory of any person or group or deceptive nor may it advocate unlawful action The Envelope Messaging Ad slogan must not emulate any form of valid indicia or payment for postage Edit a Text Message Name 1 Press Options then Page Down 2 Select ...

Page 51: ...New Values for the Normal Preset 4 3 Custom Presets 4 4 Selecting a Custom Preset 4 4 Viewing a Custom Preset 4 4 Defining a New Custom Preset 4 5 Editing a Custom Preset Name 4 6 Overwriting a Custom Preset Name 4 6 Deleting a Custom Preset 4 7 This chapter discusses the Normal and Custom Presets feature available on your machine DM300M DM400M DM475M ...

Page 52: ... condition that will be recorded by the system when you define a preset either Normal or Custom If you need to change the values of a preset just change the machine condition by pressing the appropriate feature keys and establishing the proper settings such as No Graphic Ad Class of Mail etc The Custom or Normal Preset will then pick these new settings when you define them in the Custom Presets me...

Page 53: ...ues for the Normal Preset To define new values change the settings for the Normal preset 1 Establish the proper settings on the machine such as No Graphic Ad a particular Class of Mail etc that you want the preset to contain 2 Press Options 3 Press Page Down and select Preset Options 4 Select Set Normal Preset 5 You will be prompted to confirm current settings are correct A If you select OK the ne...

Page 54: ...s 2 Press Page Down and select Preset Options 3 Select View Preset Settings the display lists all presets 4 Select the preset you want to view The first screen of defined values for the Custom Preset is listed Press Page Down to see the remainder of the defined values 5 Press Enter to select preset Press Home to return to the Home screen without selecting the preset IMPORTANT ROI ONLY Preset posta...

Page 55: ...to seventeen alpha numeric characters long When finished select OK 6 You will be prompted to confirm if all current settings are correct A If you select OK the new values are saved and you return to the preset options screen B If you select View Settings the system will display the preset name and the current values Press the down arrow key to see the remainder of the defined values Press Enter wh...

Page 56: ...n Overwriting a Custom Preset Overwriting a preset reassigns all the values assigned to it CAUTION Once you overwrite a preset its values are gone You can t recover an overwritten preset 1 Press Options 2 Press Page Down and select Preset Options 3 Press Page Down and select Overwrite Preset the display lists all presets 4 Select the preset you want to overwrite 5 You will be prompted to confirm c...

Page 57: ...te a preset its values are gone You can t recover a deleted preset 1 Press Options 2 Press Page Down and select Preset Options 3 Press Page Down and select Delete Preset the display lists all presets 4 Select the preset you want to delete 5 At the Confirm Delete screen select Yes The preset is deleted You return to the Preset Options menu 6 Press Home to return to the Home screen ...

Page 58: ...4 8 SDC2036A 4 Normal and Custom Presets ...

Page 59: ...Meter Connect 5 3 Connecting Your System to a LAN 5 4 Connecting Your System Using PC Meter Connect 5 5 Checking Funds Postage Available in your System 5 5 Checking Your Postage by Phone Account Balance 5 5 Refill Postage 5 6 Secure Refill 5 6 Printing a Funds Postage Report 5 7 Downloads from the Data Centre to your system 5 7 System Update 5 8 Envelope Messaging Advertisments 5 8 Software Update...

Page 60: ...5 2 SDC2036A 5 Adding Postage Connecting to Data Centre Connecting to the Data Centre other than for Postage 5 10 Check for Updates 5 10 ...

Page 61: ... LAN on the following page How does the system operate The system consists of a central computer situated in our Data Centre which holds details of the funds available in your Postage by Phone account Your DM300M DM400M DM475M series communicates with the Data Centre and transfers funds from your Postage by Phone account into your meter Preparing to Refill with Postage Adding postage funds to your...

Page 62: ...75M 1 Turn off power to the System 2 Plug the Ethernet cable into your router or network wall socket 3 Plug the other end of the cable into the LAN port on the rear of the system 4 Turn the System power back on Connecting Your System to a LAN The requirements for LAN connection in the table on the previous page will allow simple plug and play connection of your system If you cannot meet these requ...

Page 63: ...display letting you know the status of the process 4 At the Postage by Phone account balances display Select Continue to return to the Home Screen NOTE You can elect to refill postage by selecting Add Postage on the PbP Balance Screen Refer to Adding Postage in this chapter for more information Connecting Your System Using PC Meter Connect PC Meter Connect PCMC software must be installed onto your...

Page 64: ...ou will be asked if you want to print a receipt Either press Print Receipt and follow the prompts or select Continue to return to the Home Screen without printing a receipt NOTE The amount shown in the Add xx selection line is the amount of postage you added the last time Secure Refill It is possible to set the machine so that only a supervisor may add postage to the machine Before a password code...

Page 65: ...ct to the Data Centre to add postage or perform other transactions the Data Centre may perform the following Download required software updates to your machine Download Envelope Messaging you ordered Perform a remote audit of your machine as required by the Postal Authority Download new postal rates Generally speaking downloads are considered either mandatory you must do them at the time you are p...

Page 66: ...u will be notified that a required update is necessary Postal Inspection mandatory Your DM220i series is a Mailmark compliant system At regular intervals defined by Royal Mail it connects to the Pitney Bowes Data Centre to provide usage data to Royal Mail The connection will normally happen in the background without you needing to do anything If the connection was not made for any reason the displ...

Page 67: ...rates or not Once the effective date has been reached or passed however you will have to download the new rates The screens on your machine will give you information regarding the status of the rate update and the choices available to you When a rate change update takes place it may also affect other presets you have set in your mailing machine You should check all your presets to insure that they...

Page 68: ... a software postal update or download is available a message displays A If a download is not mandatory you will be prompted with either Download Now or Skip Return Home Select the option desired B If a download is mandatory only Download Now displays and you must perform the download 7 After the download has completed a confirmation message displays A If you need to restart the system the prompt R...

Page 69: ... the Contrast of the Display 6 4 Configuring the Tape Button 6 4 Setting the Timeouts 6 5 Setting the Normal Preset Timer 6 5 Setting Sleep Mode Activation Time 6 5 Setting Wait for Envelope DM400M DM475M 6 6 This chapter presents system options you can setup or modify such as setting time date passwords warnings etc DM300M DM400M DM475M ...

Page 70: ...he Scale 6 9 Turning Auto Scale On or Off 6 9 Setting Weight Change Options 6 10 Current WOW Weight Limit DM475M only 6 10 WOW Start Key Options DM475M only 6 10 Setting the Scale Location Code 6 10 Connecting to the Data Centre 6 11 Check for Updates 6 11 Distributor Settings 6 12 Access the Distributor Settings 6 12 Parameter Descriptions 6 13 Network Settings 6 14 Firewall Settings 6 14 Connect...

Page 71: ...ions include Time Timeouts Display Contrast Postage Values Lock Codes Passwords Configure Tape Button Serial Port Most of the basic system options are accessed by pressing Options then Setup and selecting your choice from the menu accessed by using Page Up and Page Down The one exception is Scale settings which is accessed by pressing the Weigh Rate key Advanced options include Run Install Mode Me...

Page 72: ... Press Continue to return to the setup menu Press Home to return to the home screen Configuring the Tape Button You can specify the action the system takes when the Tape button is pressed 1 Press Options 2 Select Setup 3 Press Page Down 4 Select Configure Tape Button If you always want to print one tape at a time select Print One Tape If you want to enter the number of tapes to print select Ask Fo...

Page 73: ...lect Time and Timeouts 4 Select Normal Preset Timeout 5 Key in the amount of minutes from 1 240 before the system returns to the normal preset 6 Select OK The display returns to Time and Timeouts menu 7 Press Home to return to the home screen Setting Sleep Mode Activation Time You can set the amount of time the machine waits until entering sleep mode When the machine is in sleep mode the display i...

Page 74: ...deck 1 Press Options 2 Select Setup 3 Select Time and Timeouts 4 Select Wait for Envelope 5 Key in the amount of seconds from 0 to 180 before the system stops 6 Select OK The display returns to the Time and Timeouts menu 7 Press Home to return to home screen Setting the Low Funds Warning You can set up the system so that when the postage remaining reaches a certain level the system will remind you...

Page 75: ...select OK 8 Press Home to return to home menu Disabling the Lock Code 1 Press Options 2 Select Setup 3 Select LockCode Password 4 Select Disable Lock Code 5 When prompted enter the current numeric Lock Code and select OK 6 Press Home to return to the home menu IMPORTANT INFORMATION Your DM300M DM400M DM475M mailing machine contains postal funds and if you opt to use the 4 digit numeric Lock Code t...

Page 76: ...umeric code again to confirm then press OK The machine will confirm that the new password has been enabled 9 At the Password Enabled message select OK 10 Press Home to return to the home screen Serial Port This must be set to Attached Scale DO NOT select External Accounting Changing the Lock Code You can change the Lock Code if it has been enabled 1 Press Options 2 Select Setup 3 Select LockCode P...

Page 77: ...Scale On or Off You may turn the scale s auto rating function on or off as necessary 1 Press Weigh Rate then select Page Down twice 2 Select Turn Auto Scale OFF or ON If the scale is ON you will be prompted to Turn Auto Scale OFF or Keep it turned ON Select the appropriate option If the scale is OFF you will be prompted to Turn Auto Scale ON or Keep it turned OFF Select the appropriate option 3 De...

Page 78: ...above the set weight 1 Press Weigh Rate then select Page Down three times 2 Select WOW Wt Limit 3 Enter the Maximum weight and select Confirm To revert to the maximum weight select Return to Maximum WOW Start Key Options DM475M only This sets the action the machine takes if a WOW operation is interrupted for a scale operation during use 1 Press Weigh Rate then select Page Down three times 2 Select...

Page 79: ...E Make sure the machine is connected to a LAN or via PCMC 5 After connection is made if a software postal update or download is available a message displays to inform you A If a download is not mandatory you will be prompted with either Download Now or Skip Return Home Select your preference B If a download is mandatory on Download Now displays Select this to restart the system 6 After the downloa...

Page 80: ...Centre If you want to continue press Continue otherwise press the C key 7 Key in a new entry for that parameter some entries may require alpha numeric characters To modify the existing parameter select Edit Options You can then scroll left or right to insert a character within the existing string Select Enter when done To restore default settings select Restore Defaults 8 When finished either sele...

Page 81: ...Least Cost Zone LCZ server that identifies your system and routes your call to a zone that ensures the lowest cost for the connection ANI LCZ Server Port The server port number identifies the port number on the ANI LCZ server to which your system connects on dial up Primary DNS Server This is the internet address of the primary domain name server DNS The domain name server converts your system nam...

Page 82: ...ged in consultation with your machine supplier and your own network administrator Connection Mode This function is used to set the way your system connects to Pitney Bowes services This setting should remain set to Auto Advanced Options Advanced options allow you access to features that are used very infrequently such as meter withdrawal etc The Advanced Feature menu includes Run Install Mode Mete...

Page 83: ...ining the Moistener 7 8 Cleaning the Stripper Blade Brush Assembly 7 8 Cleaning the Shield Wick 7 9 Maintaining the Moistener DM300M Only 7 10 Removing the Moistener 7 10 Removing the Moistener Brush 7 10 Removing the Shield and Wick 7 12 Running Print Tests 7 13 Test Print 7 13 Cleaning the Printer Nozzle Purging 7 14 This chapter explains how to maintain your mailing system DM300M DM400M DM475M ...

Page 84: ...you won t be able to print 1 If you have received an ink warning skip to step 2 Alternatively you can navigate through the menus to perform the replacement procedure A Press Options B If necessary Press Page Down and select Maintenance C Select Printer Maintenance D Select Replace Ink Cartridge or Replace Print Head as required 2 When prompted remove the weighing platform and open the ink access c...

Page 85: ...ard 3 When prompted to Install Now unlatch and flip open the ink cartridge guard NOTE If you are NOT changing the printhead skip to Step 6 If you have been directed by a representative of your machine supplier to change the Print Head continue with step 5A below 5A Squeeze the two grey tabs on either side of the printhead ...

Page 86: ...inthead while sliding it back into its holder 5E Push the printhead back into place You should hear a click when it is seated correctly 5F Replace the ink cartridge Follow steps 6 onwards in this chapter for more information Replacing the Ink Cartridge Printhead continued CLICK 5B While squeezing lift and tilt to the right the printhead The printhead should come up out of the machine ...

Page 87: ...ome screen Refit the weighing platform if it was removed previously 8 Rotate the guard back to the closed position 6 Remove the tape from the bottom of the new ink cartridge 7 Lower the ink cartridge into the cavity The ridges on either side of the cartridge will slide into the grooves Groove Ridge Ridge Replacing the Ink Cartridge Printhead continued ...

Page 88: ...ng solution because it helps keep your moistener clean and improves sealing efficiency 4 Replace the moistener bottle cap and place the bottle back in its original location 5 If the tank was empty allow 30 minutes for the moistener brush and wick to get completely wet 6 Close the feeder cover 2 Open the feeder cover and remove the moistener bottle Feeder Cover Check Level Here DM400M Moistener Bot...

Page 89: ...tener brush and wick to get completely wet Check Level Here Fill Here Filling the Moistener DM300M Only CAUTION Don t overfill the moistener tank 2 Add enough sealing solution or water to bring the sealant level up to the bottom of the fill hole We recommend sealing solution because it helps keep your moistener clean and improves sealing efficiency ...

Page 90: ...r Blade and Brush Assembly 1 Push the lever up on the stripper blade and brush assembly or press the button on the top of the DM475M 2 Whilst holding the lever up grasp the assembly and pull it straight out towards you Stripper Blade Brush Assembly Lever 3 Clean the moistener brush by running it under plain water NOTE If the assembly cannot be cleaned thoroughly then it should be replaced 4 If you...

Page 91: ...ck into the moistener bottle or drain the tank into a receptacle 4 Pull up and remove the shield and wick from the moistener tank 5 Separate wick from the shield Clean the wick in plain water and rinse thoroughly NOTE If the wick and shield cannot be cleaned thoroughly they will need to be replaced 6 Place the wick back into the shield 7 Push the wick and shield back into moistener tank 8 Slide th...

Page 92: ...Supplies and Options for instructions on ordering these supplies for your machine 1 Push down on the blue release lever on the moistener Removing the Moistener Release Lever 2 Pull the moistener straight out to the left 1 Remove the moistener as described above 2 Open the hinged brush holder 3 Grasp the bristles and slide the brush out of the hinged brush holder towards the front of the moistener ...

Page 93: ... the brush back towards the rear of the moistener 7 If you need to clean the wick and holder continue with Removing the Holder and Wick procedure on the next page Otherwise push down on the blue release lever on the moistener CLICK Release Lever 8 Slide the moistener back onto the machine You should hear a click as it engages Removing the Moistener Brush continued ...

Page 94: ...he shield 5 Reinstall the wick and holder assembly into the moistener 6 Reinstall the moistener Push down on the blue release lever on the moistener Removing the Shield and Wick Wick Shield 1 Remove the moistener as described on page 7 10 2 Pull up and remove the shield and wick from the moistener tank 3 Separate wick from the shield Clean the wick in plain water and rinse thoroughly 7 Separate wi...

Page 95: ... the following page 1 Press Options 2 Press Page Down if necessary 3 Select Maintenance 4 Select Printer Maintenance 5 Select Print Test Pattern 6 Follow the prompts to print the test pattern on an envelope or tape strip 7 You are asked if the test pattern is OK A If yes Select yes and you return to the Home Screen 8 Press Home to return to the home screen Good test print no missing lines Poor tes...

Page 96: ...w moments When finished the Maintenance Complete menu displays Select Print Test Pattern to print a test pattern See printing a Test Pattern in this chapter Select Select another purge to choose a different purge Select Continue to return to the Printer Maintenance menu 8 Press Home to return to the home screen IMPORTANT Always ensure that your prints are clear and complete Poor prints may be reje...

Page 97: ...splays 8 2 Error Messages 8 3 Printing Problems 8 4 Feeding Problems 8 5 Display Problems 8 9 Problems with Postage Refill 8 9 Moistening Problems 8 10 Viewing System Configuration Levels 8 10 This chapter explains how to troubleshoot your mailing system DM300M DM400M DM475M ...

Page 98: ... it can help you resolve the problem If you need to contact us please have the following information at hand Product Model DM300M DM400M DM475M Series Serial number See the back of the DM300M DM400M DM475M Series Nature of problem What happens and when does it happen Did the DM300M DM400M DM475M Series display an error message The steps you ve already taken to solve the problem and the results Det...

Page 99: ...quired Periodically your system must connect to the Data Centre to provide usage data to Royal Mail These messages remind you that a connection is due If Data Upload Required appears you MUST connect to the Data Centre before you can use the machine Connect to the Data Centre to perform the audit Not Enough Funds Insufficient funds in your DM300M DM400M DM475M Series Postage amount selected exceed...

Page 100: ...he problem see Chapter 7 Maintenance If printer maintenance fails to correct the problem call your machine supplier You may have to replace the printhead IMPORTANT Always ensure that your prints are clear and complete Poor prints may be rejected by Royal Mail If you notice missing lines in the print as shown in the illustration perform a printhead purge as described on page 7 14 of this guide The ...

Page 101: ...nvelopes correctly See the instructions in Chapter 3 Running Mail Don t try to feed oversize envelopes through the machine Use tape strips instead Clearing a stalled envelope 1 Rotate clearance lever clockwise to the released position 2 Carefully pull envelope out from right 3 Make sure deck is clear of paper fragments 4 Rotate clearance lever anticlockwise to the home position ...

Page 102: ...ly 1 Raise the Feeder Cover 2 Raise the moistener clearance lever two clicks to the fully upright position remove mail under the feeder rollers 3 If necessary remove moistener assembly to clear mail between the feeder and the printer area 2 1 1 1 2 Feeder Clearance Lever Moistener ...

Page 103: ... the feeder WOW cover 90 Feeder WOW Cover Moistener Assembly Moistener Clearance Lever 2 Raise the moistener clearance lever two clicks to the fully upright position remove mail under the feeder rollers 3 If necessary to gain access to the material push down on the blue button and slide the moistener assembly out of the deck 90 Blue Button Moistener Assembly ...

Page 104: ...6A 8 Troubleshooting 4 Raise the feeder WOW clearance lever Lift the blue feeder clearance lever IMPORTANT Do not remove mail without lifting the clearance lever 5 Lower all levers and close the feeder WOW cover ...

Page 105: ...ection our online LAN guide can help Go to www europe pb com docs and enter the code 8026 to download the guide Problems connecting when using PC Meter Connect Make sure the USB cable is connected between the franking machine and the PC Check that your PC is running and has an internet connection You cannot meet the requirements of LAN connection If do not have a LAN connection available to allow ...

Page 106: ...s don t seal Incorrect feeding Make sure you slide the envelope flap under the blue edge of the feed deck If you don t the moistener can t wet the flap Low sealant level Check the sight glass on the left side of the moistener tank If the sealant level is low add sealing solution until it reaches the bottom of the fill hole See the instructions in Chapter 7 Maintenance Dry moistener brush Try wetti...

Page 107: ...lope Messaging Ads 9 2 Departmental Accounting 9 2 How to Order 9 3 Supplies 9 3 This chapter explains how to order supplies and accessories for your digital mailing system It also tells you a little about options that can help you get the most value from your equipment DM300M DM400M DM475M ...

Page 108: ... The moistener applies sealing solution to the envelope flap You can seal envelopes or leave them unsealed depending on how you feed them See Chapter 3 Running Mail for details Envelope Messaging Ads Your system may come pre loaded with envelope messaging Envelope Messages give your mail a professional appearance and can turn your mailings into a powerful promotional tool You can purchase addition...

Page 109: ...options are available from your machine supplier Contact details are given on a separate document supplied with your DM300M DM400M DM475M Series on the rear page of this guide and or on a sticker applied to the machine IMPORTANT INFORMATION Pitney Bowes recommends that you only use genuine replacement ink cartridges that are available from Pitney Bowes If alternative cartridges or refills are obta...

Page 110: ...9 4 SDC2036A 9 Supplies and Options ...

Page 111: ...lti Account Summary Report 10 3 Account List Report 10 4 Upload Summary Report 10 4 System Setup Report 10 4 Error Report 10 5 Configuration Report 10 5 Permit Report 10 6 Software Version Report 10 6 Rates Summary Report 10 7 This chapter explains how to take advantage of the reports feature of your system DM300M DM400M DM475M ...

Page 112: ...ess Options 2 Select Reports 3 Select Last 5 Refills report 4 When prompted insert tape sheet or envelope into machine The report is printed NOTE If it is a multi page report you will be prompted to insert another envelope tape sheet 5 Select Yes to return to the Reports Menu or press No to return to the Home screen Funds Report This report lists the postage used postage available pieces processed...

Page 113: ...o return to the Reports menu or press No to return to the Home screen Multi Account Summary Report This report provides the postage history for multiple accounts if the Departmental Accounting feature is set up on your system 1 Press Options 2 Select Reports 3 Select Accounts 4 Select Multi Account Summary 5 When prompted insert envelope into machine or press Tape The report is printed NOTE If it ...

Page 114: ...t lists the complete system setup of your system It can only be printed if you have an external printer connected to your system 1 Press Options 2 Select Reports 3 Select System Setup 4 The report is printed to the external printer 5 Select Return to Report Menu or press Home to return to the Home screen Upload Summary Report This report provides the history of uploads to the Data Centre 1 Press O...

Page 115: ...ted to insert another envelope tape sheet 5 Select Yes to return to the Reports menu or press Home to return to the Home screen Error Report This report provides a history of error codes that your machine has encountered 1 Press Options 2 Select Reports 3 Press Page Down if necessary 4 Select Error 5 When prompted insert envelope into machine or press Tape The report is printed NOTE If it is a mul...

Page 116: ...turn to the Reports menu or Press Home to return to the home screen Software Version Report This report lists the versions of software used in your system If you have a problem and call your machine supplier this information may assist in the fault finding process 1 Press Options 2 Select Reports 3 Press Page Down if necessary 4 Select Software Version 5 When prompted insert envelope into machine ...

Page 117: ...ation may assist in the fault finding process 1 Press Options 2 Select Reports 3 Press Page Down if necessary 4 Select Rate Summary 5 When prompted insert envelope into machine or Press Tape NOTE If this is a multi page report you will be prompted to insert another envelope tape sheet 6 Select Yes to return to the Reports menu or Press Home to return to the home screen ...

Page 118: ...10 8 SDC2036A 10 Reports ...

Page 119: ...ting Up Account Passwords 11 5 Turning On Account Passwords 11 6 Turning Off Account Passwords 11 6 Viewing Account Totals 11 7 Clearing Account Totals 11 8 Clearing all Accounts 11 9 Deleting an Account 11 10 This chapter explains how to take advantage of the Departmental Standard Accounting feature on the system If your system uses the optional INVIEW accounting feature refer to Chapter 12 INVIE...

Page 120: ...unt since it was last cleared An account password The maintenance of your accounts is done through options on the Accounts menu accessible by pressing Options and the selecting Accounts Each Accounts menu option is discussed in this chapter Turning On Accounting if available If you have the Accounting option follow the steps below to turn on the accounting feature 1 At the home screen press Option...

Page 121: ...Accounts 3 If the supervisor password is enabled you will be prompted to enter it and select OK to continue 4 When prompted select Account Type 5 Select Turn Accounting OFF Press Home to return to the home screen with no account displayed Selecting an Account You can select an account to track postage if the optional departmental accounting feature has been bought and turned on Refer to Page 3 10 ...

Page 122: ...of this account Type in a name for the account It can be up to fifteen alpha numeric characters long Select OK to continue 6 The New Account Created Screen appears A Select Name if you would like to edit the account name Select OK to return to the New Account created screen B If the supervisor and accounts password are enabled you will have the option of adding an account password Select Edit Acct...

Page 123: ... 5 Select an account to edit 6 The Edit Account screen appears A Select Name if you would like to edit the account name Select OK to return to the Edit Account screen B If the supervisor and account passwords are enabled you will have the option of editing the account password Select Password and enter the 4 digit password Select Continue to return to the Edit Account screen C Select Number if you...

Page 124: ...d you will be prompted to enter it and select OK to continue 4 Press Page Down and select Accounting Password OFF The display will change to Accounting Password ON 5 Press Home to return to the home screen Turning Off Account Passwords You can turn off the requirement for all operators to enter passwords if passwords are set up when choosing an account 1 Press Options 2 Select Accounts 3 If the su...

Page 125: ...ill be prompted to enter it and select OK to continue 4 Select View Clear Account Totals 5 The select Account to Clear screen displays Press Page Down if necessary to select an account A You may either key in the first digit of the account number if you know it and press Enter OR B Select the account name 6 The account name pieces and value of the postage used displays 7 Press Home to return to th...

Page 126: ...in the first digit of the account number if you know it and press Enter OR B Select the account name 6 The account name pieces and value of the postage used displays If you want to clear the account A Select Clear Totals to clear the totals for account CAUTION Ensure that you do not delete this information unless you are certain that you want to This information can not be retrieved after deletion...

Page 127: ...l Account Totals 5 When prompted to clear all account totals select Yes 6 The system indicates that the totals for all accounts are cleared Select OK to return to the Accounts screen 7 Press Home to return to the home screen Clearing All Accounts You can clear the postage totals on all accounts when necessary CAUTION Make sure your really want to clear all your accounts Once you do the information...

Page 128: ...u know it and press Yes Enter OR B Use the appropriate selection key next to the display 6 When prompted to delete the account select Yes If the deleted account was the last account on the system you will be prompted to Create New Accounts or Turn Accounting OFF Select the appropriate option and follow the prompts to continue If the deleted account was not the last account on the system you will b...

Page 129: ...ot setup for Operators 12 5 If your system is Locked 12 5 Logging Off from INVIEW Budget Manager 12 5 If your system is setup for Operators 12 5 Importing and Backing Up Data Using PC Transfer Utility 12 6 This chapter explains how to use the INVIEW or Budget Manager optional Accounting features on the system If your system uses the Departmental Standard accounting feature refer to Chapter 11 Depa...

Page 130: ...tors 12 15 Important Notes re Operator Functions 12 16 INVIEW Budget Manager Account Structure 12 16 Turning Account Passwords On Off 12 18 Creating Accounts 12 18 Creating a Subaccount or Subsubaccount 12 20 Viewing or Editing Accounts 12 21 Deleting Accounts 12 22 Clearing Account Data 12 23 Selecting the Accounting Period 12 24 Global Surcharge 12 26 Turning Global Surcharge On or Off 12 26 Sel...

Page 131: ...ting a Custom Report 12 40 Deleting a Custom Report 12 41 Transaction Report 12 41 Account Summary Report 12 41 Budget Performance Budget Manager Only 12 41 Invoice Budget Manager Only 12 41 Quick Profile Report 12 41 Accounting Setup Report 12 42 Account List Report 12 42 Account Speed Code List Report 12 42 Operator List Report 12 42 Weight Break Reports 12 42 INVIEW Budget Manager Error Warning...

Page 132: ...he USB ports Please note INVIEW can also be referred to in some instances as Budget Manager Lite Turning INVIEW Budget Manager On If you have purchased the INVIEW Budget Manager Accounting option follow the steps below to turn on the feature 1 At the home screen press Options 2 Select Accounts 3 If the supervisor password is enabled you will be prompted to enter it and select OK to continue 4 When...

Page 133: ...n you start the system the INVIEW Budget Manager Main screen appears and you can begin processing mail immediately If Your System is Locked When you start the system the Locked screen appears If operators are enabled you will need to enter a password to unlock and to log on to the system If operators are disabled you will need to enter a password to unlock the meter Once you have unlocked the syst...

Page 134: ...ager INVIEW data to Total Meter Reporting Webservice If you have access to the Pitney Bowes My Account webservice and have registered with INVIEW for Total Meter Reporting it is necessary to upload Accounting information periodically from Budget Manager INVIEW to the Accounting Server This can be performed in 2 ways either 1 During a Balance Enquiry a Carry out a balance enquiry as detailed on pag...

Page 135: ...c and must be two characters in length Follow the step below to set a Station ID 1 Press Options 2 Select Accounts 3 If the supervisor password is enabled you will be prompted to enter it and select OK to continue 4 Page down and select Station ID 5 Key in the Station ID then select OK 6 Press Home to return to the home screen External Memory To enable INVIEW Budget Manager to work the memory stic...

Page 136: ...tion and press OK 7 Press OK to save the owner information 8 Press the Home key to exit setup and return to the Main screen Setting Up Job ID s Job ID 1 and 2 You can set up your system to make Job ID s mandatory with every transaction You will also be able to retain or clear the Job ID after each transaction with the Auto Clear facility Budget Manager allows you to set up two job ID s Job ID 1 an...

Page 137: ... the barcode Refer to Setting the Default Scan Type Long account names require split barcodes If you need to combine multiple barcode scans into a single barcode refer to Combining Barcodes If you want your system to require an operator to press the Enter key to accept each barcode value after it is scanned and displayed refer to Setting Auto Enter Setting the Default Scan Type When using the INVI...

Page 138: ...aracters These first 30 characters with the join character at the end would be on the first line and the second 20 characters would be on the second line When you scan these two barcode lines the system will combine them into a single barcode account value 5 For use with INVIEW Budget Manager select the appropriate option Account Name Speed Code Preset Job ID 6 If you do not want any default accou...

Page 139: ...s the default join character is 6 As soon as you make your selection the USB Barcode Scanner Setttings menu reappears You can make other selections or press C clear to return to the Setup menu The following is an example using a symbol as a join character SCANNERTEST BaRCODE ACCOUNT When you scan in these 3 barcodes the system will combine them into a single barcode value NOTE When creating your o...

Page 140: ...before using the barcode scanner To set the prefix characters 1 Press Options 2 Select Setup 3 Page down and select Configure USB Scanner 4 At the USB Barcode Scanner Settings menu select Prefix Setup 5 Select the Prefix Size and then select 1 or 2 whichever is appropriate 6 Select the appropriate prefix option to change the default for your system Barcode Prefix Contains Default Character Account...

Page 141: ...rcode To require you to press Enter to accept each scan 1 Press Options 2 Select Setup 3 Page down and select Configure USB Scanner 4 At the USB Barcode Scanner Settings menu select Auto Enter 5 Select Off to disable the Auto Enter This will now require you to manually press Enter after each scan Preparing Barcodes Barcodes must be prepared using extended 3 of 9 code All codes must begin and end w...

Page 142: ...show the following operator information that you can change Name Select this option to edit an operator s name Status Select this to toggle an operator active or inactive Password Select this option to toggle between enabling and disabling the operator password for this operator You can also use this option to edit the password Level Select this option to change the access level for this operator ...

Page 143: ...l now be offered the following functions 1 Create operator 2 View Edit operator 3 Delete operator 4 Operators Off On 5 Operator Password Off On 6 Auto Log Off These options globally control operator functions and are described on the previous page 5 Choose the option you want and follow the on screen instructions When done press Home to exit Any changes you make will take effect the next time you ...

Page 144: ...or edit the operator s name lock or unlock the operator enable disable or edit a password enable or disable report printing and edit the access level INVIEW Budget Manager Account Structure You can use INVIEW Budget Manager to track and account for postage used by departments or individuals within your organisation Your system is set up to accept a total of 74 characters for single level accounts ...

Page 145: ...entify the departments where you charge to Examples Account Engineering Subaccount Software Account Engineering Subaccount Design The original account now serves as an administrative account that owns and contains totals for the lower subaccounts If you create subsubaccounts for subaccounts the subsubaccounts become the end links and identify the departments that are charged for postage Examples A...

Page 146: ...74 6 The Account Information menu appears offering the following options for the account being created Name Select this option to edit the name of an account Turning Account Passwords On Off You can turn on the requirement for all operators to enter passwords if passwords are set up when choosing an account NOTE The Supervisor Password must be turned on before you can use this feature If it is tur...

Page 147: ...enter the name of your account the system automatically assigns the next available speed code to your account Select this option to change the speed code number assigned by the system It allows you to select from the next 500 available speed codes Owner You can use this option to edit the Owner Name Address and Telephone Number Budget Manager Only Descript This option allows you to type in a brief...

Page 148: ...ge down to scroll through the list of accounts Select the account you would like to add a subaccount or subsubaccount to 6 Select Add Sub Account or Add SubSub Account as required 7 Type in the name of the new subaccount or subsubaccount and select OK The Account Information Screen appears 8 Select and configure any of the options in the same way as creating an account see page 12 18 9 When you ar...

Page 149: ...t SPD Code Allows you to change the speed code of the account Owner Use to edit the owner name address and telephone number Budget Manager Only Description Select this option to edit the account description Spending Select this option to edit the spending limit on an account Budget Manager Only Budget Allows you to edit the budget setting for an account Budget Manager Only Manage Sub Acct Select t...

Page 150: ... period of the fiscal year ends At that time you must select the inactive accounts you want to permanently delete and redefine the yearly fiscal period Follow the steps below to delete an account 1 Press Options 2 Select Accounts 3 If the supervisor password is enabled you will be prompted to enter it and select OK to continue 4 Select Delete Accounts 5 The system displays a list of all the existi...

Page 151: ...d persons from clearing the accounting data Follow the steps below to clear the account data 1 Press Options 2 Select Accounts 3 If the supervisor password is enabled you will be prompted to enter it and select OK to continue 4 Select Clear Account Data 5 Select Print Reports if you wish to print account reports before clearing the data OR 6 Select Clear All Data 7 Confirm that you really want to ...

Page 152: ...the supervisor password is enabled you will be prompted to enter it and select OK to continue 4 Select Acct Period The Accounting Period screen appears 5 Select Edit Start of Fiscal Year a Press Clear b Type in the start date of your fiscal year c Select OK to save the date The Accounting Periods screen reappears 6 Select Period see notes on the next page Select the number of periods for your fisc...

Page 153: ...For example If you have set the periods for monthly at the 1st July the June period will be saved and July will now be the current period At the end of the fiscal year the system will prompt you to clear all 12 periods Custom Periods The start date for a custom reporting period is the date you activate the custom period on your system The custom reporting period will have to be reset on the end da...

Page 154: ... surcharge can be set anywhere from 50 00 to 50 00 A per transaction percentage surcharge is calculated multiplying the postage cost of the entire batch by the percent transaction setting The per transaction percentage can be set anywhere from 100 to 100 If you want to apply a batch surcharge or a surcharge that is customized for a specific transaction see Entering a Surcharge on page 12 30 of thi...

Page 155: ... individual piece of mail processed Per Trans The surcharge or discount is applied to each transaction Per Trans The surcharge or discount is applied to each transaction and is a percentage of the transaction cost In each case select Change to Discount Value if you wish to apply a discount rather than a surcharge A negative amount indicates a discount will be applied to the postage amount for a tr...

Page 156: ...ount screen appears listing all of your accounts 2 Select the Account you want to use to charge postage Use the Page Down key to scroll through the Account list then press the screen key that corresponds with the account name 3 If the Account password is enabled the Enter Account Password screen appears If the Account password is not enabled go to step 4 a Type in the password b Select OK 4 The sy...

Page 157: ...rt of the speed code to narrow your search Follow the steps below to select an account by speed code 1 Select Account from the Home Screen The Select Account screen appears listing all of your accounts 2 Type in the speed code or the first few numbers of the speed code The screen will show the account names that correspond with the speed code you typed 4 Select the account you want to use Press En...

Page 158: ... each and every transaction processed by the Budget Manager system see Global Surcharges on page 12 25 To enter a batch surcharge 1 At the Home Screen press the Page Down key 2 Select Surchrg The Batch Surcharges screen appears 3 To clear the existing batch surcharge settings press Page Down and select Clear All Surchrg The per piece surcharge per transaction and per transaction percentage surchar...

Page 159: ...ob ID to a transaction 1 At the Home Screen press the Page Down key 2 Select Job ID The Job ID screen appears 3 Type in the Job ID number and select OK or select the Select from Recent List option then select the Job ID You can use the Page Down key to scroll through the list 4 The system returns to the Home Screen once you have made your Job ID selection 5 Repeat steps 1 2 and 3 to change or add ...

Page 160: ...e manual transaction Class Select this option to set the postage class Postage Select this option to set the total actual postage amount for the transaction Chrg Amt Select this option to set the total postage amount that you will be charging for the transaction This is the actual postage amount plus any surcharges you may want to add By default this sets to the same postage as the actual postage ...

Page 161: ...r it and select OK to continue 4 Page Down and Select Transactions Options 5 Select Transfer a Transaction The Select Account screen appears 6 Use the Page Up and Page Down keys to scroll through the account list and then select the account you want to transfer the transaction FROM 7 Select the transaction you want to transfer The Select Account To Transfer To screen appears 8 Select the account y...

Page 162: ... will be prompted to enter it and select OK to continue 4 Page Down and Select Transactions Options 5 Select Clear Transaction Log The Clear Transaction Log screen appears 6 If you want to print a report select Yes If you do not want to print a report select No The Continue to Clear Log screen appears 7 Select Yes to clear the log The system returns to the Transaction Options screen 8 Press Home t...

Page 163: ...ing The lowest setting you can use is 80 The highest setting you can use is 100 Follow the steps below to set the log full warning 1 Press Options 2 Select Accounts 3 If the supervisor password is enabled you will be prompted to enter it and select OK to continue 4 Page Down and Select Transactions Options 5 Page Down and select Full Log Warning 6 Type in the percentage you want use from 80 to 100...

Page 164: ...ptions 5 Page Down and select Full Log Action 6 Select the action you want the system to take The system returns to the Transaction Options menu 7 Press Home to return to the Home Screen NOTES If you select Continue and overwrite Log when the log is full the system will continue processing mail and erase the old transactions The normal setting is Stop processing mail This allows you to print off t...

Page 165: ...st Account Speed Code List Operator List Weight Break Account Class Weight Break Carrier Class Weight Break Job ID Class Printing Reports You can print accounting reports using an external attached printer if one is connected to your system NOTE You must enable report printing for an operator in order for that operator to print a report See Enabling Operators on page 12 14 for more information Fol...

Page 166: ... transaction processed by the system If you select the detailed report format you will be able to include any but not all of the following data in your report Transaction ID Operator Date of Transaction Total Weight Time Pieces Account Postage Carrier Surcharge Class Fee Total Charge Job ID Job IDs 1 2 Transaction Type Custom Report Tips Available options on the Select Custom Report screen indicat...

Page 167: ...ata 10 If you selected any data that can be subtotalled the Select Data to Group By screen appears otherwise go to step 11 a Press the screen keys that correspond with the data you want to subtotal in your report b Press Enter once you have finished selecting data c If you did not select accounts on the Select Data to Group By screen then go to step 11 otherwise the Accounts to Include screen appe...

Page 168: ... to include b To remove a column from the report press the screen key that corresponds with a column you want to remove 9 If you selected any data that can be subtotalled the Select Data to subtotal screen appears otherwise go to step 10 a Press the screen keys that correspond with the data you want to subtotal in your report b Press Enter once you are done selecting data c If you did not select a...

Page 169: ...al amount charged for each transaction during the time period specified on the report Account Summary Report The Account Summary Report lists a summary of pieces postage and surcharges that have been charged to an individual account for the time period specified for the report Budget Performance Budget Manager Only The Budget Performance report lists the accounts and how they are performing agains...

Page 170: ...the accounts that have been defined in the system and the account status The report is sorted by account speed code Account speed codes refer to chargeable accounts Operator List Report The Operator List report lists the operators on the accounting system This report contains the operator name ID status enabled disabled and whether or not report printing is enabled Y N Weight Break Reports The Wei...

Page 171: ...blems tape feeding problems etc Account Limit Reached Cannot create any more accounts Contact your machine supplier to purchase an increase in the number of accounts available on your system Select Select Account to Delete The Select Account screen appears Follow the prompts to select an account to delete Funds and piece count registers are full Account must be reset Select Print Report The Single...

Page 172: ...es the system disables accounting and returns to the main screen If operators are enabled and the current operator does not have supervisor access privileges the Authorisation Required screen appears An operator with supervisor access privileges must log on to run mail without accounting If operators are disabled then the Enter Supervisor password screen appears The supervisor password must be ent...

Page 173: ...hese if you wish Descending Register Available Unused The postage funds available for use Digital Meter Stamp The imprint produced by the machine This may include The postage amount The Date The machine s Serial Number Postal Code Town Circle Information for Postal Authority use Envelope Messaging This is an optional part of the machine stamp that lets you convey your own special message to the ma...

Page 174: ...ndard set by Royal Mail for postal franking machines Your DM220i system is Mailmark compliant Postage by Phone A service that allows you to buy postage and check account status over the phone It also permits convenient postal inspection by phone PC Meter Connect Pitney Bowes software for your PC that allows your system to access the Data Centre using your PC s internet connection Presets A custom ...

Page 175: ......

Page 176: ... Limited 2014 We have made every reasonable effort to assure the accuracy and usefulness of this guide however we cannot assume responsibility for errors or omissions or liability for the misuse or misapplication of our products SDC2036A ...

Reviews: