Preparations (Setup)
20
En <DRB1414>
To return all settings to their factory
defaults
Use this command to return all changed settings to their factory
default values.
1. Turn power OFF.
2. While holding the STOP button depressed, set
the POWER switch to ON, and continue holding
the STOP button until the “POWER ON”
indication goes off.
All setting contents will be returned to their factory default
values.
The DJ mode functions listed below are set to the follow-
ing factory defaults in addition to the items in the Setup
Menu (P.19).
Auto Cue:
OFF
Auto Cue level: –60 dB
Jog mode:
VINYL ON
Time mode:
REMAIN
TV system setting for video output: PAL
■
This command additionally erases all memory contents, in-
cluding “video memory” (
☞
P.24). Be sure you wish to delete
all memory contents before using this command.
Using the Setup Menu
★
Setup menu functions are disabled during DVD playback
in DJ mode, and during CD playback. Set the unit to stop,
or remove the disc before attempting setup operations.
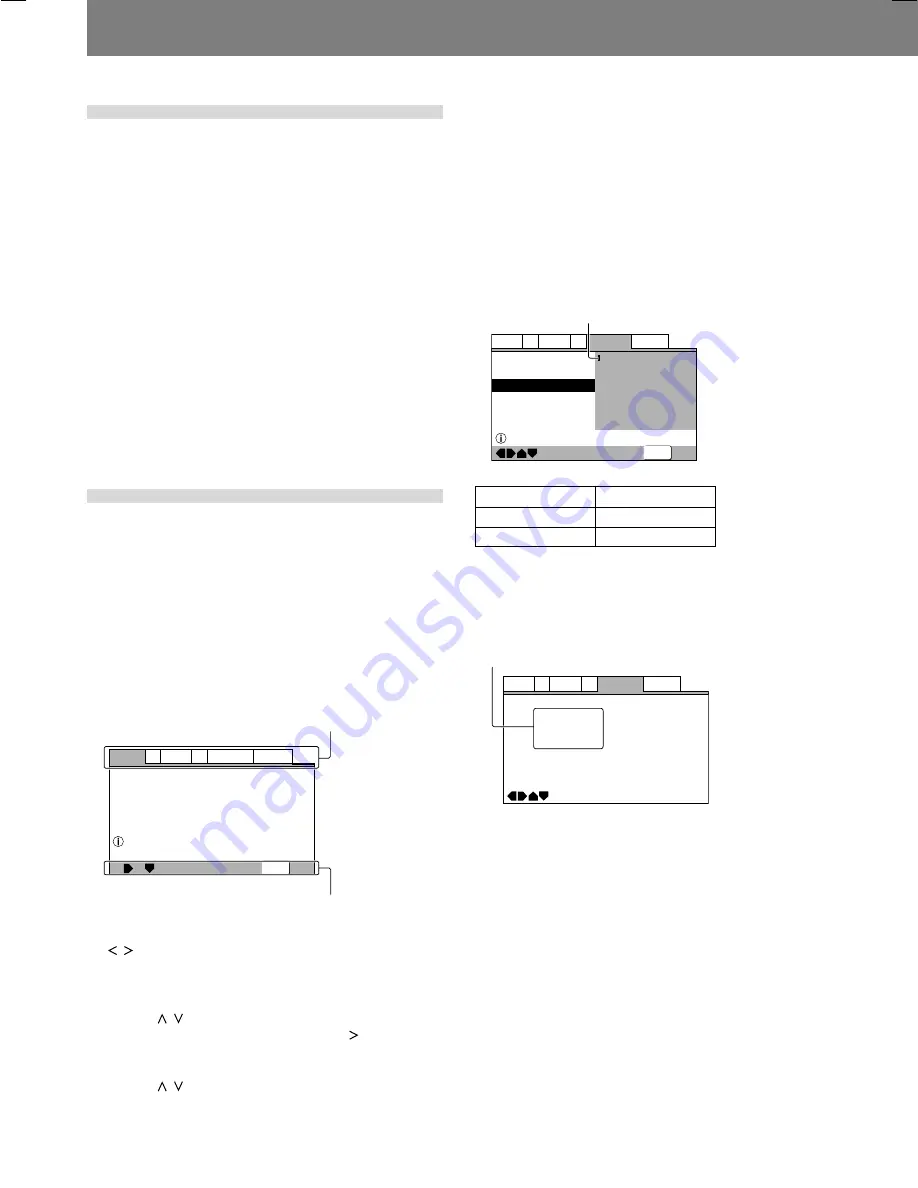
The Setup Menu is used when you wish to modify the default
factory settings. The following instructions introduce the basic
operations and controls used with the Setup Menu.
If you have not yet performed the basic setup using the Setup
Navigator, the Setup Navigator screen will appear first.
Confirm that power is turned ON, then
1. Press the SETUP button.
The Setup Menu will appear.
[Example]
V2
Video1
General
A2
Language
Exit
Move
Audio DRC
Dolby Digital Out
DTS Out
96kHz PCM Out
MPEG Out
Audio1
—
—
—
—
—
Off
Dolby Digital
Off
96kHz
3
48kHz
MPEG
3
PCM
Setup audio
Digital output format/tone adjust
SETUP
2. Press the left and right sides of the cursor button
( / ) to move between the tags at the top of the
menu ([Audio1], [Audio2], [Video1], [Video2],
[Language], or [General]).
3. Use the upper and lower sides of the cursor
button ( / ) to select the desired setting item.
4. Press the cursor button’s right side ( ) to move to
the options list.
5. Use the upper and lower sides of the cursor
button ( / ) to move between options.
6. Press the ENTER button to confirm the selection.
Repeat steps 2 to 6 to modify other settings.
Tags
Usable operation buttons
7. Press the SETUP button.
The Setup Menu will close.
If the Setup Menu is opened again after you have previously
made settings there, the previously shown menu screen will
appear.
■
Disc-dependent settings
Some setting changes are not supported, depending on the kind
of disc (DVD/CD) used. Whether a desired setting is supported
can be confirmed by viewing the indicator color at the left of the
selected setting item. Consult the accompanying table for infor-
mation regarding what settings are supported for each disc type.
Changed settings become effective immediately.
—
Language
A2
V2
General
Audio1
Video1
Exit
Move
OSD Language
Audio Language
Subtitle Language
Auto Language
English
French
German
Italian
Spanish
Other
Setup disc's subtitle language
SETUP
Indicator Color
Disc Type
Blue, Yellow
DVD only
Green
All
■
Items not changeable during playback
Items that cannot be set during playback are displayed in grey.
Perform this operation in the stop mode, or when no disc is
loaded.
Indicator
—
—
—
—
Language
A2
V2
General
Audio1
Video1
Move
OSD Language
Audio Language
Subtitle Language
Auto Language
English
English
English
On
Grey
Summary of Contents for DVJ-1000
Page 58: ...52 En DRB1414 ...


